Behavioral Cloning Project
The goals / steps of this project are the following:
- Use the simulator to collect data of good driving behavior
- Build, a convolution neural network in Keras that predicts steering angles from images
- Train and validate the model with a training and validation set
- Test that the model successfully drives around track one without leaving the road
- Summarize the results with a written report
My project includes the following files:
- notebook.ipynb containing the script to create and train the model
- drive.py for driving the car in autonomous mode
- model.h5 containing a trained convolution neural network
Using the Udacity provided simulator and my drive.py file, the car can be driven autonomously around the track by executing
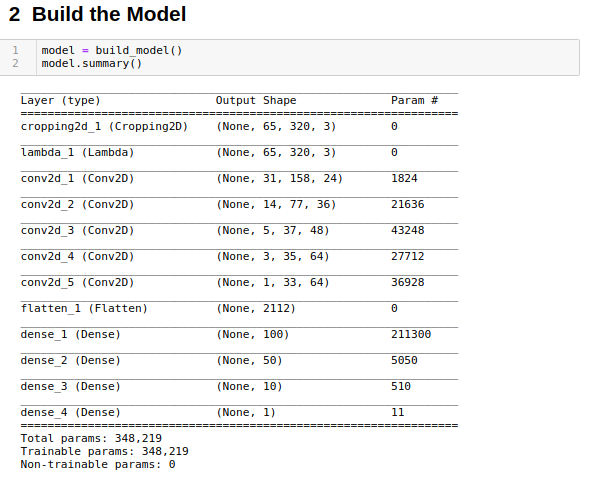
python drive.py model.h5My model consists of the Nvidia Self-Driving Model Architecture. Below is an image of the model summary and model code
The model has starts off with preprocessing layers such as cropping and normalization. Essentially, we are setting a prior about what we consider important information. This gives the most imporant information (the lane lines) in a consumable format (normalized) for the neural network. The network uses five layers of convolution. The first 3 convolutions are with a 5x5xBLOCK_WIDTH kernel and and the last two are 3x3xBLOCK_WIDTH kernel. I chose to use a 5x5 kernel in the beginning to extract larger features(More recent architectures use 3x3 kernels for everything but they have many more layers, so their adjusted focal view covers their area of interest). After the 5x5 kernel, I use a 3x3 kernel to process the feature maps created by my 5x5 kernel -- This is because the resulting feature map's pixel height/width are smaller so you need to use smaller kernels as adjustment. 2x2 kernels or 1x1 kernels could have been used instead of 3x3, however 2x2 kernels don't have a "center spot" and don't model a Gaussian filter. 1x1 kernels are usually used to reduce model complexity, and feature downsampling but that's unnecessary for this project which we are maximizing accuracy of driving and not model size. Lastly, we flatten our convolutional feature maps and feed them to various decreasing dense layers for prediction. The parameters for Dense[100, 50, 10, 1] are rather arbitray and what Nvidia used. However, I'm sure if you changed it, it wouldn't really matter. The total number of parameters is 348,219 and all of them are trainable.
Essentially, there are three main components
- Cropping and Normalization Layers. The crop is because we don't need to know about the car hood/sky for the car to able to drive. Normalization is to center our data around some ranger, so our neural network can better fit our mean-centered data.
- Convolutional Layers. Convolutions starting with 5x5 kernels and then 3x3 kernels are used to extract important features in our image.
- Dense Layers. These dense layers use our feature maps produced by the convolutional layers to make a prediction for the steering angle.
Originall, I tried different types of normalization. I also tried drop-out, L2-L1 Loss. However, the most important thing that helped me succeed was just to get high quality data. To do this, I drove the car for many laps to gain good data. Moreover, I also drove in reverse afterwards. This meant the hardest part, steering, was generalized for forwards and reverse. This meant the model wouldn't overfit on just one track.
The model used an adam optimizer, so the learning rate was not tuned manually. I chose to train the model for about 4 epochs. This is because experimentally, the loss was converging with my learning rate function, and visually the car could drive around the lap. In the beginning, I played around with using more epochs=10 to train the model, but I beleive it overfitted to the data. Thus, I chose to add more data in order prevent overfitting. I could monitor the results of training using Keras Callbacks and figure out when I should stop.
See run1.mp4 for the full video.


