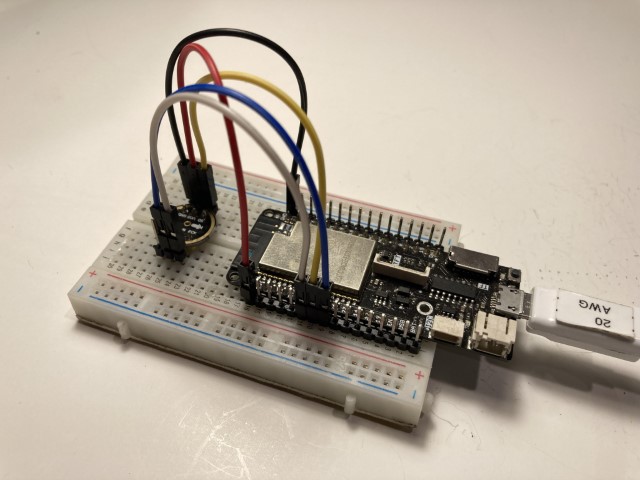
This repository provides MicroPython example code, showing how to use the I2S protocol with development boards supporting MicroPython. The I2S protocol can be used to play WAV audio files through a speaker or headphone, or to record microphone audio to a WAV file on a SD card.
The examples are supported on 4 ports: stm32, esp32, rp2, and mimxrt.
To use I2S with MicroPython on the Pyboards, ESP32, Raspberry Pi Pico, and mimxrt boards you will need to install a version of MicroPython firmware that supports I2S. For these ports, I2S is supported in the v1.20 release and all nightly builds.
- stm32 port:
- Pyboard D SF2W
- Pyboard V1.1
- esp32 port:
- Adafruit Huzzah Feather ESP32 with external SD card
- Lolin D32 Pro
- Lolin D32 with external SD card
- TinyPico with external SD card
- rp2 port:
- Raspberry Pi Pico
- mimxrt port:
- Teensy 4.0/4.1
- MIMXRT evaluation boards
- INMP441 microphone module available on ebay, aliexpress, amazon
- MSM261S4030H0 microphone module available on ebay, aliexpress, amazon
- Adafruit I2S MEMS Microphone Breakout - SPH0645LM4H. See Workaround note below.
- Adafruit I2S 3W Class D Amplifier Breakout - MAX98357A
- Adafruit I2S Stereo Decoder - UDA1334A Breakout
- I2S PCM5102 Stereo DAC Decoder available on ebay, aliexpress, amazon
- Wondom 2 x 30W Class D Audio Amplifier Board & DAC, based on TI TAS5756 device
- Custom board, based on TI TAS2505 Digital Input Class-D Speaker Amplifier
- Teensy audio sheild for Teensy 4.x
The easiest way to get started with I2S is playing a pure tone to ear phones using a DAC board such as the I2S UDA1334A breakout board or the I2S PCM5102 Stereo DAC Decoder board. Here are the steps:
-
Download and program the appropriate firmware that supports the I2S protocol into the MicroPython development board
-
Load the example code
play_tone.pyinto a text editor, found in the examples folder -
Make the following wiring connections using a quality breadboard and jumper wires. Use the GPIO pins that are listed in the example code file. Refer to the section on
Hardware Wiring Recommendationsbelow.UDA1334A board pin Pyboard V1.1 pin Pyboard D pin ESP32 pin Pico Pin Teensy 4.1 pin 3V0 3V3 3V3 3V3 3V3 3.3V GND GND GND GND GND GND BCLK Y6 Y6 32 16 4 WSEL Y5 Y5 25 17 3 DIN Y8 Y8 33 18 2 PCM5102 board pin Pyboard V1.1 pin Pyboard D pin ESP32 pin Pico Pin Teensy 4.1 pin VIN 3V3 3V3 3V3 3V3 3.3V GND GND GND GND GND GND SCK GND GND GND GND GND BCK Y6 Y6 32 16 4 LCK Y5 Y5 25 17 3 DIN Y8 Y8 33 18 2 -
Establish a REPL connection to the board
-
Copy the code from the editor e.g. ctrl-A, ctrl-C
-
Ctrl-E in the REPL
-
Paste code into the REPL
-
Ctrl-D in the REPL to run the code
-
Result: the tone should play in the ear phones
-
Try different tone frequencies
MicroPython example code is contained in the examples folder. WAV files used in the examples are contained in the wav folder.
Each example file has configuration parameters, marked with
# ======= AUDIO CONFIGURATION =======
and
# ======= I2S CONFIGURATION =======
Each example supports all MicroPython ports that offer I2S. This has the benefit of having fewer example files, but comes at the cost of large example files (e.g. many blocks of code that start with lines like elif os.uname().machine.count("Raspberry"):). Examples can be simplified by removing the blocks of port-specific code that are not needed for a particular development board.
All Pyboard V1.1 and Pyboard D examples use the following I2S peripheral ID and GPIO pins
| I2S ID | SCK pin | WS pin | SD pin |
|---|---|---|---|
| 2 | Y6 | Y5 | Y8 |
To use different GPIO mappings refer to the sections below
All ESP32 examples use the following I2S peripheral ID and GPIO pins
| I2S ID | SCK pin | WS pin | SD pin |
|---|---|---|---|
| 0 | 32 | 25 | 33 |
To use different GPIO mappings refer to the sections below
All Pico examples use the following I2S peripheral ID and GPIO pins
| I2S ID | SCK pin | WS pin | SD pin |
|---|---|---|---|
| 0 | 16 | 17 | 18 |
To use different GPIO mappings refer to the sections below
All MIMXRT examples are designed for the Teensy 4.0/4.1 boards and use the following I2S peripheral ID and GPIO pins. Note: the Teensy 4.1 is a better choice compared to the Teensy 4.0. The Teensy 4.1 has a built-in SD card slot that can be used with the machine.SDCard class, which offers fast SD card access. The Teensy 4.0 requires an external SD card module, which only works with the slower sdcard.py driver.
For transmitting to a DAC:
| I2S ID | SCK pin | WS pin | SD pin |
|---|---|---|---|
| 2 | 4 | 3 | 2 |
For receiving from a microphone:
| I2S ID | SCK pin | WS pin | SD pin |
|---|---|---|---|
| 1 | 21 | 20 | 8 |
To use different GPIO mappings refer to the sections below
The file easy_wav_player.py contains an easy-to-use micropython example for playing WAV files. This example requires
an SD card (to store the WAV files). Pyboards have a built in SD card. Some ESP32 development boards have a built-in SD Card, such as the Lolin D32 Pro. Other devices, such as the TinyPico and Raspberry Pi Pico require an external SD card module to be wired in. Additionally, for the Raspberry Pi Pico sdcard.py needs to be copied to the Pico's filesystem to enable SD card support.
Instructions
- Wire up the hardware. e.g. connect the I2S playback module to the development board, and connect an external SD Card Module (if needed). See tips on hardware wiring below. The example uses the default GPIO pins outlined above. These can be customized, if needed.
- copy file
wavplayer.pyto the internal flash file system using a command line tool such as ampy or rshell. The Thonny IDE also offers an easy way to copy this file (View->Files,Upload to /option). - copy the WAV file(s) you want to play to an SD card. Plug the SD card into the SD card Module.
- configure the file
easy_wav_player.pyto specify the WAV file(s) to play - copy the file
easy_wav_player.pyto the internal flash file system using a command line tool such as ampy or rshell. The Thonny IDE also offers an easy way to copy this file (View->Files,Upload to /option). - run
easy_wav_player.pyby importing the file into the REPL. e.g. import easy_wav_player - try various ways of playing a WAV file, using the
pause(),resume(), andstop()methods
MP3 files can be converted to WAV files using online applications such as online-convert
WAV file tag data can be inspected using a downloadable application such as MediaInfo. This application is useful to check the sample rate, stereo versus mono, and sample bit size (16, 24, or 32 bits)
On Pyboard devices I2S compatible GPIO pins are mapped to a specific I2S hardware bus. The tables below show this mapping. For example, the GPIO pin "Y6" can only be used with I2S ID=2.
Pyboard D with MicroPython WBUS-DIP28 adapter
| I2S ID | SCK pin | WS pin | SD pin |
|---|---|---|---|
| 1 | X6,W29 | X5,W16 | Y4 |
| 2 | Y1,Y6,Y9 | Y3,Y5 | Y8,W24 |
Pyboard V1.0/V1.1
| I2S ID | SCK pin | WS pin | SD pin |
|---|---|---|---|
| 2 | Y6,Y9 | Y4,Y5 | Y8,X22 |
All ESP32 GPIO pins can be used for I2S, with attention to special cases:
- GPIO34 to GPIO39 are input-only
- GPIO strapping pins: see note below on using strapping pins
Strapping Pin consideration: The following ESP32 GPIO strapping pins should be used with caution. There is a risk that the state of the attached hardware can affect the boot sequence. When possible, use other GPIO pins.
- GPIO0 - used to detect boot-mode. Bootloader runs when pin is low during powerup. Internal pull-up resistor.
- GPIO2 - used to enter serial bootloader. Internal pull-down resistor.
- GPIO4 - technical reference indicates this is a strapping pin, but usage is not described. Internal pull-down resistor.
- GPIO5 - used to configure SDIO Slave. Internal pull-up resistor.
- GPIO12 - used to select flash voltage. Internal pull-down resistor.
- GPIO15 - used to configure silencing of boot messages. Internal pull-up resistor.
All Pico GPIO pins can be used for I2S, with one limitation. The WS pin number must be one greater than the SCK pin number.
On boards supporting NXP i.MX RT processors I2S compatible GPIO pins are mapped to a specific I2S hardware bus. In addition, GPIO pins are further specified as either Transmit or Receive. The tables below show this mapping for 3 boards. For example, the GPIO pin 4 can be used with I2S ID=2 and transmitting to a DAC. Other I2S pin mapping combinations exist, but are not needed for simple-to-use I2S hardware, such as the INMP441 microphone, or the I2S PCM5102 Stereo DAC Decoder.
Teensy 4.1
For transmitting to a DAC:
| I2S ID | SCK pin | WS pin | SD pin | MCK pin |
|---|---|---|---|---|
| 1 | 26,36 | 27,37 | 39,7 | 23 |
| 2 | 4 | 3 | 2 | 33 |
For receiving from a microphone:
| I2S ID | SCK pin | WS pin | SD pin | MCK pin |
|---|---|---|---|---|
| 1 | 21 | 20 | 38,8 | 23 |
Teensy 4.0
For transmitting to a DAC:
| I2S ID | SCK pin | WS pin | SD pin | MCK pin |
|---|---|---|---|---|
| 1 | 26,36 | 27,37 | 7 | 23 |
| 2 | 4 | 3 | 2 | 33 |
For receiving from a microphone:
| I2S ID | SCK pin | WS pin | SD pin | MCK pin |
|---|---|---|---|---|
| 1 | 21 | 20 | 8 | 23 |
Seeed Arch Mix
For transmitting to a DAC:
| I2S ID | SCK pin | WS pin | SD pin | MCK pin |
|---|---|---|---|---|
| 1 | J4 14 | J4 15 | J4 13 | J4 09 |
For receiving from a microphone:
| I2S ID | SCK pin | WS pin | SD pin | MCK pin |
|---|---|---|---|---|
| 1 | J4 11 | J4 10 | J4 12 | J4 09 |
Some audio codecs require a Master Clock signal at a typical frequency of 256 * sampling frequency.
Only the mimxrt port supports Master Clock generation in the I2S class. For other ports, the machine.PWM
class offers a convenient way to generate the Master Clock signal. Here is some example code showing how to generate a Master Clock for the teensy audio shield.
I have found the best audio quality is acheived when:
- wires are short
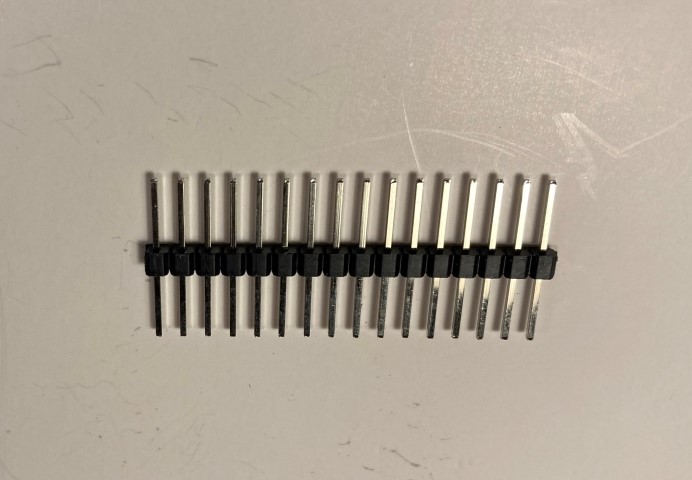
- modules are connected with header pins and 10cm long female-female jumpers, OR
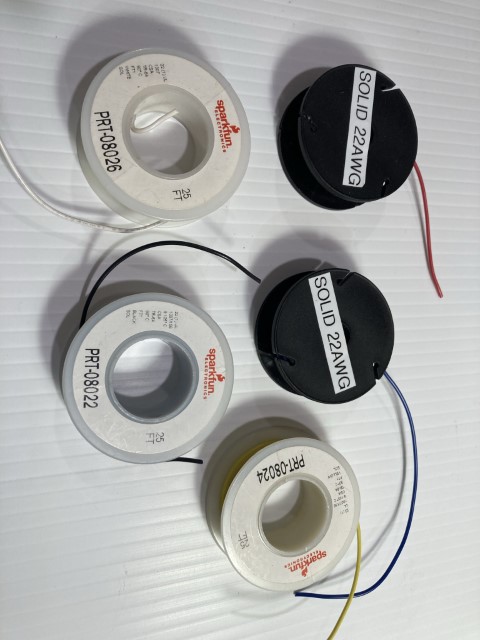
- solid core 22 AWG wire
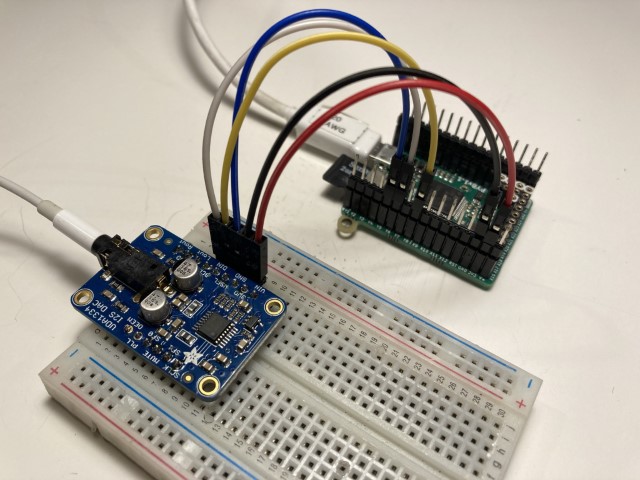
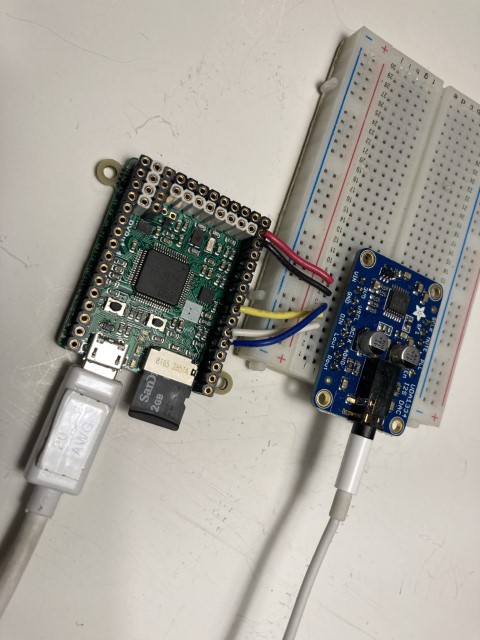
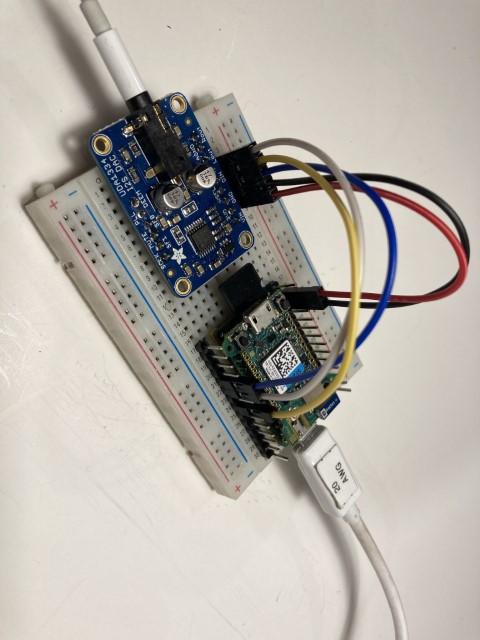
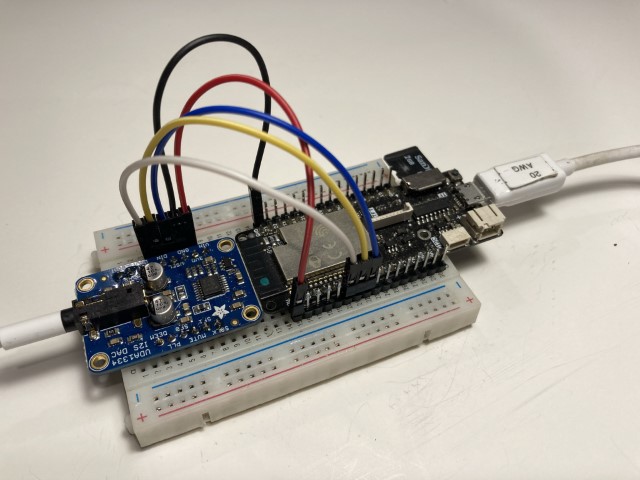
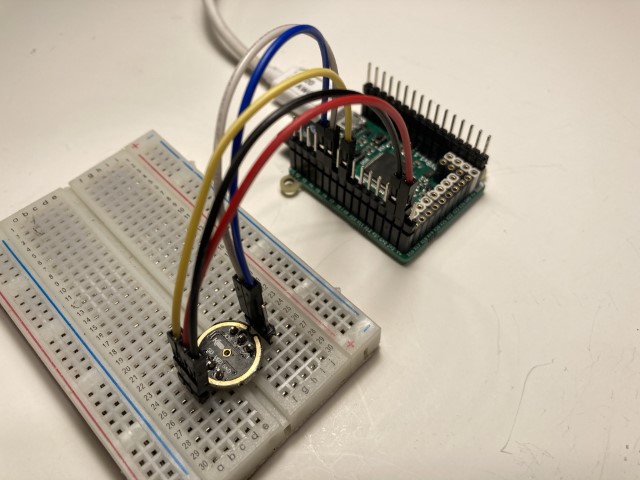
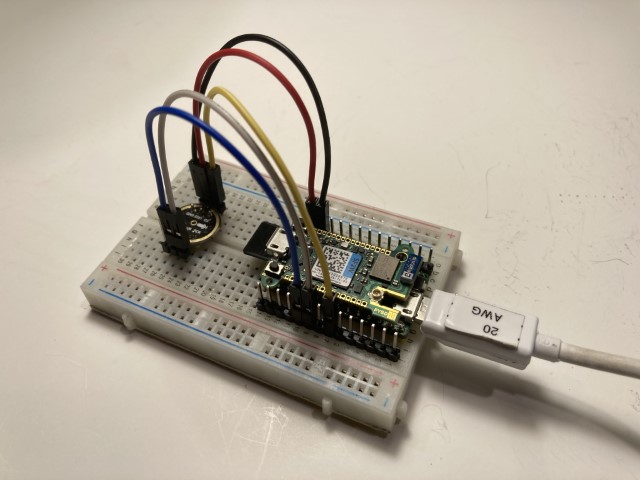
The following images show example connections between microcontroller boards and breakout boards. The following colour conventions are used for the signals:
| Signal | Colour |
|---|---|
| +3.3V | Red |
| GND | Black |
| SCK | White |
| WS | Blue |
| SD | Yellow |
Connections made with Female-Female jumpers and header pins
Connections made with 22 AWG wire
Connections made with Female-Female jumpers and header pins
Connections made with Female-Female jumpers and header pins
Connections made with Female-Female jumpers and header pins
Connections made with Female-Female jumpers and header pins
Connections made with Female-Female jumpers and header pins
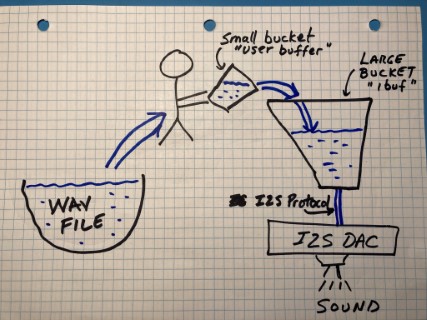
The I2S protocol is different than other protocols such as I2C and SPI. Those protocols are transactional. A controller requests data from a peripheral and waits for a reply. I2S is a streaming protocol. Data flows continuously, ideally without gaps.
It's interesting to use a water and bucket analogy for the MicroPython I2S implementation. Consider writing a DAC using I2S. The internal buffer(ibuf) can be considered as a large bucket of water, with a hole in the bottom that drains the bucket. The water streaming out of the bottom is analogous to the flow of audio samples going into the I2S hardware. That flow must be constant and at a fixed rate. The user facing buffer is like a small bucket that is used to fill the large bucket. In the case of I2S writes, the small bucket is used to transport audio samples from a Wav file "lake" and fill the large bucket (ibuf). Imagine a person using the small bucket to move audio samples from the Wav file to the large bucket; if the large bucket becomes full, the person might go do another task, and come back later to see if there is more room in the large bucket. When they return, if there is space in the large bucket, they will pour some more water (samples) into the large bucket. Initially, the large buffer is empty. Almost immediately after water is poured into the large bucket audio samples stream out of the bottom and sound is heard almost immediately. After the last small bucket is poured into the large bucket it will take some time to drain the large bucket -- sound will be heard for some amount of time after the last small bucket is poured in.
If the person is too slow to refill the large bucket it will run dry and the water flow stops, a condition called "underflow" -- there will be a gap in sound produced.
Does a water analogy help to explain I2S? comments welcome !
Q: Are there sizing guidelines for the internal buffer (ibuf)?
A: For playback of wave files, a good starting point is to size the ibuf = 2x user buffer size. For example, if the user buffer is 10kB, ibuf could be sized at 20kB. If gaps are detected in the audio playback increasing the size of ibuf may mitigate the gaps. For microphone recordings, ibuf will often need to be much larger. Unlike reads, data writes to most SD cards are not consistent - some writes can take much longer. For example, the average write speed might be 1000kB/s, but some writes may slow to 10kB/s. Having a large ibuf accommodates these periods of slow data writes. Consider starting with ibuf = 4x user buffer size. Increase the ibuf size if gaps are detected in the recording.
Q: How many seconds of audio data is held in the internal buffer (ibuf)?
A: T[seconds] = ibuf-size-in-bytes / sample-rate-in-samples-per-second / num-channels / sample-size-in-bytes
stereo = 2 channels, mono = 1 channel.
Q: Are there sizing guidelines for the user buffer?
A: Smaller sizes will favour efficient use of heap space, but suffer from the inherent inefficiency of more switching between filling and emptying. A larger user buffer size suffers from a longer time of processing the samples or time to fill from a SD card - this longer time may block critical time functions from running. A good starting point is a user buffer of 5kB.
Q: What conditions causes gaps in the sample stream?
A: For writes to a DAC, a gap will happen when the internal buffer is filled at a slower rate than samples being sent to the I2S DAC. This is called underflow. For reads from a microphone, a gap will happen when the internal buffer is emptied at a slower rate than sample data is being read from the microphone. This is called overflow.
Q: Does the MicroPython I2S class support devices that need a MCK signal?
A: Yes, one port currently supports MCK. The mimxrt port of I2S allows a MCK output to be defined. Most devices that are popular with users do not need a MCK signal.
This is a well designed breakout board based on the SPH0645LM4H microphone device. Users need to be aware that the SPH0645LM4H device implements non-standard Philips I2S timing. When used with the ESP32, all audio samples coming from the I2S microphone are shifted to the left by one bit. This increases the sound level by 6dB. More details on this problem are outlined a StreetSense project log.
Workaround: Use the static I2S class method shift() to right shift all samples that are read from the microphone.
"Le blues de la vache" by Le Collectif Unifié de la Crécelle is licensed under CC BY-NC-SA 2.1
