This demo shows and IT Hardware Order application build on the case management features and technology of Red Hat Process Automation Manager 7.
In this demo, the PAM Execution Engine is deployed as a capability with a lightweight SpringBoot application, a feature that was introduced in the 7.1 release of the PAM platform. The process/case uses external microservices built on Vert.x to demonstrate how Process Automation Manager is used in a microservices world to orchestrate process execution. The process implements the Saga pattern via standard BPMN2 compensation flows, showing the powerful concepts and ease of semantical expression that Red Hat Process Automation Manager 7 brings to a modern microservices architecture.
This demo runs on OpenShift, and therefore requires an available OpenShift runtime. This can be a OpenShift Container Platform instance, a Minishift instance, etc. The only requirement is that there are enough resource available to run the 4 OpenShift pods that this demo consists off.
This demo can be installed on Red Hat OpenShift in various ways. We'll explain the different options provided.
All installation options require an oc client installation that is connected to a running OpenShift instance. More information on OpenShift and how to setup a local OpenShift development environment based on the Red Hat Container Development Kit can be found here.
NOTE
The Red Hat Process Automation Manager 7 - Business Central image requires a Persistent Volume which has both ReadWriteOnce (RWO) and ReadWriteMany (RWX) Access Types. If no PVs matching this description are available, deployment of that image will fail until a PV of that type is available.
This installation option will install the demo in OpenShift using a single script, after which the demo project needs to be manually imported.
-
Run the
init-openshift.sh(Linux/macOS) orinit-openshift.ps1(Windows) file. This will create a new project and application in OpenShift and deploy the demo. -
Login to your OpenShift console. For a local OpenShift installation this is usually: https://{host}:8443/console
-
A full walkthrough script of the demo can be found here
This installation option will install the demo in OpenShift using the provided provision.sh (Linux/macOS) or provision.ps1 (Windows) script, which gives the user a bit more control how to provision to OpenShift.
-
In the demo directory, go to
./support/openshift. In that directory you will find theprovision.sh(Linux/macOS) andprovision.ps1(Windows) script. -
Run
./provision.sh -h(Linux/macOS) or./provision.ps1 -h(Windows) to inspect the installation options. -
To provision the demo, with the OpenShift ImageStreams in the project's namespace, run
./provision.sh setup rhpam7-oih --with-imagestreams(Linux/macOS) or./provision.sh -command setup -demo rhpam7-oih -with-imagestreams(Windows)
NOTE
The
with-imagestreamsparameter installs the Process Automation Manager 7 image streams and templates into the project namespace instead of theopenshiftnamespace (for which you need admin rights). If you already have the required image-streams and templates installed in your OpenShift environment in theopenshiftnamespace, you can omit thewith-imagestreamsfrom the setup command.
-
A second useful option is the
--pv-capacity(Linux/macOS)/-pv-capacity(Windows) option, which allows you to set the capacity of the Persistent Volume used by the Business Central component. This is for example required when installing this demo in OpenShift Online, as the Persistent Volume Claim needs to be set to1Giinstead of the default512Mi. So, to install this demo in OpenShift Online, you can use the following command:./provision.sh setup rhpam7-oih --pv-capacity 1Gi --with-imagestreams(Linux/macOS) or./provision.ps1 -command setup -demo rhpam7-oih -pv-capacity 1Gi -with-imagestreams(Windows). -
After provisioning, follow the instructions from above "Automated installation", starting at step 3.
-
To delete an already provisioned demo, run
./provision.sh delete rhpam7-oih(Linux/macOS) or./provision.ps1 -command delete -demo rhpam7-oih(Windows).
The following functionality is covered:
-
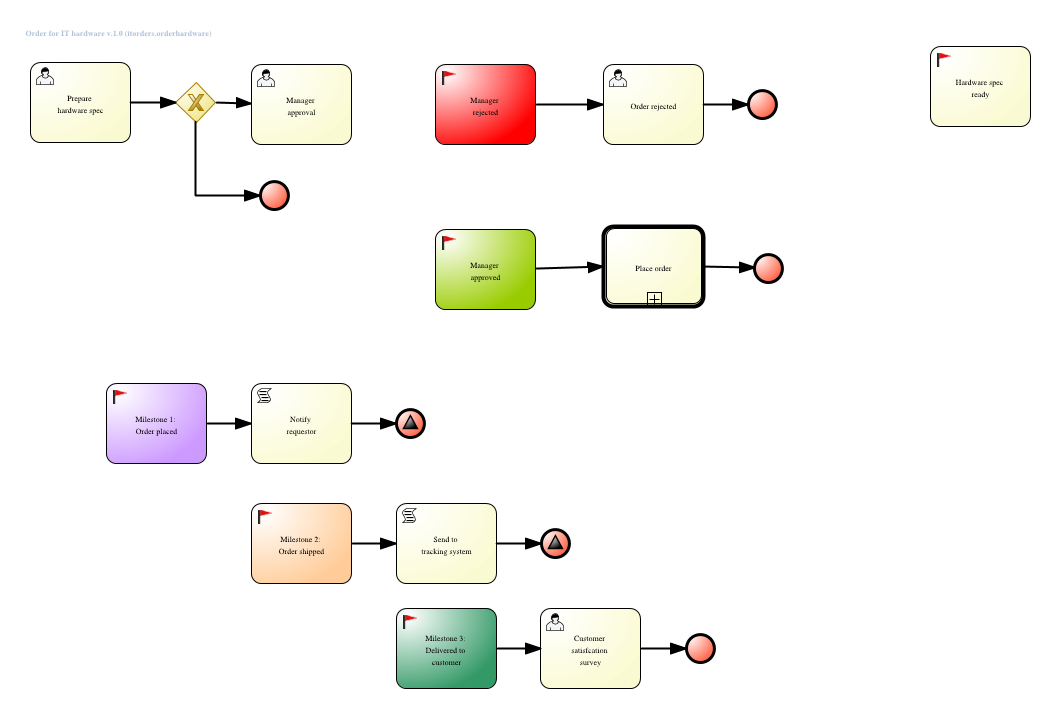
Case Management: the IT Order process is implemented as a dynamic, data-driven case. Changes in data drive the execution of the case/process.
-
Document Management: uploaded documents are stored via the PAM 7 Document Management Service
-
Human/User Tasks: various user tasks need to be completed to complete the full order process. Integration between the User/Human Task Service and the front-end applications is done via REST
-
API integration: the AngularJS UI integrates with the PAM Execution Engine through RESTful APIs.
-
SpringBoot: the PAM Execution Engine runs on a SpringBoot runtime. The runtime is connected to a PAM 7 Business Central environment for process management.
-
Vert.x integration: the Order Service is implemented using Vert.x. Integration between the Vert.x application and the PAM Execution Engine is done via RESTful APIs
-
Saga pattern: The order in the order service is cancelled via a BPMN2 compensation flow when the order time’s out. This effectively is the implementation of the Saga pattern in a BPMN2 process.
See the tagged releases for the following versions of the product: