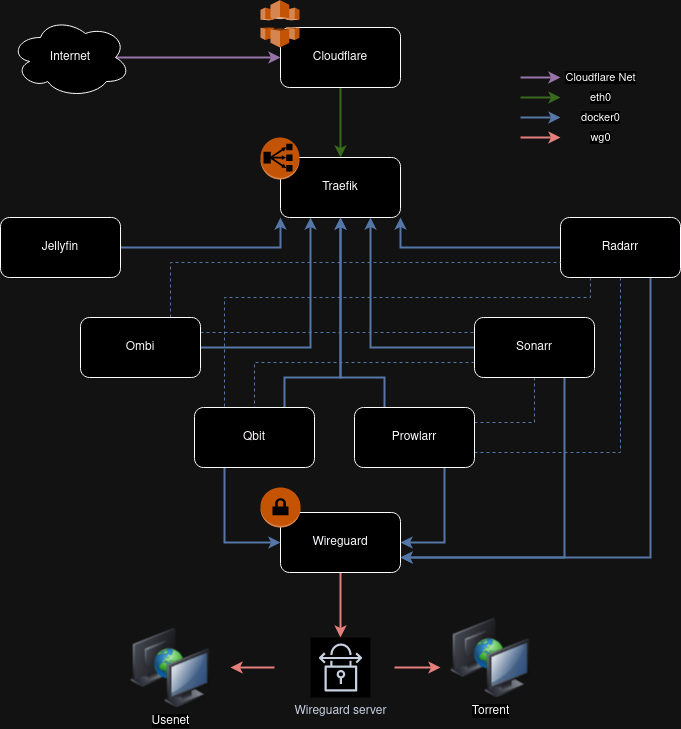
Mediaservarr is a docker-and-VPN-ready mediaserver stack, or if you prefer, your DIY seedbox. It is inspired by the work of PARC6502 and introduces some tweaks and improvements for portability and network protection.
- Traefik - reverse proxy/load balancer
- Wireguard - VPN client
- Jellyfin - media server
- Sonnarr - tv downloader
- Radarr - movie downloader
- Ombi - requester for radarr & sonarr
- Qbittorrent - torrent client, required for downloaders to work
- Prowlarr - Torrent tracker api, required for downloaders to work
- docker
- docker-compose
- A cloudflare account is recommended
- A wireguard VPN config file
After cloning this repo...
- Copy the example.env and give it your own variables
cp example.env .env
vim .env-
Setup your DNS so that all *.yourdomain go to the media server and put your wireguard wg0.conf file into the wireguard-config subdirectory.
-
Fire up the docker containers
# Make sure you're running this command from inside the mediaservarr folder and that the .env file is inside the same folder
docker-compose up -d
# The command will take a bit, after it runs you can run the following to check all the containers are running
docker-compose ps- Login to
qbitusing the useradminand the password retrieved from the logs, and change it via Tools -> Options -> WebUI -> Change password. - Go to Tools -> Options -> BitTorrent -> set "When ratio reaches" 0 in the "Seeding limits" section.
- Run the following command:
docker exec -it qbit bash # Get inside qBittorrent container
mkdir /downloads/movies /downloads/tvshows
chown 1000:1000 /downloads/movies /downloads/tvshows- Settings --> Media Management --> Check mark "Movies deleted from disk are automatically unmonitored in Radarr" under File management section --> Save.
- Settings --> Download clients --> qBittorrent --> Add
localhostand port8080--> Username and password --> Test --> Save. - Settings --> General --> Enable advance setting --> Select Authentication and add username and password Indexer will get automatically added during configuration of Prowlarr. See 'Configure Prowlarr' section.
- Settings --> Media Management --> scroll all the way down and click on "Add root folder" --> add
/downloads/moviesfor Radarr and/downloads/tvshowsfor Sonarr. - Settings --> Metadata --> Select your country.
- Settings --> Indexers --> Set maximum size if you want to avoid to download files too big.
Sonarr can also be configured in similar way.
- When you access the jellyfin for first time using browser, A guided configuration will guide you to configure jellyfin. Just follow the guide.
- Add media library folder and choose
/data/movies/.
- Settings --> General --> Authentications --> Select Authentication and add username and password.
- Add Indexers, Indexers --> Add Indexer --> Search for indexer --> Choose base URL --> Test and Save.
- Add application, Settings --> Apps --> Add application --> Choose Radarr --> Prowlarr server (http://localhost:9696) --> Radarr server (http://radarr:7878) --> API Key --> Test and Save.
- Add application, Settings --> Apps --> Add application --> Choose Sonarr --> Prowlarr server (http://localhost:9696) --> Sonarr server (http://localhost:8989) --> API Key --> Test and Save. This will add indexers in respective apps automatically.
Ombi needs to be connected to sonarr, radarr and jellyfin. You could also set up passwordless login if you're only going to be using it on your network.
