 WiFiNATify
Convert the MiniPiRack to use WiFi for WAN and a NAT internally
The MiniPiRack ships with each processor board configured to use an external DHCP server via a hard-wired ethernet cable. However, it's not always easy to pull a network cable to where the MiniPiRack is located. Usually in those environments, there's readily-accessible wifi. Luckily, the processor boards (Raspberry Pis) have both an ethernet and a wifi network interface.
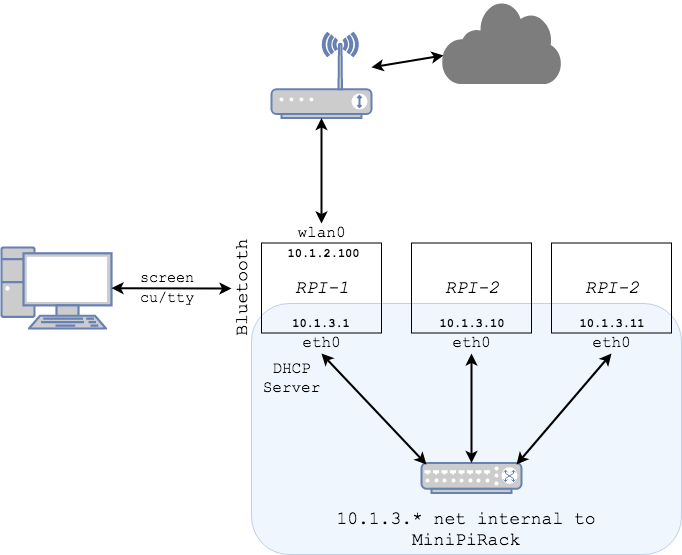
This ansible script configures the MiniPiRack to use the wifi network interface as the gateway to the network and exposes a DHCP server and NAT service to the other processor boards.
See network diagram.

The internal network (p2-r1, p3-r1) can be access via p1-r1 as a jump server.
HOWTO Setup the Wifi and NAT
-
Connect via wired connection so the ansible script can be run.
-
Run the ansible script to configure the MiniPiRack.
-
Disconnect the ethernet cable while the rack reboots. You won't need it anymore.
-
Depending on your network setup, you might be able to connect using:
ssh pirate@p1-r1.local -
If p1-r1.local does not resolve to an IP address, use the Bluetooth pairing to attach to the master p1-r1 (see directions below.)
-
Get the IP address of the p1-r1 wlan0 network adapter using 'ifconfig'
-
ssh to p1-r1 by:
ssh pirate@<ip address of p1-r1 wlan0> -
Enjoy your newly Wifi-connected, NAT-ed MiniPiRack!
To run the ansible playbook
ansible-playbook -i hosts site.yml --extra-vars "ssid=<wifi network name> wifipassword=<wifi password name> btname=<paired Bluetooth name>"
ssid - the SSID of the WiFi network to connect to wifipassword - the password of the WiFi network The 'btname' variable is optional. Without it, the btname will default to 'rpi1'.
To access a terminal via BlueTooth using 'screen'
The ansible script will expose the master (p1-r1) via Bluetooth so that you can connect to it via iTerm2 or other terminal program.
HOWTO Connect via Bluetooth
- Using Bluetooth, pair your laptop to the MiniPiRack master (p1-r1) (Bluetooth pairing )
- Connect using 'screen' to p1-r1 (See directions below.)
Find the Bluetooth device
This will not work until you have paired your laptop with p1-r1 (Step #4 in the HOWTO).
At a shell prompt:
ls -al /dev/cu*
You should see something like the following
/dev/cu.p1-r1-SerialPort
The name of the connected device is 'p1-r1'
Connect via Bluetooth using 'screen'
The command to start a tty session is: screen /dev/cu.<name of connected device goes here>-SerialPort 115200
For the device listed above (p1-r1):
screen /dev/cu.p1-r1-SerialPort 115200
Credit for showing how to expose a terminal via Bluetooth goes to Patrick Hundal for the HOWTO at https://hacks.mozilla.org/2017/02/headless-raspberry-pi-configuration-over-bluetooth/
MiniPiRack.com - a scalable, desktop cluster