
Automatic SSH Tunnel is a Python script which can be used to create a Reverse SSH Tunnel between multiple computers running Linux and a centralized server.
Licensed under the MIT License - https://opensource.org/licenses/MIT
-
Automatically configures and runs openssh to set-up a reverse ssh connection during boot-up
-
Automatically generates ssh keys
-
No need to store the server's password
-
Works with Debian-based systems, including Ubuntu
-
3-step configuration wizard that requires less than 1 minute to set-up
-
These instructions were tested on Ubuntu 15.10, Ubuntu 14.04.3, and Raspbian Jessie (Raspberry Pi)
-
The installation script automatically installs openssh-server with Apt

Clone the latest repository version from Github (recommended):
$ git clone https://github.com/facerecog/auto-ssh-tunnel.git
Alternatively, download the .tar.gz file from the top of this page and unpack it:
$ wget https://github.com/facerecog/auto-ssh-tunnel/tarball/master -O - | tar -xz
Now cd into the newly extracted directory.
Additional instructions for Mac OS X Users
Go to:
System Preferences > Sharing. Turn on "Remote Login". Allow access for "All Users".
-
Run configuration.py to specify the port, username, and IP address of the SSH server:
$ python configure.py <port> <username> <ip address> -
Run the following command:
$ sudo python setup.py install
The installation will proceed automatically. If successful, the output of all the commands should roughly show:
Reading package lists... Done
Building dependency tree
Reading state information... Done
openssh-server is already the newest version.
0 upgraded, 0 newly installed, 0 to remove and 118 not upgraded.
[*] Installing autossh client...
[*] Installing autossh as startup application...
mkdir: cannot create directory ‘.ssh’: File exists
yes: standard output: Broken pipe
yes: write error
Generating public/private rsa key pair.
Enter file in which to save the key (/root/.ssh/id_rsa): priv_key already exists.
Overwrite (y/n)? [*] Copying SSH-Keys file over to server...
/usr/bin/ssh-copy-id: INFO: attempting to log in with the new key(s), to filter out any that are already installed
/usr/bin/ssh-copy-id: INFO: 1 key(s) remain to be installed -- if you are prompted now it is to install the new keys
"<username>@<ip address>" 's password:
Number of key(s) added: 1

Now try logging into the machine, with:   "ssh ' "<username>@<ip address>" '"
and check to make sure that only the key(s) you wanted were added.

[*] Installing private keys inside protected folder...
yes: standard output: Broken pipe
yes: write error
[*] Moving autossh client into the /usr/local/bin/ directory...
[*] Moving private key to /etc/auto-ssh-tunnel/
mkdir: cannot create directory ‘/etc/auto-ssh-tunnel’: File exists
yes: standard output: Broken pipe
yes: write error

[*] We are now finished with the installation! Restart the client to complete the installation. To run autossh, input connect.py on the terminal.
Also there is a systemd service file to start the connection on boot.
sudo cp reverse-tunnel.service /etc/systemd/system/
sudo systemctl enable reverse-tunnel.service
sudo systemctl daemon-reload
During installation, the script will automatically append the following lines to /etc/ssh/ssh_config:
ServerAliveInterval 30
ServerAliveCountMax 4
It will also append the following to /etc/ssh/sshd_config
ClientAliveInterval 30
ClientAliveCountMax 4
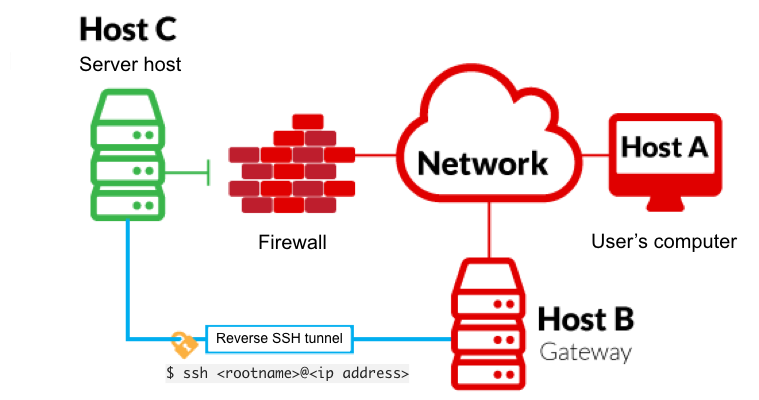
Upon boot, the client will run connect.py, which sets up a reverse ssh tunnel. The server may now ssh into the client even if the client resides behind a NAT firewall.
-
From the client, ssh into your server:
$ ssh <rootname>@<ip address> -
Once in, connect back to your client:
$ ssh <your username>@localhost -p <port number specified as above> -
If successful, you have just ssh-ed back into your client. Congratulations and enjoy!
To uninstall:
$ sudo rm -rf /etc/init.d/connect.py /etc/auto-ssh-tunnel /usr/local/bin/connect.py /System/Library/StartupItems/auto-ssh-tunnel/
If you want to support this project, please consider reaching out to me via muhd.amrullah@facerecog.asia
Property of Facerecog Asia Pte. Ltd. and 26 Factorial