Added basic support for chituboard based printers(Elegoo Mars, Anycubic Photon, Phrozen, etc.) to octoprint.
- upload files to folder
~/.octoprint/uploads/resin - pause and resume are still somewhat buggy due to a timeout issue
- File analysis CLI command works
octoprint plugins chituboard:sla_analysis filename - Plugin might not work if you've updated your Elegoo Mars printer to the newest firmware due to issues with Chitu3d encrypting their files so users are forced to use Chitubox 1.9.0. I'm not planning on incorporating the non FOSS chitubox SDK into an AGPLv3 licensed plugin.
- Todo: write model viewer to display layer slices and relevant info. Anyone is welcome to take this on, I'm terrible at javascript
A user made a nice multi part setup video explaining how to set it up, I reccomend using a Raspberry Pi Zero 2W since its significantly more powerful.
Part 1: https://youtu.be/WtDkcHgXEX8
Part 2: https://youtu.be/1j9HFumHR-c
Hardware setup instructions
- Raspberry Pi Zero W(not reccomended underpowered), Zero 2 W, 3A+ or 4B only supports raspberry pi's with USB-OTG ports
- Supported printers: SLA printers with chitu3d mainboards or Anycubic mainboards
- Anycubic Photon
- Elegoo Mars
- Elegoo Mars Pro
- Elegoo Mars 2
- Elegoo Mars 2 Pro
- Elegoo Saturn
- Phrozen Sonic Mighty 4K
- Phrozen Sonic Mini 4K
- Creality LD-002H
- Creality LD-002R
- Peopoly Phenom L
- Peopoly Phenom Noir
- EPAX E10/X10
- Voxelab Proxima
Our goal here is to use the Pi as a USB flash drive. The printer mainboards use the USB port to read USB FAT storage devices not for serial control. The printer can only supply around 500 mA via the 5V line so its best to power you pi with an external power source. Follow one of these steps.
- Put some tape on the 5V line of your USB cable. This tutorial is a good reference on how to do this.
- Cut the connection between the 5V line and the USB port on the Pi. Some people online do this, but I didn’t want to do any permanent changes to my Pi.
- The USB-OTG port on the Raspberry pi 4B is also the USB host port
- users should put tape on the USB-A end of your USB C to USB A cable
- users will also need to power the pi via the GPIO pins, I suggest using the X735.
- users who forget to tape over the 5V pin on will risk frying their pi 4B
Follow tutorial from Mariner blog post for more detailed hardware setup process.
Connect the jumper wires from the pi's UART0 port to the Elegoo Mars 2 motherboard like this.
 pinout.xyz is a good reference if you’re unfamiliar with the Raspberry Pi’s GPIO pins. Note that the Pi’s TX pin is connected to the motherboard’s RX pin and vice-versa. Connect GND to GND, Rx to Tx, and Tx to Rx
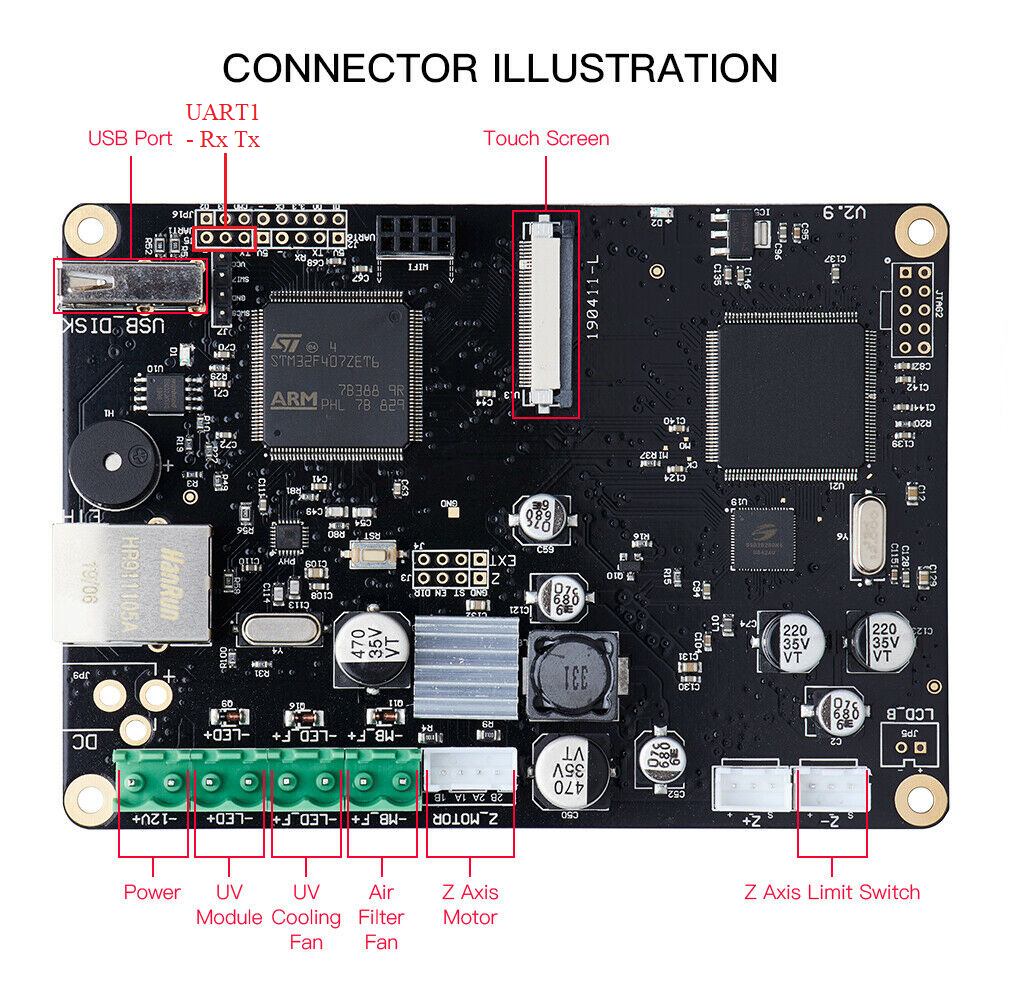
Anycubic Photon motherboard
Solder a 3 pin header to UART1 located near the USB port on the board.
 Image source
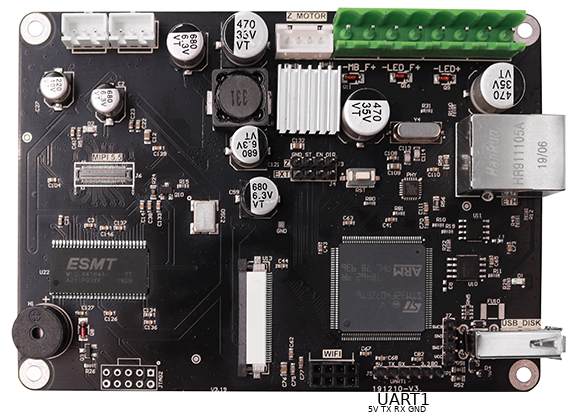
ChiTu L V3 board
UART1 port on chitu L V3 marked at bottom. Don't connect 5V line. Chitu mainboard can supply a max of 500 mA backpowering will cause brownouts.

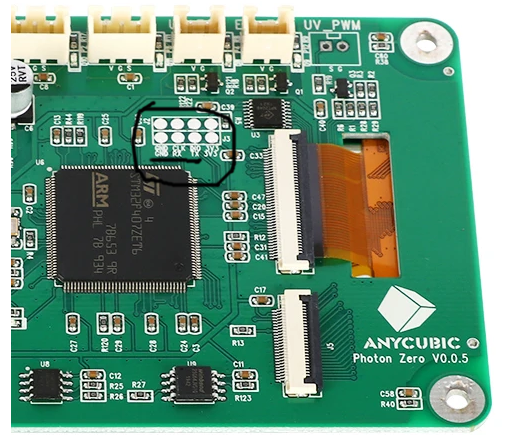
Anycubic Photon Zero motherboard
This is a potential UART port on the Photon zero motherboard. I think its for the ESP-01S wifi chip which acts as a wifi UART bridge. You might be able to connect a PI to the RX and TX pins. Try this at your own risk I don't own this printer so I haven't tested this.

This script is intended for a fresh octopi installation on a Raspberry Pi Zero or raspberry pi 4
It will set up a folder on the Pi as a USB drive using the USB-OTG, create a sambashare, and a couple other things.
Either from this Github or using
wget https://raw.githubusercontent.com/rudetrooper/Octoprint-Chituboard/main/Chituboard.sh
sudo chmod +x ./Chituboard.sh
sudo bash ./Chituboard.sh
Follow the prompts in the script, reboot, and run once more. You should see a different set of prompts on the second run
Modify config.yaml to match these settings
- Todo: finish writing settings mixin stuff so this can be configure during plugin install
serial:
  abortHeatupOnCancel: false
  additionalPorts:
  - /dev/ttyS0
  baudrate: 115200
  blacklistedBaudrates:
  - 9600
  - 19200
  - 57600
  - 230400
  capabilities:
    autoreport_sdstatus: false
    autoreport_temp: false
  disconnectOnErrors: false
  exclusive: false
  externalHeatupDetection: false
  firmwareDetection: false
  helloCommand: M4002
  ignoreErrorsFromFirmware: true
  logPositionOnCancel: true
  maxCommunicationTimeouts:
    long: 0
    printing: 0
  neverSendChecksum: true
  port: /dev/ttyS0
  sanityCheckTools: false
  sdAlwaysAvailable: true
  timeout:
    sdStatus: 3.0
    sdStatusAutoreport: 0.0
    temperature: 2.0
    temperatureAutoreport: 0.0
    temperatureTargetSet: 5.0
  triggerOkForM29: false
  unknownCommandsNeedAck: false
  useParityWorkaround: never