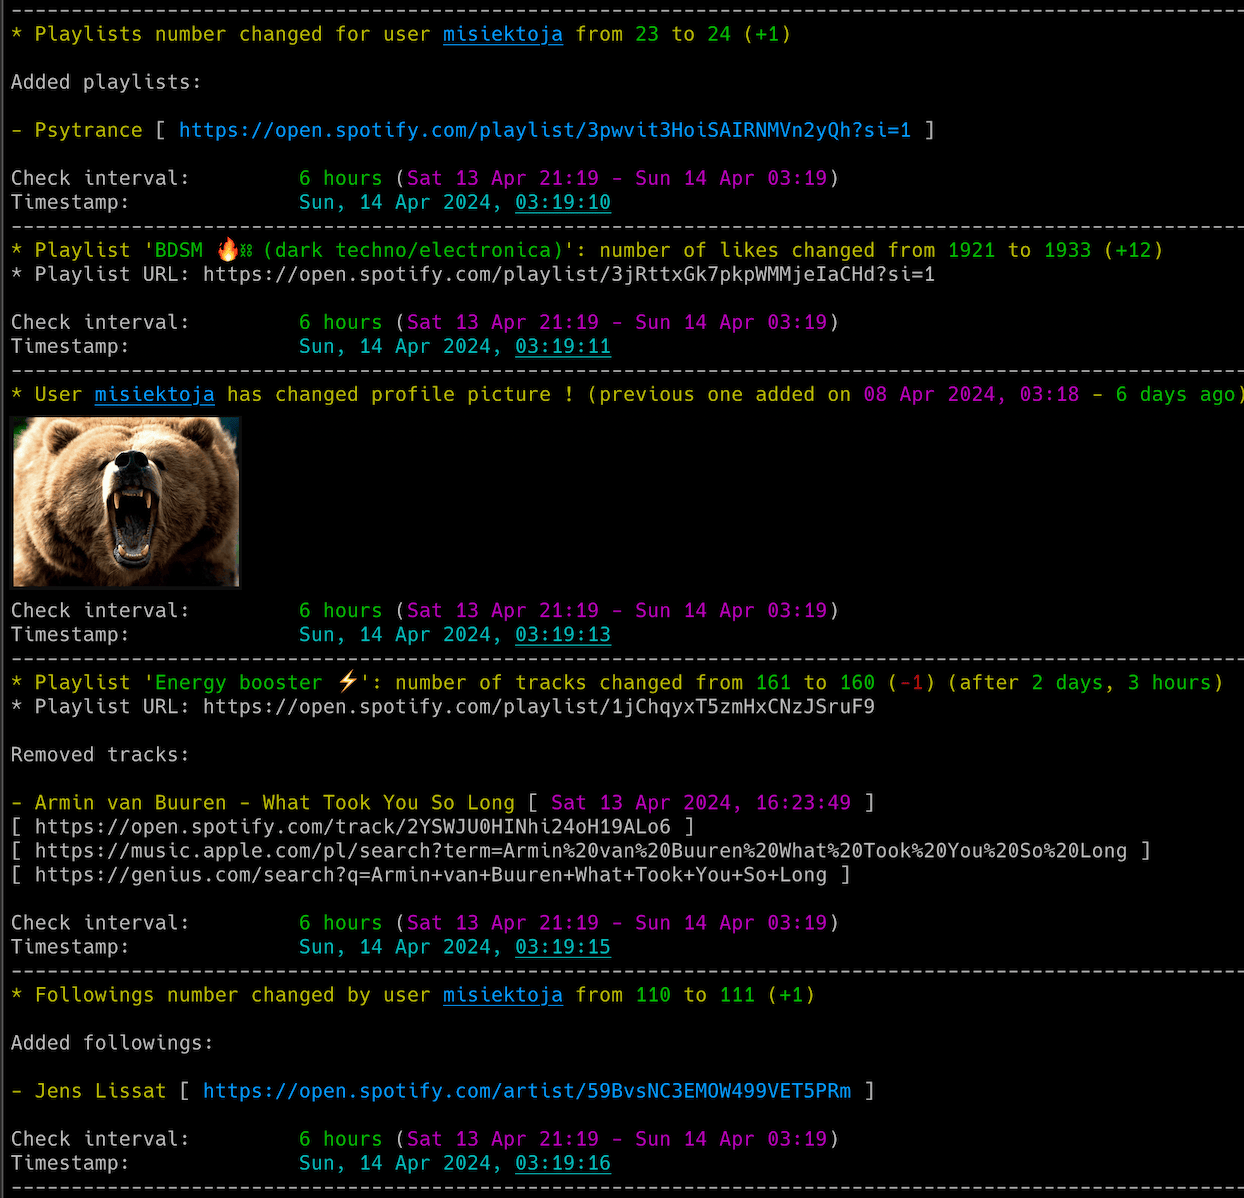
spotify_profile_monitor is an OSINT tool written in Python which allows for real-time monitoring of Spotify users activities and profile changes.
NOTE: If you want to track Spotify friends music activity check out the other tool I developed: spotify_monitor.
- Real-time tracking of Spotify user activities and profile changes:
- added/removed followings and followers
- added/removed public playlists
- added/removed tracks in playlists
- playlists name and description changes
- number of likes for playlists
- changed profile pictures
- Email notifications for different events (added/removed followings + followers + public playlists + its tracks, playlists name and description changes, changed profile pictures, number of likes for playlists, errors)
- Attaching changed profile pictures directly in email notifications
- Displaying the profile picture right in your terminal (if you have imgcat installed)
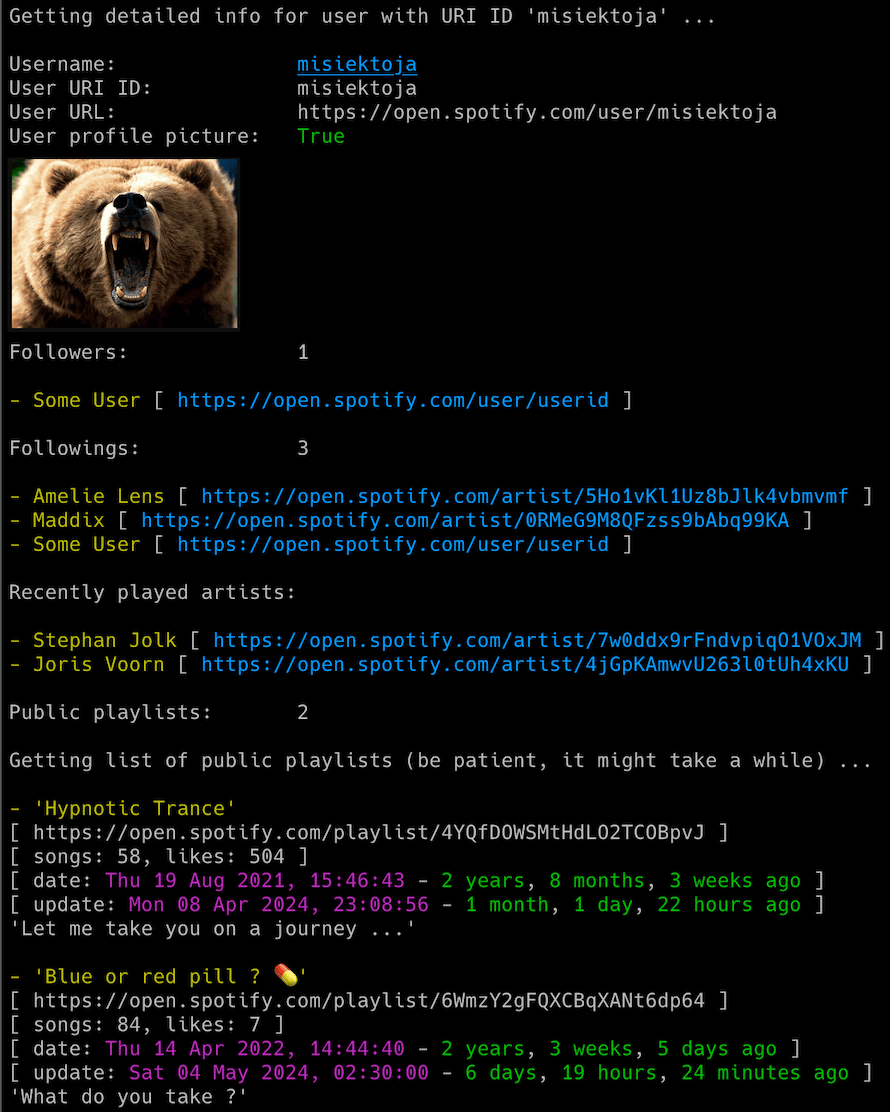
- Additional functionalities on top of the monitoring mode allowing to display detailed info about the user, list of followers & followings, recently played artists and possibility to search for users with specific names
- Saving all profile changes with timestamps to the CSV file
- Clickable Spotify, Apple Music and Genius Lyrics search URLs printed in the console & included in email notifications
- Possibility to control the running copy of the script via signals
Release notes can be found here
I'm not a dev, project done as a hobby. Code is ugly and as-is, but it works (at least for me) ;-)
The script requires Python 3.x.
It uses requests, python-dateutil, pytz, tzlocal and urllib3.
It has been tested successfully on:
- macOS (Ventura & Sonoma)
- Linux:
- Raspberry Pi Bullseye & Bookworm
- Ubuntu 24
- Rocky Linux 8.x
- Kali Linux 2024
- Windows (10 & 11)
It should work on other versions of macOS, Linux, Unix and Windows as well.
Install the required Python packages:
python3 -m pip install requests python-dateutil pytz tzlocal urllib3Or from requirements.txt:
pip3 install -r requirements.txtCopy the spotify_profile_monitor.py file to the desired location.
You might want to add executable rights if on Linux/Unix/macOS:
chmod a+x spotify_profile_monitor.pyEdit the spotify_profile_monitor.py file and change any desired configuration variables in the marked CONFIGURATION SECTION (all parameters have detailed description in the comments).
Log in to Spotify web client https://open.spotify.com/ in your web browser and copy the value of sp_dc cookie to SP_DC_COOKIE variable (or use -u parameter).
You can use Cookie-Editor by cgagnier to get it easily (available for all major web browsers): https://cookie-editor.com/
Newly generated Spotify's sp_dc cookie should be valid for 1 year. You will be informed by the tool once the cookie expires (proper message on the console and in email if errors notifications have not been disabled via -e parameter).
It is suggested to create a new Spotify account for usage with the tool since we are not using official Spotify Web API most of the time (as some needed features were not available).
The tool will try to automatically detect your local time zone so it can convert Spotify timestamps to your time.
In case you want to specify your timezone manually then change LOCAL_TIMEZONE variable from 'Auto' to specific location, e.g.
LOCAL_TIMEZONE='Europe/Warsaw'
In such case it is not needed to install tzlocal pip module.
This step is optional and only needed if you want to use the feature to search for users with specific name to get their Spotify user URI ID (-s parameter).
For that you need to intercept your Spotify client's network traffic and get the sha256 value.
To simulate the needed request, search for some user in Spotify client. Then in intercepting proxy look for requests with searchUsers or searchDesktop operation name.
Display details of one of such requests and copy the sha256Hash parameter value and put it in SP_SHA256 variable.
You are interested in the string marked as "XXXXXXXXXX" here.
I used Proxyman proxy on MacOS to intercept Spotify's client traffic.
If you want to use email notifications functionality you need to change the SMTP settings (host, port, user, password, sender, recipient) in the spotify_profile_monitor.py file. If you leave the default settings then no notifications will be sent.
You can verify if your SMTP settings are correct by using -z parameter (the tool will try to send a test email notification):
./spotify_profile_monitor.py -zAll other variables can be left at their defaults, but feel free to experiment with it.
To get the list of all supported parameters:
./spotify_profile_monitor.py -hor
python3 ./spotify_profile_monitor.py -hTo monitor specific user for all profile changes, just type Spotify user URI ID as parameter (misiektoja in the example below):
./spotify_profile_monitor.py misiektojaIf you have not changed SP_DC_COOKIE variable in the spotify_profile_monitor.py file, you can use -u parameter:
./spotify_profile_monitor.py misiektoja -u "your_sp_dc_cookie_value"The tool will run infinitely and monitor the user until the script is interrupted (Ctrl+C) or killed the other way.
You can monitor multiple Spotify users by spawning multiple copies of the script.
It is suggested to use sth like tmux or screen to have the script running after you log out from the server (unless you are running it on your desktop).
The tool automatically saves its output to spotify_profile_monitor_{user_uri_id}.log file (the log file name suffix can be changed via -y parameter or logging can be disabled completely with -d parameter).
The tool also saves the list of followings, followers and playlists to these files:
- spotify_profile_{user_uri_id}_followings.json
- spotify_profile_{user_uri_id}_followers.json
- spotify_profile_{user_uri_id}_playlists.json
Thanks to this we can detect changes after the tool is restarted (the file name suffix {user_uri_id} can be changed to custom one via -y parameter).
The tool also saves the user profile picture to spotify_profile_{user_uri_id}_pic*.jpeg files (the file name suffix {user_uri_id} can be changed to custom one via -y parameter).
The easiest way is to use your Spotify client. Go to the profile page of your friend and then click 3 dots and select 'Copy link to profile'. In my case it is: https://open.spotify.com/user/misiektoja
Then use the string after /user/ (misiektoja in the example) as user URI ID.
You can also use built-in functionality to search for user names (-s parameter) to get user URI ID:
./spotify_profile_monitor.py -s "misiektoja"It will list all users with such names with their user URI ID.
Before using this feature make sure you followed the instructions here
There is also other mode of the tool which displays different requested information (-l, -i, -a, -f and -s parameters).
If you want to display details for specific Spotify playlist URL (i.e. its name, description, number of tracks, likes, overall duration, creation & last update date, list of tracks with information when they have been added), then use -l parameter:
./spotify_profile_monitor.py -l "https://open.spotify.com/playlist/33u3A8wbd6Q54in8zJ1cWE"If you want to display details for specific Spotify user profile URL (i.e. user URI ID, list & number of followers and followings, recently played artists, list & number of user's playlists with basic statistics like when created, last updated, description, number of tracks and likes), then use -i parameter:
./spotify_profile_monitor.py -i misiektojaIf you only want to display list of followings & followers for the user (-f parameter):
./spotify_profile_monitor.py -f misiektojaIf you only want to display list of recently played artists (-a parameter):
./spotify_profile_monitor.py -a misiektojaAnd if you want to search for users with specific name to get their Spotify user URI ID (-s parameter):
./spotify_profile_monitor.py -s misiektojaYou can use the described features regardless if the monitoring is used or not (it does not interfere).
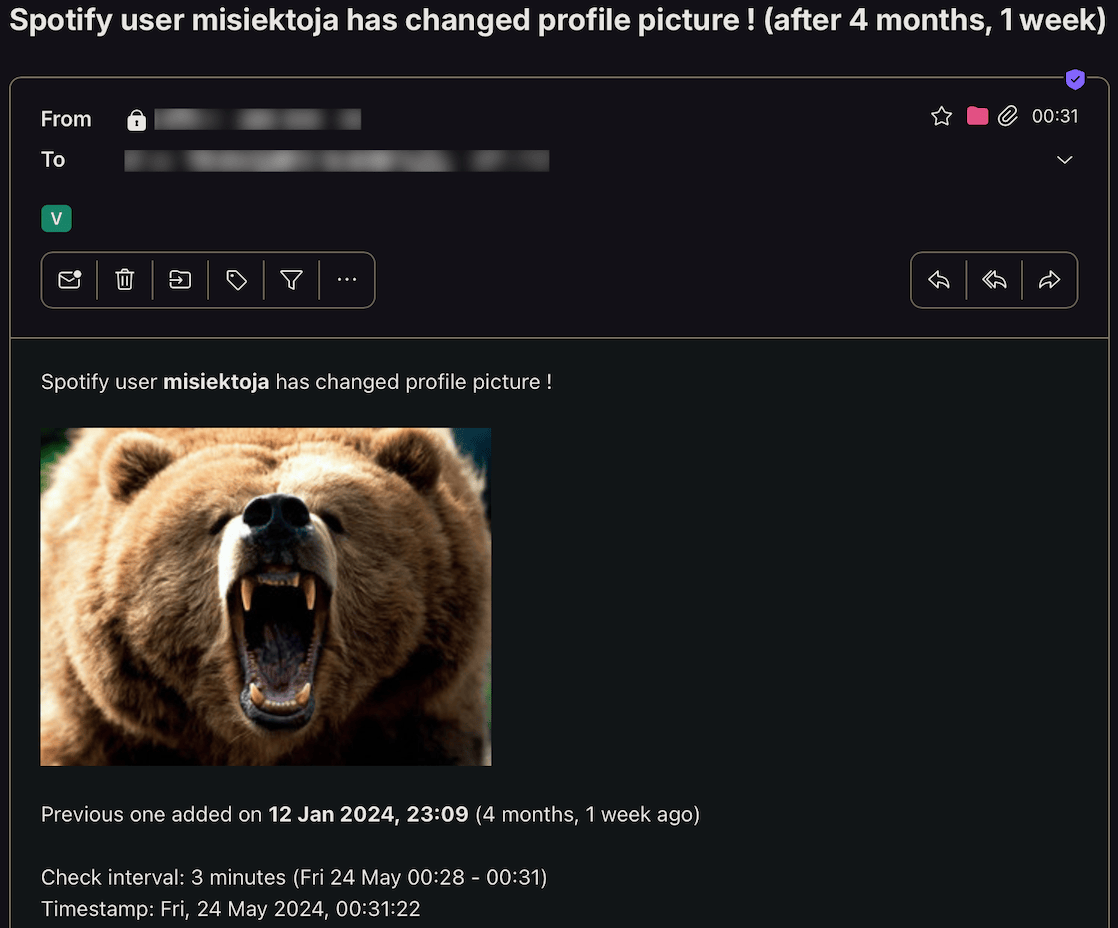
If you want to get email notifications for all user profile changes use -p parameter:
./spotify_profile_monitor.py misiektoja -pMake sure you defined your SMTP settings earlier (see SMTP settings).
Example email:
If you want to save all profile changes in the CSV file, use -b parameter with the name of the file (it will be automatically created if it does not exist):
./spotify_profile_monitor.py misiektoja -b spotify_profile_changes_misiektoja.csvThe tool has functionality to detect changed profile pictures. Proper information will be visible in the console (and email notifications when -p parameter is enabled). By default this feature is enabled, but you can disable it either by setting DETECT_CHANGED_PROFILE_PIC variable to False or by enabling -j / --do_not_detect_changed_profile_pic parameter.
Since Spotify user's profile picture URL seems to change from time to time, the tool detects changed profile picture by doing binary comparison of saved jpeg files. Initially it saves the profile pic to spotify_profile_{user_uri_id}_pic.jpeg file after the tool is started (in monitoring mode), then during every check the new picture is fetched and the tool does binary comparison if it has changed or not.
In case of changes the old profile picture is moved to spotify_profile_{user_uri_id}_pic_old.jpeg file and the new one is saved to spotify_profile_{user_uri_id}_pic.jpeg and also to the file named spotify_profile_{user_uri_id}_pic_YYmmdd_HHMM.jpeg (so we can have history of all profile pictures).
if you have imgcat installed you can enable the feature displaying pictures right in your terminal. For that put path to your imgcat binary in IMGCAT_PATH variable (or leave it empty to disable this functionality).
If you want to change the check interval to 15 minutes (900 seconds) use -c parameter:
./spotify_profile_monitor.py misiektoja -c 900The tool has several signal handlers implemented which allow to change behavior of the tool without a need to restart it with new parameters.
List of supported signals:
| Signal | Description |
|---|---|
| USR1 | Toggle email notifications for user's profile changes (-p) |
| TRAP | Increase the profile check timer (by 5 minutes) |
| ABRT | Decrease the profile check timer (by 5 minutes) |
So if you want to change functionality of the running tool, just send the proper signal to the desired copy of the script.
I personally use pkill tool, so for example to toggle email notifications for user's profile changes, for the tool instance monitoring the misiektoja user:
pkill -f -USR1 "python3 ./spotify_profile_monitor.py misiektoja"As Windows supports limited number of signals, this functionality is available only on Linux/Unix/macOS.
Check other supported parameters using -h.
You can combine all the parameters mentioned earlier in monitoring mode (listing mode only supports -l, -i, -a, -f, -s).
If you use GRC and want to have the tool's log output properly colored you can use the configuration file available here
Change your grc configuration (typically .grc/grc.conf) and add this part:
# monitoring log file
.*_monitor_.*\.log
conf.monitor_logs
Now copy the conf.monitor_logs to your .grc directory and spotify_profile_monitor log files should be nicely colored when using grc tool.
This project is licensed under the GPLv3 - see the LICENSE file for details


