Note: This is a document authoring recruitment test for 27 partners.
Tape is a library for testing JavaScript code. It was written by James Halliday, aka substack. Full code and the original documentation can be found here.
Being a beginner friendly framework, Tape is great for learning to write unit tests. Unit tests are small, automated tests that compare the actual output from individual units with expected output. A unit is often, if not usually, a single function. In order to be testable a function should produce predictable results. Expected value 5, for instance, can be used to test the following function:
function addTwoAndThree() {
  return 2+3;
}
Tape is known as the ‘bare minimum’ testing framework. As such it is lightweight, with no configuration required and free from global variables such as describe. Tests produced with Tape are JavaScript files and can run in Node or in a browser.
Tape produces TAP output. TAP stands for Test Anything Protocol; it is documented here. It was originally designed to test Perl code in the late 1980s. A protocol is a standardised way of doing something, in the case of TAP - reporting the outcome of unit tests. A classic example of a protocol is meeting the Queen: call her ‘Ma’am’ (like in "jam"). TAP prescribes the following reporting from a test:
- 1..n reports the number of tests run with n being the number of tests
- ok 1 - means that the first test was successful
- not ok 2 - means that the second test failed
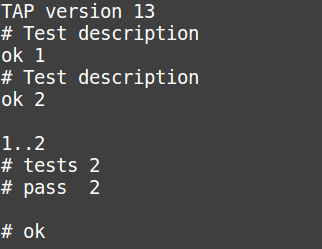
The screenshot below shows the TAP output produced by running two successful tests. The words ‘Test description’ are placeholders, here the test author should write concise and meaningful explanations of functionality being tested.
Failing tests will produce exceptions, messages outlining why tests were not successful. If one previously experienced a less minimalist testing framework they might be left disappointed: standard TAP output has no color coding, no timings, no file or function names, no line numbers. On the brighter side, if one is used to deciphering TAP output for JavaScript test, they will be able to understand TAP producing tests of other programming languages.
Another limitation of Tape and TAP is a small number of built-in assertions. Built-in assertions are methods included in the testing library that allow to compare the expected outcome of a unit with its actual outcome.
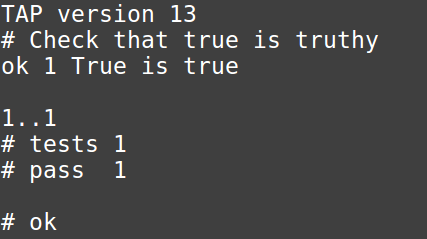
test("Check that true is truthy", function (t) {
  t.ok(true, "True is true");
  t.end();
});
The code snippet above uses Boolean assertion ok(). It has a single test and a single assertion. ok() takes a single value and a success message as parameters. The test output now displays the custom test description "Check that true is truthy" and the success message "True is true":
You can add multiple assertions to a single test and use notOk() to check values expected to be falsy. Remember to be mindful of JavaScript type coercion when asserting Booleans.
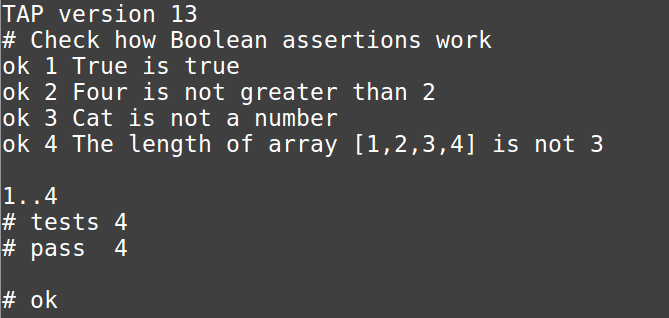
test("Check how Boolean assertions work", function (t) {
  t.ok(true, 'True is true');
  t.notOk(4 < 2, 'Four is not greater than 2');
  t.ok(typeof 'cat' !== Number, 'Cat is not a number');
  t.notOk([1, 2, 3, 4].length === 3, 'The length of array [1,2,3,4] is not 3');
  t.end();
});
In TAP output test descriptions are preceded by #, whereas assertion success messages follow ok.
Boolean assertions are great to introduce the idea. However, as Eric Elliott, the author of “Programming JavaScript Applications” (O'Reilly), points out:
“If the only available assertion in every test suite was equal(), almost every test suite in the world would be better for it.”
test("Testing equality assertion", function (t) {
  t.equal(4 + 2, 6, 'Working for 4+2=6');
  t.end();
});
The snippet above shows a passing test. equal() takes two values and a success message as parameters. The values given to equal() are expected and actual results. The test below, however, will fail
test("Testing equality assertion", function (t) {
  t.equal([1, 2, 3], [1, 2, 3], 'Two arrays are equal');
  t.end();
});
throwing the following exception:
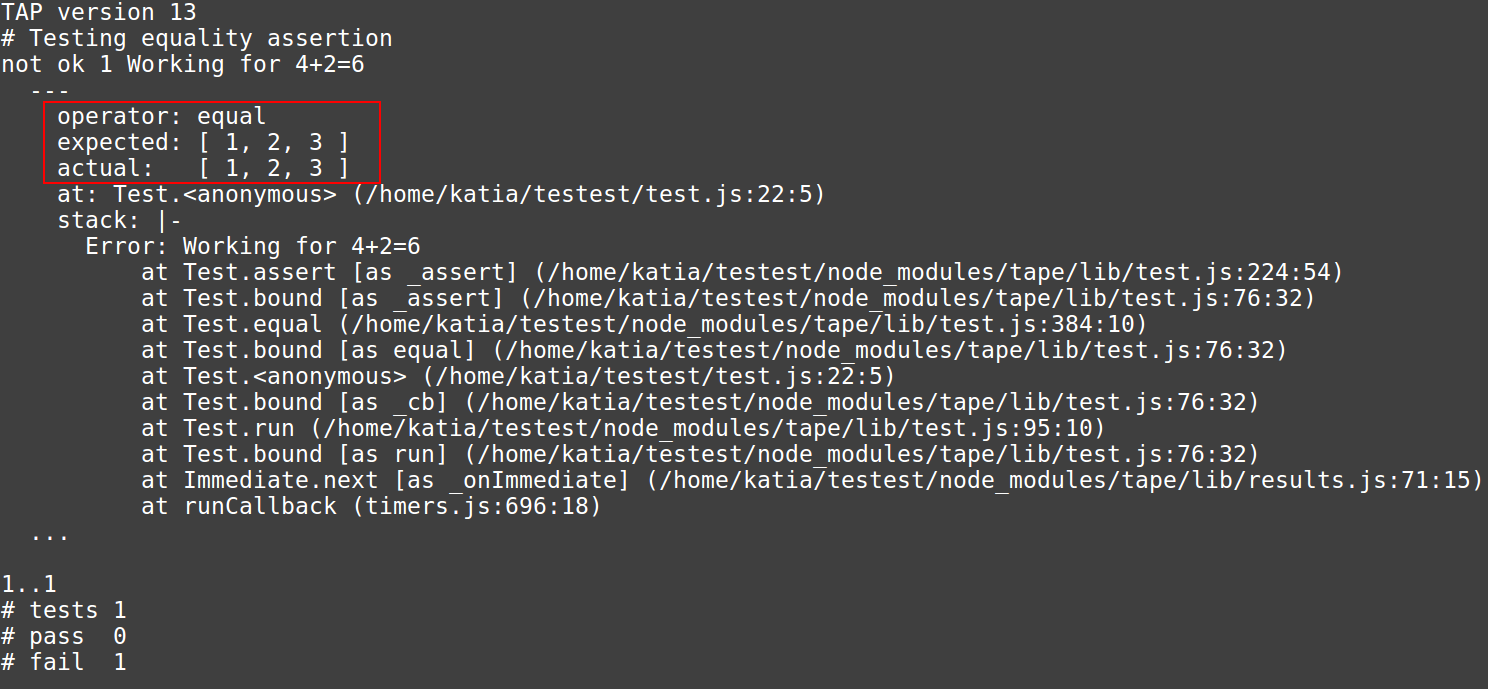
Even though the expected and actual arrays (outlined in red, above) are identical, they cannot be compared with equal(). To compare non-primitive data types (objects or arrays) deepEqual() operator must be used.
test("Testing deep equality assertion", function (t) {
  var actual = { item: "tape", amount: 3 };
  var expected = { item: "tape", amount: 3 };
  t.deepEqual(actual, expected, 'Actual object is equal to expected');
  t.end();
});
The full list of available Tape assertions can be found here.
Even though Tape tests can run in a browser, it is easier to start using Tape in Node.js. Make sure you have Node, a JavaScript run-time environment that executes JavaScript code outside of a browser. To check whether you have Node installed type node -v in your terminal. Expect to see v followed by the versions number, i.e. v10.4.1. You can download Node and read installation instructions here. When you install Node.js, npm (Node Package Manager) is automatically installed as well. You can explore npm here and you will be using it to set up Tape.
It is recommended to install Tape globally first. In your terminal type the following:
npm install tape --gHowever, in order to start writing and running your own Tape tests you will need to create a project folder, initialise it with npm init and include Tape as a dependency for every individual project. You can find a beginner's guide to dependencies and using npm here.
To create your project folder named tests (you can choose a different name) type the following in your terminal:
mkdir testsTo navigate inside your new folder:
cd testsThe following steps should be done from within your project directory. To make absolutely sure you are in the directory you are planning to use as your project, it is a good to know pwd command (print working directory). pwd outputs the path to the folder you are currently in, for example mycomputer/home/tests means you are currently inside the folder tests.
To initialise your project:
npm initnpm init will provide a set of questions that you can skip by pressing the return button.
To set up Tape as the developer's dependency for a specific project:
npm install tape --save-devNow you can use touch command in your terminal to create the files you need. You will need a file containing your JavaScript code and a file containing your tests. To create your JavaScript file you may use:
touch index.jsAnd to create your test file:
touch index.test.jsNote: name.test.js is a naming convention for test files. Following naming convention is optional, but a good practice.
To write your JS code and your tests you need to open your project in the text editor of your choice, for example, Atom or Visual Studio Code.
To open a project in Atom:
atom .and in VS Code:
code .You may need to set up code command for Mac OS, find instructions here.
Make sure you type these from within your project folder, in the terminal. Use pwd to check if you are in the right folder.
In order to complete the set up it is important to write your first test. Like all snippets provided above it does not have to be testing any actual code. The example below uses Visual Studio Code and assertion ok():
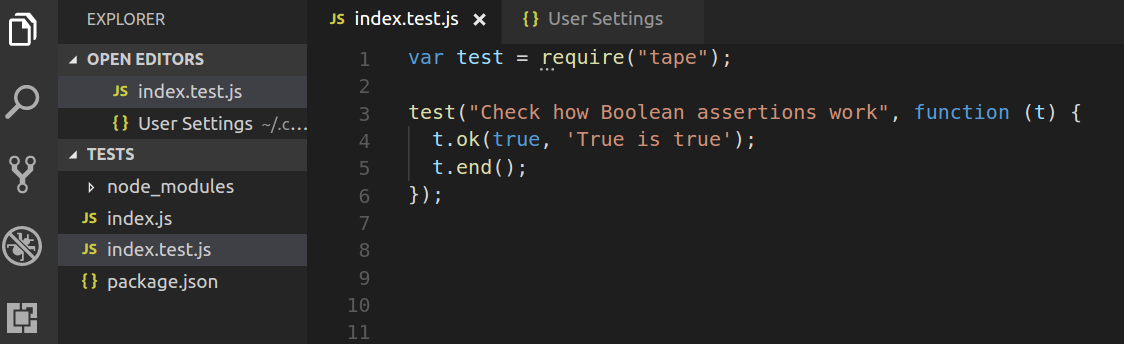
In order to run the test type the following in your terminal (from within the project folder,pwd to check):
node index.test.jsYour should see the TAP output of your first test. Remember that file name should be whatever you named your file.
Note that there is a file included in the project that you did not create: package.json. It was created by npm init and contains information about modules and dependencies used in your project.
It is yet another convention to run test files with npm test. We can modify our package.json to make it possible. Open package.json and change the "test" property in the following way making sure you use your test file name:
  "scripts": {
    "test": "tape ./index.test.js"
  },
Now you can run your test from the terminal by typing:
npm testActually, you can make it shorter:
npm tNow you are ready to write some code and test it. How about writing and testing a program that outputs a list of prime numbers, from 0 to n?
You can, for example, do it in the following way:
function prime(num) {
  var primes = [];
  loop: for (var i = 2; i <= num; i++) {
    for (var j = 0; j <= primes.length; j++)
      if (i % primes[j] === 0) continue loop;
    primes.push(i);
  }
  return primes;
}
It would work and would even impress (not everyone knows labels, i.e. loop:). However, testing this code would be difficult. To make testing and subsequently debugging easier it is better to split the code into multiple (at least two) functions.
Here is a basic function that checks for primality:
function isPrime(n) {
  for (var i = 2; i <= Math.sqrt(n); i++)
    if (n % i == 0) return false;
  return true;
}
It should be written in your index.js file. In order to make it available in your index.test.js file you need to add a module.exports statement at the end of your JavaScript file:
function isPrime(n) {
  for (var i = 2; i <= Math.sqrt(n); i++)
    if (n % i == 0) return false;
  return true;
}
module.exports = isPrime;
Now you need to require your module containing function isPrime(n) in yout test file. Moreover, you also need to require tape in your test file. Your first test will have to have two require statements at the start and some tests. Traditionally, the first test should check that Tape is working.
var test = require("tape");
var isPrime = require("./index.js");

test("Check how Boolean assertions work", function (t) {
  t.ok(true, 'True is true');
  t.end();
});

test("Check that 7 is a prime number", function (t) {
  t.ok(isPrime(7), '7 is a prime');
  t.end();
});
Note that the names test and t are arbitrary; they are variable names.
Now you can run your first test that tests actual code. Using snippets of assertions above you can write more of your own tests for function isPrime(n).
We know that negative numbers cannot be prime. We should probably test our function for the output with negative numbers. But if we add assertion t.notOk(isPrime(-9), '-9 is not a prime'); the test will fail. That means the code itself was wrong. This situation illustrates the idea of Test Driven Development - first write a failing test and then write or re-write a unit to make the test pass. We should refactor our code to make our new test pass, for example:
function isPrime(n) {
  if (n % 1 || n < 2) return false;
  for (var i = 2; i <= Math.sqrt(n); i++)
    if (n % i == 0) return false;
  return true;
}
You can now test function isPrime(n) with an argument 'cat'. What result do you expect? Is actual equal expected? You can continue testing and refactoring your function with different arguments (edge cases).
The second function of the program should use function isPrime(n) in order to generate a list of primes from 0 to n. To export two functions from the same file we have to assign an object containing reference to both functions to module.exports as so:
function primelist(num) {
  let res = [];
  for (let i = 2; i <= num; i++)
    if (isPrime(i)) res.push(i);
  return res;
}

function isPrime(n) {
  if (n % 1 || n < 2) return false;
  for (var i = 2; i <= Math.sqrt(n); i++)
    if (n % i == 0) return false;
  return true;
}

module.exports = { primelist, isPrime };
If we run our old tests now they will fail. We need to use dot notation or destructuring assignment to make both functions available in test file. With dot notation our tests will be:
var test = require("tape");
var primes = require("./index.js");

test("Check how Boolean assertions work", function (t) {
  t.ok(true, 'True is true');
  t.end();
});

test("Check that primes identify correctly", function (t) {
  t.ok(primes.isPrime(7), '7 is a prime');
  t.notOk(primes.isPrime(-9), '-9 is not a prime');
  t.end();
});
With destructuring assignment:
var test = require("tape");
var { isPrime, primelist } = require("./index.js");

test("Check how Boolean assertions work", function (t) {
  t.ok(true, 'True is true');
  t.end();
});

test("Check that primes identify correctly", function (t) {
  t.ok(isPrime(7), '7 is a prime');
  t.notOk(isPrime(-9), '-9 is not a prime');
  t.end();
});
Now you can use code snippets of deepEqual() to test function primelist().
- Unit Testing JavaScript Applications With Tape by Andy Neale
- Stack Overflow discussion - what do developers want to see in TAP output
- Testling Guide to Tape
- Unit testing Node.js with Tape by Diogo Splinola
- Unit Testing with Tape by James Anaipakos
- An Overview of JavaScript Testing in 2018
- DWYL - learn Tape tutorial
- Rethinking unit test assertions by Eric Elliot