The developer at Mystique Unicorn are using big data analytics applications using Apache Spark framework. At the moment they are using AWS EMR for most of their workflows. But they are looking eliminate the heavy lifting of installing and managing their frameworks and integrations with AWS services.
They have been using Kubernetes to orchestrate and manage their containerized applications and benefit from the scalability, portability, extensibility, and speed that Kubernetes offers. They are looking for a way to run EMR workloads on Kubernetes.
Can you show them how the can get started?
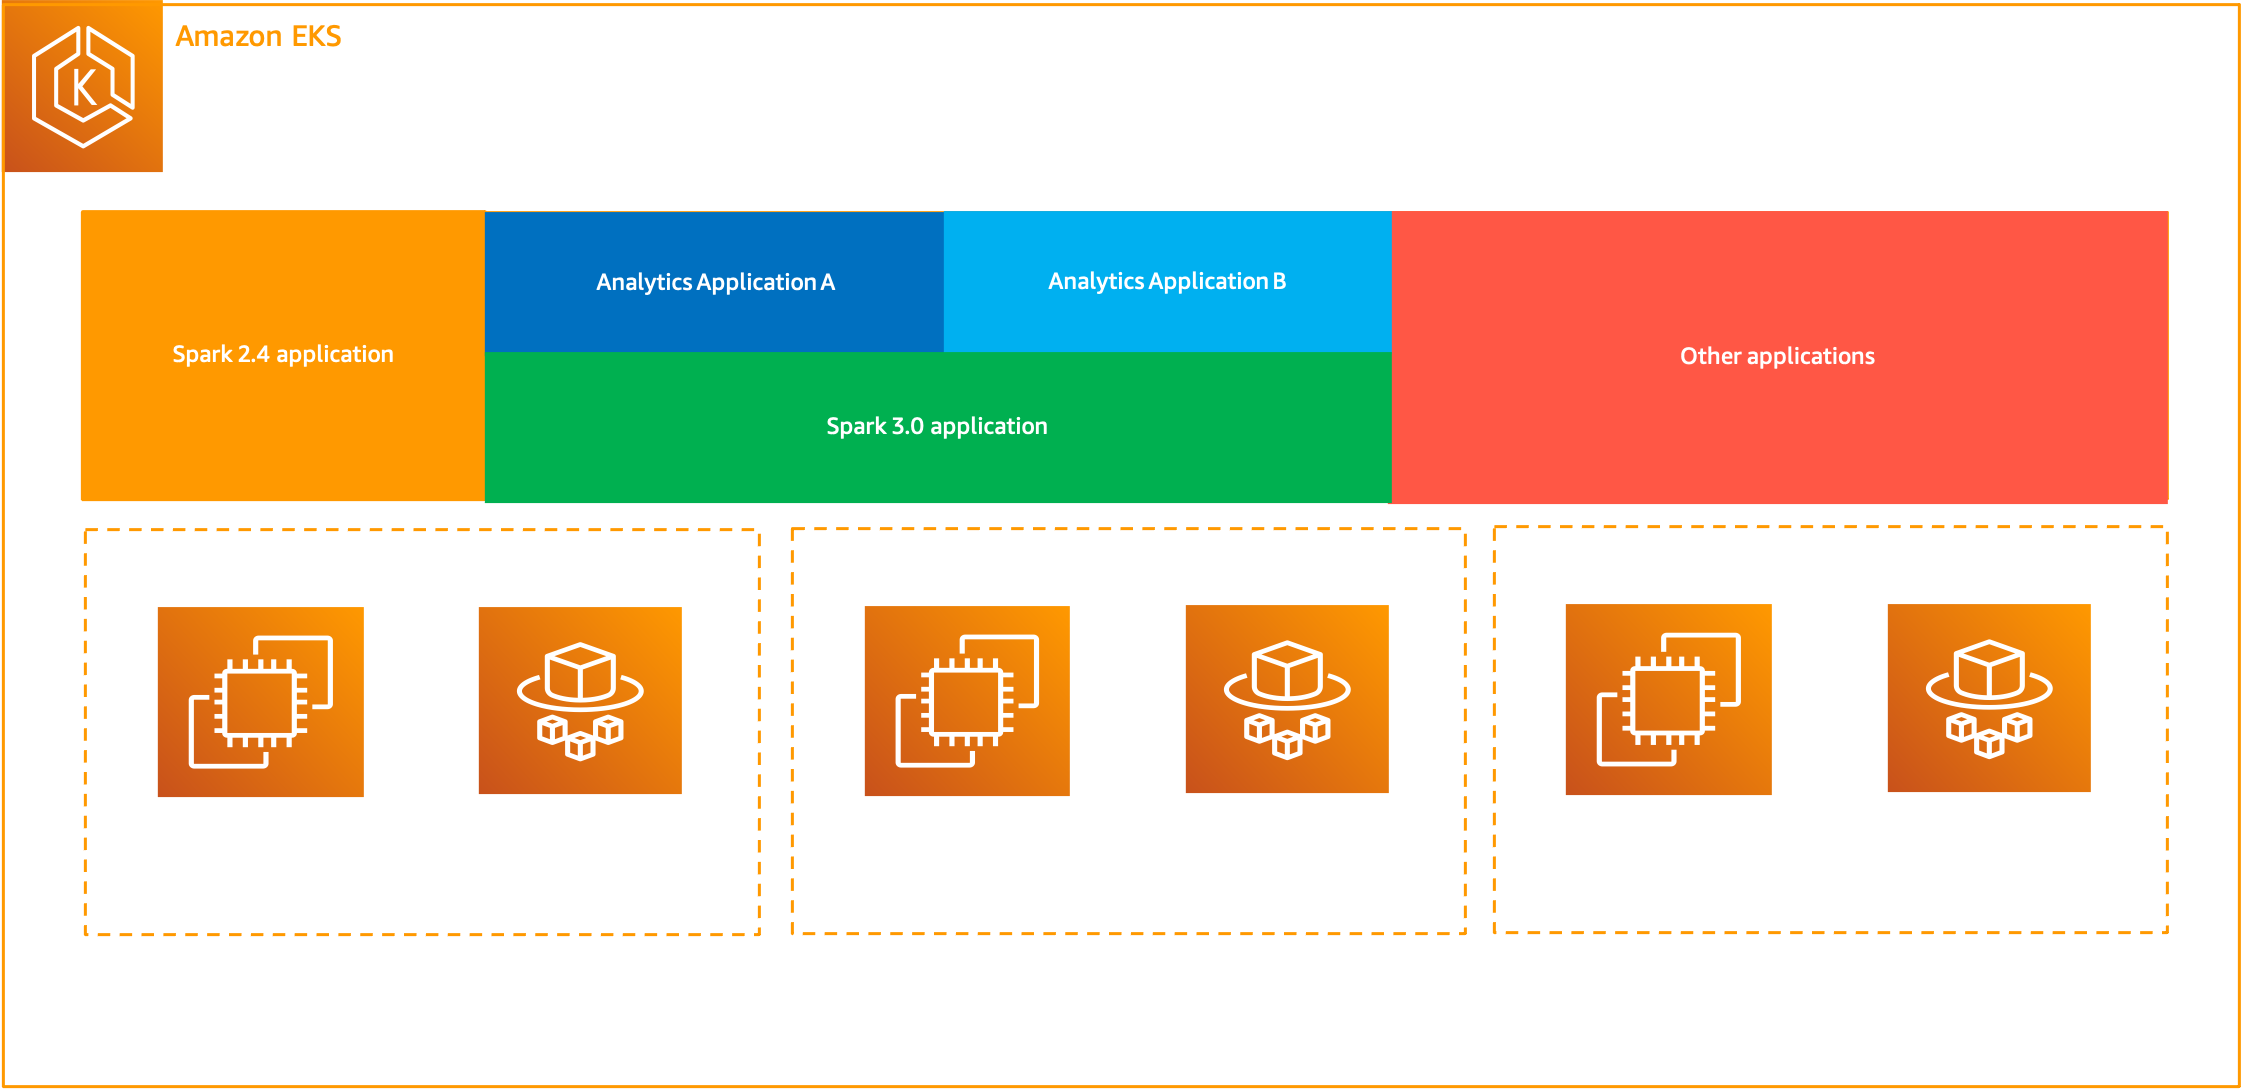
AWS recently announced Amazon EMR on Amazon EKS, a new deployment option in EMR that allows you to automate the provisioning and management of open-source big data frameworks on EKS. With EMR on EKS, You can now run Spark applications alongside other types of applications on the same EKS cluster to improve resource utilization and simplify infrastructure management.
You get all the same EMR capabilities on EKS that you will get on EC2 today, such as access to the latest frameworks, performance optimized runtimes, EMR Notebooks for application development, and Spark user interface for debugging.
To run jobs on EKS, we need to three components:
- A Kubernetes Namespace: It will help us isolate workloads in multi-tenant clusters. It can have either Amazon EC2 or AWS Fargate as the compute provider. This flexibility provides you with different performance and cost options for your jobs to run on.
- Virtual EMR Cluster: Registering Amazon EMR with a Kubernetes namespace on Amazon EKS creates a virtual cluster. Amazon EMR can then run analytics workloads on that namespace. When you use Amazon EMR on EKS to submit Spark jobs to the virtual cluster, Amazon EMR on EKS requests the Kubernetes scheduler on Amazon EKS to schedule pods.
- Job: A job run is a unit of work, such as a Spark jar, PySpark script, or SparkSQL query, that you submit to Amazon EMR on EKS. For each job that you run, Amazon EMR on EKS creates a container with an Amazon Linux 2 base image, Apache Spark, and associated dependencies. Each job runs in a pod. The pod terminates after the job terminates. Sidecar containers, such as log or metric forwarders, can be deployed to the pod. After the job terminates, you can still debug it using Spark application UI in the Amazon EMR console.
To allow Amazon EMR on EKS access to a specific namespace in the cluster by taking the following actions, We need a Kubernetes role and bind the role to a Kubernetes. This cluster role will be and mapping the Kubernetes user emr-container with the service linked role AWSServiceRoleForAmazonEMRContainers.
In this blog, I will show you how to setup
- A simple EKS cluster
- A Virtual EMR Cluster on EKS
- Run a sample spark job
-
This demo, instructions, scripts and cloudformation template is designed to be run in
us-east-1. With few modifications you can try it out in other regions as well(Not covered here).- 🛠 AWS CLI Installed & Configured - Get help here
- 🛠 AWS CDK Installed & Configured - Get help here
- 🛠 Python Packages, Change the below commands to suit your OS, the following is written for amzn linux 2
- Python3 -
yum install -y python3 - Python Pip -
yum install -y python-pip - Virtualenv -
pip3 install virtualenv
- Python3 -
-
-
Get the application code
git clone https://github.com/miztiik/service-mesh-in-eks
cd service-mesh-in-eks
-
-
We will use
cdkto make our deployments easier. Lets go ahead and install the necessary components.# You should have npm pre-installed # If you DONT have cdk installed npm install -g aws-cdk # Make sure you in root directory python3 -m venv .venv source .venv/bin/activate pip3 install -r requirements.txt
The very first time you deploy an AWS CDK app into an environment (account/region), you’ll need to install a
bootstrap stack, Otherwise just go ahead and deploy usingcdk deploy.cdk bootstrap cdk ls # Follow on screen promptsYou should see an output of the available stacks,
eks-cluster-vpc-stack11
eks-cluster-stack11
ssm-agent-installer-daemonset-stack11
emr-artifacts-bkt-stack11
emr-on-eks-stack11
-
Let us walk through each of the stacks,
-
Stack: eks-cluster-vpc-stack11 To host our EKS cluster we need a custom VPC. This stack will build a multi-az VPC with the following attributes,
- VPC:
- 2-AZ Subnets with Public, Private and Isolated Subnets.
- 1 NAT GW for internet access from private subnets
Initiate the deployment with the following command,
cdk deploy eks-cluster-vpc-stack11
After successfully deploying the stack, Check the
Outputssection of the stack for the - VPC:
-
Stack: eks-cluster-stack11 As we are starting out a new cluster, we will use most default. No logging is configured or any add-ons. The cluster will have the following attributes,
- The control pane is launched with public access. i.e the cluster can be access without a bastion host
c_adminIAM role added to aws-auth configMap to administer the cluster from CLI.- One OnDemand managed EC2 node group created from a launch template
- It create two
t3.mediuminstances runningAmazon Linux 2. - Auto-scaling Group with
2desired instances. - The nodes will have a node role attached to them with
AmazonSSMManagedInstanceCorepermissions - Kubernetes label
app:miztiik_on_demand_ng - A cluster user
emr-containerwith access to AWS Service RoleAWSServiceRoleForAmazonEMRContainers
- It create two
The EKS cluster will be created in the custom VPC created earlier. Initiate the deployment with the following command,
cdk deploy eks-cluster-stack11
After successfully deploying the stack, Check the
Outputssection of the stack. You will find the**ConfigCommand**that allows yous to interact with your cluster usingkubectl -
Stack: ssm-agent-installer-daemonset-stack11 This EKS AMI used in this stack does not include the AWS SSM Agent out of the box. If we ever want to patch or run something remotely on our EKS nodes, this agent is really helpful to automate those tasks. We will deploy a daemonset that will run exactly once? on each node using a cron entry injection that deletes itself after successful execution. If you are interested take a look at the daemonset manifest here
stacks/back_end/eks_cluster_stacks/eks_ssm_daemonset_stack/eks_ssm_daemonset_stack.py. This is inspired by this AWS guidance.Initiate the deployment with the following command,
cdk deploy ssm-agent-installer-daemonset-stack11
After successfully deploying the stack, You can connect to the worker nodes instance using SSM Session Manager.
-
Stack: emr-artifacts-bkt-stack11
This stack will create the s3 bucket to hold our EMR job artifacts. We will add a bucket policy to delegate all access management to be done by access points. Although not required for this demo, we may use it in the future.
Initiate the deployment with the following command,
cdk deploy emr-artifacts-bkt-stack11
After successfully deploying the stack, Check the
Outputssection of the stack. You will find theEmrArtifactsBucket. -
Stack: emr-on-eks-stack11 This stack creates the following resources to help us run EMR on EKS,
- EKS Namespace -
spark-ns - Cluster Role
emr-containersand role binding in namespacespark-ns - IAM Role for EMR job execution - The permissions can be tightened further. For example scoping it down to a specific bucket
- EMR Virtual Cluster -
miztiikVirtualEmrCluster01
Initiate the deployment with the following command,
cdk deploy emr-on-eks-stack11
After successfully deploying the stack, Take a note of the
EmrVirtualClusterId,EmrNamespaceandEmrExecutionRoleArn, we will use them later to submit jobs. - EKS Namespace -
-
-
-
Run EMR Job on EKS
There are many ways of submitting job to your EMR cluster, here we will use the CLI to submit a job using the built-in sample driver.
You will need the output values from previous stacks and update these variables
VIRTUAL_CLUSTER_ID,EMR_EXECUTION_ROLE_ARNands3DemoBucketexport VIRTUAL_CLUSTER_ID=$(aws emr-containers list-virtual-clusters --query "virtualClusters[?state=='RUNNING'].id" --output text) export EMR_EXECUTION_ROLE_ARN="arn:aws:iam::111122223333:role/emr-on-eks-stack-emr01ExecutionRole12AD66FB08-JQBF4ATJWD5F" export s3DemoBucket=s3://emr-artifacts-bkt-stack-databucketd8691f4e-1ge5lqvbumiq2 aws emr-containers start-job-run \ --virtual-cluster-id=$VIRTUAL_CLUSTER_ID \ --name=pi-2 \ --execution-role-arn=$EMR_EXECUTION_ROLE_ARN \ --release-label=emr-6.2.0-latest \ --job-driver='{ "sparkSubmitJobDriver": { "entryPoint": "local:///usr/lib/spark/examples/src/main/python/pi.py", "sparkSubmitParameters": "--conf spark.executor.instances=1 --conf spark.executor.memory=2G --conf spark.executor.cores=1 --conf spark.driver.cores=1" } }'
Expected output,
{
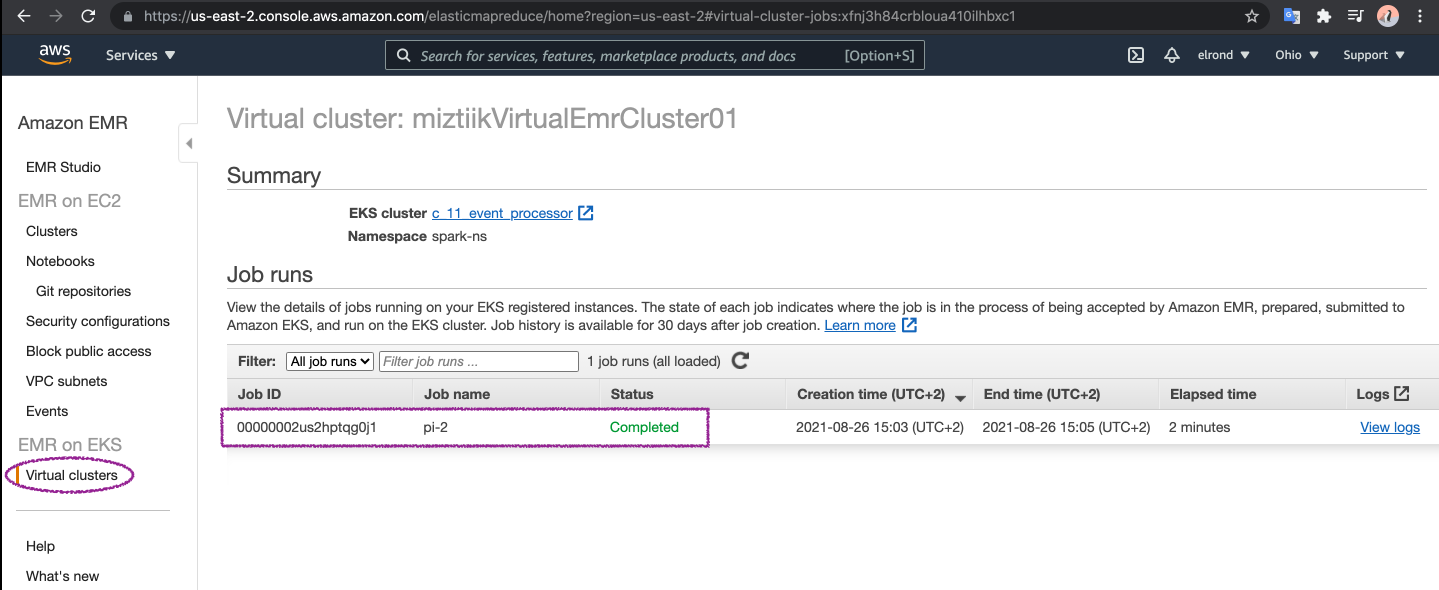
    "id": "00000002us2hptqg0j1",
    "name": "pi-2",
    "arn": "arn:aws:emr-containers:us-east-2:111122223333:/virtualclusters/xfnj3h84crbloua410ilhbxc1/jobruns/00000002us2hptqg0j1",
    "virtualClusterId": "xfnj3h84crbloua410ilhbxc1"
}
Verify all the services have been installed correctly and running,
kubectl -n istio-system get svc
After couple of minutes(as this job is super simple), you check out the logs or EMR dashboard. You will find the job history and the status of the job.
-
Here we have demonstrated how to use EMR in EKS. You can extend this by running your EMR job on Fargate or triggering the job through step functions or Apache Airflow.
If you want to destroy all the resources created by the stack, Execute the below command to delete the stack, or you can delete the stack from console as well
- Resources created during Deploying The Application
- Delete CloudWatch Lambda LogGroups
- Any other custom resources, you have created for this demo
# Delete from cdk
cdk destroy

# Follow any on-screen prompts

# Delete the CF Stack, If you used cloudformation to deploy the stack.
aws cloudformation delete-stack \
  --stack-name "MiztiikAutomationStack" \
  --region "${AWS_REGION}"
This is not an exhaustive list, please carry out other necessary steps as maybe applicable to your needs.
This repository aims to show how to setup EMR on EKS to new developers, Solution Architects & Ops Engineers in AWS. Based on that knowledge these Udemy course #1, course #2 helps you build complete architecture in AWS.
Thank you for your interest in contributing to our project. Whether it is a bug report, new feature, correction, or additional documentation or solutions, we greatly value feedback and contributions from our community. Start here

Level: 200


