Correlation of text content across documents using Watson Natural Language Understanding, Python NLTK and IBM Data Science experience
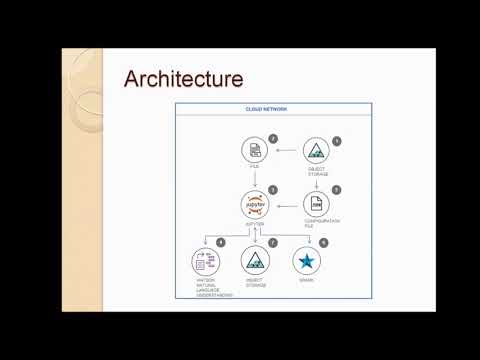
In this developer journey we will use Jupyter notebooks in IBM Data Science experience(DSX) to correlate text content across documents with Python NLTK toolkit and IBM Watson Natural Language Understanding. The correlation algorithm is driven by an input configuration json that contains the rules and grammar for building the relations. The configuration json document can be modified to obtain better correlation results between text content across documents.
When the reader has completed this journey, they will understand how to:
- Create and run a Jupyter notebook in DSX.
- Use DSX Object Storage to access data and configuration files.
- Use IBM Watson Natural Language Understanding API to extract metadata from documents in Jupyter notebooks.
- Extract and format unstructured data using simplified Python functions.
- Use a configuration file to specify the co-reference and relations grammar.
- Store the processed output JSON in DSX Object Storage.
The intended audience for this journey is developers who want to learn a method for correlation of text content across documents. The distinguishing factor of this journey is that it allows a configurable mechanism of text correlation.

-
IBM Data Science Experience: Analyze data using RStudio, Jupyter, and Python in a configured, collaborative environment that includes IBM value-adds, such as managed Spark.
-
Bluemix Object Storage: A Bluemix service that provides an unstructured cloud data store to build and deliver cost effective apps and services with high reliability and fast speed to market. This code pattern uses Object Storage(Swift API).
-
Watson Natural Language Understanding: A Bluemix service that can analyze text to extract meta-data from content such as concepts, entities, keywords, categories, sentiment, emotion, relations, semantic roles, using natural language understanding.
- Jupyter Notebooks: An open-source web application that allows you to create and share documents that contain live code, equations, visualizations and explanatory text.
Follow these steps to setup and run this developer journey. The steps are described in detail below.
- Sign up for the Data Science Experience
- Create Bluemix services
- Create the notebook
- Add the data and configuraton file
- Update the notebook with service credentials
- Run the notebook
- Analyze the results
Sign up for IBM's Data Science Experience.
By signing up for the Data Science Experience, two services will be created - Spark and ObjectStore in your Bluemix account. Choose the storage type as Object Storage (Swift API) for this code pattern.
Create the following Bluemix service and name it wdc-NLU-service:

Use the menu on the top to select Projects and then Default Project.
Click on Add notebooks (upper right) to create a notebook.
- Select the
From URLtab. - Enter a name for the notebook.
- Optionally, enter a description for the notebook.
- Enter this Notebook URL: https://github.com/IBM/watson-document-co-relation/blob/master/notebooks/watson_correlate_documents.ipynb
- Click the
Create Notebookbutton.

- From the
My Projects > Defaultpage, UseFind and Add Data(look for the10/01icon) and itsFilestab. - Click
browseand navigate to this repowatson-document-classifier/data/sample_text_1.txt - Click
browseand navigate to this repowatson-document-classifier/data/sample_text_2.txt - Click
browseand navigate to this repowatson-document-classifier/configuration/sample_config.txt

Note: It is possible to use your own data and configuration files. If you use a configuration file from your computer, make sure to conform to the JSON structure given in
configuration/sample_config.txt.
If you use your own data and configuration files, you will need to update the variables that refer to the data and configuration files in the Jupyter Notebook.
In the notebook, update the global variables in the cell following 2.3 Global Variables section.
Replace the sampleTextFileName1,sampleTextFileName2 with the name of your data file and sampleConfigFileName with your configuration file name.

Select the cell below 2.1 Add your service credentials from Bluemix for the Watson services section in the notebook to update the credentials for Watson Natural Langauage Understanding.
Open the Watson Natural Language Understanding service in your Bluemix Dashboard and click on your service, which you should have named wdc-NLU-service.
Once the service is open click the Service Credentials menu on the left.

In the Service Credentials that opens up in the UI, select whichever Credentials you would like to use in the notebook from the KEY NAME column. Click View credentials and copy username and password key values that appear on the UI in JSON format.

Update the username and password key values in the cell below 2.1 Add your service credentials from Bluemix for the Watson services section.

-
Select the cell below
2.2 Add your service credentials for Object Storagesection in the notebook to update the credentials for Object Store. -
Delete the contents of the cell
-
Use
Find and Add Data(look for the10/01icon) and itsFilestab. You should see the file names uploaded earlier. Make sure your active cell is the empty one below2.2 Add... -
Select
Insert to code(below your sample_text.txt). -
Click
Insert Crendentialsfrom drop down menu. -
Make sure the credentials are saved as
credentials_1.

When a notebook is executed, what is actually happening is that each code cell in the notebook is executed, in order, from top to bottom.
IMPORTANT: The first time you run your notebook, you will need to install the necessary packages in section 1.1 and then
Restart the kernel.
Each code cell is selectable and is preceded by a tag in the left margin. The tag
format is In [x]:. Depending on the state of the notebook, the x can be:
- A blank, this indicates that the cell has never been executed.
- A number, this number represents the relative order this code step was executed.
- A
*, this indicates that the cell is currently executing.
There are several ways to execute the code cells in your notebook:
- One cell at a time.
- Select the cell, and then press the
Playbutton in the toolbar.
- Select the cell, and then press the
- Batch mode, in sequential order.
- From the
Cellmenu bar, there are several options available. For example, you canRun Allcells in your notebook, or you canRun All Below, that will start executing from the first cell under the currently selected cell, and then continue executing all cells that follow.
- From the
- At a scheduled time.
- Press the
Schedulebutton located in the top right section of your notebook panel. Here you can schedule your notebook to be executed once at some future time, or repeatedly at your specified interval.
- Press the
After running each cell of the notebook under Correlate text, the results will display.
The document similarity score is computed using the cosine distance function in NLTK module. The document similarity results can be enhanced by adding to the stop words or text tags. The words added to stop words will be ignored for comparison. The word tags from watson text classifier or any custom tags added will be accounted for the comparison.
The configuration json controls the way the text is correlated. The correlation involves two aspects - co-referencing and relation determination. The configuration json contains the rules and grammar for co-referencing and determining relations. The output from Watson Natural Language Understanding and Python NLTK toolkit is processed based on the rules and grammar specified in the configuration json to come up with the correlation of content across documents.

We can modify the configuration json to add more rules and grammar for co-referencing and determining the relations. The text content correlation results can be enhanced without changes to the code.
We can see from the 6. Visualize correlated text in the notebook the correlations between the text in the two sample documents that we provided.
