- Attach event listeners to multiple elements on the page
- Explain event propagation and identify how it can be used
- Use conditional logic in combination with event propagation to delegate events
- Use a single event handler callback to handle multiple events
- Use the
datasetattribute to store data on specific DOM elements
- When a user clicks the X on any animal, remove it from the page
- When the user clicks the Donate button on any animal, add $10 to its donation amount
- Bubbling!
- When you trigger an event on a child, the event will bubble up to all ancestor elements and trigger event handlers of the same type on all ancestors (e.g. clicking on a child activates child's event click handler AS WELL as parent's click handler)
event.stopPropagationstops the event from bubbling upwards
- The combination of conditional logic and event propagation to route events within a single event handler
- In other words, different DOM nodes can trigger different things
- Given a series of buttons deeply nested in some
<div></div>tags on our page:
<div id="helicopter-parent">
  <div>
    <br>
    <div>
      <br>
      <div>
        <p>HI</p>
        <div>
          <button data-name="alert">Alert ME</button>
          <button data-name="log">Console Log something</button>
          <button data-name="error">Console Error</button>
        </div>
      </div>
    </div>
  </div>
</div>
</div>- How might we listen for events on those buttons?
- We could find all the buttons, loop over that collection and attach several event listeners for our buttons. This should feel messy and hacky. There must be a better way!™
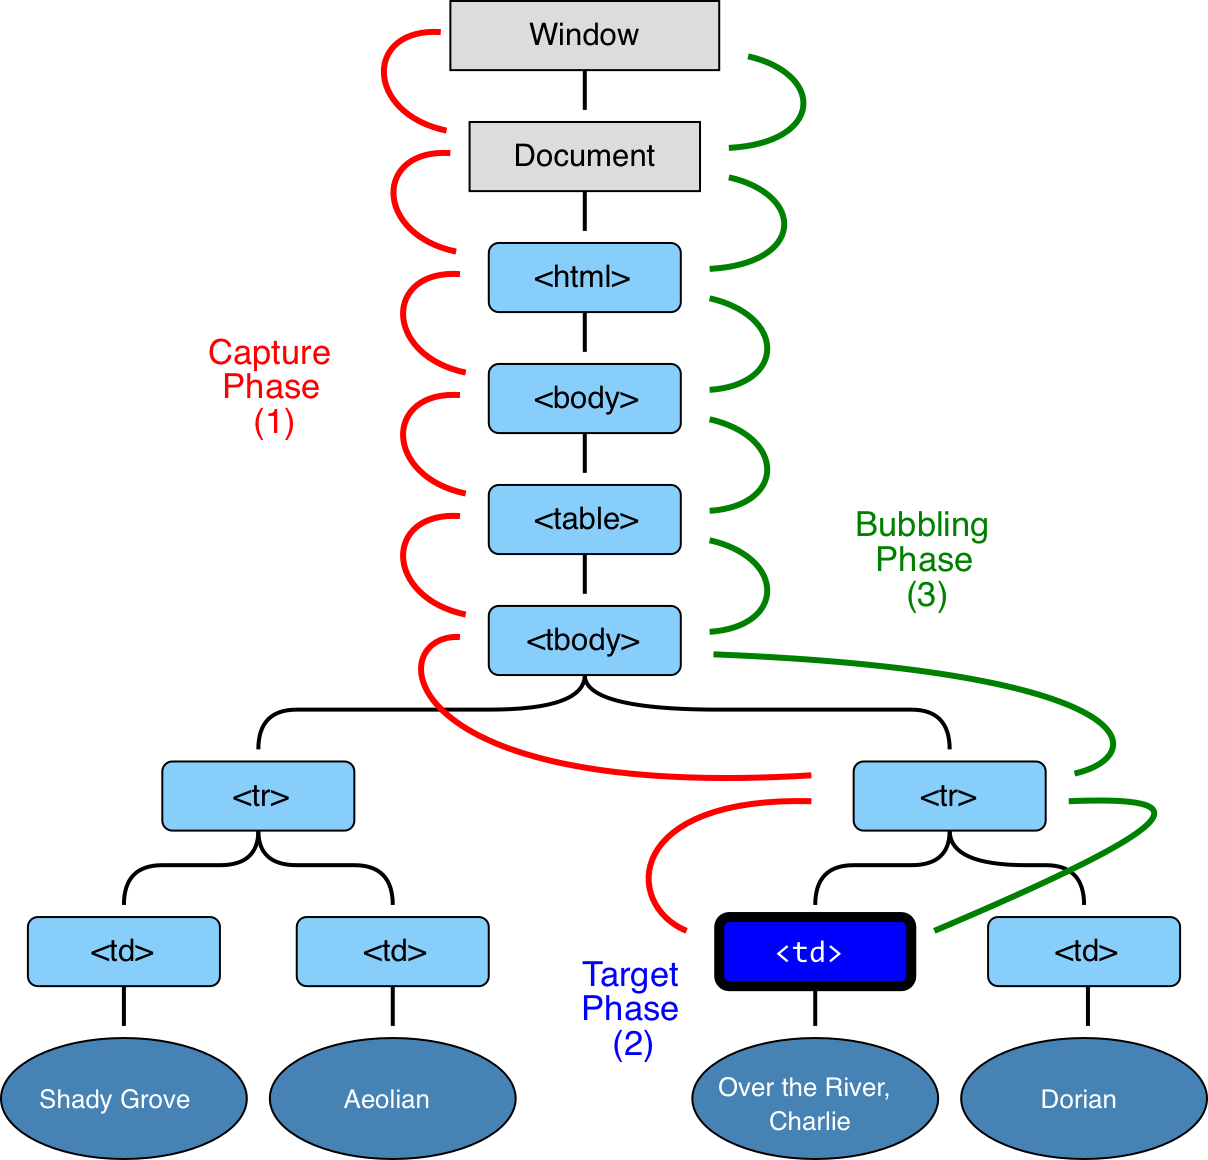
-
The diagram above outlines the flow of JS events from the target all the way up the DOM (tree) to the topmost node, the
Document- In other words, every HTML element will know about everything that happens to its children
-
Instead of iterating over the buttons and attaching duplicate event handlers, we can create one event handler to Rule Them All™:
const helicopterNode = document.getElementById('helicopter-parent')

helicopterNode.addEventListener('click', function(event) {
  console.log(event.target) //event target will be whatever node was clicked
})- Now we can introduce some control flow to our click handler and decide what to do based on which button was clicked:
helicopterNode.addEventListener('click', function(event) {
  // i do not need to prevent the click default action
  //event.target is the node that was clicked
  // our buttons have a key of dataset -> { name: 'alert' }
  // i am checking the value of button.dataset.name and deciding what to do based on what i find

  if (event.target.dataset.name === 'alert') {
    window.alert('HI')
  } else if (event.target.dataset.name === 'log') {
    console.log('HI')
  } else if (event.target.dataset.name === 'error') {
    console.error('HI')
  }
})- nice

- A way to store information on HTML DOM nodes
- Used in a variety of ways, but principally used to store information about that particular node
- HTML must have attribute of
data-<key>="<value>" - Accessible on DOM nodes via
datasetattribute as a object
For example, if I have a button like this:
<button data-action="delete" data-id="1">Delete</button>I can access the data-action and data-id attributes like this:
const btn = document.querySelector("button")
console.log(btn.dataset.action)
console.log(btn.dataset.id)
I can also set new dataset attributes:
btn.dataset.anything = "whatever I want"Note that dataset values, like all other values in HTML attributes, will be returned as strings; so if you're using an ID and expecting it to be a number, make sure to parse it.
console.log(typeof btn.dataset.id) // string
const idAsANumber = parseInt(btn.dataset.id)
console.log(typeof idAsANumber) // number