An xUnit runner for Autodesk Revit.
Check out our blog post on this 👉 https://speckle.systems/blog/xunitrevit !
xUnitRevit uses speckle.xunit.runner.wpf which is a fork of xunit.runner.wpf, it allows to easily develop and run xUnit tests in Revit.
Many thanks to all the developers of xunit and xunit.runner.wpf!
This repo is composed of 2 projects:
- xUnitRevit: the actual Revit addin
- xUnitRevitUtils: a utility library to help pass Revit data to the test libraries when running the tests
There are very few steps required to create and run your fist unit tests with xUnitRevit:
- create a copy of the config sample file and re-name the copy to
config.json - follow the instructions here to set up the config file
- build/install xUnitRevit
- create a test library
- start Revit, launch the xUnitRevit addin and select the test library
- done! Add a star ⭐ to our repo if it was useful 😉
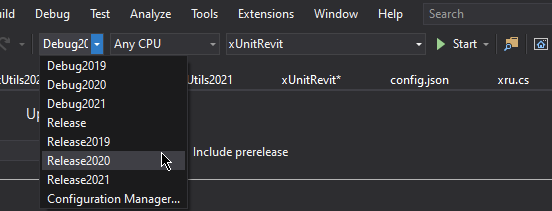
After cloning this repo, all you need to do to run xUnitRevit is to build the project in Debug mode, by selecting the build configuration that matches your Revit version.
This will build the project and copy its dlls to the Revit addin folder %appdata%\Autodesk\Revit\Addins.
You can also, similarly, build the project in Release mode, and manually copy the built files from xunit-Revit\Release.
Creating a test library is pretty straightforward, at least we tried to make it as simple as possible!
Just follow the steps below for Revit 2021:
- create a new .net framework class library project (4.8 for Revit 2021)
- add the NuGet packages
xunitxUnitRevitUtils.2021
That's it, now we can start adding our tests.
To do almost anything with the Revit API you need a reference to the active Document, and this is where xUnitRevitUtils comes into play, with its xru static class. The code below shows how we can use it to get a list of Walls and check their properties.
Full code : https://github.com/Speckle-Next/xUnitRevit/blob/master/SampleLibrary/SampleTest.cs
  [Fact]
public void WallsHaveVolume()
{
  var testModel = GetTestModel("walls.rvt");
  var doc = xru.OpenDoc(testModel);

  var walls = new FilteredElementCollector(doc).WhereElementIsNotElementType().OfCategory(BuiltInCategory.OST_Walls).ToElements();

  foreach(var wall in walls)
  {
    var volumeParam = wall.get_Parameter(BuiltInParameter.HOST_VOLUME_COMPUTED);
    Assert.NotNull(volumeParam);
    Assert.True(volumeParam.AsDouble() > 0);
  }
  doc.Close(false);
}To be able to share context between tests, xUnits uses fixtures. We can use fixtures for instance, to open a Revit model only once and use it across multiple tests.
Let's see an example, full code: https://github.com/Speckle-Next/xUnitRevit/blob/master/SampleLibrary/TestWithFixture.cs
public class DocFixture : IDisposable
{
  public Document Doc { get; set; }
  public IList<Element> Walls { get; set; }


  public DocFixture()
  {
    var testModel = Utils.GetTestModel("walls.rvt");
    Doc = xru.OpenDoc(testModel);

    Walls = new FilteredElementCollector(Doc).WhereElementIsNotElementType().OfCategory(BuiltInCategory.OST_Walls).ToElements();
  }

  public void Dispose()
  {
  }
}
public class TestWithFixture : IClassFixture<DocFixture>
{
  DocFixture fixture;
  public TestWithFixture(DocFixture fixture)
  {
    this.fixture = fixture;
  }

  [Fact]
  public void CountWalls()
  {
    Assert.Equal(4, fixture.Walls.Count);
  }

  [Fact]
  public void WallOffset()
  {
    var wall = fixture.Doc.GetElement(new ElementId(346573));
    var param = wall.get_Parameter(BuiltInParameter.WALL_BASE_OFFSET);
    var baseOffset = UnitUtils.ConvertFromInternalUnits(param.AsDouble(), param.DisplayUnitType);

    Assert.Equal(2000, baseOffset);
  }
}Another feature of xUnitRevitUtils is that it offers a helper method to run Transactions, so you don't have to worry about that 🤯! Check the example below: https://github.com/Speckle-Next/xUnitRevit/blob/master/SampleLibrary/TestWithFixture.cs
[Fact]
public void MoveWallsUp()
{
  var walls = fixture.Walls.Where(x => x.Id.IntegerValue != 346573);

  xru.RunInTransaction(() =>
  {
    foreach(var wall in walls)
    {
      var param = wall.get_Parameter(BuiltInParameter.WALL_BASE_OFFSET);
      var baseOffset = UnitUtils.ConvertToInternalUnits(2000, param.DisplayUnitType);
      param.Set(baseOffset);
    }
  }, fixture.Doc)
  .Wait(); // Important! Wait for action to finish

  foreach (var wall in walls)
  {
    var param = wall.get_Parameter(BuiltInParameter.WALL_BASE_OFFSET);
    var baseOffset = UnitUtils.ConvertFromInternalUnits(param.AsDouble(), param.DisplayUnitType);
    Assert.Equal(2000, baseOffset);
  }
}We've added a couple of optional settings for lazy developers like me, to help speed up frequent testing of a test library. You'll see a config_sample.json in the root of the project. Copy the file and rename the copy to config.json and set it to copy local = true. You'll then be able to configure
startupAssemblies: if set, automatically loads a set of assemblies when xUnitRevit startsautoStart: if true, automatically opens the xUnitRevit window after Revit loads
Dlls loaded by xUnitRevit are loaded in Revit's AppDomain, and therefore it's not possible to recompile them until Revit is closed (even if you see an auto reload option in the UI). But don't despair, since Revit 2020 it's possible to edit & continue your code while debugging, so you won't have to restart Revit each time.
As for next steps, we're planning to add additional features to run xUnitRevit from a CI/CD routine.
Stay tuned!
xUnitRevit was developed to help us develop a better Speckle 2.0 connector for Revit, we hope you'll find it useful too.
Want to suggest a feature, report a bug, submit a PR? Please open an issue to discuss first!


