- Hugging Face - Named entity recognition (NER)
- Hugging Face - Text Summarization
- Hugging Face - Question Answering
Note : For fine-tuning auto-regressive (decoder-only) LLM, see here.
Here I have used Ubuntu Server 20.04 LTS in Microsoft Azure.
Install and setup HuggingFace as follows.
# compilers and development settings
sudo apt-get update
sudo apt install -y gcc
sudo apt-get install -y make

# install CUDA 11.4.4 (because I use old generation K80 GPU)
wget https://developer.download.nvidia.com/compute/cuda/11.4.4/local_installers/cuda_11.4.4_470.82.01_linux.run
sudo sh cuda_11.4.4_470.82.01_linux.run
echo -e "export LD_LIBRARY_PATH=/usr/local/cuda-11.4/lib64" >> ~/.bashrc
source ~/.bashrc

# install and upgrade pip
sudo apt-get install -y python3-pip
sudo -H pip3 install --upgrade pip

# install pytorch with GPU accelerated
# (see https://pytorch.org/get-started/locally/ )
pip3 install torch==1.12.1 \
  torchvision==0.13.1 \
  torchaudio==0.12.1 \
  --extra-index-url https://download.pytorch.org/whl/cu114

# install sentencepiece for multi-lingual modeling
pip3 install omegaconf==2.2.3 \
  hydra-core==1.2.0 \
  fairseq==0.10.2 \
  sentencepiece==0.1.97

# install huggingface libraries
pip3 install transformers==4.23.1 \
  datasets==2.6.1 \
  evaluate==0.3.0

# install jupyter if you run code in notebook
pip3 install jupyter
Note : When you optimize training with HuggingFace-DeepSpeed integration, install the following packages and related libraries.
sudo apt-get install -y python3-mpi4py ninja-build
pip3 install deepspeed==0.7.3 accelerate==0.13.2
You can also install DeepSpeed with transformers' extras as follows.
pip3 install transformers[deepspeed]
Note : When you optimize inference also in DeepSpeed, install CUDA 10.2 instead.
After installation, please logout and login again to take effect for "jupyter" path. Then, start Jupyter notebook as follows.
This will show the access url in console, such as http://localhost:8888/tree?token=xxxxxxxxxx. (The default port is 8888.)
jupyter notebook
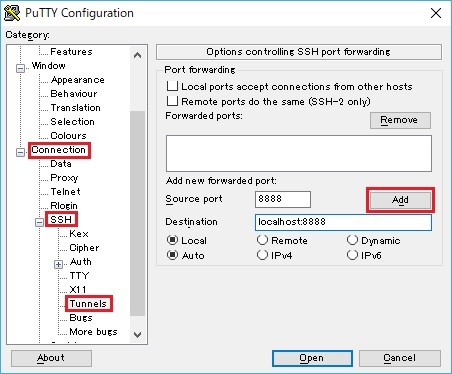
Connect to Ubuntu server with SSH tunnel (port forwarding) from your working desktop in order to access notebook URL.
For instance, the following is the SSH tunnel setting on "PuTTY" terminal client in Windows. (You can use ssh -L option in Mac OS or PowerShell.)
Copy the notebook URL (http://localhost:8888/?token=...) in the console output (see above) and open this address with your web browser.
Tsuyoshi Matsuzaki @ Microsoft
