image to images translation - Multi task pix2pix
This repository contains the codes and example images/folders for image-to-images translation.
image-to-images translation is the extended version of image-to-image translation (pix2pix) which can learn and provide two out images.
The codes are based on codes of pix2pix shared by https://github.com/affinelayer/pix2pix-tensorflow and is modified to address our desired goals.
This concept and code is used in the following researches:
https://youtu.be/J8Uth26_7rQ
which you can find more information:
https://arxiv.org/abs/1906.10089
If you found this codes usefull, please cite the following paper published by IEEE Transactions on Medical Imaging, entitled " Image-to-Images Translation for Multi-Task Organ Segmentation and Bone Suppression in Chest X-Ray Radiography": https://doi.org/10.1109/TMI.2020.2974159
Main hyperparameters: batch_size = 20 beta1 = 0.5 gan_weight = 1.0 l1_weight = 10 lr = 0.0002 ndf = 64 ngf = 64 scale_size = 512
This code is also used for following paper at IEEE ISBI conference, entitled "Joint Low Dose CT Denoising And Kidney Segmentation": https://doi.org/10.1109/ISBIWorkshops50223.2020.9153392
Main hyperparameters: batch_size = 20 beta1 = 0.5 gan_weight = 1.0 l1_weight = 10 lr = 0.0002 ndf = 64 ngf = 64 scale_size = 512 desired_l1_loss = 0.007
https://arxiv.org/abs/2105.14986
Main hyperparameters: ngf = 100 ndf = 64 kernelsize = 3 batch_size = 20 beta1 = 0.5 gan_weight = 1.0 l1_weight = 10 lr = 0.0002 scale_size = 512 desired_l1_loss = 0.01
The codes are tested by python 3.5, 3.6 and tensorflow 1.12, 1.13 and 1.14. If the training stopped with no error or message,you need gpu with more memory.
This is the version v2, which makes the cross validation automatically. The v1 is also available and located in the folder v1.
Main scripts located in scripts folder are as follow (512x512 image size):
- pix2pix_0orig_cv.py : original pix2pix
- pix2pix_MT_cv.py : Multi-task pix2pix
- pix2pix_dG_cv.py : Single-task pix2pix with dilation at stages 2 till 7 of the encoder of the generator network
- pix2pix_MTdG_cv.py : Mutlit-task pix2pix with dilation at stages 2 till 7 of the encoder of the generator network
All the scripts can be called by the arguments:
--output_dir_all path/to/dir/for/saving/outputs
--input_dir_all path/to/dir/images
--cv_info_dir path/to/dir/cv/setups
--task_No number indicating tasks: 1 and 2 for single tasks, 3 for multi-task
--desired_l1_loss desired l1 loss for early stopping
--max_epochs maximum epochs
--batch_size batch size
--seed any number e.g. 1
--l1_weight weight for l1 part in loss function
--ngf number of filters for the first layer, default 64
--lr learning rate, default 0.0002
--kernelsize size of the kernel for filters of the conv layers in generator, default 4
--patience_epochs number of patience epochs in which discriminator loss is decreasing while generator loss is increasing (i.e. discriminator starts to win), default 100
e.g.
for training with cross validation, single task, task 1, ... :
python ./Scripts/pix2pix_0orig_cv.py --output_dir_all ./Outputs --input_dir_all ./ImageData --cv_info_dir ./CV_info --task_No 1 --desired_l1_loss 0.05 --max_epochs 2000 --batch_size 2 --kernelsize 4 --seed 1 --l1_weight 10
and for multi-task:
python ./Scripts/pix2pix_MT_cv.py --output_dir_all ./Outputs --input_dir_all ./ImageData --cv_info_dir ./CV_info --task_No 3 --desired_l1_loss 0.05 --max_epochs 2000 --batch_size 2 --kernelsize 4 --seed 1 --l1_weight 10
As stated above, the defualt image size is 512x512. if you want to change it, just change the following lines in each script:
a.scale_size=512
CROP_SIZE = 512
Do not forget that, the size of images in the --input_dir_all directory should be consistent with CROP_SIZE.
If you want to use the scripts without terminal and arguments, there are simple assignments after the CombineImages() function which you can find them and edit them. They are disbaled as comments now. for example:
#a.input_dir_all='../ImageData'
#a.cv_info_dir='../CV_info'
#a.output_dir_all='../Outputs'
#a.task_No='3'
#a.max_epochs=2000
#a.desired_l1_loss=0.05
Now, we show more examples as follow.
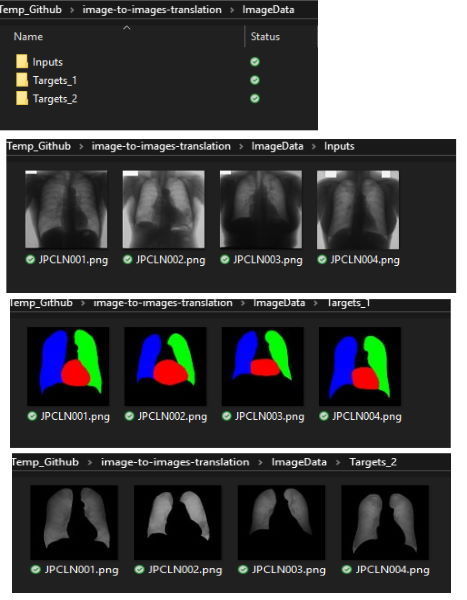
All the input images including, input, targets of tasks 1 and 2 should be placed in a folder and assigned to the input_dir_all arguments. Following image shows an example of the input folder:
For the mentioned research following datasets were used:
- Segmentation: https://www.isi.uu.nl/Research/Databases/SCR/
- Bone suppression: https://www.kaggle.com/hmchuong/xray-bone-shadow-supression
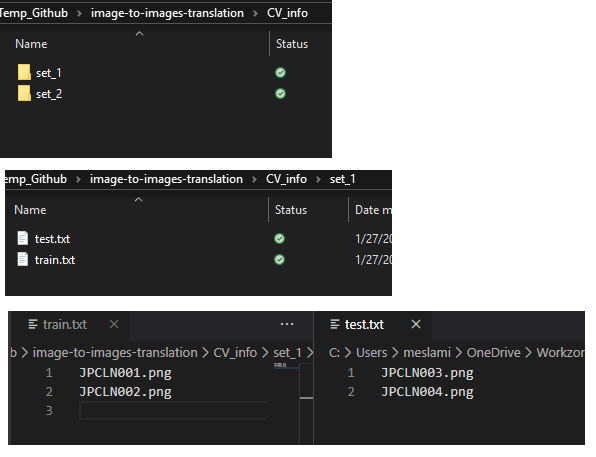
The names of image files which will be used for training/testing are deteremined by the train.txt and test.txt files which will be located in a folder and assigned to the cv_info_dir argument. Following image shows an example for 2 folds set_1 and set_2:
Do not forget to set the values of batch size, epochs, kernelsize and etc. appropriately.
With following command shells, traing and testing will be executed automatically based on the sets in cv_info_dir and therefore the models and results will be saved in output_dir_all folder.
Notice that, if the folder contains previous saved models, the code will continue training.
We can add more input arguments such as --ngf if is required.
python ./Scripts/pix2pix_0orig_cv.py --output_dir_all ./Outputs --input_dir_all ./ImageData --cv_info_dir ./CV_info --task_No 1 --desired_l1_loss 0.05 --kernelsize 4 --max_epochs 2000 --batch_size 2 --seed 1 --l1_weight 10
python ./Scripts/pix2pix_0orig_cv.py --output_dir_all ./Outputs --input_dir_all ./ImageData --cv_info_dir ./CV_info --task_No 2 --desired_l1_loss 0.05 --kernelsize 4 --max_epochs 2000 --batch_size 2 --seed 1 --l1_weight 10
python ./Scripts/pix2pix_dG_cv.py --output_dir_all ./Outputs --input_dir_all ./ImageData --cv_info_dir ./CV_info --task_No 1 --desired_l1_loss 0.05 --kernelsize 4 --max_epochs 2000 --batch_size 2 --seed 1 --l1_weight 10
python ./Scripts/pix2pix_dG_cv.py --output_dir_all ./Outputs --input_dir_all ./ImageData --cv_info_dir ./CV_info --task_No 2 --desired_l1_loss 0.05 --kernelsize 4 --max_epochs 2000 --batch_size 2 --seed 1 --l1_weight 10
python ./Scripts/pix2pix_MT_cv.py --output_dir_all ./Outputs --input_dir_all ./ImageData --cv_info_dir ./CV_info --task_No 3 --desired_l1_loss 0.05 --kernelsize 4 --max_epochs 2000 --batch_size 2 --seed 1 --l1_weight 10
python ./Scripts/pix2pix_MTdG_cv.py --output_dir_all ./Outputs --input_dir_all ./ImageData --cv_info_dir ./CV_info --task_No 3 --desired_l1_loss 0.05 --kernelsize 4 --max_epochs 2000 --batch_size 2 --seed 1 --l1_weight 10
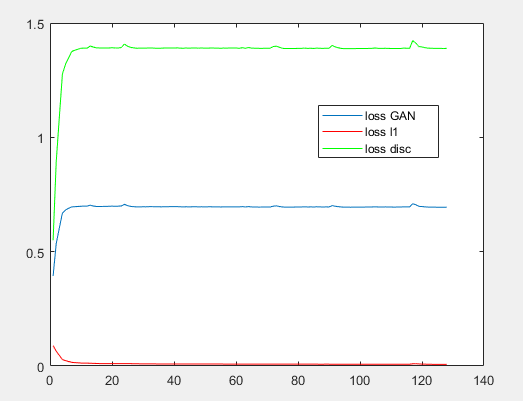
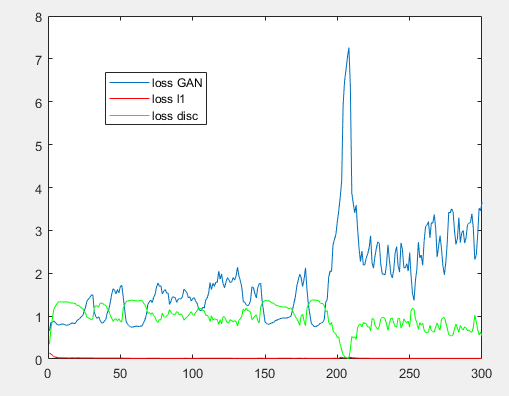
Always follow the loss values which are reported in the terminal to make sure that the GAN network works well.
for example, following image shows a training case, in which generator successfully fooled the discrimantor:

While the following case study shows that the discriminator is the winner around 200th epoch. Also, the problems was so complicated than previous case study in which the system converged easily. Here there are many struggles even before epoch 200:

It means, if we are sure about hyperparamteres (i.e. they work for other folds) we can retrain the fold, sometimes this approach work. Otherwise, we should change the hyperparameters, e.g. setting the max_epochs to 180, desired l1 loss, l1 wieght, etc.
You can also, control the training and making the early stop with pointing the --patience_epochs argument. for example,for a --patience_epochs 5, means if we have 5 sequential epochs in which discriminator is going to be better while generator is going to be worse, the train will stop, save the model and test.
The generator of the pix2pix is a U-net style network. If we want to just evaluate the network without adversarial fashion, we can use file Pr_unet_p2pGenerator.py. This file contains the only generator of pix2pix (u-net). Settings and arguments are same as above. Notice that, some arguements are not useful anymore (they were for GAN). Example of arguments are available before definition of the CreateModel().
Notice that, the u-net mentioned in paper TMI is not this network. That was the original u-net.
Similarly for multitask u-net, use Pr_Multi_unet_p2pGenerator.py.

