Wanted to get into a quick dive into observables and decided to follow up with Stalz's free course on egghead.
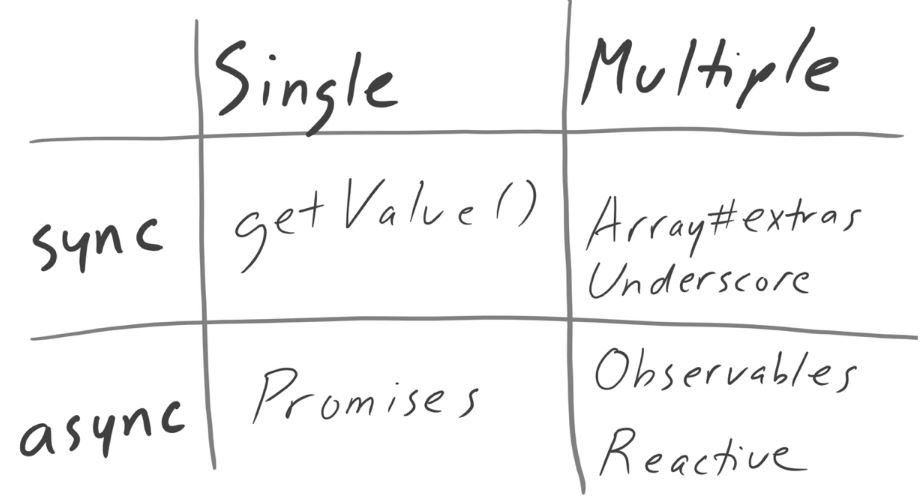
If you have never heard of observables or streams this graph will help you understand the type of data structures we're dealing with:
At the bottom of every section, you will find a JSBIN link so that you can mess with the code and see the effects.
- The Cycle.js principle: separating logic from effects
- Main function and effects functions
- Customizing effects from the main function
- Introducing run() and driver functions
- Read effects from the DOM: click events
- Generalizing run() function for more types of sources
- Making our toy driver more flexible
- Fine-grained control over the DOM Source
- Hyperscript as our alternative to template languages
- From toy Driver to real DOM driver
- Hello Wolrld! in CycleJS
- An Interactive counter in Cycle.js
- Using Cycle.JS HTTP Driver
- Body-Mass Index calculator built in Cycle.js
- Model-View-Intent pattern for seperation of concerns
// Logic
Rx.Observable.timer(0, 1000) // increment timer by 1 at each second
	.map( x => `Seconds elapsed ${x}`)
	// effects
	.subscribe( text => {
		const container = document.querySelector("#app")
		container.textContent = text
	})
Main goal of using Cycle.js => separating logic from effects
- logic: the arrangements of your orders (functional)
- effects: anything that changes the external world. (imperative)
The guiding principle is that we want to push subscribes (effects) as far away from our logic (app). In another words, we want our effects to live in the framework (cyclejs). Thus the developer will only need to take care of the logic.
Refactoring to make the code more structural and adding a console.log effect
/*********** Logic (functional) *********************/
function main () {
	return Rx.Observable.timer(0, 1000)
		.map( x => `Seconds elapsed ${x}`)
}

/***********  Effects (imperative) *********************/
function DOMEffect(text$) {
	text$.subscribe( text => {
		const container = document.querySelector("#app")
		container.textContent = text
	})
}

// To get a consoleLog Effect:
function consoleLogEffect(msg$) {
	msg$.subscribe(msg => console.log(msg))
}

// getting the observable from main
const sink = main();

DOMEffect(sink);
consoleLogEffect(sink);
In general you would want to put your effects in a function (seperated from your app)
From the previous example we were getting the same strings in both the console.log and the page -If we wanted different outputs, we'll need to set up different sinks: -In JS, we can get that outcome by returning an object with different keys: DOM and Log
/***********  Logic *********************/
function main() {
	return {
  		DOM: Rx.Observable.timer(0, 1000)
    		.map( x => `Seconds elapsed ${x}`),
    	Log: Rx.Observable.timer(0, 2000)
    		.map(x => 2 * x)
	}
}

/***********  Effects *********************/
function DOMEffect(text$) {
	return text$.subscribe(text => {
		const container = document.querySelector('#app')
		container.textContent = text;
	})
}

function consoleLogEffect(msg$) {
	msg$.subscribe(msg => console.log(msg))
}

const sinks = main();

DOMEffect(sinks.DOM) // => output on the page
consoleLogEffect(sinks.Log) // => output on the console
You can think of the sink here as a placeholder for our logic.
From the previous code, we notice that the sinks are not logic nor effects. In another words it is just helping us to make our app run. So let's abstract it away.
/***********  Logic *********************/
function main() {
	return {
  		DOM: Rx.Observable.timer(0, 1000)
    		.map( x => `Seconds elapsed ${x}`),
    	Log: Rx.Observable.timer(0, 2000)
    		.map(x => 2 * x)
	}
}

/***********  Effects *********************/
function DOMDriver(text$) {
	text$.subscribe(text => {
		const container = document.querySelector('#app')
		container.textContent = text;
	})
}

function consoleLogDriver(msg$) {
	msg$.subscribe(msg => console.log(msg))
}

/***********  Drivers *********************/
const drivers = {
	DOM: DOMDriver,
	Log: consoleLogDriver
}

function run (mainFn, drivers) {
	const sinks = mainFn();
	Object.keys(drivers).forEach( key => {
		drivers[key](sinks[key])
	})
}

run(main, drivers) // => if using JSbin you'll see the output on both the page and console
You have probably noticed that hardcoding the methods somehow makes it difficult for us to update our logic and effects. (For example getting rid of either DOM or Log)
To make our job easier instead of hard-coding the effects inside run. We can pass each logic to its corresponding effects. (experience in functional programming helps here.)
Stalz uses the variable name driver for illustration purposes: (middleware between hardware and software).
Thus far, we don't have way of getting user inputs (clicks, texts and so on). To tackle this we can borrow the data flow networks terminalogies:
- source: input (read) effects
- sink: output (write) effects
Lucky for us, Observables makes it really easy for us to the the clicks with: Rx.Observable.fromEvent(document, 'click') Let's give it a shot, by making a mokup counter app that reset itself to 0 everytime we click on the DOM.
function main(DOMSource) {
	const click$ = DOMSource;
	return {
  		DOM: click$
  			.startWith(null)
  			.flatMapLatest( () =>
  				Rx.Observable.timer(0, 1000)
  					.map(i => `Seconds elapsed ${i}`)
  			),
    	Log: Rx.Observable.timer(0, 2000)
    		.map(x => 2 * x)
	}
}

function DOMDriver(text$) {
	text$.subscribe(text => {
		const container = document.querySelector('#app')
		container.textContent = text;
	})

	// DOMSource to return all click within the page
	const DOMSource = Rx.Observable.fromEvent(document, 'click');
	return DOMSource;
}

// To get a console.log effect
function consoleLogDriver(msg$) {
	msg$.subscribe(msg => console.log(msg))
}

function run (mainFn, drivers) {
	const proxyDOMSource = new Rx.Subject();
	const sinks = mainFn(proxyDOMSource);
	const DOMSource = drivers.DOM(sinks.DOM)
	DOMSource.subscribe(click => proxyDOMSource.onNext(click));

	/* Subscribes to the dom source, get every click and feed it back to the DOM source
	onNext => pushes the event onto the proxy observable
	 */
	// Object.keys(drivers).forEach( key => {
	// 	drivers[key](sinks[key])
	// })
}

const drivers = {
	DOM: DOMDriver,
	LOG: consoleLogDriver
}

run(main, drivers)
Here we strike the heart of the matter when we start to consider the following:
	a = f(b)
	b = g(a)
	Because both a and b are observables, we can solve the matter each params proxies:
	bProxy = ...
	a = f(bProxy)
	b = g(a)
	bProxy.imitate(b)
So now every time we click on the DOM it will go to main(DOMSource) and then we can use it. This allows us to reset the timer every time the dom is clicked.
- You can think of new Rx.Subject() as a null value (observable) in RxJS. It has nothing happening until you assign something to it later.
- The onNext method pushes the event to the proxy observable.
Finally, we were able to get and write from the dom.
What we have done so far is pure RxJS. We achieved the goal of making our run function general. Now CycleJS, has a run function and we can import it with a cdn, delete our run function and replace run(main, drivers) with Cycle.run(main, drivers).
function main(Sources) {
  const click$ = Sources.DOM;
  const sinks = {
    DOM: click$
      .startWith(null)
      .flatMapLatest( () =>
        Rx.Observable.timer(0, 1000).map( x => `Seconds elapsed ${x}`)
      ),
    Log: Rx.Observable.timer(0, 2000).map( i => 2 * i)
  }
  return sinks;
}

function DOMDriver(text$) {
  text$.subscribe(text => {
    const container = document.querySelector('#app')
    container.textContent = text;
  })
  const DOMSource = Rx.Observable.fromEvent(document, 'click');
  return DOMSource;
}

function consoleLogDriver(msg$) {
  msg$.subscribe(msg => console.log(msg))
}

const drivers = {
  DOM: DOMDriver,
  Log: consoleLogDriver,
}

function run (mainFn, drivers) {
  const proxySources = {};
  Object.keys(drivers).forEach(key => {
    proxySources[key] = new Rx.Subject()
  })
  const sinks = mainFn(proxySources)
  Object.keys(drivers).forEach( key => {
    const source = drivers[key](sinks[key])
    source.subscribe(x => proxySources[key].onNext(x))
  })

}

run(main, drivers)Drivers are pluggins that allow you to make effects (without effects almost nothing happens).
Instead of just returning a string, let's return an object that defines the properties of our element.
A way to go about it is to create a function that takes an object and returns a DOM element. For instance:
function createElement(obj) {
    const element = document.createElement(obj.tagName)
    element.innerHTML = obj.children[0]
    return element;
}
Now if we get other tags on our element we will have to revert to some type of recursion. This puts us in a very powerful position where we don't have to worry about the nesting of tags anymore.
function main(Sources) {
  const click$ = Sources.DOM;
  const sinks = {
    DOM: click$
      .startWith(null)
      .flatMapLatest( () =>
        Rx.Observable.timer(0, 1000)
          .map( x => {
            return {
              tagName: 'h1',
              children: [
                {
                  tagName: 'SPAN',
                  children: [
                    `Seconds Elapsed ${x}`
                  ]
                }
              ]
            };
      })
      ),
    Log: Rx.Observable.timer(0, 2000).map( i => 2 * i)
  }
  return sinks;
}

function DOMDriver(obj$) {
  function createElement(obj) {
    const element = document.createElement(obj.tagName)
    obj.children
      .filter(c => typeof c=== 'object' )
      .map(createElement)
      .forEach( i => element.appendChild(i))
    obj.children
      .filter(c => typeof c === 'string')
      .forEach(c => element.innerHTML += c)
    return element;
  }

  obj$.subscribe(obj => {
    const container = document.querySelector('#app')
    container.innerHTML = '';
    const element = createElement(obj);
    container.appendChild(element);
  })
  const DOMSource = Rx.Observable.fromEvent(document, 'click');
  return DOMSource;
}

function consoleLogDriver(msg$) {
  msg$.subscribe(msg => console.log(msg))
}

const drivers = {
  DOM: DOMDriver,
  Log: consoleLogDriver,
}

Cycle.run(main, drivers)Sounds too generic? it does However we can specify the actual changing (behaviors). Let's say if we wanted to reset the timer on mouseover instead. That's a logic issue and therefore will have to update our main function.
=> we'll have to also update our DOMSource with the function selectEvents which takes a tagname and an eventType
=> Then return an observable
=> Then we want to make sure to filter the event to match
function main(Sources) {
  const mouseover$ = Sources.DOM.selectEvents('span', 'mouseover');
  const sinks = {
    DOM: mouseover$
      .startWith(null)
      .flatMapLatest( () =>
        Rx.Observable.timer(0, 1000)
          .map( x => {
            return {
              tagName: 'h1',
              children: [
                {
                  tagName: 'SPAN',
                  children: [
                    `Seconds Elapsed ${x}`
                  ]
                }
              ]
            };
      })
      ),
    Log: Rx.Observable.timer(0, 2000).map( i => 2 * i)
  }
  return sinks;
}

function DOMDriver(obj$) {
  function createElement(obj) {
    const element = document.createElement(obj.tagName)
    obj.children
      .filter(c => typeof c=== 'object' )
      .map(createElement)
      .forEach( i => element.appendChild(i))
    obj.children
      .filter(c => typeof c === 'string')
      .forEach(c => element.innerHTML += c)
    return element;
  }

  obj$.subscribe(obj => {
    const container = document.querySelector('#app')
    container.innerHTML = '';
    const element = createElement(obj);
    container.appendChild(element);
  })
  const DOMSource = {
    selectEvents: function (tagName, eventType) {
      return Rx.Observable.fromEvent(document, eventType)
        .filter(ev => ev.target.tagName === tagName.toUpperCase())
    }
  }
  return DOMSource;
}

function consoleLogDriver(msg$) {
  msg$.subscribe(msg => console.log(msg))
}

const drivers = {
  DOM: DOMDriver,
  Log: consoleLogDriver,
}

Cycle.run(main, drivers)To make our job easier when creating dom elements, we can create a function that takes a (tagName, children) then returns the appropriate dom element. The "h" tag is introduced because of the existence of a similar function in Cycle-DOM called hyperScript which is an alternative to a template language. Utilizing the tag function now we can simply get the templating like in Jade in a fast and easy way.
function h (tagName, children) {
  return {
    tagName: tagName,
    children: children
  }
}

function h1(children) {
  return {
    tagName: 'H1',
    children: children
  };
}

function span(children) {
  return {
    tagName: 'SPAN',
    children: children
  };
}


function main(Sources) {
  const mouseover$ = Sources.DOM.selectEvents('span', 'mouseover');
  const sinks = {
    DOM: mouseover$
      .startWith(null)
      .flatMapLatest( () =>
        Rx.Observable.timer(0, 1000)
          .map( x =>
              h1([
                  span([`Seconds Elapsed ${x}`])
              ])
          )
      ),
    Log: Rx.Observable.timer(0, 2000).map( i => 2 * i)
  }
  return sinks;
}

function DOMDriver(obj$) {
  function createElement(obj) {
    const element = document.createElement(obj.tagName)
    obj.children
      .filter(c => typeof c=== 'object' )
      .map(createElement)
      .forEach( i => element.appendChild(i))
    obj.children
      .filter(c => typeof c === 'string')
      .forEach(c => element.innerHTML += c)
    return element;
  }

  obj$.subscribe(obj => {
    const container = document.querySelector('#app')
    container.innerHTML = '';
    const element = createElement(obj);
    container.appendChild(element);
  })
  const DOMSource = {
    selectEvents: function (tagName, eventType) {
      return Rx.Observable.fromEvent(document, eventType)
        .filter(ev => ev.target.tagName === tagName.toUpperCase())
    }
  }
  return DOMSource;
}

function consoleLogDriver(msg$) {
  msg$.subscribe(msg => console.log(msg))
}

const drivers = {
  DOM: DOMDriver,
  Log: consoleLogDriver,
}


Cycle.run(main, drivers)How about if we wanted to import all the drivers? Well Cycle DOM can help us in that regard, it uses the virtual-dom underneath to avoid expensive recreation of the DOM.
const {h, h1, span, makeDOMDriver} = CycleDOM;

function main(Sources) {
  const mouseover$ = Sources.DOM.select('span').events('mouseover');
  const sinks = {
    DOM: mouseover$
      .startWith(null)
      .flatMapLatest( () =>
         Rx.Observable.timer(0, 1000)
            .map( x => h1({style: {background:'red'}},[ span([`Seconds Elapsed ${x}`]) ]))
      ),
    Log: Rx.Observable.timer(0, 2000).map( i => 2 * i)
  }
  return sinks;
}


function consoleLogDriver(msg$) {
  msg$.subscribe(msg => console.log(msg));
}

const drivers = {
  DOM: makeDOMDriver('#app'),
  Log: consoleLogDriver
};

Cycle.run(main, drivers);/**************** Fully functional Hello world {name} app *************/
const {label, input, h1, hr, div, makeDOMDriver} = CycleDOM;
function main(sources) {
const inputEv$ = sources.DOM.select('.field').events('input');
const name$ = inputEv$.map(ev => ev.target.value).startWith('');
return {
DOM: name$.map(name =>
div([
label('Name: '),
input('.field', {type: 'text'}),
hr(),
h1(`Hello ${name}`!)
])
)
};
}
const drivers = {
DOM: makeDOMDriver('#app'),
};
Cycle.run(main, drivers);The key takeaways are:
- The DOM driver (makeDOMDriver) is doing the heavy lifting.
- The main always returns an object of sinks.
- Here the DOM sink is returning an Observable.
- The observable is only returning one event (div event)
a virtual dom element - (label, input, hr and h1) at this point are write effects
- Notice that instead of "Rx.Observable.of" we have "name$", we can do this because name$ itself is an observable (getting it's value from inputEv$).
To detect the input, we need some read effects:
- The read effects come from the DOMSource (with select we can restrict our choices)
- We are importing the needed dom elements from CycleDOM
- '.field' => the first argument for the input represent its class
- The secret sauce of CycleJS is that there is a continuous loop between write and read events, thus the name.
Side-note: At some point you might wondering, why do have the .startWith('') method on name$ and as Stalz eloquently put it, you cannot map on emptiness, so you have to begin with something (ex: an empty string).
Now our goal is to build a counter app with increment and decrement buttons. Before getting into the interactivity of the app, it is recommended to get static page first. Let's dive in:
const {button, p, label, input, h1, hr, div, makeDOMDriver} = CycleDOM;

function main(sources) {
  return {
    DOM: Rx.Observable.of(
      div([
        button('.decrement','Decrement'),
        button('.increment', 'Increment'),
        p([
          label('0')
        ])
      ])
    )
  };
}

const drivers = {
  DOM: makeDOMDriver('#app'),
};

Cycle.run(main, drivers);
For the first argument on the buttons, you can set up either classes or ids with the "." or "#" selectors and if you check on your dev tools you will see the exact tags you wanted.
Now as our static page is set, let's talk about the number one spoiler urge which is wanting to set the value of an observable.
To resist the urge think about it in Fight Club style:
	Rule 1: Do not set the value of an observable
	Rule 2: Do NOT set the value of an observable
Not following the rule spoils the dynamic nature of observables, you would lose the reactive pattern and would not give you seperation of concerns.
Our goal is to declare the future value of the counter instead:
For example,  if our counter stream: counter$ started with 10, you could view it as
10 ----> 10 -----> 10 -----> 10 -----> 10
------------------> Time ------------>
So what you would want to do is merge the increment and decrement action into the stream
.scan() allows us to make this type of operation
(also named as horizontal combinator or (past combinator))

so as a dummy visual Merging example we could have:
 10 ----> (-1) ----> (-1) ----> (-1) ----> (+1) ---->
 10 ----> ( 9) ----> ( 8) ----> ( 7) ----> ( 8) ---->
For more practice on this, check out RxMarbles.
/* Final Code */

const {label, button, p, input, div, makeDOMDriver } = CycleDOM;

function main(sources) {
  const incr$ = sources.DOM.select('.increment').events('click');
  const decr$ = sources.DOM.select('.decrement').events('click');

  const incrAction$ = incr$.map(ev => +1);
  const decrAction$ = decr$.map(ev => -1);

  const counter$ = Rx.Observable.of(0)
    .merge(incrAction$).merge(decrAction$)
    .scan((prev, current) => prev + current)

  return {
    DOM: counter$.map(counter =>
      div([
        button('.increment', 'increment'),
        button('.decrement', 'decrement'),
        p([
          label([`Counter: ${counter}`])
        ])
      ])
    )
  };

}

const drivers = {
  DOM: makeDOMDriver('#app'),
};

Cycle.run(main, drivers);Now how about http drivers and observables. Yes, Cycle does have a HTTP driver.
The idea for this app is to make an http request to fetch a single piece of data from a REST server and display it on our page (DOM).
/******** For the static page *********/

const {button, p, h4, a, h1, div, makeDOMDriver} = CycleDOM;
const { makeHTTPDriver } = CycleHTTPDriver;

function main(sources) {
  return {
    DOM: Rx.Observable.of(
      div([
        button('.get-first', 'Get first user'),
        div('.user-details', [
          h1('.user-name', '(name)'),
          h4('.user-email', '(email)'),
          a('.user-website', {href: 'google.com'}, '(website)')
        ])
      ])
    )
  };
}

const drivers = {
  DOM: makeDOMDriver('#app'),
  HTTP: makeHTTPDriver()
};

Cycle.run(main, drivers);
Steps to accomplish under the hood:
- button clicked (DOM read effects) - from sources
- request sent: HTTP write effect
- response received (HTTP read effect) - from sources
- data display (DOM write effects)
Write effects are sinks and read effects are coming from the sources.
// Final Code

const { label, h4, h1, p, a, div, button, makeDOMDriver } = CycleDOM;
const { makeHTTPDriver } = CycleHTTPDriver;

function main(sources) {
  const clickAction$ = sources.DOM.select('.get-first').events('click');
  const request$ = clickAction$.map( () => {
    return {
      url: "http://jsonplaceholder.typicode.com/users/1",
      method: "GET"
    };
  });

  const response$$ = sources.HTTP.filter(response$ => response$.request.url === "http://jsonplaceholder.typicode.com/users/1");
  const response$ = response$$.switch();

  const firstUser$ = response$.map(response => response.body).startWith(null)

  return {
    DOM: firstUser$.map(firstUser =>
      div([
        button('.get-first', 'make request'),
        firstUser === null ? null: div('.user-details',[
          h1('.user-name', firstUser.name),
          h4('.user-email', firstUser.email),
          a('.user-website', {href: firstUser.website}, firstUser.website)
        ])
      ])

    ),
    HTTP: request$
  };
}

const drivers = {
  DOM: makeDOMDriver('#app'),
  HTTP: makeHTTPDriver()
};


Cycle.run(main, drivers)
Sounds like a lot? It is and you will most likely get confused (like I did) if you're not thinking about the request in a structural manner.
- The first step is outlining the four steps that are being taken
- Figure out which task come from where (read => sources, write => sinks)
Notice that we're using the endpoint from jsonplaceholdertypicode to get the data of the first user.
Explaining the reason why we are using the .switch() on response$$ would take several sentences and analogies so definitely watch the vid: if you want to learn more.
The idea here is that the user would input their height and weight to get their bodymass.
Before getting too deeply about the app's logic, let's set up the static page:
const { label, input, h3, p, a, div, button, makeDOMDriver } = CycleDOM;

function main(sources) {
  return {
    DOM: Rx.Observable.of(
      div([
        div([
          label(`weight: 00kg`),
          input('.weight', {type: 'range', min: 40, max: 150, value: 70})
        ]),
        div([
          label(`height: 00cm`),
          input('.height', {type: 'range', min: 120, max: 230, value: 160})
        ]),
        h3(`Your BMI is 000`)
      ])
    )
  }
}

const drivers = {
  DOM: makeDOMDriver('#app'),
}

Cycle.run(main, drivers)
Let's list out the different steps to take under the hood:
- read the user weight (read DOM event)
- read the user height (read DOM event)
- "calculate" the user's BMI (logic)
- Display the user's BMI, height and weight (write DOM events),
In our previous counter example, we got our way by merging two streams But because we have to calculate the BMI, we need both height and weight, we will use the method .combineLatest() instead.
// Final code
const { label, input, h3, p, a, div, button, makeDOMDriver } = CycleDOM;

function main(sources) {
  const weight$ = sources.DOM.select('.weight').events('input')
    .map(ev => ev.target.value);
  const height$ = sources.DOM.select('.height').events('input')
    .map(ev => ev.target.value);

  const state$ = Rx.Observable.combineLatest(
    weight$.startWith(70),
    height$.startWith(130),
    (weight, height) => {
      const heightInMeters = height * 0.01;
      const bmi = Math.round(weight /(heightInMeters * heightInMeters));

      return {bmi, weight, height};
    });

  return {
    DOM: state$.map( state =>
      div([
        div([
          label(`weight: ${ state.weight } kg`),
          input('.weight', {type: 'range', min: 40, max: 150, value: state.weight })
        ]),
        div([
          label(`height: ${ state.height } cm`),
          input('.height', {type: 'range', min: 120, max: 230, value: state.height })
        ]),
        h3(`Your BMI is ${ state.bmi }`)
      ])
    )
  };
}

const drivers = {
  DOM: makeDOMDriver('#app'),
};

Cycle.run(main, drivers);Our former Big main function is working properly and it's great. However we can start to get easily confused as our app grows including other features. Then starting to think of our app in a modular and small components becomes a good rule of thumb.
And here comes the Intent - Model - View pattern.
To get a hang of it let's refactor our last BMI index code with it.
const { label, input, h3, p, a, div, button, makeDOMDriver } = CycleDOM;

function intent(sources) {
  const weight$ = sources.DOM.select('.weight').events('input')
    .map(ev => ev.target.value);
  const height$ = sources.DOM.select('.height').events('input')
    .map(ev => ev.target.value);
  return { weight$, height$ }

}

function model (weight$, height$) {
  const state$ = Rx.Observable.combineLatest(
    weight$.startWith(70),
    height$.startWith(130),
    (weight, height) => {
      const heightInMeters = height * 0.01;
      const bmi = Math.round(weight /(heightInMeters * heightInMeters));

      return {bmi, weight, height};
    });
  return state$;
}

function view (state$) {
  return state$.map( state =>
    div([
      div([
        label(`weight: ${ state.weight } kg`),
        input('.weight', {type: 'range', min: 40, max: 150, value: state.weight })
      ]),
      div([
        label(`height: ${ state.height } cm`),
        input('.height', {type: 'range', min: 120, max: 230, value: state.height })
      ]),
      h3(`Your BMI is ${ state.bmi }`)
    ])
  )
}

function main(sources) {
  const { weight$, height$ } = intent(sources)
  const state$ = model(weight$, height$);
  const vtree$ = view(state$);

  return {
    DOM: vtree$
  }
}

const drivers = {
  DOM: makeDOMDriver('#app'),
};


Cycle.run(main, drivers);