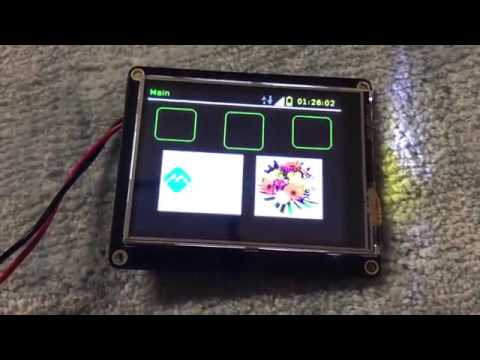
This project is a demonstration of the capabilities of Mongoose OS. It is build around two popular pieces of hardware, both available from Adafruit:
- Huzzah32 ESP32 Feather
- 2.4" TFT/TouchScreen Featherwing
- Also works for 3.5" TFT/TouchScreen Featherwing
The code is cross-platform, and will also compile and run on ESP8266 (Huzzah feather), although it will be considerably faster on the ESP32 (Huzzah32 feather).
The TFT Featherwing features three components:
- ILI9341 2.4" or 3.5" TFT screen driven by SPI
- STMPE610 Resistive touchscreen driven by SPI
- MicroSD storage device driven by SPI
The Huzzah plugs right into the TFT Featherwing for a compact device without the need for breadboards, dupont wires and the like. It's really a great platform to showcase the power of Mongoose OS.
The Huzzah uses its SPI bus to communicate with the touch sensor and the
TFT screen. Its MOSI, MISO and SCLK pins are shared with the other
devices, and it selects which slave device to communicate with by means of
three CS pins.
Peculiarities of the hardware setup:
- The TFT driver chip, ILI9341, has an additional pin called
DC, which it uses to receive blobs of data from the microcontroller. - The Touchscreen driver chip, STMPE610, has an additional pin called
IRQ, which it pulls low when a touch event has registered. The chip buffers the last 128 touch events, and the microcontroller, upon receipt of the interrupt, can read them. That means no polling or busy waiting! - The TFT Featherwing has an additional pin called
LITE, on which it accepts a 10KHz PWM signal. Setting the duty cycle to 0% turns off the backlight entirely, setting it to 100% turns on the backlight, and values in between partially dim the backlight. - The Huzzah32 has a built in 3.7V LiPo, and charges it when the device is connected to USB. Adafruit have helpfully connected the battery output to an ADC pin (A13 / GPIO35) using a 1:1 voltage divider (so a full LiPo battery at 4.2V will read out at 2.1V on the ADC channel. Note The Huzzah (ESP8266 version) does not have the battery connected to an ADC pin.
The LITE and IRQ pads on the TFT Featherwing have to be soldered to
connect them to the Huzzah:
-
Solder the
IRQpad to the top left pad. -
Solder the
LITEpad to the second from the top left pad.
See mos.yml to see which pins these pads represent on the micro controller as
they are different between Huzzah (ESP8266) and Huzzah32 (ESP32).
Here's a picture to help you find your bearings:

To showcase the idiomatic use of Mongoose OS, we will to do the following:
- Write drivers for the ILI9341 and STMPE610 chips. We've taken the native Mongoose OS SPI driver as a base -- this way, this code will run on any hardware target that Mongoose OS supports.
- Install an interrupt handler for the touch screen events.
- Install a PWM driver for the backlight.
- Install an ADC reader on GPIO35.
- Create a UI container which can display
widgets, both provided in C code, such assrc/widget_*.c, but also provided by users in a JSON configuration. - Store the JSON and image data on the provided
SPIFFSfilesystem infs/. - Interact with the user by performing actions on the
widgets. - Report on system statistics using Prometheus.
There are two main components: widgets and screens.
A widget is an object that describes a user interface element (an image, a
button, or a system widget with specific implementation behavior). System
widgets can have timers associated with them, as such they can perform
regular callbacks to redraw themselves. They are initialized with a few
variables, notably their (x,y) coordinates and width and height. They also
have a name and, optionally a user_data blob can be attached to them.
This widget exposes widget_time_ev() which gets called every second, and
displays the current NTP time.
This widget exposes widget_battery_ev() which gets called every now and
again, measures the current voltage of the attached LiPo, and draws a battery
icon in green (full), yellow (half full), or red (empty).
This widget exposes widget_wifi_ev() which gets called every 5 seconds, and
it retrieves the current WiFi signal strength (RSSI), mapping it to a value
between 0 and 100%, and draws a WiFi icon in white.
This widget exposes widget_network_ev() which gets draws two arrows, one
pointed up (for Send traffic), and one pointed down (for Recv traffic). It
has two helper functions: widget_network_send() and widget_network_recv()
which redraw the arrows in yellow, setting a 100ms timer that will redraw the
arrows in grey again.
Users can call the send and recv functions to show network activity.
This widget exposes widget_name_ev() which prints a string based on some
local state it keeps. Its event handler implements TOUCH_DOWN and TOUCH_UP
Which cycles between the app.hostname system configuration string (see
mos.yml for its defintion), the IP address, the associated WiFi SSID, and
the screen name (see below).
A screen is an object that holds the widgets. The API for screens is
meant to be simplistic: both to be able to fit in the available compute
resources of smaller micro controllers, but also to show readers how these
things work without bogging them down in overly complex code to wade through.
Users typically create a screen by:
  struct screen_t *screen;
  struct widget_t *w;
  screen=screen_create_from_file("/screen_home.json", widget_default_ev);

  // Add a custom widget
  w = widget_create("time", 240, 0, 80, 20);
  widget_set_handler(w, widget_time_ev);
  widget_set_timer(w, 1000);
screen_widget_add(screen, w);The main app installs the interrupt handler for STMPE610, which is where all
the action is. When users interact with the device, the interrupt handler
calls a callback with an event number and additional data (such as the
(x,y) coordinates, pressure, direction of the touch (TOUCH_DOWN and TOUCH_UP)
and duration of the touch.
The handler touch_handler() then looks if any widgets are covering the
(x,y) coordinates in the current screen, and if so, passes the event to a
hander for the widget (in our example above, widget_default_ev for
widgets we read from the JSON file, and widget_time_ev for the manually
added time widget.
The Featherwing has a PWM based backlight. The implementaion in
src/backlight.c shows a way to dim the screen when it is not in use.
The way this works, is by means of backlight_keepalive() which sets the
backlight on, and updates backlight_last_keepalive. A timer checks if
the last keepalive call hasn't been too long ago, and if it was, it initiates
a screen dimmer by setting a new target duty cycle and time to get to that
target (usually 1000ms). Then it'll start a repeating a 20ms timer that dims
the backlight until the target it reached, after which it deinstalls itself.
See backlight_fader_cb() for details. Very slick!
If the screen is off, backlight_active() will return false. The main
touch_handler() (the one that gets interrupts from the STMPE610), will
ignore the first TOUCH_DOWN and TOUCH_UP events in that case, but it
will wake up the screen again by calling backlight_keepalive().
The application includes Prometheus Metrics which allows users to export metrics to a monitoring system. The library comes with several Mongoose OS specific metrics (such as memory, build platform, MQTT statistics, etc), but also allows users to add handlers of their own.
For example, the battery widget installs a callback adding one such metric
(the measured battery voltage).
Unit tests are an incredibly important tool for any software engineer. The
author wrote the widget and screen implementations by means of test based
engineering, in which the code is written by first authoring tests, and then
making the tests pass. This is a wonderful way to prove non-trivial
implementations.
See the unittest/Makefile for a compilable target (on Linux at least). It
runs tests against the code, ensuring that timers are set and removed,
object creation and destruction are working, and getters/setters and other
code operates as designed.
Several pieces of code were borrowed from other authors. In particular, kudos go to the following fine individuals:
- Espressif Systems for the awesome ESP8266 and ESP32 microcontrollers.
- LoBo (loboris@GitHub) for a reference ILI9341 driver for ESP32 (which the author rewrote to use native Mongoose OS SPI).
- Adafruit for inspiration on the STMPE610 driver (which the author rewrote to support interrupts), as well as the fonts.
- Lode Vandevenne and Sean Middleditch for the uPNG code to handle PNG images.
- Cesanta for Mongoose OS, Mongoose, and the JSON
frozenlibrary.