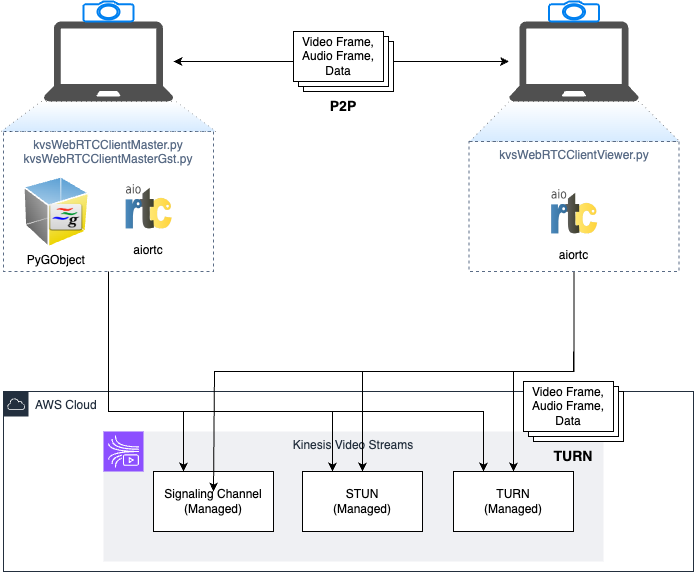
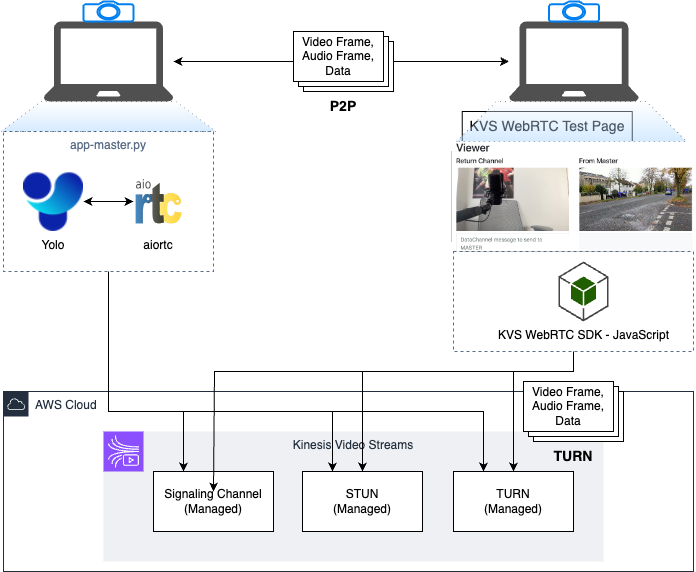
The python-samples-for-amazon-kinesis-video-streams-with-webrtc repository provides a Python-based solution for transmitting media using Amazon Kinesis Video Streams (KVS) with WebRTC. It addresses the challenge of the lack of a dedicated Python library for KVS WebRTC by utilizing the WebRTC standard. This implementation demonstrates how to leverage WebRTC for real-time communication, enabling secure, low-latency media streaming and two-way interaction between IoT devices and WebRTC-compliant web or mobile applications.
Clone the repo:
git clone https://github.com/aws-samples/python-samples-for-amazon-kinesis-video-streams-with-webrtc.git
cd python-samples-for-amazon-kinesis-video-streams-with-webrtc
To manually create a virtualenv on macOS and Linux:
python3 -m venv .venvAfter the init process completes and the virtualenv is created, you can use the following step to activate your virtualenv.
source .venv/bin/activateOnce the virtualenv is activated, you can install the required dependencies.
Note
One of the dependencies is YOLOv8 and it is distributed under the GPLv3 license.
pip install -r requirements.txtInstall this if you are going to test GStreamer samples.
sudo apt-get install pkg-config libssl-dev libcurl4-openssl-dev libgstreamer1.0-dev libgstreamer-plugins-base1.0-dev
sudo apt install gstreamer1.0-tools gstreamer1.0-plugins-base-apps gstreamer1.0-plugins-good gstreamer1.0-plugins-bad gstreamer1.0-plugins-ugly gstreamer1.0-libav
sudo apt-get install libcairo2-dev libgirepository1.0-dev gir1.2-glib-2.0

find /usr -name gst-plugin-scanner
export GST_PLUGIN_SCANNER=/usr/lib/x86_64-linux-gnu/gstreamer1.0/gstreamer-1.0/gst-plugin-scannerbrew install gstreamerYou will use the AWS CLI to get temporary credentials for AWS authentication. If you have not already set up the AWS CLI on the PC for operation, follow the steps: Installing the AWS CLI and Configuring the AWS CLI.
- In the terminal of your device or local terminal, execute the following:
python script/getTemporaryCredentialsAWSCli.pyoutput
This is the temporary credential valid for 43199 seconds.
Paste them in your shell!

export AWS_ACCESS_KEY_ID=AXXXXXXXXXXXXX7
export AWS_SECRET_ACCESS_KEY=fXXXXXXXXXXXXXXXX4
export AWS_SESSION_TOKEN=FXXXXXXXXXXXXXXXX0
export AWS_DEFAULT_REGION=usXXXX2- Execute the copied output to the terminal of the machine where you want to
export AWS_ACCESS_KEY_ID=AXXXXXXXXXXXXX7
export AWS_SECRET_ACCESS_KEY=fXXXXXXXXXXXXXXXX4
export AWS_SESSION_TOKEN=FXXXXXXXXXXXXXXXX0
export AWS_DEFAULT_REGION=usXXXX2-
login to the AWS Console
-
Make sure that you are in the AWS region that you want to deploy your resources to
-
Start CloudShell
-
Upload getTemporaryCredentialsCloudShell.py to CloudShell
-
Run getTemporaryCredentialsCloudShell.py retrieve temporary credentials from AWS_CONTAINER_CREDENTIALS_FULL_URI
In your CloudShell
python getTemporaryCredentialsCloudShell.py
output
This is the temporary credential valid for 43199 seconds.
Paste them in your shell!

export AWS_ACCESS_KEY_ID=AXXXXXXXXXXXXX7
export AWS_SECRET_ACCESS_KEY=fXXXXXXXXXXXXXXXX4
export AWS_SESSION_TOKEN=FXXXXXXXXXXXXXXXX0
export AWS_DEFAULT_REGION=usXXXX2
-
Execute the copied output to the terminal of the machine where you want to
In your device or local terminal
export AWS_ACCESS_KEY_ID=AXXXXXXXXXXXXX7
export AWS_SECRET_ACCESS_KEY=fXXXXXXXXXXXXXXXX4
export AWS_SESSION_TOKEN=FXXXXXXXXXXXXXXXX0
export AWS_DEFAULT_REGION=usXXXX2
Note
CDK to deploy all the necessary resources including signaling_channel is in infra folder. We will be using CloudShell to deploy it.
-
Navigate to python-samples-for-amazon-kinesis-video-streams-with-webrtc folder
-
zip infra folder
zip -r infra.zip infra
-
Login to the AWS Console
-
Make sure that you are in the AWS region that you want to deploy your resources to
-
Start CloudShell
-
Upload infra.zip to CloudShell
-
unzip infra.zip
In your CloudShell
unzip infra.zip
-
Go to infra folder
cd infra -
Update CDK
sudo npm install -g aws-cdk
-
Create a virtualenv:
python -m venv .venv
-
activate your virtualenv.
source .venv/bin/activate -
Install the required dependencies.
pip install -r requirements.txt
-
Bootstrap environment with the AWS CDK (One Time)
cdk bootstrap
-
You can now synthesize the CloudFormation template for this code.
cdk synth
-
Deploy CDK
cdk deploy
-
Run write_certs.py to download IoT device Certificates to the script-output folder.
python write_certs.py
-
Verify the files in script-output folder
ls -a script-output
output
. .. device.cert.pem device.private.key .env rootca.pem -
zip script-output folder
zip -r script-output.zip script-output
-
Download script-output.zip to local infra folder
- Individual file path:
infra/script-output.zip
- Individual file path:
-
unzip script-output.zip in infra folder In your device or local terminal
cd infra
unzip script-output.zip
ls -a script-output
output
. .. .env device.cert.pem device.private.key rootca.pem
This step creates a signaling channel for the WebRTC Master and Viewer.
- login to the AWS Console
- Make sure that you are in the AWS region that you want to deploy your resources to
- Start CloudShell
- If a channel has already been created, check the ARN value for that channel by running the following command.
aws kinesisvideo describe-signaling-channel --channel-name kvs-demo-channel --region AWS_DEFAULT_REGION
- Create a signaling channel for the WebRTC Master and Viewer.
aws kinesisvideo create-signaling-channel --channel-name kvs-demo-channel --region AWS_DEFAULT_REGION
We will use the channel ARN information returned by executing the above command in the next step.
| Directory | File | Description |
|---|---|---|
| simple | kvsWebRTCClientMaster.py | Master client for KVS WebRTC: Manages media tracks and signaling, supporting various OS inputs via aiortc. |
| simple | kvsWebRTCClientViewer.py | Viewer client for KVS WebRTC: Handles media tracks and signaling, compatible with multiple OS through aiortc. |
| simple | kvsWebrtcClientMasterGst.py | Master client for KVS WebRTC: Utilizes GStreamer for advanced media processing and conversion. |
| ml/yolov8 | app-master-infer-self.py | Master client for KVS WebRTC: Offers optional YOLO object detection for real-time processing. |
Use video file as a media source
python source/simple/kvsWebRTCClientMaster.py --channel-arn arn:aws:kinesisvideo:[region]:[account-number]:channel/[channel-name]/[number] --file-path [your-video-file]Use camera as a media source
python source/simple/kvsWebRTCClientMaster.py --channel-arn arn:aws:kinesisvideo:[region]:[account-number]:channel/[channel-name]/[number]Use video file as a media source
python source/simple/kvsWebRTCClientViewer.py --channel-arn arn:aws:kinesisvideo:[region]:[account-number]:channel/[channel-name]/[number] --file-path [your-video-file]Use camera as a media source
python source/simple/kvsWebRTCClientViewer.py --channel-arn arn:aws:kinesisvideo:[region]:[account-number]:channel/[channel-name]/[number]python source/simple/kvsWebrtcClientMasterGst.py --channel-arn arn:aws:kinesisvideo:[region]:[account-number]:channel/[channel-name]/[number] Use video file as a media source
python source/ml/yolov8/app-master-infer-self.py ---channel-arn arn:aws:kinesisvideo:[region]:[account-number]:channel/[channel-name]/[number] --file-path [your-video-file] --mode=yoloUse camera as a media source
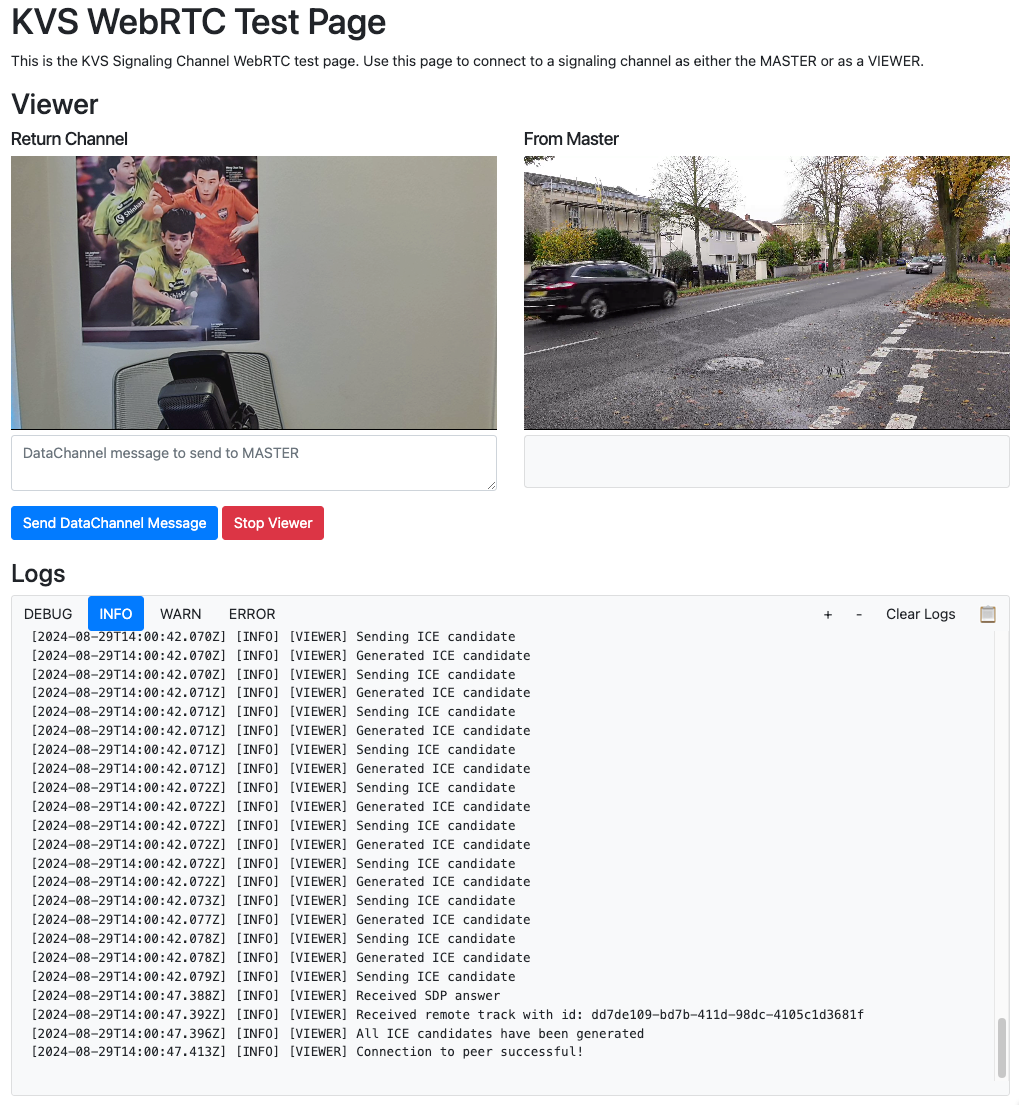
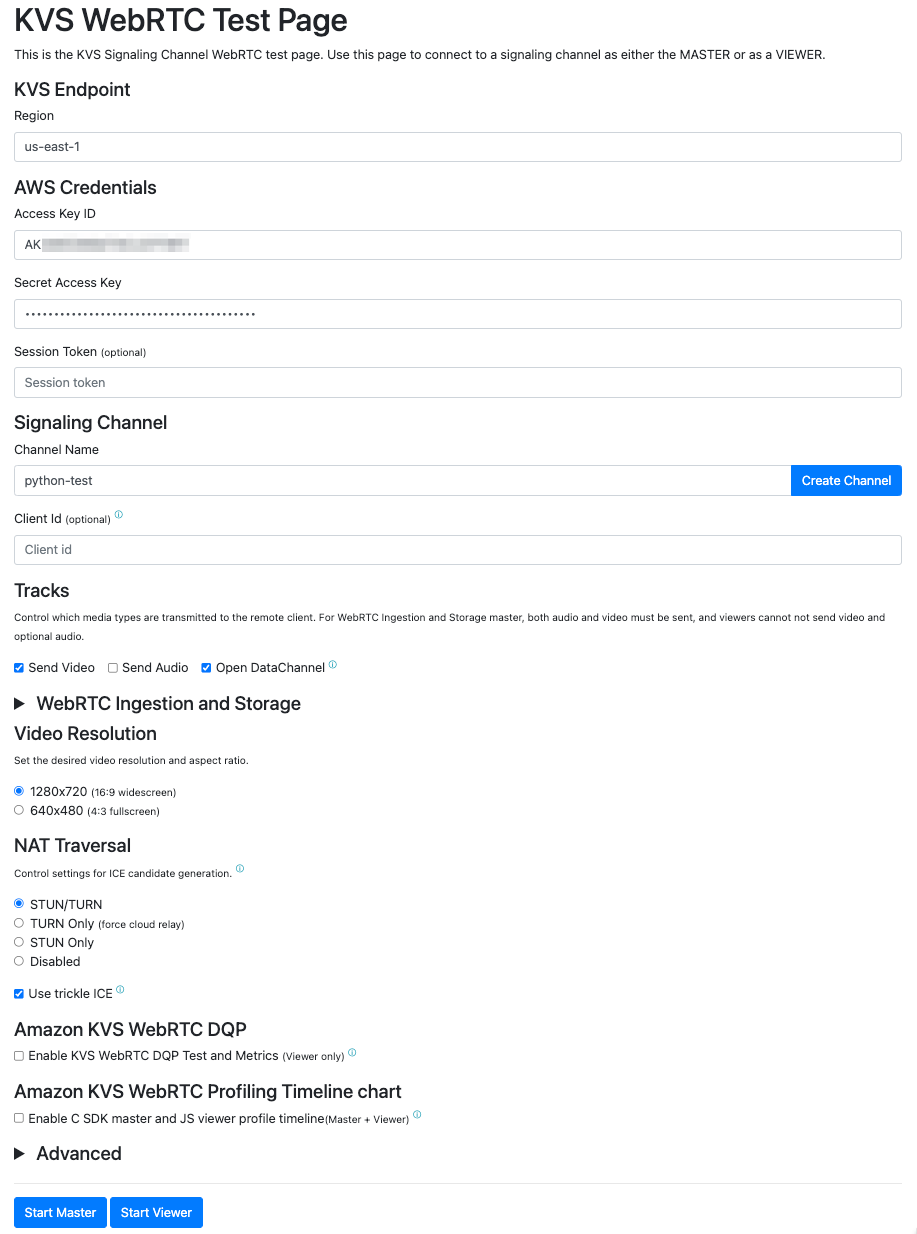
python source/ml/yolov8/app-master-infer-self.py --channel-arn arn:aws:kinesisvideo:[region]:[account-number]:channel/[channel-name]/[number] --mode=yoloTo experiment with the WebRTC aspects of this project, you can use the Kinesis Video Streams WebRTC Test Page. This page is built using the WebRTC JS SDK and allows you to:
- Act as both a master and a viewer
- Experiment with different ICE Candidate configurations
- Enable/disable Trickle ICE
- Enforce TURN usage
- Enforce specific ICE candidates
-
Navigate to the KVS WebRTC Test Page
-
Enter the following details:
- Region: [REGION_NAME] (where your signaling channel is created)
- Access Key ID: [AWS_ACCESS_KEY_ID]
- Secret Access Key: [AWS_SECRET_ACCESS_KEY]
- Session Token: [AWS_SESSION_TOKEN]
- Channel Name: kvs-demo-channel (must match the signaling channel used by the master or viewer)
- Run the kvsWebRTCClientMaster.py script.
- Start a viewer on the Kinesis Video Streams WebRTC Test Page.
-
Start a master on the Kinesis Video Streams WebRTC Test Page.
- Note: Always start the master before the viewer.
-
Run the kvsWebRTCClientViewer.py script.
These steps allow you to test both the master and viewer functionalities of your WebRTC application using the Kinesis Video Streams test page and your Python scripts.

This demo shows that Amazon Kinesis Video Streams with WebRTC can be implemented in Python. This demo does not officially represent the Python SDK, nor is it officially supported by AWS. AWS is not responsible for issues that may occur when using this demo in a production environment.


