PMP is a platform for managing task lists for projects. Create tasks. Assign them to employees.
This app features a custom made Interpreter for creating/deleting a large amount tasks at once.
In order to access the PMP platform, a manager will create an account. During the account creation the manager will list the emails of the team members they want on their team. More team members can be added at a later time. The team members will recieve emails that allow them to setup their account password and settings.
- Go to the signup page
- Enter a valid email and password
- Enter the emails of the employees to add to the platform
- Confirm your account settings
As an employee your first time login link will be sent to you by email, where you will then be able to set your account password. Once your password is set you will be able to login from the main portal.
Tasks can be created either via the create task bar or the batch new tasks popup:
First open the Create Task Bar:
- Click
Viewin the top left navigation menu - Hover over
Taskbars - Click
Show Create Task
Enter the task information into the relevant fields. The task will not add if the task or teams fields are left blank.
Next click Add Task To Database. The task will add and the bar will automatically close.
If you would like to add multiple tasks, ensure the Keep Open option is checked.
If you are adding large amounts of tasks that use similar formatting, it is much more efficient to use the Batch New Tasks feature.
Multiple tasks can be added to the database by using a single template.
Templates can be very quickly written using strings, although it will likely be much easier to intially use the wizard to generate the correct template string.
To learn how to write templates, see the template syntax section of this document.
To open the wizard for a template input, click the ⚡ button next to the corresponding form.
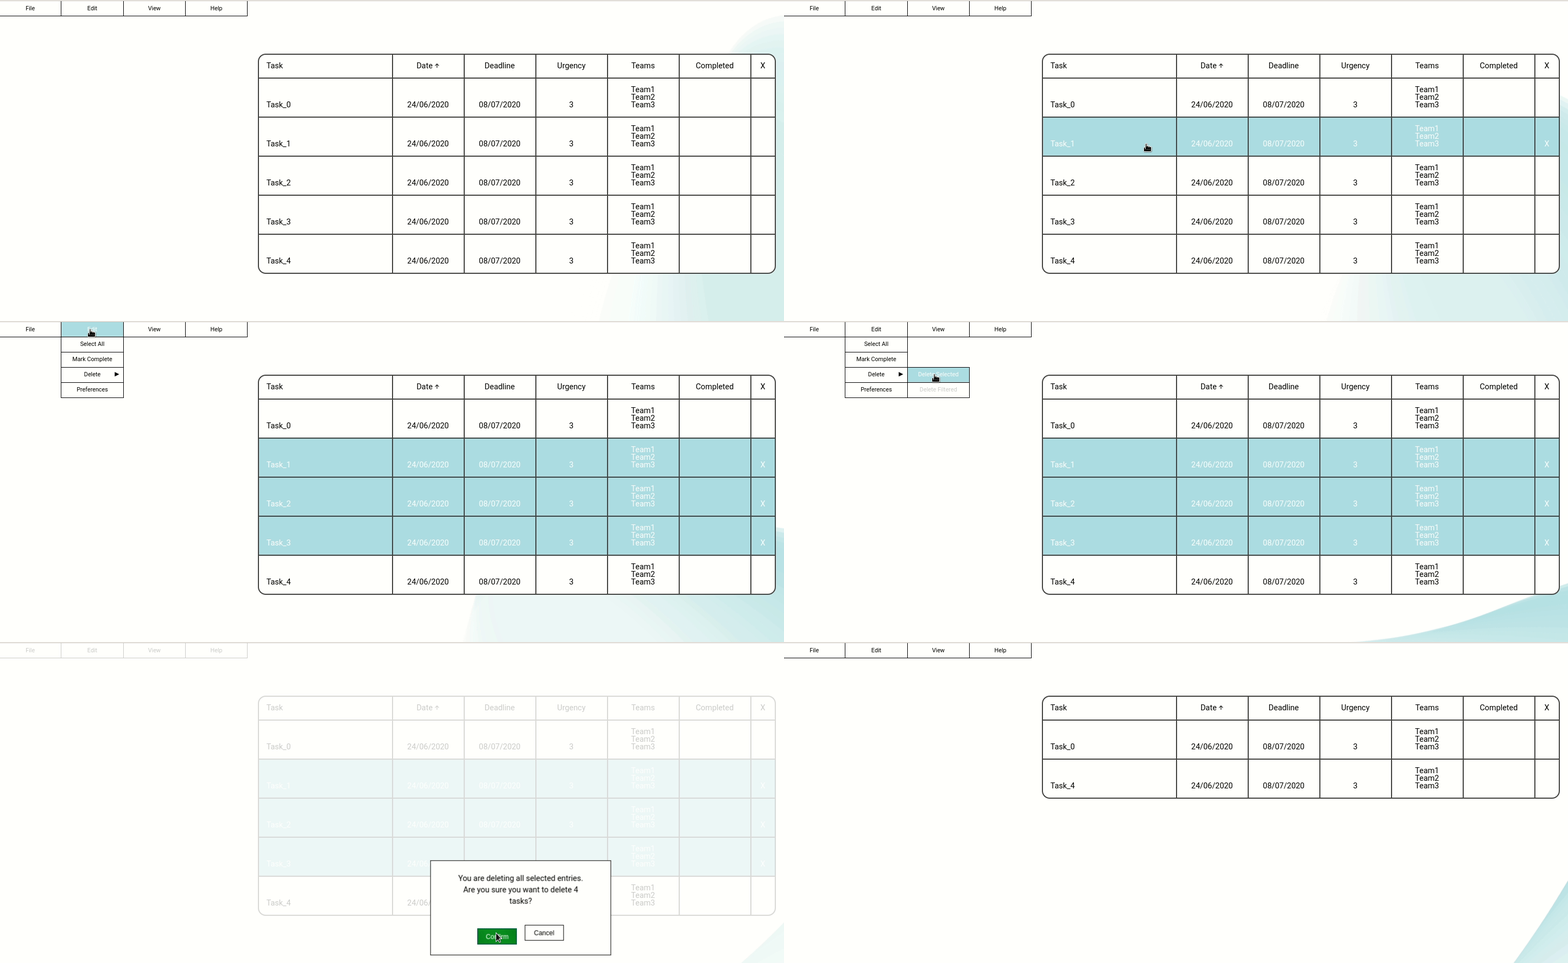
Tasks can be deleted either via selecting manually or batch deleting by matching regex/parameters:
- Select the tasks to delete by clicking and dragging over them
- Click
Editin the top left navigation menu - Hover over
Delete - Click
Delete Selected
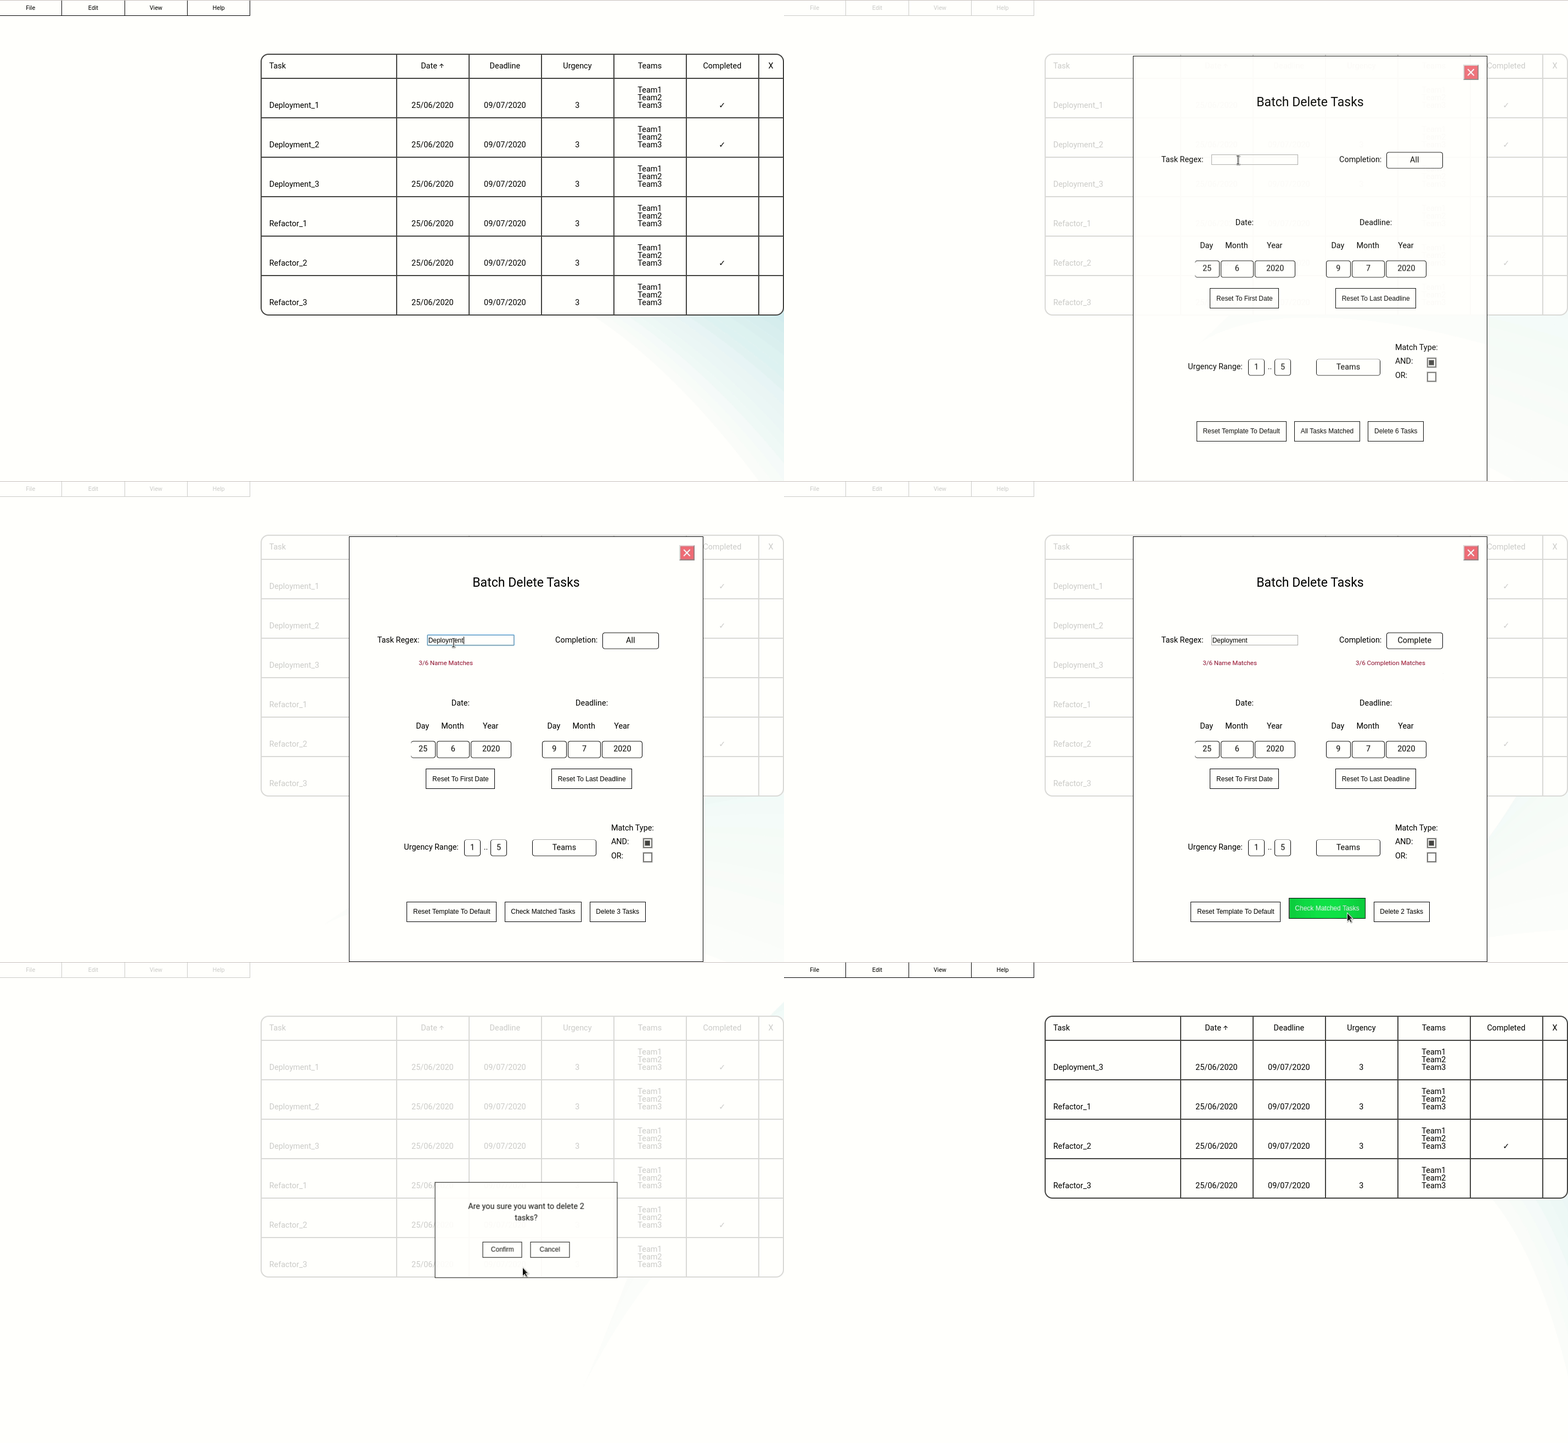
First open the Batch Delete Tasks popup:
- Click
Filein the top left navigation menu - Click
Delete Tasks
For this example all completed tasks named "Deployment" tasks will be checked and then deleted:
- Click in the
Task Regexform - Type
"Deployment" - Click the
Completiondropdown - Select
Complete - Click the
Check Matched Tasksbutton
The matched tasks to be deleted will then be displayed.To delete:
- Click the
Delete 𝑥 Tasksbutton - Click the
Confirmbutton
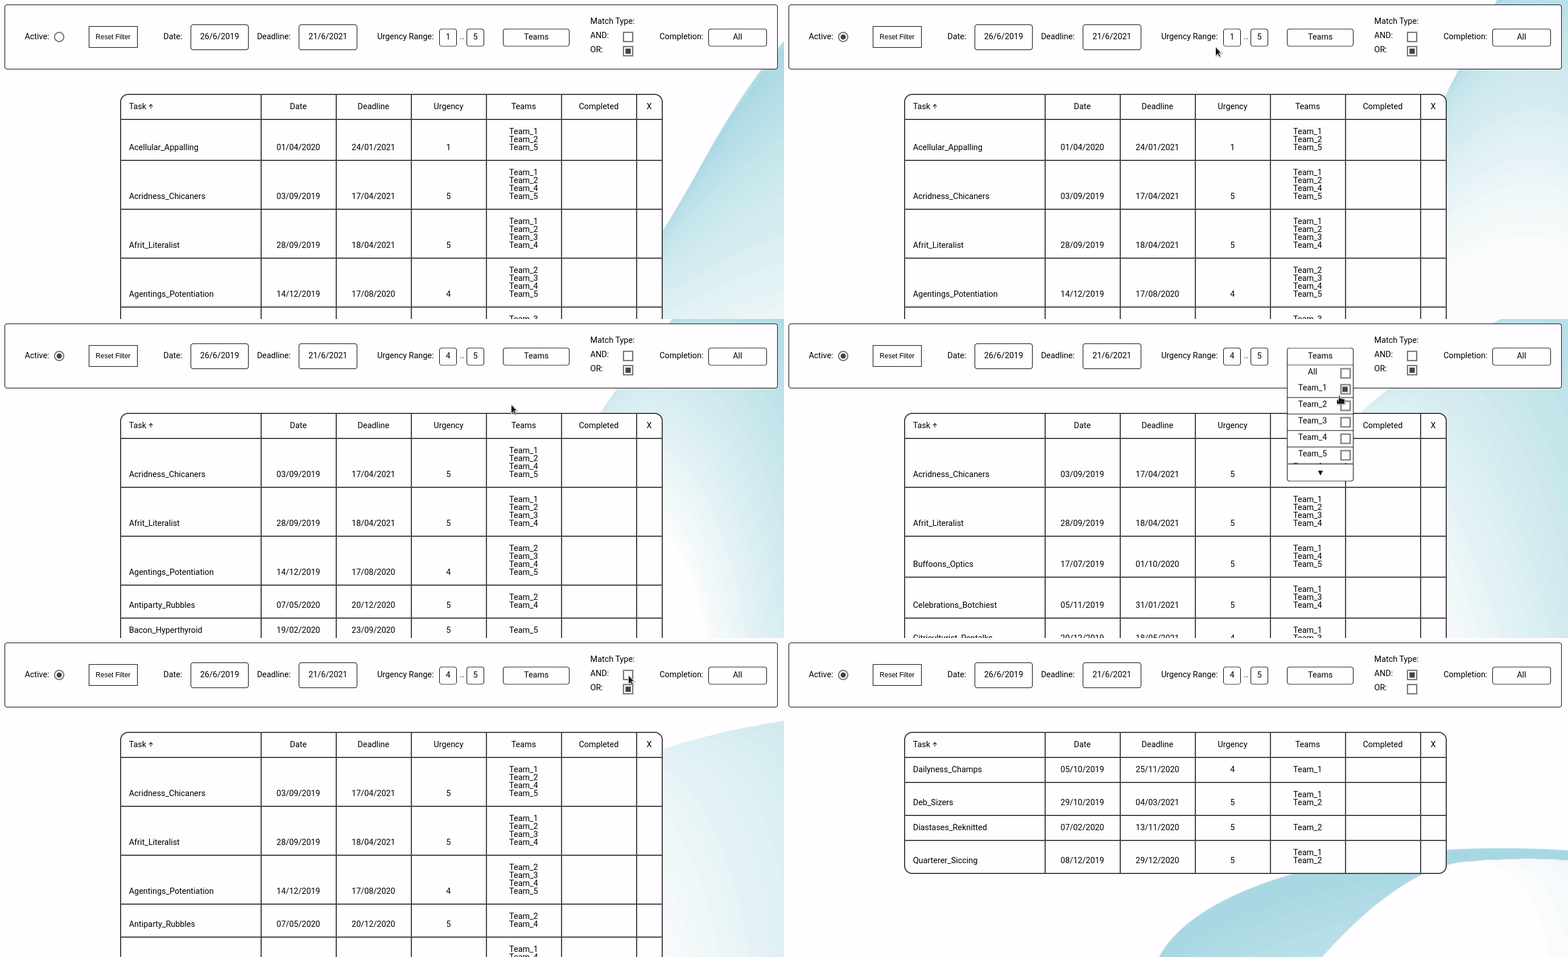
The task list can be filtered for tasks that meet a specific set of criterion.
Open the filter via the following method:
- Click on
Viewin the top left navigation menu - Hover over
Taskbars - Click
Show Filter
For this example the task list is filtered for tasks that are highly urgent and involve only the 2 main teams:
- Select the
Activecheckbox to turn on the filter - Set
Urgency Rangeto minimum4 - For the
Teamsdropdown, selectTeam 1&Team 2 - Set
Match TypetoAND
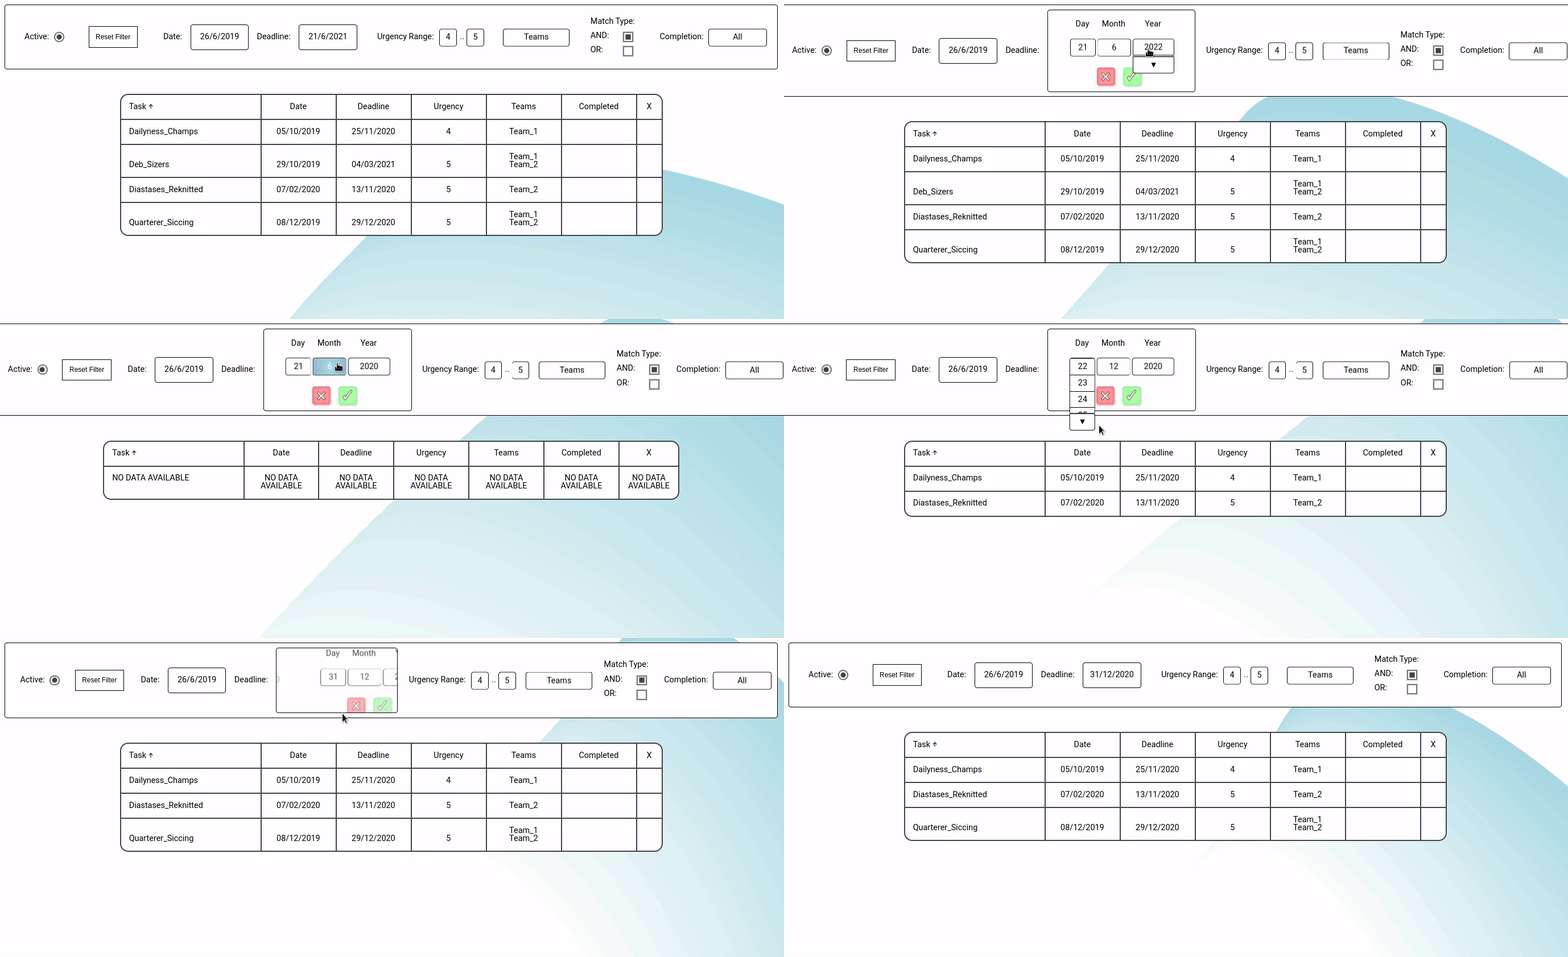
To further the example, the filtered list only needs to include tasks that have a deadline in the year 2020:
- Click the
Deadlinedate - Set the date to
31/12/2020 - Click the
✓button
${n/l, #, a/d}
Where:
nis number,lis letter#is number of digits, (skipped for letter)ais ascending,dis descending
Examples:
BackendTest_${n}with 3 tasks would output:[BackendTest_0, BackendTest_1, BackendTest_2]FrontendTest_${n,3,d}with 3 tasks would output:[FrontendTest_002, FrontendTest_001, FrontendTest_000]Review_${l}with 4 tasks would output:[Review_a, Review_b, Review_c, Review_d]feature_${l,d}with 5 tasks would output:[feature_z, feature_y, feature_x, feature_w, feature_v]
${#/#/#} +/- # n d/w/m/y
Where:
${#/#/#}is the date/month/year (usetinstead of a number for today's date/month/year)+or-#is the date modification multipliernis the task number index (leave out for static modification)d/w/m/yis the unit of the modification (day, week, month or year)
Note:
${t}is shorthand for${t/t/t}, today's date.
Multiple modifications can be applied to one date (i.e. ${t} + nd + 5y - w)
Examples:
${1/1/2020}+2ndwith 5 tasks would output:[1/1/2020, 1/3/2020, 1/5/2020, 1/7/2020, 1/9/2020]${31/10/2020}+5ywith 3 tasks would output:[31/10/2025, 31/10/2025, 31/10/2025]${24/2/2020}-2nwwith 5 tasks would output:[24/2/2020, 10/2/2020, 27/1/2020, 13/1/2020, 30/12/2019]${10/5/2021}-3nm+nywith 4 tasks would output:[10/5/2021, 10/2/2022, 10/11/2022, 10/8/2023]
Authentification is not yet implemented. Once implemented the manager account will be able to view the complete task list and assign tasks to individual teams. A team account will only be able to view the tasks assigned to them and tick them off as they are completed.


