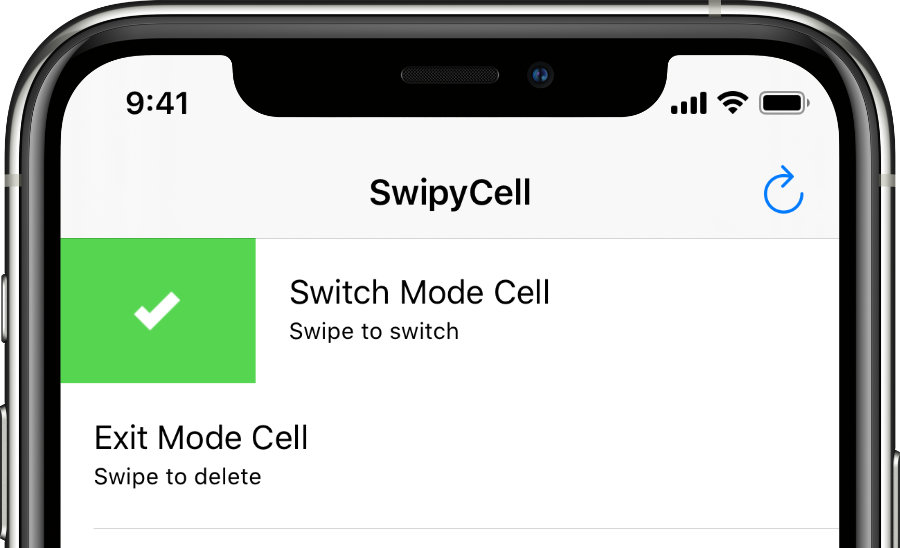
Swipeable UITableViewCell inspired by the popular Mailbox App, implemented in Swift.
The .exit mode is the original behavior, known from the Mailbox app.
The .toggle is another behavior where the cell will bounce back after swiping it.
Swift Package Manger is Apples first party tool for managing distribution of source code, aimed at making it easy to share your code and reuse others’ code.
To use the SwipyCell library in a SwiftPM project, add the following line to the dependencies in your Package.swift file:
.package(url: "https://github.com/moritzsternemann/SwipyCell", .upToNextMinor(from: "4.1.0")),CocoaPods is a dependency manager for Cocoa projects.
To integrate SwipyCell into your project using CocoaPods, add it to your Podfile:
pod 'SwipyCell', '~> 4.1'
Carthage is a decentralized dependency manager that automates the process of adding frameworks to your Cocoa application.
To integrate SwipyCell into your project using Carthage, add it to your Cartfile:
github "moritzsternemann/SwipyCell" >= 4.1
A complete example is available in the Example directory. The following code is a very basic example:
override func tableView(_ tableView: UITableView, cellForRowAt indexPath: IndexPath) -> UITableViewCell {
    let cell = tableView.dequeueReusableCell(withIdentifier: "cell", for: indexPath) as! SwipyCell
    cell.selectionStyle = .gray
    cell.contentView.backgroundColor = UIColor.white

    let checkView = viewWithImageName("check")
    let greenColor = UIColor(red: 85.0 / 255.0, green: 213.0 / 255.0, blue: 80.0 / 255.0, alpha: 1.0)

    let crossView = viewWithImageName("cross")
    let redColor = UIColor(red: 232.0 / 255.0, green: 61.0 / 255.0, blue: 14.0 / 255.0, alpha: 1.0)

    let clockView = viewWithImageName("clock")
    let yellowColor = UIColor(red: 254.0 / 255.0, green: 217.0 / 255.0, blue: 56.0 / 255.0, alpha: 1.0)

    let listView = viewWithImageName("list")
    let brownColor = UIColor(red: 206.0 / 255.0, green: 149.0 / 255.0, blue: 98.0 / 255.0, alpha: 1.0)

    cell.defaultColor = tableView.backgroundView?.backgroundColor
    cell.delegate = self

    cell.textLabel?.text = "Switch Mode Cell"
    cell.detailTextLabel?.text = "Swipe to switch"

    cell.addSwipeTrigger(forState: .state(0, .left), withMode: .toggle, swipeView: checkView, swipeColor: greenColor, completion: { cell, trigger, state, mode in
        print("Did swipe \"Checkmark\" cell")
    })

    cell.addSwipeTrigger(forState: .state(1, .left), withMode: .toggle, swipeView: crossView, swipeColor: redColor, completion: { cell, trigger, state, mode in
        print("Did swipe \"Cross\" cell")
    })

    cell.addSwipeTrigger(forState: .state(0, .right), withMode: .toggle, swipeView: clockView, swipeColor: yellowColor, completion: { cell, trigger, state, mode in
        print("Did swipe \"Clock\" cell")
    })

    cell.addSwipeTrigger(forState: .state(1, .right), withMode: .toggle, swipeView: listView, swipeColor: brownColor, completion: { cell, trigger, state, mode in
        print("Did swipe \"List\" cell")
    })

    return cell
}
SwipyCellState represents a sliding state, for example the first state to the left of the cell.
The possible values are
.none- center position of the cell.state(index, side)- index of the state from near to far and side of the state, each relative to the cell
SwipyCellMode as shown above.
SwipyCellTriggerBlock is a typealias for
(SwipyCell, SwipyCellTrigger, SwipyCellState, SwipyCellMode) -> Void
Adding swipe triggers to cells is easy using this method:
func addSwipeTrigger(forState: SwipyCellState, withMode: SwipyCellMode, swipeView: UIView, swipeColor: UIColor, completion: SwipyCellTriggerBlock)forStateat which the trigger should activatewithModefor the triggerswipeView: e.g. display an iconswipeColor: backgroundColor of the swipeViewcompletion: called after the swipe gesture has ended, only if the trigger point was reached
SwipyCell provides three delegate methods in order to track the users behaviors.
// When the user starts swiping the cell this method is called
func swipyCellDidStartSwiping(_ cell: SwipyCell)

// When the user ends swiping the cell this method is called
func swipyCellDidFinishSwiping(_ cell: SwipyCell, atState state: SwipyCellState, triggerActivated activated: Bool)

// When the user is dragging, this method is called with the percentage from the border
func swipyCell(_ cell: SwipyCell, didSwipeWithPercentage percentage: CGFloat, currentState state: SwipyCellState, triggerActivated activated: Bool)All configurable options are defined in the SwipyCellConfig.shared singleton object. Every new cell has these options set as defaults. To alter the defaults simply change the variables of the SwipyCellConfig singleton object.
Trigger points are defined in the triggerPoints<CGFloat, SwipyCellState> dictionary in either the configuration singleton or each cell individually.
Each key marks the swiping percentage for a trigger point; the corresponding value is an identifier to reference the trigger point later. A negative key marks a point on the right side of the cell (slide to the left), a positive key marks a point on the left side of the cell (slide to the right).
To modify the trigger points there are a couple of methods available on every cell as well as the configuration singleton:
// Set a new trigger point for the given state
func setTriggerPoint(forState state: SwipyCellState, at point: CGFloat)

// Set a new trigger point for the given index on BOTH sides of the cell
func setTriggerPoint(forIndex index: Int, at point: CGFloat)

// Overwrite all existing trigger points with the given new ones
func setTriggerPoints(_ points: [CGFloat: SwipyCellState])
// The Integer parameter is the index for BOTH sides of the cell
func setTriggerPoints(_ points: [CGFloat: Int])

// Overwrite all existing trigger points with new ones in order of the array on BOTH sides
func setTriggerPoints(points: [CGFloat])

// Get all existing trigger points
func getTriggerPoints() -> [CGFloat: SwipyCellState]

// Clear all existing trigger points
func clearTriggerPoints()
Defaults: 25% and 75% on each side
var swipeViewPadding: CGFloatswipeViewPadding is the padding between the swipe view and and the outer edge of the cell.
Default: 24.0
var shouldAnimateSwipeViews: BoolshouldAnimateSwipeViews sets if the swipeView should move with the cell while sliding or stay at the outer edge.
Default: true
var defaultSwipeViewColor: UIColordefaultSwipeViewColor is the color of the swipe when the current state is .none.
Default: UIColor.white
You can animate the cell back to it's default position when using .exit mode using the swipeToOrigin(_:) method. This could be useful if your app asks the user for confirmation and the user want's to cancel the action.
cell.swipeToOrigin {
    print("Swiped back")
}I'm Moritz Sternemann, a computer-science student at Technical University of Munich.
- Email: opensource@moritzsternemann.de
- Twitter: @strnmn
- LinkedIn: /in/moritzsternemann
SwipyCell is available under the MIT license. See LICENSE file for more info.


