Martin Skarzynski
This README is based on the workshop created by Ted Laderas: https://github.com/laderast/distill_website/
Below I will outline the steps I took to create my own site using this workshop template.
- Install Miniforge: https://github.com/conda-forge/miniforge#miniforge
- Create and activate a conda environment:
conda create -n distill r-essentials python
conda activate distill
- Install the following packages in R:
Rscript -e "install.packages(c(\"tidyverse\", \"postcards\", \"distill\", \"usethis\"))"
- Create a repo called username.github.io
- Install the GitHub CLI:
brew install gh
- Authenticate:
gh auth login
- Create the repo:
gh repo create --public mskar.github.io
- Create
.nojekyllfile
touch .nojekyll
- Take a look at the example website before getting started:
https://distill-example.netlify.app/
- Gather up the following materials:
- Links to Social Media (twitter, linkedin, etc)
- Bio
- Headshot
- Knitted
.htmlfiles you want to share
- Sign up for a netlify account and log in: https://netlify.com
These are the main files for the project.
index.Rmd- This is the main website page.about.Rmd- This is a nice looking about page built using the{postcards}package.image- A folder. Any images you put in here can be accessed byimage/martin.pngin your pages.articles/- A folder. This is a nice place to park your articles. For right now, it's probably easier to have self-contained articles (single html files)_site.yml- Customize this to change menus and linksdocs/folder - this contains your rendered website - you'll drop this folder into Netlify Drop and it will serve it.theme.css- this is where you can set appearance options, such as font, font-size, and colors.
{distill} is what is called a static site generator. It takes Markdown and Rmarkdown and converts them to . .html files.
Much like any RMarkdown file, {distill} uses {knitr} and pandoc to build your website files that are contained in an RStudio Project. It knits your .Rmd files, converting them to .html files to a folder. The name of this output folder is set in the _site.yml folder. The output folder contains all of them files you need to upload to make a website. I called this folder docs so that my site can work with GitHub pages.
Netlify is what is called a hosting service. This is a network of computers called web servers that are accessible via web addresses that will serve your website files when they are requested by a web browser.
The amazing thing about Netlify is that it is mostly free and it is very fast, no matter where you are (they have web servers almost everywhere).
We'll use Netlify Drop to get our website files up and accessible as quickly as possible.
Take a look at about.Rmd and start filling out the front matter with your own links:
links:
  - label: LinkedIn
    url: "https://www.linkedin.com/in/mskar/"
  - label: Twitter
    url: "https://twitter.com/marskar"
  - label: Portfolio
    url: "index.html"
  - label: Email
    url: "mailto:email@email.com"
Add your photo to the images folder. Change the line in about.Rmd:
image: "image/martin.jpg"
to the name of your file. For example, if your file is named jane.jpg and you put it in images:
image: "image/jane.jpg"
Rscript -e "rmarkdown::render_site()"
- Open the
docsfolder and click on theindex.htmlfile (make sure you're viewing in web browser)- This is your main link to the website (the entry point). For example, if I was hosting my website at https://mskar.github.io/, this would be the first page that I would see.
- Your
aboutpage is available asabout.htmlin thedocsfolder. - Click away and make sure that everything works (links in menu, etc). If not, update the
_site.ymland build it again.
The postcards package has the following built in themes:
jollajolla_blueonofretrestles- which your current site uses
Change this line in your about.Rmd file to the theme of your interest and start building again:
output:
  postcards::trestles
You can now add your articles to the articles/ folder.
There are a couple example articles here. Add your own files here.
In general, you'll put knitted html articles here. Distill does not rebuild articles, it leaves that up to you.
The relative path to access articles is like this:
articles/crops.html
You'll use this when adding links to your menu.
The menu lives in the _site.yml file:
navbar:
  right:
    - text: "Home"
      href: index.html
    - text: "About"
      href: about.html
    - text: "Articles"
      menu:
          -  text: "dplyr::slice()"
             href: articles/slice.html
          -  text: "Crop Yields"
             href: articles/crops.html
Add another menu entry under articles, or modify the above entries to have a link to your articles.
Build your website again and preview it to make sure the links work.
We'll take the docs folder with our generated website and drop this entire folder into Netlify Drop.
The first thing you want to do is claim your site and register for a Netlify account. That ties your newly created website to your account so you can update it.
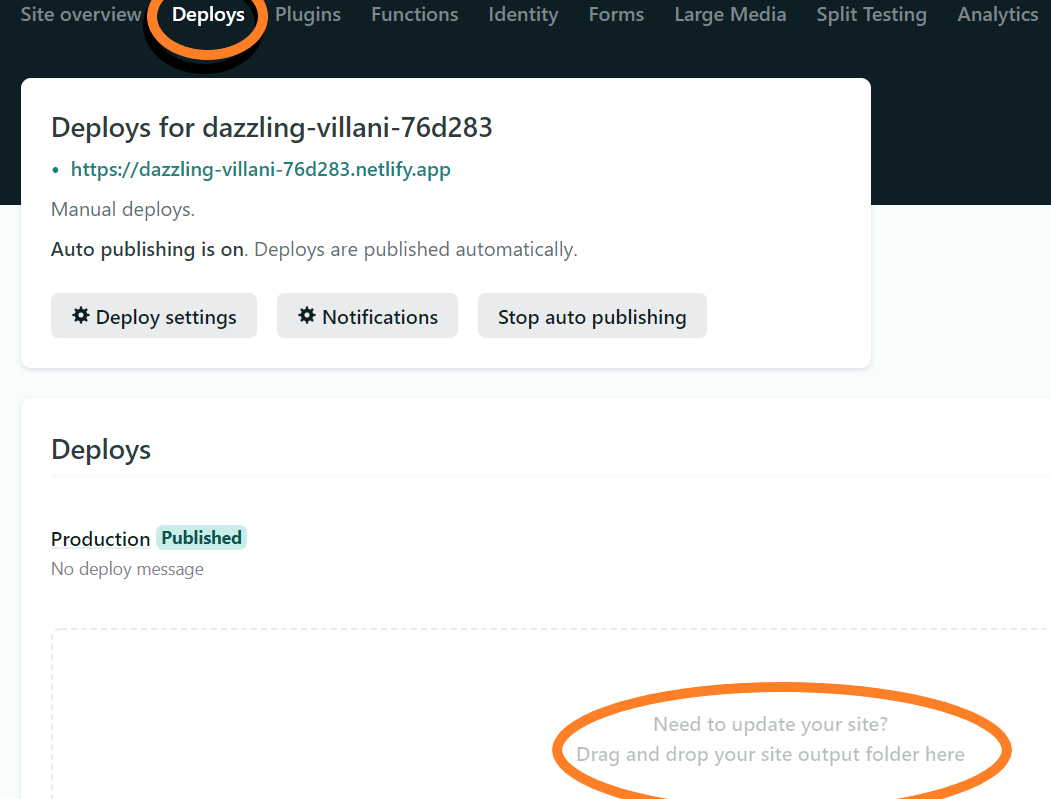
When you update your website with the Build Website button, you'll drag the _site folder onto the deploy zone. This is under the deploy tab:
More info here: https://docs.netlify.com/site-deploys/create-deploys/#drag-and-drop
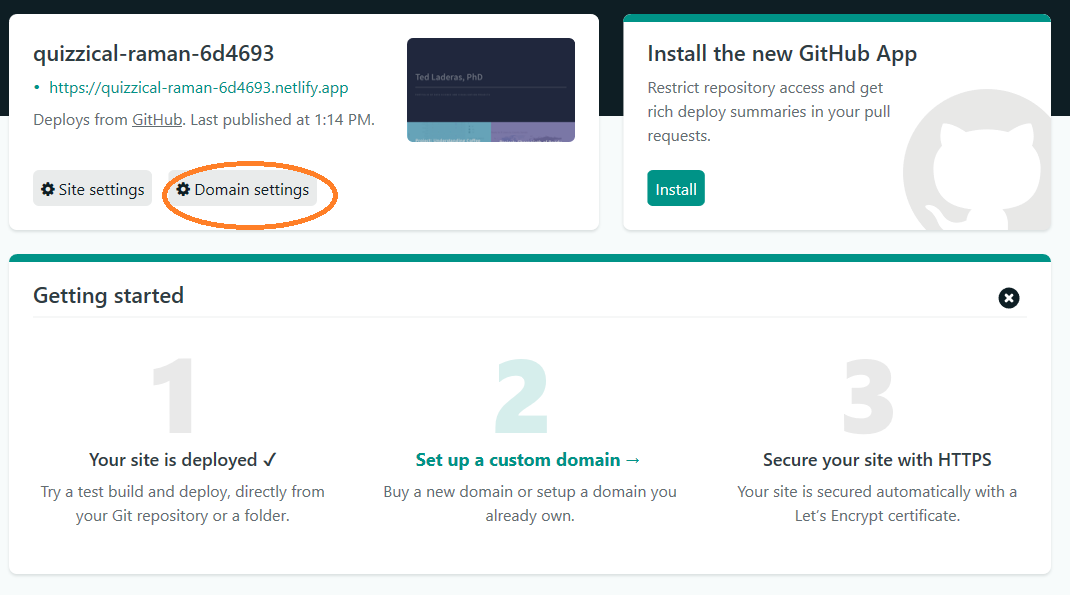
That crazy name is the address of your site. To change it, you can click on the Domain Settings button:
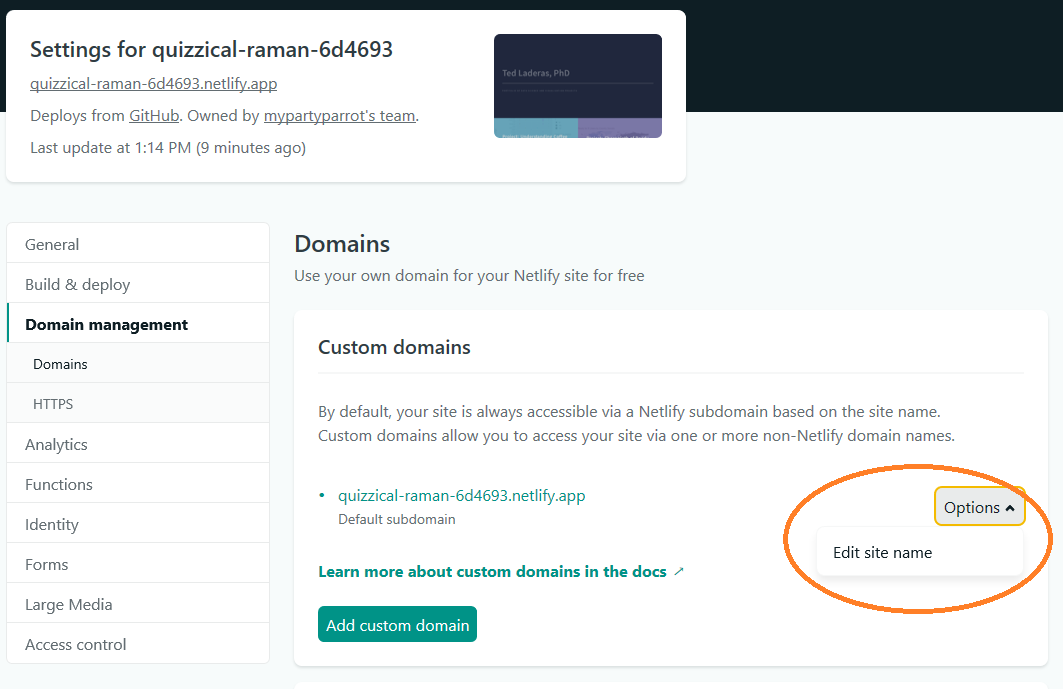
In the following page, click the Options >> Edit Site Name button. You can change the first part of the domain, such as "myportfolio.netlify.app).
Note that this only applies to the main distill website and not the about.html, since that is styled separately.
In _site.yml, try uncommenting this line and seeing how the site changes.
#theme: theme.css
You can modify the appearance of your website by altering the theme.css file. Much more info about this here:
https://rstudio.github.io/distill/website.html#theming
If you want to start from scratch, I highly recommend the Distill tutorial here:
https://rstudio.github.io/distill/website.html
You may want to setup your webpage as a blog, which lets you add posts by date:
https://rstudio.github.io/distill/blog.html
This is beyond the scope of this tutorial, but you can put your site code up on GitHub as well. This has the following advantages:
- Lets others contribute to your website
- Can host on GitHub Pages as well
- Lets others reuse your code for their own website
If you're interested in this, I really recommend Happy Git with R as a way to get started.
Thank you to RStudio for the {distill} package. It is so great!
Portions of this tutorial are adapted from: https://rstudio.github.io/distill/website.html and from https://rstudio.com/resources/webinars/sharing-on-short-notice-how-to-get-your-materials-online-with-r-markdown/


