This is a very old and outdated example plugin for openLCA. This was created for a developer training several years ago.
openLCA1 is a free, professional Life Cycle Assessment (LCA) and footprint software. It is an open-source software and licensed under the Mozilla Public License version 2.02. Thus, the software is fully transparent and can be modified by anyone. Additionally, it is possible to add new functionality to openLCA via plugins. This guide explains how you can set up a development environment to build openLCA from source and explains the general structure of the openLCA source code. It also shows in a small example how you can develop an openLCA plugin.
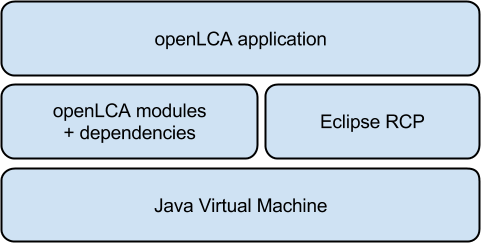
The picture below shows the overall architecture of openLCA. It is a
Java application that runs on the Eclipse Rich Client Platform
(RCP)3. However, the core functionality is independent from the
Eclipse runtime and can be integrated in every other application that
runs on the Java Virtual Machine (JVM). This core functionality is
bundled in a project called olca-modules (the openLCA modules) whereas
the project name of openLCA application is olca-app (the openLCA
application).
The official source code repository of the olca-modules project is
https://github.com/GreenDelta/olca-modules and for the olca-app
project it is https://github.com/GreenDelta/olca-app.
As openLCA is a Java application, the first thing you should install is the Java Development Kit (JDK). The openLCA application uses features of Java 8 and therefore you need the JDK 8 to build the application. If you just want to build the openLCA modules the JDK 7 should be sufficient. We recommend to use Oracle Java4 but it should also work with Open JDK5. For Windows and Mac OS X you can just use the installers provided on the Oracle download site. For Linux the best procedure is probably the one described here: http://askubuntu.com/questions/56104/how-can-i-install-sun-oracles-proprietary-java-jdk-6-7-8-or-jre.
The source code of openLCA is managed via Git6 and hosted on Github7. You can find the source repository of the openLCA modules under https://github.com/GreenDelta/olca-modules and the repository of the openLCA application under https://github.com/GreenDelta/olca-app. The easiest way to get the code and to stay up to date with the development of openLCA is to install git and clone these repositories:
git clone https://github.com/GreenDelta/olca-app
git clone https://github.com/GreenDelta/olca-modules
This will create the two folders olca-app and olca-modules in the
current directory which contain the complete source code.
We use Maven8 to manage the build and the dependencies of the openLCA
modules and for the dependency management in the openLCA application.
Thus, you need to have Maven installed. The olca-modules is a Maven
multi-modules project. If you navigate to this repository and type
mvn install -DskipTests=trueMaven will try to build and install all the sub-modules of this project
into your local repository. If you do this the first time the build will
probably fail because we need ojAlgo9 which is unfortunately not
managed via the central Maven repository. Thus, we need to download
ojAlgo and install it into our local repository manually. Therefore,
download the current ojAlgo package and install the ojalgo-VERSION.jar
using the following command:
mvn install:install-file -Dfile=ojalgo-VERSION.jar \
-DgroupId=org.ojalgo -DartifactId=ojalgo \
-Dversion=VERSION -Dpackaging=jar
You may also have to change the version in the dependency declaration in
the file olca-modules/olca-core/pom.xml:
<dependency>
    <groupId>org.ojalgo</groupId>
    <artifactId>ojalgo</artifactId>
    <version>VERSION</version>
</dependency>
If you run the install command again everything should work now. 10
Now we need to copy our openLCA modules libraries and all the other
dependencies into the openLCA application project. We also use a Maven
script for this task which is located under olca-app/olca-app/pom.xml.
To make the development cycle a bit more convenient there is a small
shell/batch script located in the olca-app project which combines all
the Maven related tasks:
 # compile and install olca-modules and update
 # the dependencies in olca-app
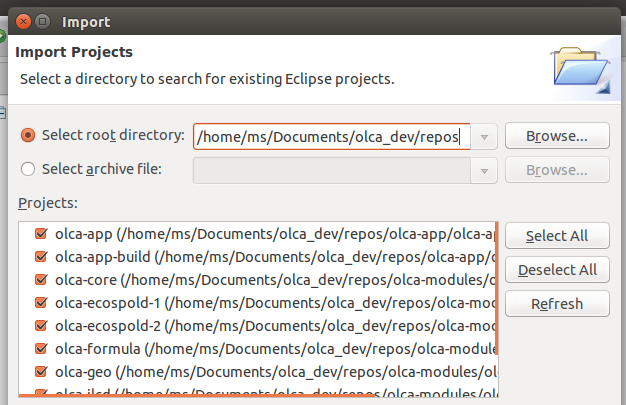
./olca-app/update_modules.shThe olca-modules and olca-app projects are already configured as
Eclipse projects. Thus, you can directly import them into an Eclipse
project. Select the folder where your code repositories are located and
you can import these projects like in the following picture:
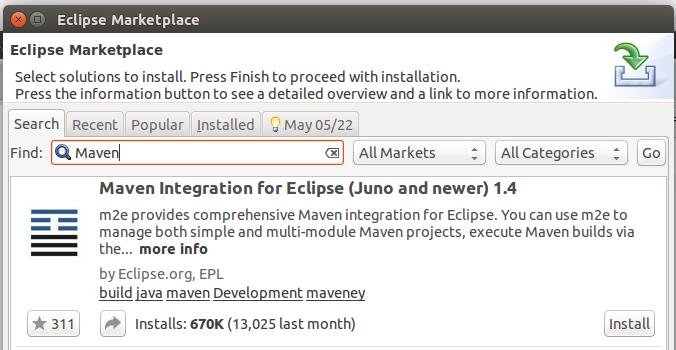
After the import you will see again a lot of errors which we will fix in the following. First, install the Maven integration for Eclipse from the Eclipse Marketplace (Help/Marketplace):
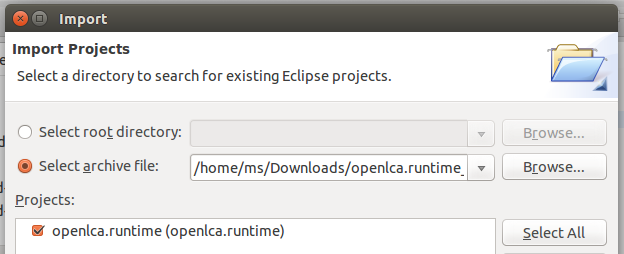
Then, download the runtime project from https://drive.google.com/file/d/0Bw9cXD8IWJzzRERLLVNXU19oNGM/edit?usp=sharing and import it as existing project into the workspace (chose 'Select archive file'):
Open the file platform.target in the runtime project and click the
option Set as target platform in the target definition editor.
Finally, set the JDK 8 as the default Java runtime under Preferences/Java/Installed JREs and the compiler compliance level to 1.8 under Preferences/Java/Compiler.
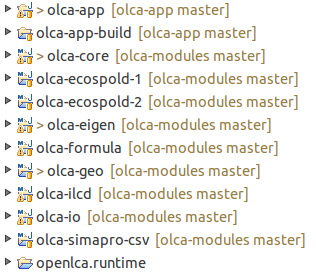
When you set up your development environment as described above you should see the following projects in the Eclipse workspace:
olca-app: Contains the openLCA application that is based on Eclipse RCP: the user interface, editor logic, database management etc.olca-app-build: Contains the build scripts, tools, and runtimes for compiling and packaging the RCP application for Windows, Linux, and Mac OS.olca-core: Contains the openLCA data model, calculation procedures, and functionality for interacting with a database.olca-ecospold-1: Contains the data model for automatic binding of EcoSpold 1 XML files to object graphs and the other way around.olca-ecospold-2: Same as olca-ecospold-1 but for the EcoSpold 2 data format.olca-eigen: Provides JNI11 wrappers to the high performance math libraries OpenBLAS12 and Eigen13.olca-formula: Contains a formula interpreter that is used for parameter evaluation in different scopes in openLCA.olca-geo: Contains the functionality for localized LCIA calculations including the handling of shapefiles and KML data.olca-ilcd: Contains the data model for automatic binding of ILCD XML files to object graphs and the other way around. It supports the storing and reading of ILCD files from folders, ZIP files, and ILCD network nodes (i.e. soda4LCA servers14).olca-io: Contains the mappings and export/import interfaces from the openLCA data model to various data formats.olca-simapro-csv: Contains a parser and data model for reading SimaPro CSV files.openlca.runtime: Contains the dependencies (i.e. the OSGi bundles) of the openLCA RCP application.
Each project should also have a README file in its root folder which explains the content and structure of the respective project in more detail.
As the olca-app and olca-modules project are independent from each
other, the modules have to be updated in the olca-app project when they
changed. We use Maven (as described above) to automate these updates.
Just run the update_modules.bat/sh script when you changed something
in the olca-modules and it will build the modules, install them in your
local Maven repository, and update them in your olca-app project.
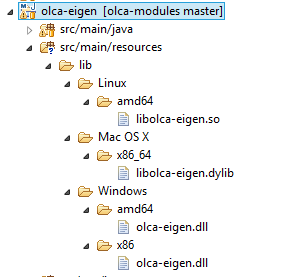
The openLCA modules projects contain quite some unit tests which you can run with the standard Maven test command or via the user interface of your Java IDE. When you download the source code repository these tests will initially fail because of the missing native libraries in the olca-eigen module. You can fix this by either compiling the native libraries by yourself or copying the prepared builds into the olca-eigen project following the instructions in this READEME file: https://github.com/GreenDelta/olca-modules/tree/master/olca-eigen. The folder structure of the olca-eigen project should look like this (you only need the library for your operating system):
Because the openLCA application is based on the Eclipse Rich Client Platform we can use the Eclipse plugin features also in openLCA. With this it is possible to develop and distribute additional functionalities as add-ons/plugins. In the following the development of a plugin is described on a practical exampled. It is assumed that the development environment is already set up as described above. This project is open source15 and you can use it as a template for the development of other openLCA plugins.
In the following we will develop a plugin for the export of product system graphs as GEXF files. GEXF stands for Graph Exchange XML Format16 which is an open format for exchanging graphs and networks. We will develop a simple but nice export so that we can open and visualize a product system graph in Gephi17.
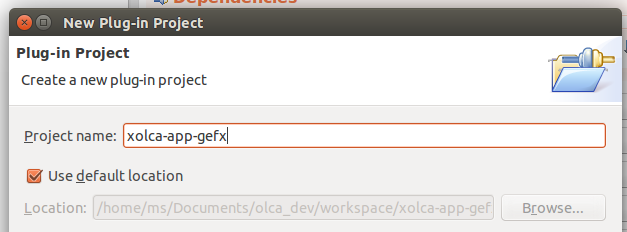
We create a new plugin xolca-app-gefx and keep the settings in the
wizard (except for the package names which we make a bit more Java
friendly):
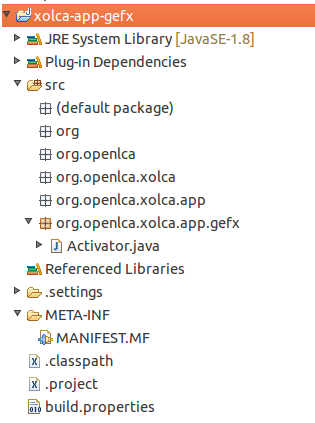
After this the new plugin project looks like this:
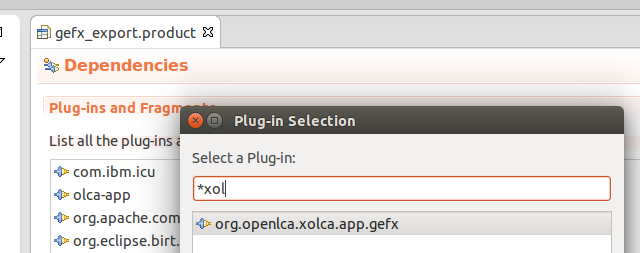
Now we copy the product configuration openLCA.product from the
olca-app project into the plugin project and rename it, e.g.
gefx_export.product. Then we open the product configuration and add
our plugin in the dependency tab:
When we now run this configuration our plugin is loaded and we can test its functionality.
(TODO: picture: plugin in configuration details; Java 8 entry in manifest may results in a problem - fixed in Eclipse 4.4?)
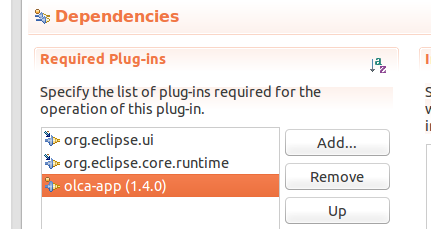
Finally, we add the olca-app bundle to the plugin dependencies so that
we can use the openLCA API. Therefore open the MANIFEST.MF and add the
olca-app entry:
We now write the export wizard:
public class ExportWizard extends Wizard implements IExportWizard{

  private ModelSelectionPage page;

  @Override
  public void init(IWorkbench workbench,
    IStructuredSelection selection) {
    setWindowTitle("Export product system as GEXF file");
    setNeedsProgressMonitor(true);
  }

  @Override
  public void addPages() {
    page = new ModelSelectionPage(ModelType.PRODUCT_SYSTEM);
    addPage(page);
  }

  @Override
  public boolean performFinish() {
    File dir = page.getExportDestination();
    List<BaseDescriptor> models = page.getSelectedModels();
    if(dir == null || models.isEmpty())
      return true;
    // TODO: write export functionality
    return false;
  }
}
And we register the wizard in the plugin.xml of our project:
<?xml version="1.0" encoding="UTF-8"?>
<?eclipse version="3.4"?>
<plugin>
 <extension
  point="org.eclipse.ui.exportWizards">
    <wizard
      class="org.openlca.xolca.app.gefx.ExportWizard"
      id="xolca-app-gefx.ExportWizard"
      name="GEXF Export">
    </wizard>
 </extension>
</plugin>
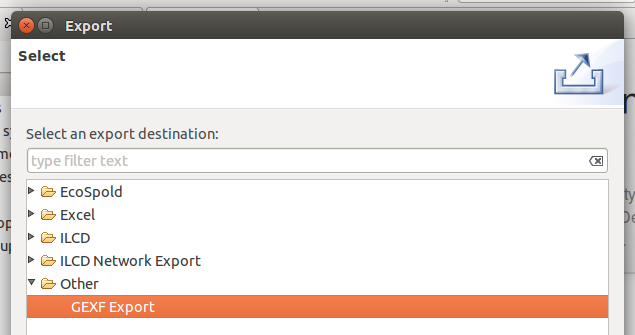
When we run our product configuration now the plugin should be registered in the export wizards:
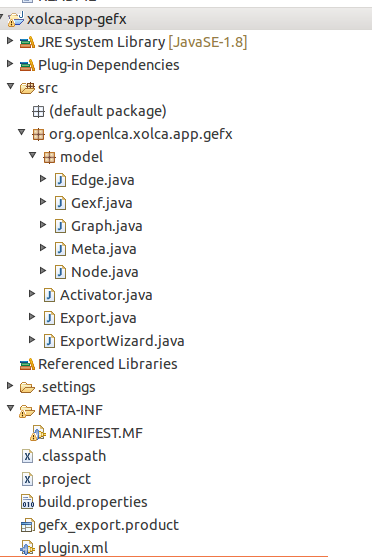
The details of the export can be seen in the source code of the plugin.
First we created our GEXF data model. For the XML serialization we used
JAXB18 and annotated our model respectively. The mapping of the
product system graph to the GEXF model is done in the class Export.
The final project structure looks like this:
Finally, we call our export in the wizard:
@Override
public boolean performFinish() {
  File dir = page.getExportDestination();
  List<BaseDescriptor> models = page.getSelectedModels();
  Export export = new Export(Database.get(), dir,
    Cache.getEntityCache());
  if (dir == null || models.isEmpty())
    return true;
  try {
    getContainer().run(true, true, (monitor) -> {
      monitor.beginTask("GEXF Export: ", models.size());
      models.forEach((d) -> {
        monitor.subTask(d.getName());
        export.doIt(d);
        monitor.worked(1);
      });
      monitor.done();
    });
    return true;
  } catch (Exception e) {
    log.error("failed to run GEXF export", e);
    return false;
  }
}
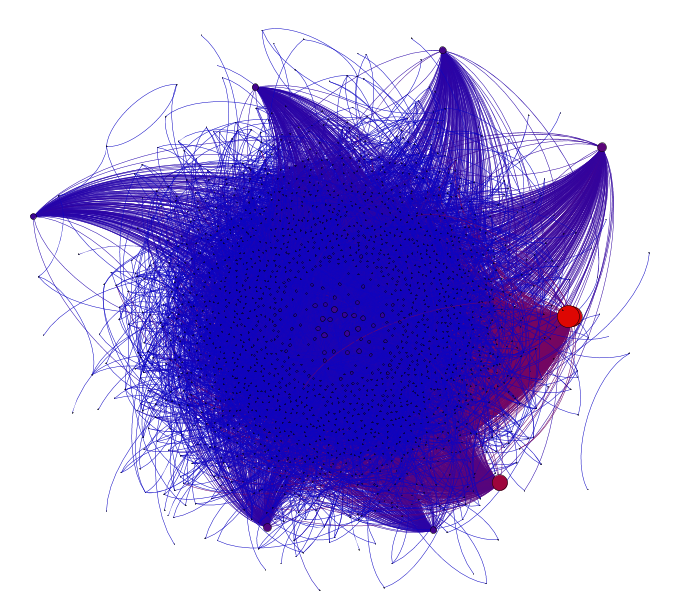
Now the export is fully functional and produces GEXF files that can be opened and analyzed with Gephi:
Footnotes
-
http://www.oracle.com/technetwork/java/javase/downloads/index.html ↩
-
Note if you run the comment without the
-DskipTests=trueflag the build will only work if you have the native libraries in theolca-eigenmodule correctly installed as this is required to pass the tests (this is described later). ↩ -
http://docs.oracle.com/javase/8/docs/technotes/guides/jni/ ↩
-
http://www.iai.kit.edu/www-extern/index.php?id=soda4lca&L=1 ↩
