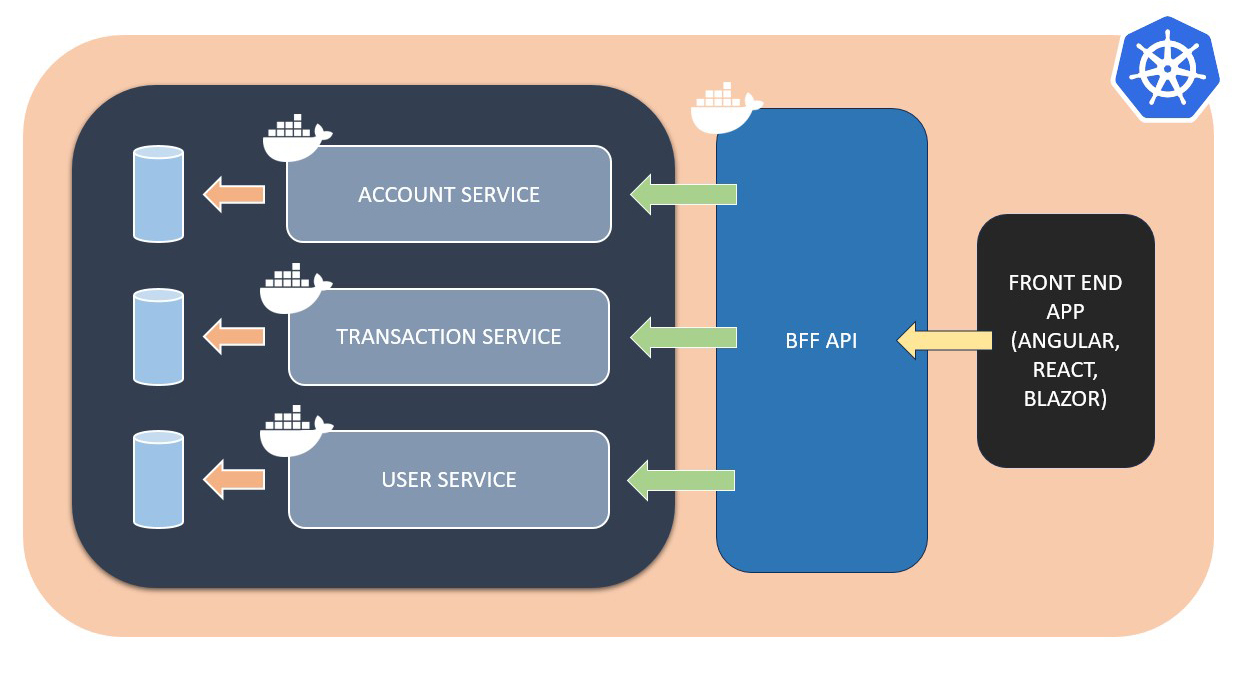
The project was designed based on microservice architecture. Accordingly, the project includes 3 main microservices and 1 BFF (Back-End for Front-End) service.
Account Service is created to handle the user's requirements related to account transactions.
Ports:
> http://localhost:3201/swagger
> https://localhost:3202/swagger
Transaction Service is created to handle the requirements related to the transaction operations of the user's accounts.
Ports:
> http://localhost:3205/swagger
> https://localhost:3206/swagger
User Service is created to handle the requirements related to user transactions.
Ports:
> http://localhost:3203/swagger
> https://localhost:3204/swagger
BFF Service is created to meet the requirements of the interface (front-end) application.
Ports:
> http://localhost:3299/swagger
> https://localhost:3298/swagger
System logs are configured to be stored on ElasticSearch.
Ports:
> http://localhost:9200
Kibana is configured to monitor system logs.
Ports:
> http://localhost:5601
NOTE: All services must be running in order to fully test the project.
There is a simple data in the memory for test case:
User
- Id (UserId): 1000001
- Name: Mustafa
- Surname: Çiçek
Account
- Id: 2000001
- CustomerId: 1000001
Transaction:
- Id: 3000001
- AccountId: 2000001
- Amount: 1000
- TransactionType: Deposit
To create a new account via the BFF API, a request can be made as follows:
End Point: POST /api/accounts
Request Body:
{
  "customerId": 1000001,
  "amount": 1000,
  "transactionType": 1
}
To retrieve the accounts and transactions of a user (customer) via the BFF API, a request can be made as follows.
End Point: GET /api/users/{userId}
Request Body:
Change the {userId} with: 1000001
Response Body:
{
  "user": {
    "userId": 1000001,
    "name": "Mustafa",
    "surname": "Çiçek",
    "accounts": [
      {
        "accountId": 2000001,
        "transactions": [
          {
            "transactionId": 3000001,
            "amount": 1000,
            "transactionType": 1
          }
        ]
      }
    ]
  }
}Basically: Swagger integration has been done in all projects. It automatically redirects when run directly with Rider or Visual Studio. Otherwise, the API documentation can be accessed by typing "/swagger" at the end of the URL.
Alternatively, the project can be run using the following methods.
Open a terminal and go to the Solution directory of the project. You can use the PowerShell command file named "RunAllProjects.ps1" in this directory.
You can find instructions within the script.
.\RunAllProjects.ps1
PS: Also, you can use the test command file "RunAllTests.ps1" to run all Unit Tests.
.\RunAllTests.ps1
Open a terminal and go to the Solution directory of the project. You can use the Bash command file named "RunAllProjects.ps1" in this directory.
You can find instructions within the script.
./RunAllProjects.sh
PS: Also, you can use the test command file "RunAllTests.sh" to run all Unit Tests.
./RunAllTests.sh
Open a terminal and go to the Solution directory of the project. You can use the Docker-Compose file named "docker-compose.yaml" in this directory.
You can find instructions within the script.
docker-compose up -d
Open a terminal and go to the API directory of the each project. You can use the file named "deployment.yaml" in the directory.
kubectl apply -f deployment.yaml
- .NET Core 7: https://docs.microsoft.com/en-us/dotnet/core
- ASP.NET Core 7: https://docs.microsoft.com/en-us/aspnet/core | https://learn.microsoft.com/en-us/aspnet/core/tutorials/first-web-api?view=aspnetcore-7.0&tabs=visual-studio
- MediatR: https://github.com/jbogard/MediatR
- NUnit: https://github.com/nunit/nunit | https://docs.microsoft.com/en-us/dotnet/core/testing/unit-testing-with-nunit
- FluentValidation: https://github.com/FluentValidation/FluentValidation
- Serilog: https://github.com/serilog/serilog
- Swagger (Swashbuckle): https://github.com/domaindrivendev/Swashbuckle.AspNetCore
- Docker: https://www.docker.com | https://docs.docker.com/language/dotnet/ | https://learn.microsoft.com/en-us/dotnet/core/docker/introduction
- Kubernetes: https://kubernetes.io
- SOLID Principles
- Microservices: https://microservices.io
- Dependency Injection
- In-Memory Cache: https://learn.microsoft.com/en-us/aspnet/core/performance/caching/memory?view=aspnetcore-7.0
- CQRS: https://microservices.io/patterns/data/cqrs.html
- Unit Testing Best Practices (with simple examples): https://docs.microsoft.com/en-us/dotnet/core/testing/unit-testing-best-practices
- Health Check: https://microservices.io/patterns/observability/health-check-api.html
- ElasticSearch (Logging Storage): https://www.elastic.co/elasticsearch
- Kibana (Logging Monitoring): https://www.elastic.co/kibana
- PowerPlant: https://github.com/mstfcck/PowerPlant
- SmartCharging: https://github.com/mstfcck/SmartCharging
- Railroad: https://github.com/mstfcck/Railroad
- EscapeMines: https://github.com/mstfcck/EscapeMines
