My project includes the following files:
- model.py containing the script to create and train the model
- drive.py for driving the car in autonomous mode
- model.h5 containing a trained convolution neural network
- writeup_report.md or writeup_report.pdf summarizing the results
Behavioral Cloning Project
The goals / steps of this project are the following:
- Use the simulator to collect data of good driving behavior
- Build, a convolution neural network in Keras that predicts steering angles from images
- Train and validate the model with a training and validation set
- Test that the model successfully drives around track one without leaving the road
- Summarize the results with a written report
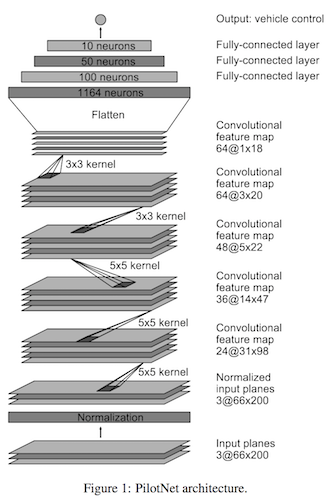
The model I implemented for cloning the driver's behavior follow PilotNet which id suggested by "Explaining How a Deep Neural Network Trained with End-to-End Learning Steers a Car" https://arxiv.org/pdf/1704.07911.pdf.
The model consists of 5 convolutional layers followed by 3 fully connected hidden layers. The output layer has one neuron which gives the streering angle. The first 3 convolutional layer use (5,5) kernels, while the following 2 convonlutional layers use (3,3) kernels. ReLU activation function is added to each layer for non-linearity.
With 20 iterations of training, the loss of training data is continuously decreased while the loss of the validation dataset is being saturated or slow down in decreasing rate after about 10 iteration.
Training and Validation Loss without Dropout
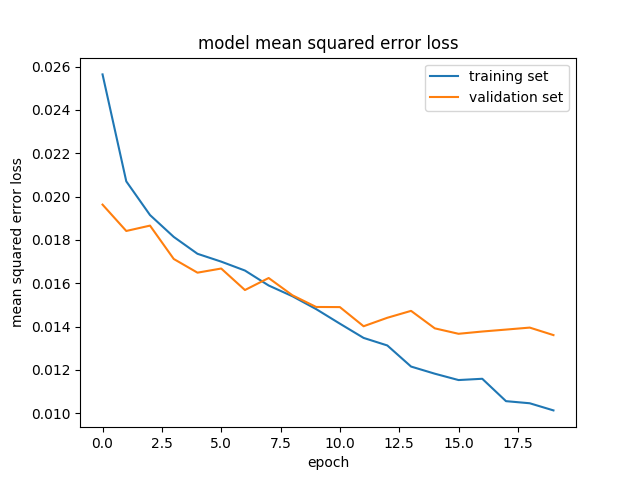
Training and Validation Loss with 50% Dropout after each Fully Connected layers
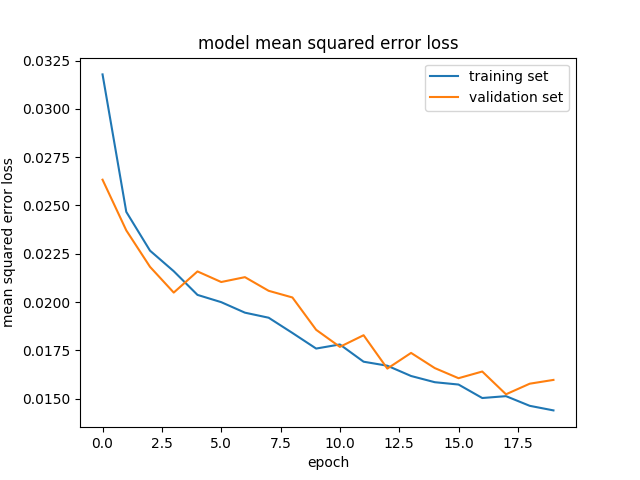
Here is how to add dropout;
model.add(Convolution2D(24, 5, 5, subsample=(2,2), activation='relu'))
model.add(Convolution2D(36, 5, 5, subsample=(2,2), activation='relu'))
model.add(Convolution2D(48, 5, 5, subsample=(2,2), activation='relu'))
model.add(Convolution2D(64, 3, 3, activation='relu'))
model.add(Convolution2D(64, 3, 3, activation='relu'))
model.add(Flatten())
model.add(Dense(100, activation='relu'))
model.add(Dropout(0.5))
model.add(Dense(50, activation='relu'))
model.add(Dropout(0.5))
model.add(Dense(10, activation='relu'))
model.add(Dense(1))
The model used an adam optimizer, which decays learning rate over iteration. The learning rate decay is 0 by default. I could change the decay and the initial learning rate value if the training performance (both speed and optimization) is poor. Fortunately, the training data with the above model does not give any good reason to change it.
The lessons learned: Gargage In, Gargage Out
-
First Attempt for Training data generation
Training data was chosen to keep the vehicle driving on the middle of the lane. I used a combination of driving in the center of the lane, recovering from the left and right sides of the road, turning curves as smoothly as possible, and also driving the reverse way.
Here is one important learning from this project. The initial training data includes frames where my simulation car goes to either right or left side of the road. Even worse, the training data includes frames where the car goes out of the road.
Why? I need to get training data which includes recovering, and I need first to the right or left or even out of the road. However, what the model learned is not only how to recover but also how to get off the road, which is NOT what I expect. To overcome this funny result, I excluded the video frames where the car moves to the right or left of the road, and out of the road. Dataset only includes frames of recovering. With that, the model knows how to recover while trying to keep itself in the middle of the road.
-
Secod Attempt for Training data generation to fix the problem
Also, the first partially successful model sometimes got stuck when the car approached to curb. This model only learn steering angle based on the images. The car only goes forward. So, when this happends, it tries to make a progress only by moving left or right, which fails to solve this stuck problem. The only way to solve this problem is not to hit the curb, and this can be achieved by giving such training data; data showing moving away from the curb. I gathered such data additionally, and re-train the model, which make a progress.
However, this data gathering stragegy NEVER produces a practical model at all. The automous driving car frequently goes off the road.
-
What is the problem?
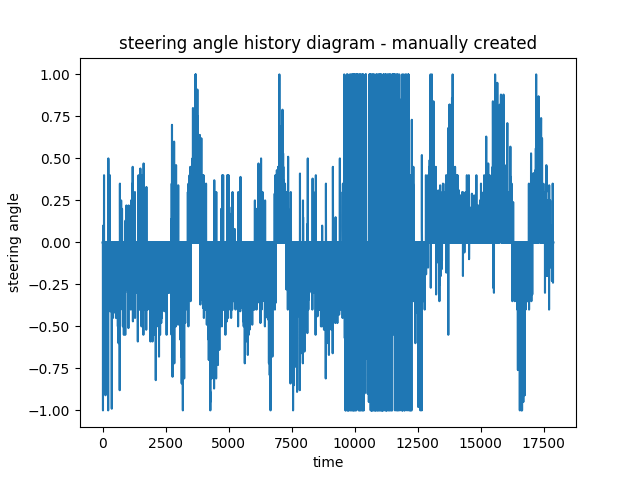
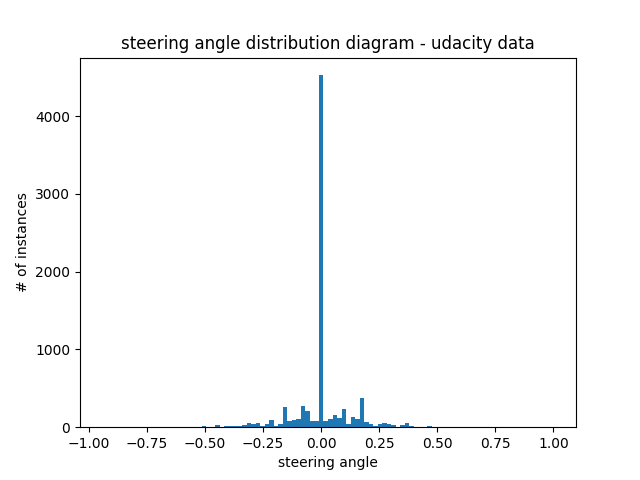
As seen in the historam of steering angles from the manual driving, steering angle are biased to 1 or large values. Due to this, the trained model tends to make sharp turn which makes the car move toward the edge of the road easily. Let's take a look at the udacity dataset.
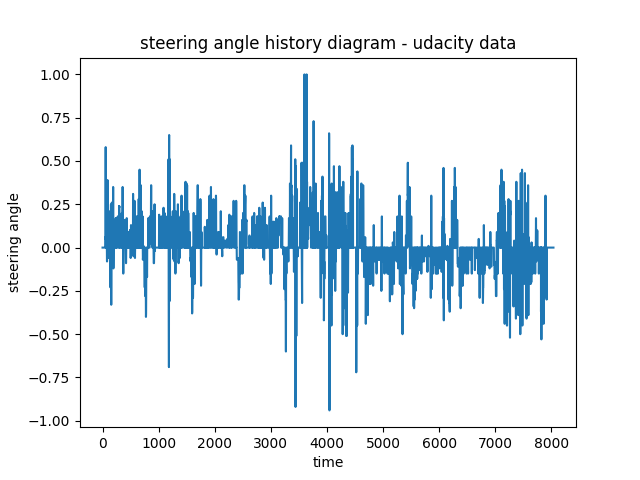
This graph does not show any sharp turn while the angles are less the 0.25 which contains smoother driving behavior.
Using keyboard for manual driving, I could not get this kind of smooth driving pattern myself. So, I decided to use Udacity driving data.
The overall strategy for deriving a model architecture was to learn from images with steering wheel angle.
My first step was to use a convolution neural network model similar to the famous and simple ConvNet, LeNet. I thought this model might be appropriate because the model needs to predict the streering wheel's angel for a given image taken from the onboard camera. This can be easily achieved by having 1 neuron in the output layer, and make it regression not classification. For that, MSE (Mean Squared Error) is chosen as the cost function.
In order to gauge how well the model was working, I split my image and steering angle data into a training and validation set. I found that the model's performance is not good enough. So, I changed the network architecture to the proven one; PilotNet from LeNet.
I will explain the data augmenting and pre-processing I applied below.
The final model architecture consisted of a convolution neural network with 5 convolutional layers and 3 fully connected layers. The first 2 layers are to normalize inputs and to drop input images. First 3 convolutional layers uses (5,5) kernel with (2,2) subsamples or strides. The following 2 convonlutional layers uses (3,3) kernels with the default subsamples (1,1).
Here is a visualization of the architecture (note: visualizing the architecture is optional according to the project rubric)
Also, check out the below model summary. Keras provide summary() function to desctibe the model with number of parameters for each layers, output shape, and the total number of parameters of the model. As seen below, the number of parameters of convolutional layers are smaller than one of fully connected layers, which is one of characteristic of ConvNet.
_________________________________________________________________
Layer (type)                 Output Shape              Param #
=================================================================
lambda_1 (Lambda)            (None, 160, 320, 3)       0
_________________________________________________________________
cropping2d_1 (Cropping2D)    (None, 65, 320, 3)        0
_________________________________________________________________
conv2d_1 (Conv2D)            (None, 31, 158, 24)       1824
_________________________________________________________________
conv2d_2 (Conv2D)            (None, 14, 77, 36)        21636
_________________________________________________________________
conv2d_3 (Conv2D)            (None, 5, 37, 48)         43248
_________________________________________________________________
conv2d_4 (Conv2D)            (None, 3, 35, 64)         27712
_________________________________________________________________
conv2d_5 (Conv2D)            (None, 1, 33, 64)         36928
_________________________________________________________________
flatten_1 (Flatten)          (None, 2112)              0
_________________________________________________________________
dense_1 (Dense)              (None, 100)               211300
_________________________________________________________________
dropout_1 (Dropout)          (None, 100)               0
_________________________________________________________________
dense_2 (Dense)              (None, 50)                5050
_________________________________________________________________
dropout_2 (Dropout)          (None, 50)                0
_________________________________________________________________
dense_3 (Dense)              (None, 10)                510
_________________________________________________________________
dropout_3 (Dropout)          (None, 10)                0
_________________________________________________________________
dense_4 (Dense)              (None, 1)                 11
=================================================================
Total params: 348,219
Trainable params: 348,219
Non-trainable params: 0
_________________________________________________________________
How to plot the model and to give summary from Keras? Very simple.
plot_model(model, to_file='model.png')
model.summary()
Udacity driving dataset has 3 images from 3 cameras; center, left, and right along with steering angle.
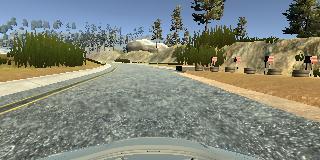
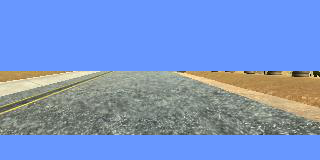
Here is an example image of center lane driving:
Taking a look at the steering angle distribution, I see the data is biased to 0 angle, or going straight. This is an expected patten because most of the road is straight.
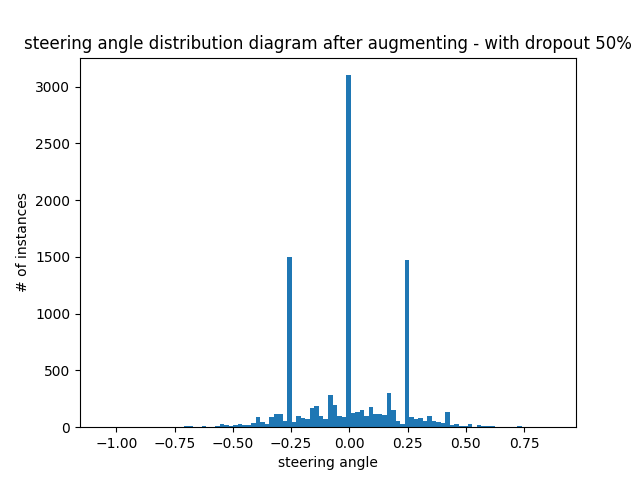
To fix this unbalanced issue, two methods are possible; 1) remove data having steering angle 0, or 2) use left or right image with adjusted steering angle. 1) is not a good choice because the number of training data is decreased. So, it is very natual to use method 2).
I randomly select one of center, left and right image instead of using all 3 images for each. If left or right image is chosen, steering angle is adjusted by adding or substracting correction value (I chosed 0.25 from experienmet)
To augment the data sat, I also flipped images and angles thinking that this would make the model robust because the track mostly consists of left curves. The model learns how to follow left curves good enough, but without enough data telling how to follow right curves the model will be confused on the left right curve. To overcome this, I could use a track having more right curve, but flipping images give the same. For example, here is an image that has then been flipped:
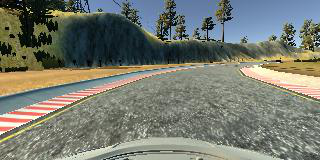 Flipped image (streering wheel angle also flipped)
With these two applied, the steering angle distribution has less biased toward 0. But still there is a room for improvement.
Also, to reduce any noise all images are cropped to contain only road not tree or water which are not necessary for learning. Here is what it is done.
Taking a look at the orignal image, trees are at the top of the image, and the part of the car is at the bottom of the image.
So, the blue boxes are the area of no-interest in training the model.
Let's crop these area to have the images which are necessary for behavior cloning.
The cropping is embedded into the network architecture rather than done seperately. In this way, it is not necessary to tell the user of this model to drop images manually before feeding data into the model for inference.
model.add(Cropping2D(cropping=((70,25),(0,0))))
After the preprocessing process, I had 10,758 training data at the end.
I finally randomly shuffled the data set and put 20% of the data into a validation set.
For each iterationn, I saved the trained model parameter. I selected the final model after iteration 10, and it give a good driving without going off road.
200/200 [============================>.] - ETA: 0s - loss: 0.0314Epoch 00001: saving model to model-01-0.023.h5
201/200 [==============================] - 14s 71ms/step - loss: 0.0313 - val_loss: 0.0226
Epoch 2/10
199/200 [============================>.] - ETA: 0s - loss: 0.0256Epoch 00002: saving model to model-02-0.019.h5
201/200 [==============================] - 11s 54ms/step - loss: 0.0255 - val_loss: 0.0194
Epoch 3/10
200/200 [============================>.] - ETA: 0s - loss: 0.0231Epoch 00003: saving model to model-03-0.020.h5
201/200 [==============================] - 11s 55ms/step - loss: 0.0231 - val_loss: 0.0198
Epoch 4/10
199/200 [============================>.] - ETA: 0s - loss: 0.0219Epoch 00004: saving model to model-04-0.019.h5
201/200 [==============================] - 11s 53ms/step - loss: 0.0218 - val_loss: 0.0191
Epoch 5/10
200/200 [============================>.] - ETA: 0s - loss: 0.0209Epoch 00005: saving model to model-05-0.020.h5
201/200 [==============================] - 11s 53ms/step - loss: 0.0209 - val_loss: 0.0199
Epoch 6/10
199/200 [============================>.] - ETA: 0s - loss: 0.0204Epoch 00006: saving model to model-06-0.018.h5
201/200 [==============================] - 11s 53ms/step - loss: 0.0204 - val_loss: 0.0182
Epoch 7/10
199/200 [============================>.] - ETA: 0s - loss: 0.0196Epoch 00007: saving model to model-07-0.017.h5
201/200 [==============================] - 11s 54ms/step - loss: 0.0196 - val_loss: 0.0167
Epoch 8/10
200/200 [============================>.] - ETA: 0s - loss: 0.0191Epoch 00008: saving model to model-08-0.017.h5
201/200 [==============================] - 11s 53ms/step - loss: 0.0191 - val_loss: 0.0167
Epoch 9/10
200/200 [============================>.] - ETA: 0s - loss: 0.0188Epoch 00009: saving model to model-09-0.016.h5
201/200 [==============================] - 11s 54ms/step - loss: 0.0187 - val_loss: 0.0163
Epoch 10/10
199/200 [============================>.] - ETA: 0s - loss: 0.0181Epoch 00010: saving model to model-10-0.016.h5
201/200 [==============================] - 11s 53ms/step - loss: 0.0181 - val_loss: 0.0163
Curious on how well it works? Here is the video recording from self-driving car using the model trained. See the video clip.

