Food classification plays a crucial role in various applications, from dietary monitoring to restaurant menu analysis. The challenge lies in accurately categorizing diverse food items into specific groups. This project aims to address the following challenges:
-
Diverse Food Categories: The dataset encompasses a wide range of food categories, each with its own unique visual characteristics, making accurate classification challenging.
-
Limited Data Availability: In some categories, obtaining a sufficient amount of labeled data for training can be a hurdle, leading to potential biases and performance issues.
-
Model Generalization: Achieving a model that generalizes well across different food types and variations is a key objective, considering the practical application of food classification in various scenarios.
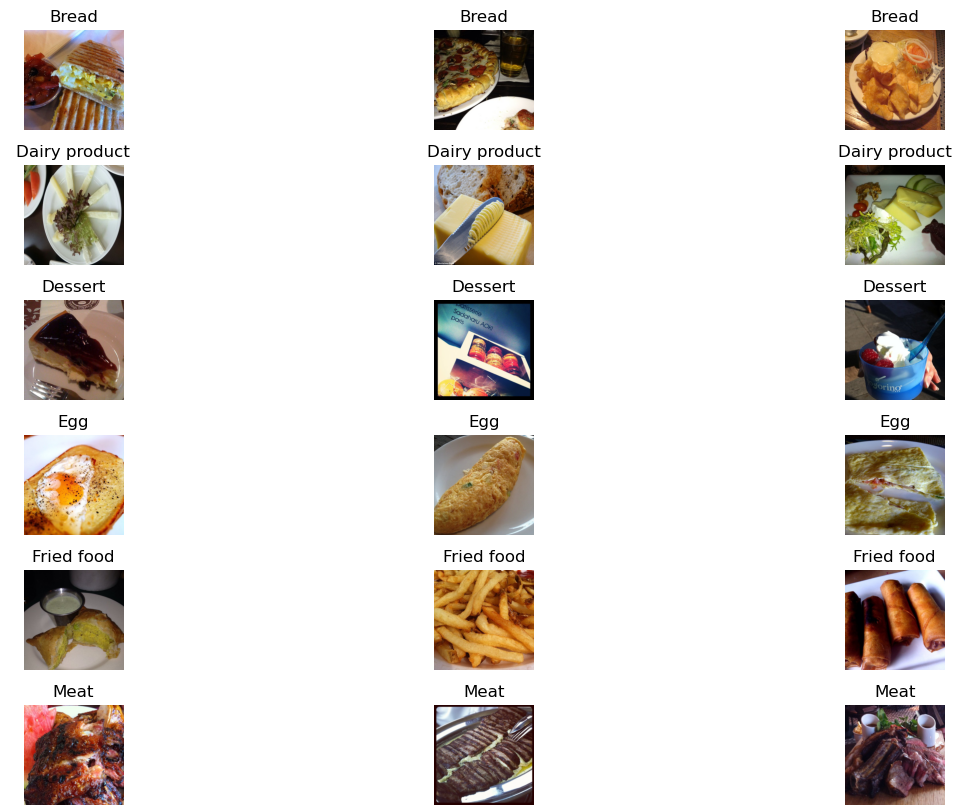
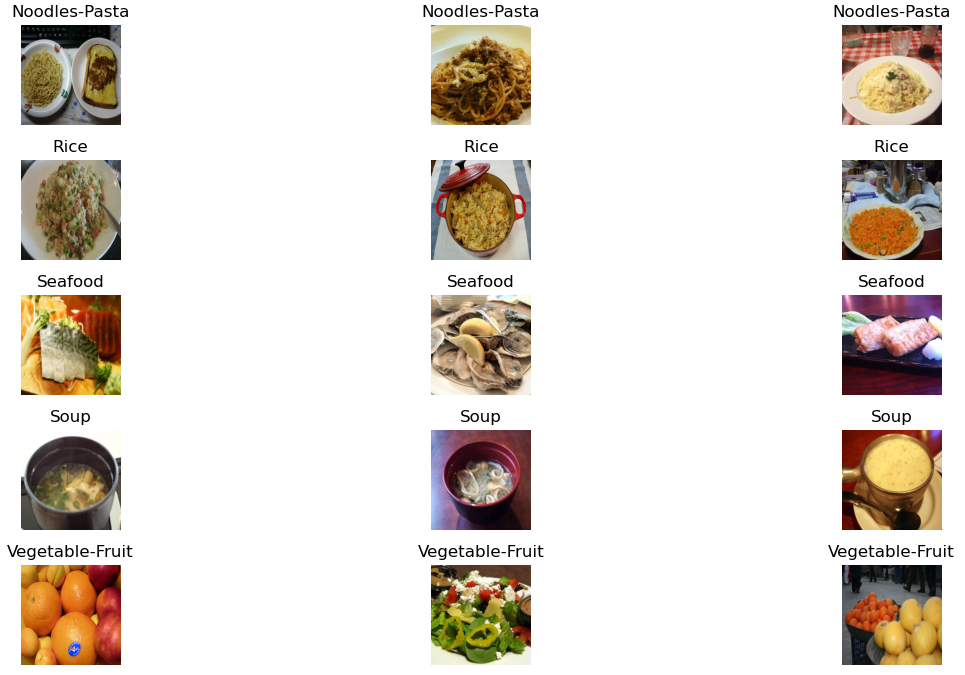
This dataset contains 16,643 food images grouped into 11 major food categories: Bread, Dairy product, Dessert, Egg, Fried food, Meat, Noodles-Pasta, Rice, Seafood, Soup, Vegetable-Fruit.
The dataset is divided into three splits: evaluation, training, and validation, and each split includes images of the 11 food categories.
For more details and to access the dataset, you can visit Dataset Resource.
Notes: I performed the model training processes of this project with Saturn Cloud. Additionally, the notebook food-classification-model-training.ipynb contains all the training processes for the food classification model.
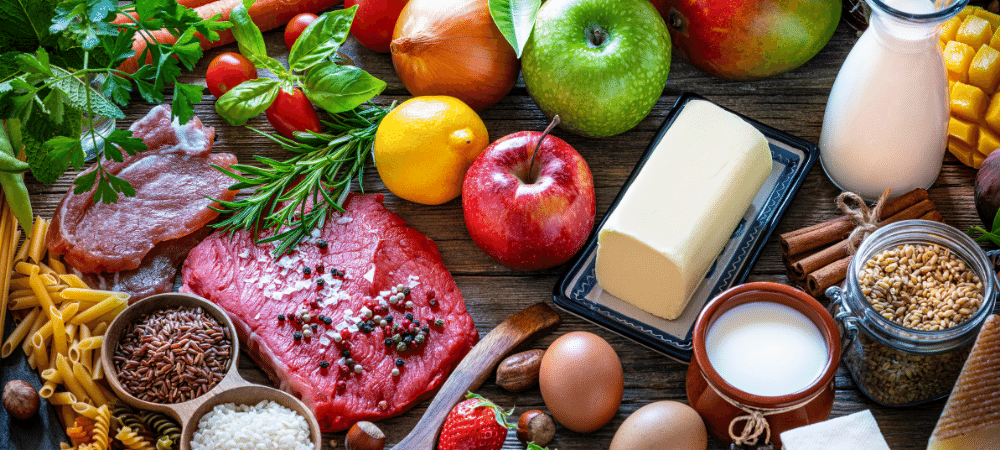
The dataset consists of sample images as shown below:
You can use the following Python code to load an image from the dataset and convert it into a numpy array of a 3D shape. Each row of the array represents the values of the red, green, and blue color channels of one pixel in the image:
import numpy as np
from tensorflow.keras.preprocessing.image import load_img

# Set the path, name, and full name of the image
path = "./training/Dessert"
name = "100.jpg"
fullname = f"{path}/{name}"

# Load the image and convert it into a numpy array
img = load_img(fullname, target_size=(299, 299))
x = np.array(img)

# Print the shape of the numpy array
print("Image Shape:", x.shape)In this section, pre-trained convolutional neural networks have been utilized for our food classification. The Keras applications offer different pre-trained models with various architectures. The model Xception has been employed for this project. This model takes an input image size of (229, 229) and scales each image pixel between -1 and 1.
# Create an instance of the pre-trained Xception model
model = Xception(weights='imagenet', input_shape=(229, 229, 3))
X = np.array([x])
X.shape # Output: (1, 299, 299, 3)
X = preprocess_input(X)
pred = model.predict(X)
pred.shape # Output: (1, 1000)
decode_predictions(pred)- Along with image size, the model also expects the
batch_sizewhich is the size of the batches of data (default 32). If one image is passed to the model, then the expected shape of the model should be (1, 229, 229, 3) - The preprocess_input function was used on our data to make predictions, as shown in the statement:
X = preprocess_input(X) - The
pred = model.predict(X)function returns 2D array of shape(1, 1000), where 1000 is the probablity of the image classes.decode_predictions(pred)can be used to get the class names and their probabilities in readable format.
Following are the steps to create train/validation data for model:
# Build image generator for training (takes preprocessing input function)
train_gen = ImageDataGenerator(preprocessing_function=preprocess_input)

# Load in train dataset into train generator
train_ds = train_gen.flow_from_directory('./training', # Train images directory
                                         target_size=(150,150), # resize images to train faster
                                         batch_size=32) # 32 images per batch

# Create image generator for validation
val_gen = ImageDataGenerator(preprocessing_function=preprocess_input)

# Load in image for validation
val_ds = val_gen.flow_from_directory('./validation', # Validation image directory
                                     target_size=(150,150),
                                     batch_size=32,
                                     shuffle=False) # False for validation
Following are the steps to build model from a pretrained model:
# Build base model
base_model = Xception(weights='imagenet',
                      include_top=False, # to create custom dense layer
                      input_shape=(150,150,3))

# Freeze the convolutional base by preventing the weights being updated during training
base_model.trainable = False

# Define expected image shape as input
inputs = keras.Input(shape=(150,150,3))

# Feed inputs to the base model
base = base_model(inputs, training=False) # set False because the model contains BatchNormalization layer

# Convert matrices into vectors using pooling layer
vectors = keras.layers.GlobalAveragePooling2D()(base)

# Create dense layer of 11 classes
outputs = keras.layers.Dense(11)(vectors)

# Create model for training
model = keras.Model(inputs, outputs)
Following are the steps to instantiate optimizer and loss function:
# Define learning rate
learning_rate = 0.01

# Create optimizer
optimizer = keras.optimizers.Adam(learning_rate=learning_rate)

# Define loss function
loss = keras.losses.CategoricalCrossentropy(from_logits=True) # to keep the raw output of dense layer without applying softmax

# Compile the model
model.compile(optimizer=optimizer,
              loss=loss,
              metrics=['accuracy']) # evaluation metric accuracy
The model is ready to train once it is defined and compiled:
# Train the model, validate it with validation data, and save the training history
history = model.fit(train_ds, epochs=15, validation_data=val_ds)# Function to create model
def make_model(learning_rate=0.01):
base_model = Xception(weights='imagenet',
include_top=False,
input_shape=(150,150,3))
base_model.trainable = False
#########################################
inputs = keras.Input(shape=(150,150,3))
base = base_model(inputs, training=False)
vectors = keras.layers.GlobalAveragePooling2D()(base)
outputs = keras.layers.Dense(11)(vectors)
model = keras.Model(inputs, outputs)
#########################################
optimizer = keras.optimizers.Adam(learning_rate=learning_rate)
loss = keras.losses.CategoricalCrossentropy(from_logits=True)
# Compile the model
model.compile(optimizer=optimizer,
loss=loss,
metrics=['accuracy'])
return model# Dictionary to store history with different learning rates
scores = {}
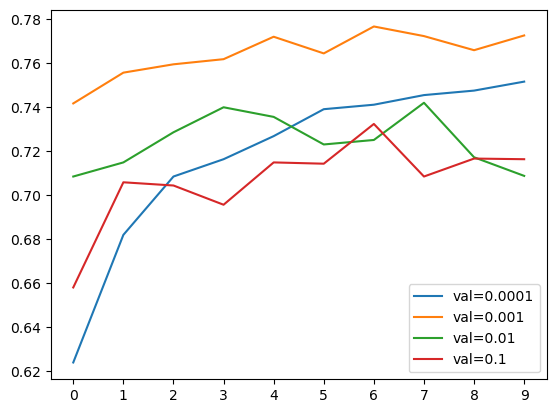
for lr in [0.0001, 0.001, 0.01, 0.1]:
print(f"learning rate: {lr}")
model = make_model(learning_rate=lr)
history = model.fit(train_ds, epochs=10, validation_data=val_ds)
scores[lr] = history.history
print()
print()- best learning_rate = 0.001
ModelCheckpoint callback is used to save the best model during training.
model.save_weights('model_v1.h5', save_format='h5')
checkpoint = keras.callbacks.ModelCheckpoint(
    'xception_v1_{epoch:02d}_{val_accuracy:.3f}.h5',
    save_best_only=True,
    monitor='val_accuracy',
    mode='max'
)Add size_inner parameter and inner = keras.layers.Dense(size_inner, activation='relu')(vectors) to the make_model function.
Next, train the model with different sizes of inner layer:
learning_rate = 0.001

scores = {}

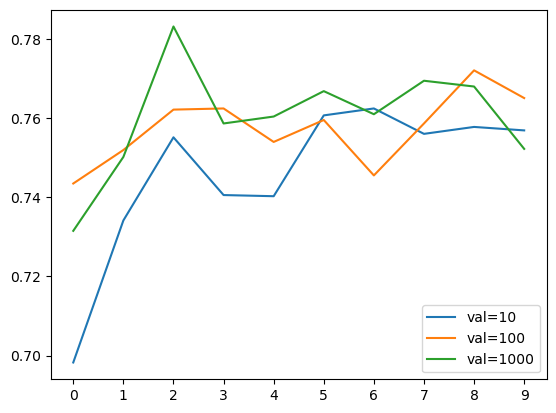
for size in [10, 100, 1000]:
    print(f"size: {size}")

    model = make_model(learning_rate=learning_rate, size_inner=size)
    history = model.fit(train_ds, epochs=10, validation_data=val_ds)
    scores[size] = history.history

    print()
print()- best size_inner = 1000
Add droprate parameter and drop = keras.layers.Dropout(droprate)(inner) to the make_model function.
learning_rate = 0.001
size = 1000

scores = {}

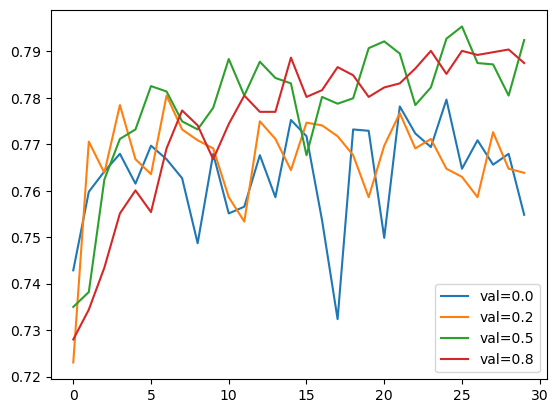
for droprate in [0.0, 0.2, 0.5, 0.8]:
    print(f"droprate: {droprate}")

    model = make_model(
        learning_rate=learning_rate,
        size_inner=size,
        droprate=droprate
    )
    # Train for longer (epochs=30) cause of dropout regularization
    history = model.fit(train_ds, epochs=30, validation_data=val_ds)
    scores[droprate] = history.history

    print()
print()- I'm go with droprate = 0.5
How to choose augmentations?
- First step is to use our own judgement, for example, looking at the images (both on train and validation), does it make sense to introduce horizontal flip?
- Look at the dataset, what kind of vairations are there? are objects always center?
- Augmentations are hyperparameters: like many other hyperparameters, often times we need to test whether image augmentations are useful for the model or not. If the model doesn't improve or have same performance after certain epochs, in that case we don't use it.
# Create image generator for train data and also augment the images
train_gen = ImageDataGenerator(
    preprocessing_function=preprocess_input,
    shear_range=10,
    zoom_range=0.1,
    vertical_flip=True
)

train_ds = train_gen.flow_from_directory(
    "./training",
    target_size=(150, 150),
    batch_size=32
)

val_gen = ImageDataGenerator(preprocessing_function=preprocess_input)
val_ds = val_gen.flow_from_directory(
    "./validation",
    target_size=(150, 150),
    batch_size=32,
    shuffle=False
)- After the data augmentation process, no significant increase in accuracy values was observed. Therefore, there is no need for us to use the data augmentation process.
So far, all the experiments we conducted were carried out on a smaller model. The reason for this choice is that smaller models train faster, allowing us to iterate more quickly and experiment with different parameters. Now it's time to train a larger model with a size of 299x299.
checkpoint = keras.callbacks.ModelCheckpoint(
    'xception_v4_{epoch:02d}_{val_accuracy:.3f}.h5',
    save_best_only=True,
    monitor='val_accuracy',
    mode='max'
)
learning_rate = 0.001
size = 1000
droprate = 0.5
input_size = 299
model = make_model(
input_size=input_size,
learning_rate=learning_rate,
size_inner=size,
droprate=droprate
)
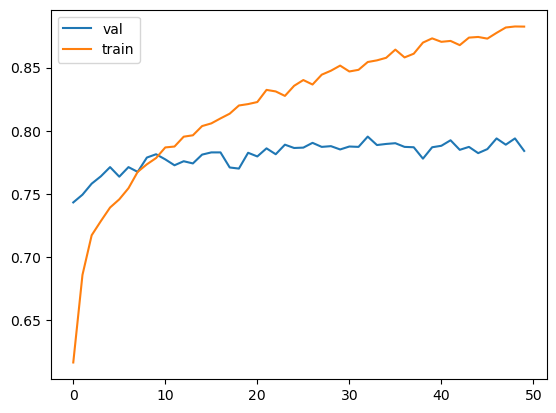
history = model.fit(train_ds, epochs=50, validation_data=val_ds,
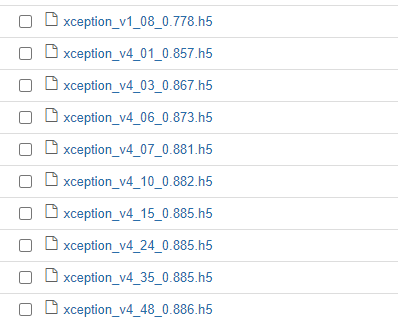
callbacks=[checkpoint])- best checkpoint =
xception_v4_48_0.886.h5
- The saved model can be loaded and used for prediction with
keras.models.load_model(path/to/saved_model)method. - The model performance can be evaluated on test data with
model.evaluate(test_ds).
model = keras.models.load_model('xception_v4_48_0.886.h5')
model.evaluate(test_ds)- The prediction on the test image can be made using the method
model.predict(X).
path = "./evaluation/Dessert/14.jpg"
img = load_img(path, target_size=(299, 299))
x = np.array(img) # converting img to numpy array
X = np.array([x])
X = preprocess_input(X)
pred = model.predict(X)
prediction_result = dict(zip(classes, pred[0]))
max_class = max(prediction_result, key=prediction_result.get)
print(f"The predicted class with the highest value: {max_class}") #The predicted class with the highest value: Dessert
The prediction results of the model look quite successful.
- tensorflow has a size of approximately 1.7 GB
- there are size limits of cloud services and docker container
- tensorflow lite is small in size and limited to using a model to make predictions (inference)
- convert tensorflow keras model to a tensorflow lite model
The conversion process from Keras to TF-Lite for the food classification model can be found in tensorflow-model.ipynb.
- Create
lambda_function.pyfor AWS Lambda - Test the lambda function
- Open IPython in the terminal, import the
lambda_function, and then uselambda_function.predict("your url")to make predictions. Replace "your url" with the URL you want to classify.


- Create a file named
predict_flask.py - Open a terminal and run python
predict_flask.pyto start the server. - Open another terminal and run python
test_flask.py. If it displays the class of food, it indicates that the model and server are functioning. - Use
Ctrl + cto stop the server.
- To build a virtual environment, run
pip install pipenv - Install required packages with
pipenv install numpy pandas flask requests matplotlib tensorflow keras tflite_runtime keras_image_helper python-dotenv - Use
pipenv shellto enter the virtual environment
- Create a file named
Dockerfilewith the following content:
FROM public.ecr.aws/lambda/python:3.9

RUN pip install keras-image-helper

RUN pip install https://github.com/alexeygrigorev/tflite-aws-lambda/raw/main/tflite/tflite_runtime-2.7.0-cp39-cp39-linux_x86_64.whl

COPY xception_v4_48_0.886.tflite .
COPY lambda_function.py .

CMD ["lambda_function.lambda_handler"] - Build the Docker image using the following command:
docker build -t your_image_name .- Replace
your_image_namewith a name of your choice.
- Now, we need to test it:
docker run -it --rm -p 8080:8080 your_image_name- Now, let's test it:
Create a file named
test.py
import requests

url = 'http://localhost:8080/2015-03-31/functions/function/invocations'

data = {'url': 'https://bit.ly/fried-food'}

result = requests.post(url, json=data).json()
print(result)- Open a terminal and run python
test.py
# Open the command line
# you can install awscli, if you dont have it
pip install awscli
# if you are doing it for the first time you'll need to run `aws configure`
aws configure
# create image
aws ecr create-repository --repository-name food-classification-imagesWe can refresh Amazon Elastic Container Registery page. We should be able to see it there.

- Log in to registry:
aws ecr get-login --no-include-email | sed 's/[0-9a-zA-Z=]\{20,\}/PASSWORD/g'The output of this command:
docker login -u AWS -p PASSWORD https://318268944894.dkr.ecr.eu-west-1.amazonaws.com- Then, take whatever this command returns and immediately execute it:
$(aws ecr get-login --no-include-email)The output: Login Succeeded
- Now, copy and paste the following commands into the terminal:
ACCOUNT=318268944894
REGION=eu-west-1
REGISTRY=food-classification-images
PREFIX=${ACCOUNT}.dkr.ecr.${REGION}.amazonaws.com/${REGISTRY}

TAG=food-classification-model-xception-v4-001
REMOTE_URI=${PREFIX}:${TAG}- Run the image:
docker run -it --rm food-classification-model:latest- Use
Ctrl + cto stop. - Tag this image with the URI we just created:
docker tag food-classification-model:latest ${REMOTE_URI}- Push to ECR:
docker push ${REMOTE_URI}- Let's now use it for our lambda function:
Select container image and give a name


Probably, it will fail with an error.

- To fix the error, we need to go to configuration and then general configuration and click edit and we need to increase timeout to 30 seconds. Then we also need to give it more memory.


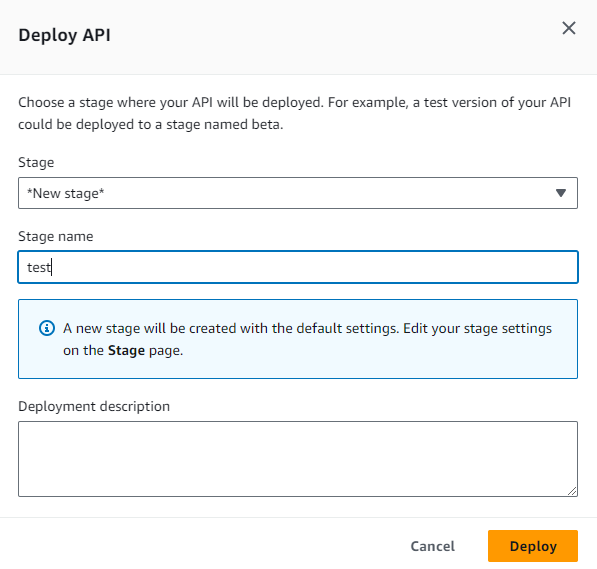
- Go to API Gateway
- Click Create API
- Select REST API and click Build
- After creating API, create a resource
- Create post method for lambda function.
- Test:
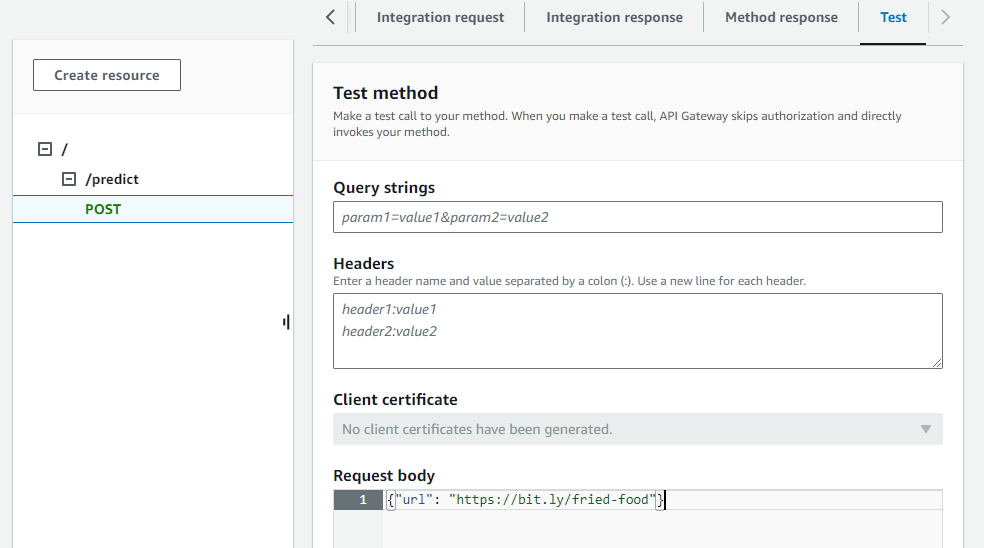
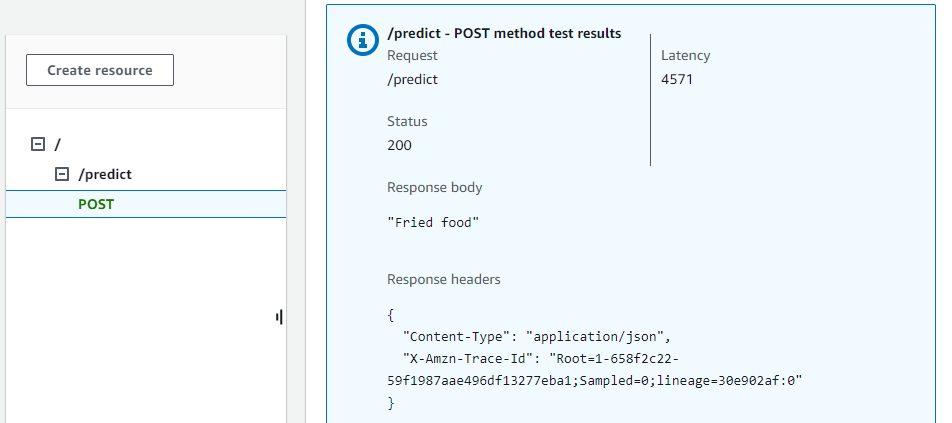
What happens now is that we have a URL that we can use for testing our API Gateway.
- Update your
test.pyfile by appending '/predict' to the newly generated URL after deploying the AWS Lambda function through API Gateway
Note: The new file I created is named test_aws_lambda.py. After watching this YouTube video, I used the dotenv library to hide the URL generated after deployment.
- Run python
test_aws_lambda.py
