- Notes - Docker
- Understanding Docker
- Installing Docker
- Discovering Docker
- Docker in the Real World
- Creating a Dockerfile
- Building and pushing Docker images
- Running Docker containers
- Live code loading with volumes
- Debugging tips and tricks
- Linking containers with Docker networks
- Persisting data to your Docker host
- Sharing data between containers
- Optimizing your Docker images
- Running scripts when a container starts
- Cleaning up after yourself
- Saving time and money.
- VMs waste lots of resources (like Vagrant).
- Each Vagrantbox is huge, around 700mb-1GB. So we need lots of spaces for each project.
- Docker is 10x efficient than Vagrant when it comes to disk space.
- Prevents 'it works on my machine' issues.
- Prevents problems like dependency version mismatch.
- Docker runs your apps in a controlled environment.
- Keeps your system nice and clean.
- Prevents setup burden of languages and tools.
- VMs create isolated environments, but they are slow and not efficient.
- Then LXC came into the action. The problem with LXCs is, they are tough to use, because they are complicated.
-
Docker containers are not VMs. Think of containers as isolated processes.
-
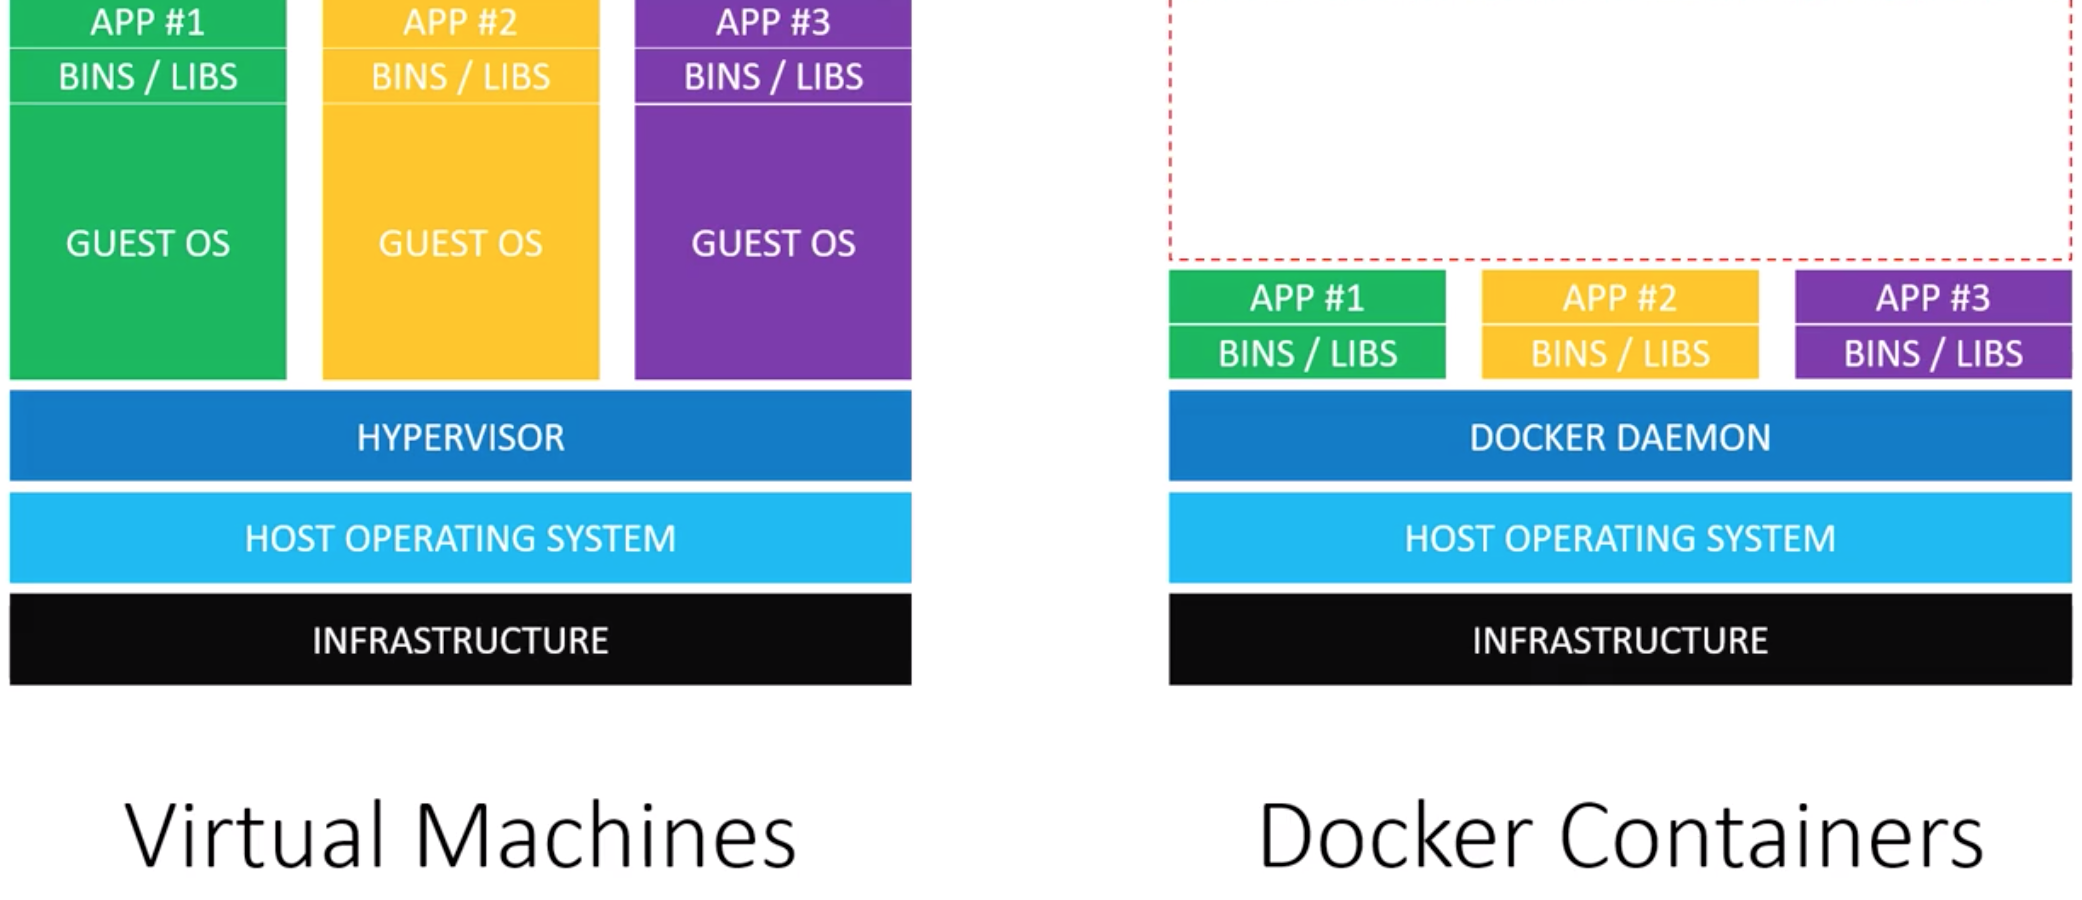
To be able to run a VM on a server:
- We need an infrastructure
- Then a host operating system
- Hypervisor to run VMs on this operating system. There are two types of hypervisors:
- Type 1: Direct link to the infrastructure, such as HyperKit (OSx), Hyper-V (Windows) and KVM (Linux)
- Type 2: Runs as an app on the host OS: VirtualBox/VMWare
- On top of hypervisor, we will have different guest operating systems. The problem is all these guestOSs occupies space on our disk, uses CPU and memory resources.
- On top of GuestOS, we will have our binaries and libraries.
- Then there will be our apps on top of everything.
-
To be able to run a docker container on a server:
- We need an infrastructure
- Then a host operating system
- Docker deamon (replaces hypervisor)
- Our binaries and libraries
- Then there will be our apps on top of everything.
-
In summary:
-
Both have advantages and disadvantages.
-
VMs are good for isolating systems.
-
Docker containers are good for isolating applications.
-
VMs are like houses. Houses (VMs) are fully self-contained. They have their own infrastructure like plumbing, heating, electrical systems and so on. On the other hand, most houses include a bedroom, bathroom, living room and additional rooms. If you only need an area to sleep and poop, you will probably end up by buying what you need because that's how houses are built.
-
Docker containers are apartments. Apartments also provide privacy, and you will have your space, but you will be using a shared infrastructure. Each apartment building is using shared plumbing, heating, electrical systems etc. Apartments maximize alternatives for your size needs, you can buy a huge apartment or a very small one.
-
Cloud hosting providers use VMs. Hardware constraints tied into your plan.
-
Docker can run on dedicated hardware (bare-matel) too!
-
Build once deploy everywhere is the whole point.
-
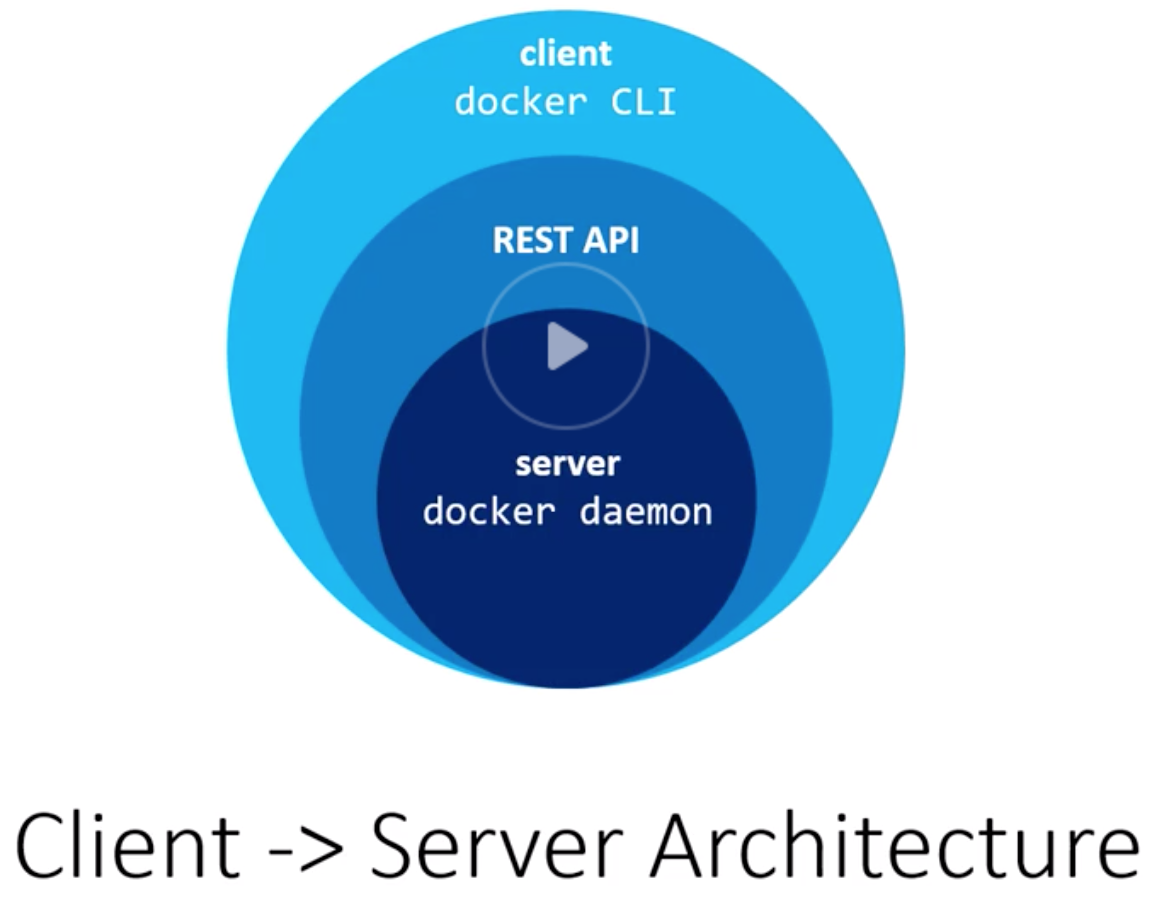
docker daemonis the server that runs on host operating system. It only runs on Linux, because it depends on Linux kernel features. -
docker daemonexposes a REST API for the clients. One of the most popular clients communicating with daemon isdocker cli. When you install docker, you get daemon and cli together. -
You can use the client to manage many components of docker, like containers, images and networks.
-
Docker CE is production ready. Docker EE is for mission critical apps.
-
Docker EE provides:
- Certified images and plugins
- Vulnerability scans
- Access to Docker datacenter
- Official support
-
Prices range 750$ to 2000$ per year.
-
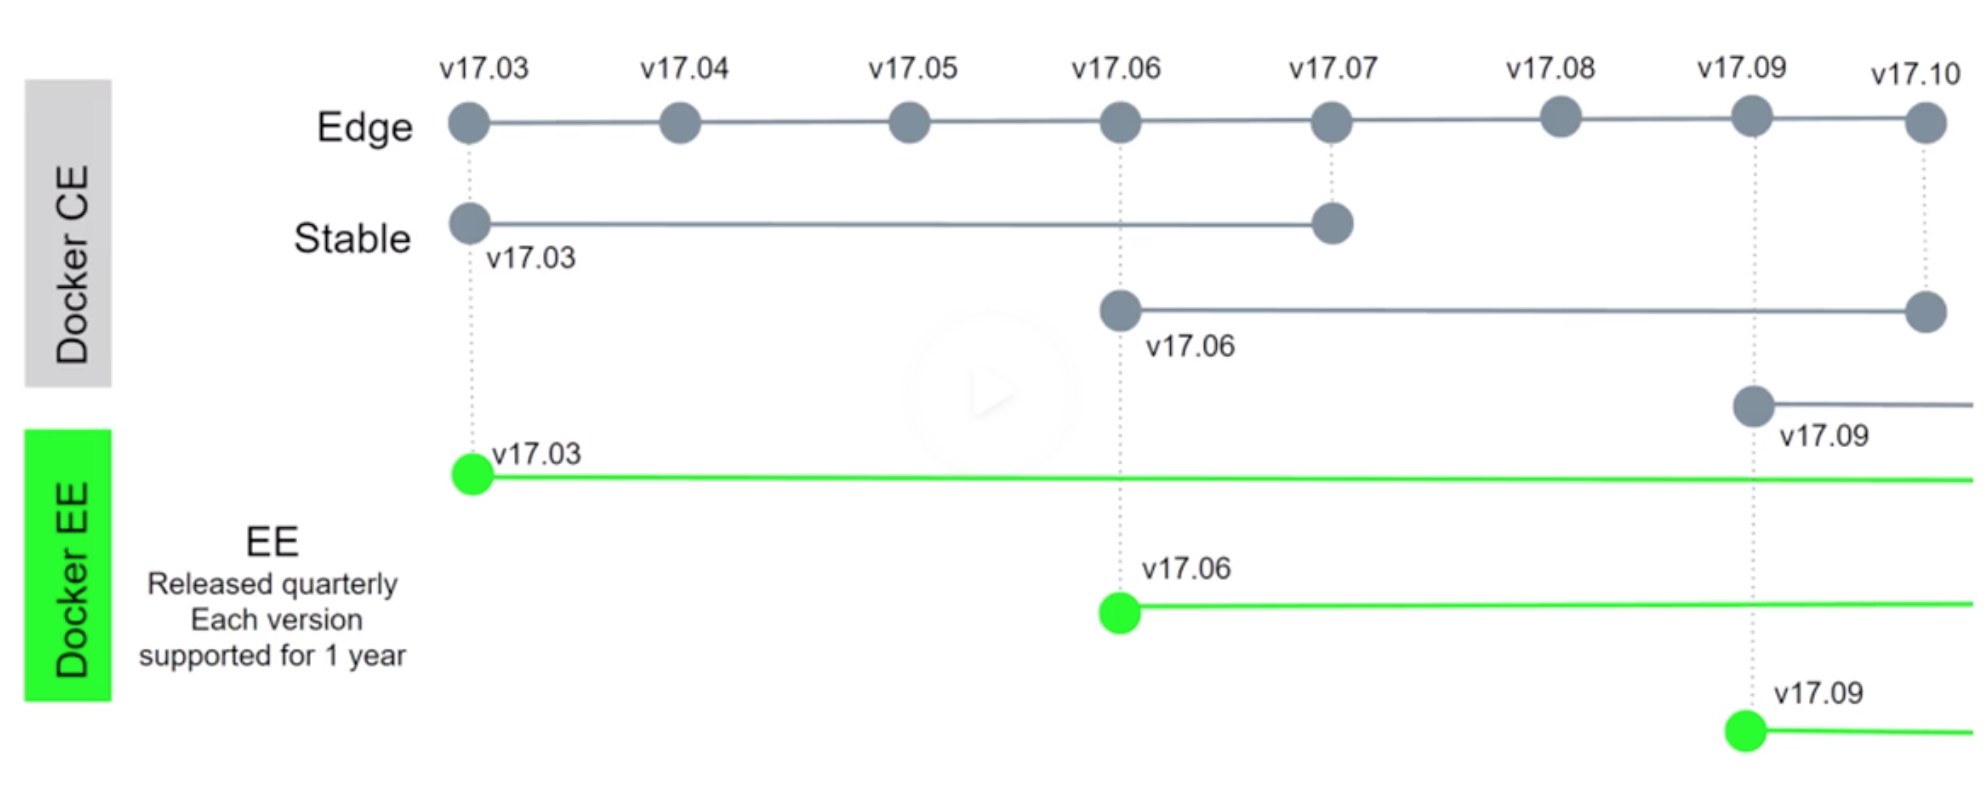
Docker CE edition comes with two release channels:
- Edge channel: Released each month. Getting updates at the same month.
- Stable channel: Released every 4 months. Each release is supported for 4 months.
-
Docker EE releases are every 3 months. Each release is supported for 12 months.
-
Versioning scheme is structured with date. For example
17.03means 2017 March.
Docker toolbox installs:
- Docker CE/EE
- Docker Compose
- Docker Machine
- VirtualBox
- Docker QuickStart Terminal
- Kitematic
Since the docker-daemon requires Linux, and OSx and Windows are not running Linux you need some way to load up Linux in OSx and Windows. Here VirtualBox comes into the action. Remember, VirtualBox is a type-2 hypervisor. docker machine helps you create servers and install docker. It's a command line tool. Docker machine can be used locally in cloud.
- Docker for Mac/Windows is a newer tool than Docker toolbox, and is the prefered way. No VirtualBox is required for Docker for Mac/Windows because it uses the type-1 hypervisor (OSx: Hyper-Kit, Windows: Hyper-V).
Docker for Mac/Windows installs:
- Docker CE/EE
- Docker Compose
- Docker Machine
Docker Toolbox vs. Docker for Mac/Windows
-
Docker Toolbox (with type2 hypervisor, virtualbox):
- Requires Windows 7+ or Mountain Lion 10.8+, and Windows home version is ok.
- Works on older hardware
- Docker daemon is running on remote. Ie: access 192.168.99.100 etc.
- You have to use
docker quick start terminal.
-
Docker for Mac/Windows (with type1 hypervisor, natively, without VirtualBox):
- Requires Win 10 (Pro, Ent, Stu) or Yosemite 10.10.3+
- Requires hardware never than 2010
- Docker daemon is running locally. Ie. access localhost
- You can use any terminal you want.
-
Check docker:
docker info
-
Check docker-compose:
docker-compose --version
docker run hello-world
# => hello world!
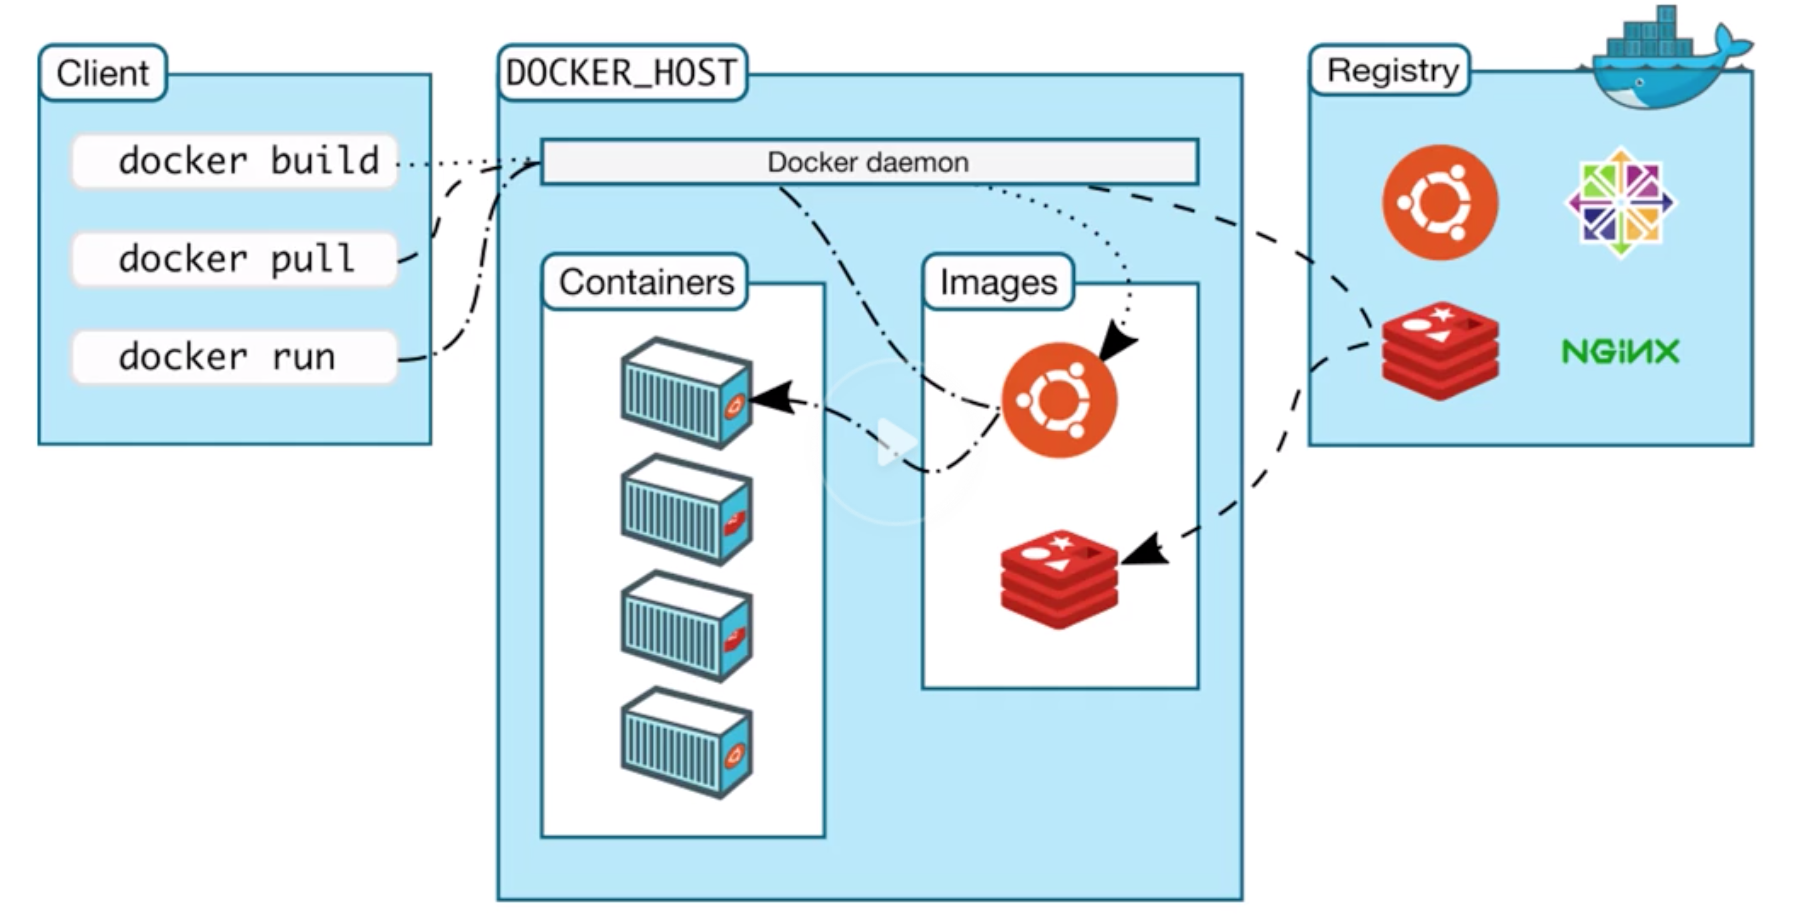
To generate this message, Docker took the following steps:
- The Docker client contacted the Docker daemon.
- The Docker daemon pulled the
hello-worldimage from the Docker Hub (amd64) - The Docker daemon created a new container from that image which runs the executable that produces the output you are currently reading.
- The Docker daemon streamed that output to the Docker client, which sent it to your terminal.
Lets play a little bit:
docker run -it ubuntu bash
docker run -it alpine sh
docker run -it alpine ls /varA docker image is a combination of a file system and parameters. A docker image doesn't have any state attached to it, and once built it never changes. A docker image is something that you can download, build and run.
Container is the running version of an image. Analogy:
- Docker Image = Class
- Container = instance
You can run many containers from a single image. Docker containers are immutable. Any change you made will be lost forever.
docker run -it alpine sh
cd /home
touch foobar.txt
exit # file is gone forever
If we open two different terminals, and type docker run -it alpine sh in both of them, this two containers will be independent and will not effect each others. When you create a file in one of them, the other container will not be able to see it.
DockerHub is a docker registry. It's a place where you can store your images. It's like Github, but for docker images.
docker run docker.io/library/hello-worldThere are 2 ways to build a docker image:
docker commitcommand.- Dockerfile
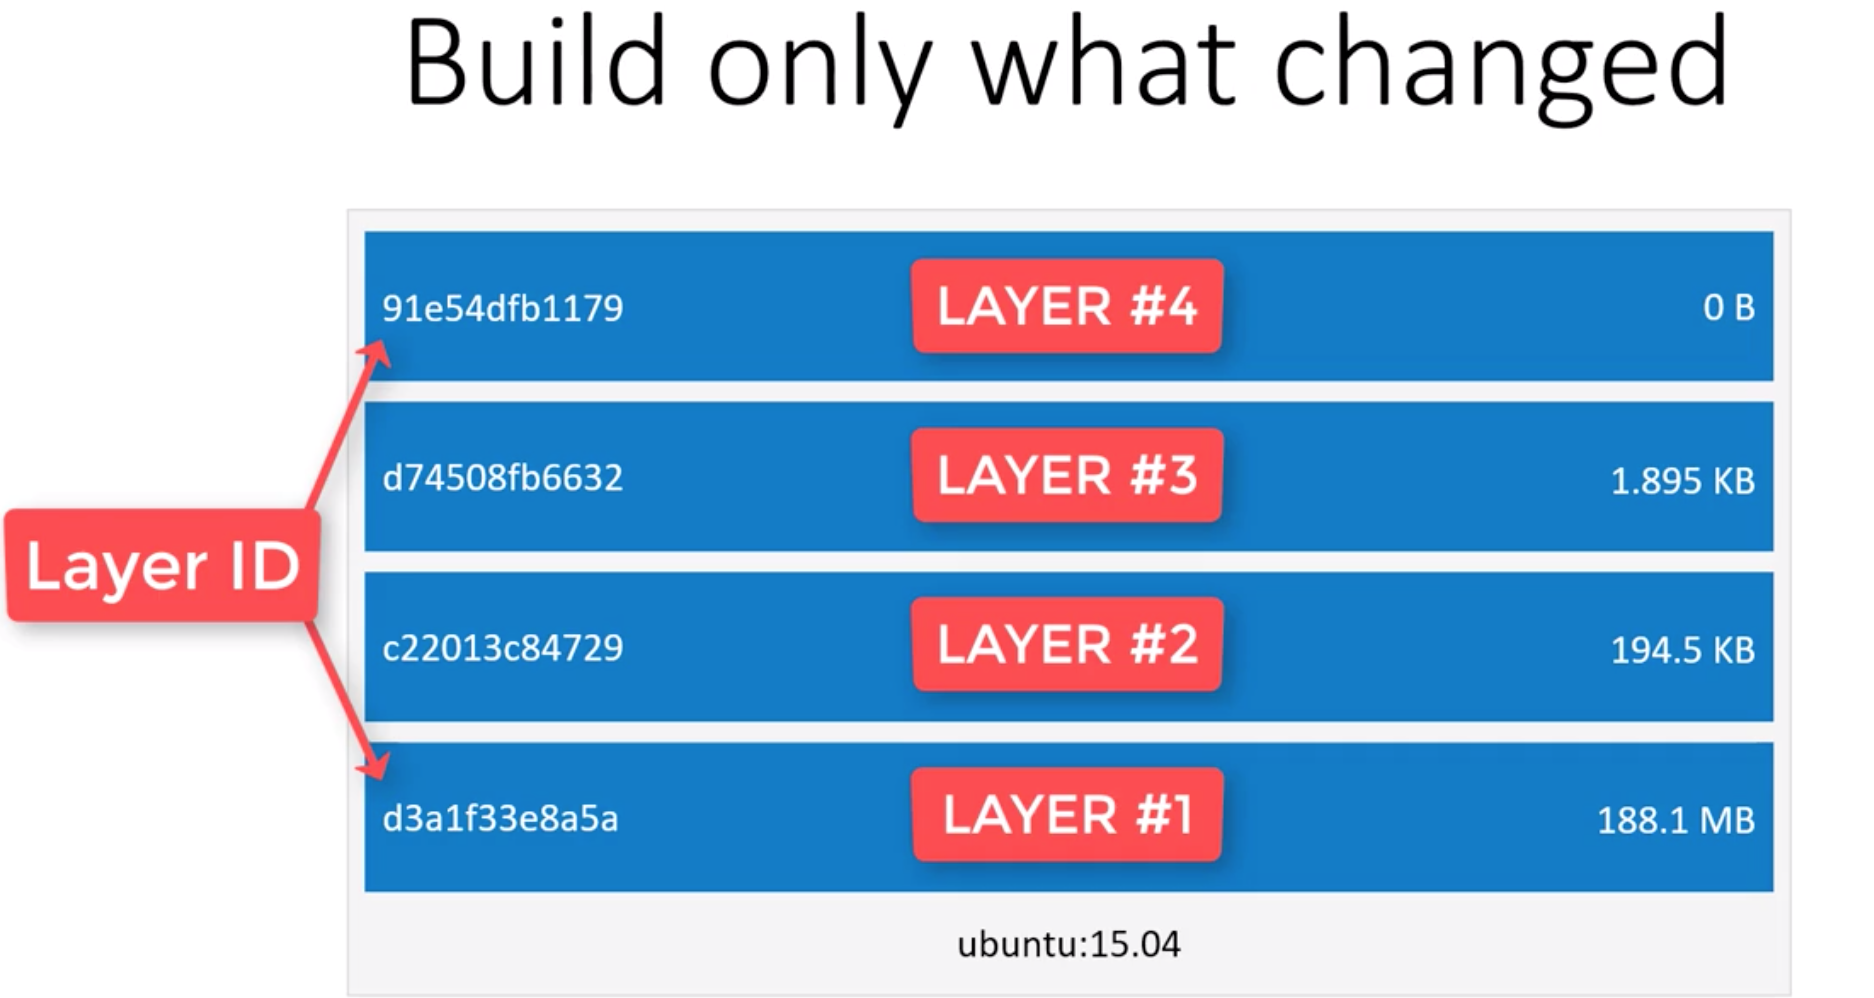
Most of the time we prefer to use Dockerfile. Docker images are composed one or more layers. Try to think of each layer as self contained files, and a docker image is the result of stacking together one or more of this layers.
Docker only pulls parts that has changed. So, when we update our docker image, it will not download everything from scratch, it will only download changed parts. The same exists when it comes to generating docker images.
Docker images are basically stack of layers and Dockerfile is just a recipe.
The first instruction in a Dockerfile must be FROM. FROM allows us to import/define a base image. A base image could be another docker image, or we can create one from scratch. It's highly recommended to use an official image.
RUN allows you to run any command, that you can run on your OS, without docker.
WORKDIR expects you to pass a directory, and any other instruction we run from this point on will be on the context of the path we set here.
COPY simply copies files from the directory where your Dockerfile exists. You can't copy files that are above Dockerfile, you can only copy files that are below your Dockerfile.
Dockerfile after this chapter:
FROM ruby:2.5-alpine

RUN mkdir /app
WORKDIR /app

COPY Gemfile Gemfile.lock /app
RUN bundle install --jobs 4 --retry 3
COPY . .
Docker caches every layer. So it makes sense to copy Gemfile and Gemfile.lock before copying entire project folder. Otherwise if we configure our project like this:
FROM ruby:2.5-alpine

RUN mkdir /app
WORKDIR /app

COPY . .
RUN bundle install --jobs 4 --retry 3
It's going to install our dependencies every time from scratch and it's gonna take more time.
LABEL command enables you to attach arbitrary meta data to your image, that you can retrieve later.
LABEL maintainer="M. Serhat Dundar <msdundars@gmail.com>"
      version="0.1"
CMD is a little bit interesting. It defines the default command to be run when the docker image gets started. CMD is different than the RUN command, because it's executed when the docker image gets ran, as opposed to the RUN command, that is executed when the docker image gets built. We can use CMD to run the server when image gets run.
CMD bundle exec rails server -b "0.0.0.0" -p 3000Dockerfile after this chapter:
FROM ruby:2.5-alpine

RUN mkdir /app
WORKDIR /app

COPY Gemfile Gemfile.lock /app/
RUN bundle install --jobs 4 --retry 3
COPY . .

LABEL maintainer="M. Serhat Dundar <msdundar@babbel.com>" \
  version="0.1"

CMD bundle exec rails server -b "0.0.0.0" -p 3000Get help:
docker --helpBuild the image:
docker image build -t deeplinks_resolver .Inspect an image:
docker image inspect deeplinks_resolverBuild the image with a tag:
docker image build -t deeplinks_resolver:1.0 .List all docker images on your computer:
docker image lsDelete an image:
docker image rm deeplinks_resolver:1.0We can use repository, repository+tag and image ID options to delete an image.
We don't need to type full ID to delete an image, just some characters are fine:
docker image rm 1234Login to Docker hub:
docker loginBefore pushing our image to hub we must tag it with our username:
docker image tag deeplinks_resolver msdundar/deeplinks_resolver:latestPush the latest version of the image:
docker image push msdundar/deeplinks_resolver:latestPull the image from docker hub:
docker pull msdundar/deeplinks_resolverList all running containers:
docker container lsRun a docker container:
docker container runRun a docker container in interactive mod and with ports:
docker container run -it -p 3000:3000 -e RAILS_ENV=development -e SOMETHING_ELSE=foo deeplinks_resolver:0.1
-itflag enables terminal colors, CTRL+C key and makes docker container interactive The first port is the bind port under docker host, and the second port is the bind port withing the docker container -e flag allows us to pass environment variables
We can hit CTRL+C to stop our container. Then we will not be seeing our container if we run docker container ls.
Stopped containers don't use disk space, but it's always a good idea to destroy stopped containers.
We can list stopped containers as follows:
docker container ls -aWe can delete stopped containers as follows:
docker container rm CONTAINER_ID|CONTAINER_NAMEBut of course it's annoying to remove them manually. So we can automate this process with --rm flag:
docker container run -it -p 3000:3000 --rm --name my_container deeplinks_resolver:0.1We can also use -d to run our containers in detached mode:
docker container run -it -p 3000:3000 --rm --name my_container -d deeplinks_resolver:0.1Our container will continue to run in background. Since we can not make CTRL+C for a container running in background, we can stop it first, then delete:
docker container stop 12345
docker container rm 12345
We can get log output of a running/stopped container:
docker container logs 12345It's also possible to tail logs from a container:
docker container logs -f 12345Real time metrics about running containers:
docker container statsWe can start two containers from the same image, but their names has to be unique and they have to use different ports:
docker container run -it -p 3000:3000 --rm --name my_container_1 -d deeplinks_resolver:0.1
docker container run -it -p 3001:3001 --rm --name my_container_2 -d deeplinks_resolver:0.1
We can make our containers restart if something goes wrong. This is actually useful in production systems:
docker container run -it -p 3000:3000 --restart on-failure --name my_container_1 -d deeplinks_resolver:0.1We can't use
-rmand--restartflags together.
To follow code changes directly in our container we can use volumes. To be able to use volumes with our container -v flag comes into play.
docker container run -it -p 3001:3001 --rm --name my_container_2 -d -v "$PWD:/app" deeplinks_resolver:0.1This will take everything from our working directory to the running container. It's also possible to pass multiple volume commands.
Interact with a running container:
docker container exec -it my_container shWe can also interact in other ways:
docker container exec -it my_container ruby --version # 2.5.5p157We can also create files inside the container:
docker container exec -it my_container_1 touch foo.txtThe problem is file ownership and permissions. Sometimes docker assigns file ownership as root:root. We can pass a user parameter to avoid this problem.
docker container exec -it my_container_1 --user "$(id -u):$(id -g)" touch foo.txtid -u will get user ID. id -g will get group id.
Lets create another image:
docker image build -t deeplinks_resolver:0.2 .Lets pull redis image:
docker pull redis:3.2-alpineThere are 2 types of networks:
- Internal networks: LAN
- External networks: WAN
A container can run on any network. We can check networks like this:
docker network lsWe can inspect any network as follows:
docker network inspect bridgeLets start redis container and our deeplinks#resolver container in background:
docker container run --rm -itd -p 6379:6379 --name redis redis:3.2-alpine
docker container run --rm -itd -p 3000:3000 --name deeplinks_resolver deeplinks_resolver:0.2
Check IP address of a container:
docker exec redis ipconfigBut this is a little bit problematic. Because in this case, we have to configure/hardcode IP addresses manually, and if one of the IP addresses change, our containers will break. Docker has a better solution for this. We can configure our own bridge, so our containers can communicate with each other.
docker network create --driver bridge first_network
docker network inspect first_network
Lets stop our running containers first, and then start them with --net flag:
docker container run --rm -itd -p 6379:6379 --name redis --net first_network redis:3.2-alpine
docker container run --rm -itd -p 3000:3000 --name deeplinks_resolver --net first_network deeplinks_resolver:0.2
Inspect the network now:
docker network inspect first_networkLets try pinging our redis server from deeplinks_resolver:
docker exec deeplinks_resolver ping redisWe will lose data generated by our app when we stop the container. We can create named volumes to persist data, and use container with databases etc.
docker volume create deeplinks_resolver_redisList all volumes:
docker volume lsInspect a volume:
docker volume inspect deeplinks_resolver_redisWe can attach volumes with -v flag, when we are starting the container:
docker container run --rm -itd -p 3000:3000 --name deeplinks_resolver --net first_network -v deeplinks_resolver_redis:/data deeplinks_resolver:0.2/data folder isn't always necessary, but by default redis image is looking at this folder as a volume. We found this information from redis image documentation.
Normally containers supposed to be stateless and portable! Therefore we shouldn't be storing anything in our container. But databases are an exception to this.
We can expose any folder as a volume like this:
VOLUME ["/app/public"]We can also expose any folder with -v flag:
docker container run --rm -itd -p 3000:3000 --name deeplinks_resolver --net first_network -v $PWD:/app -v /app/public/Then we can point volumes from other containers:
docker container run --rm -itd -p 6379:6379 --name redis --net first_network -v deeplinks_resolver_redis:/data --volumes-from deeplinks_resolver redis:3.2-alpineLets verify the volume:
docker container exec -it redis sh
ls /app/public
You can see the changes immediately in volumes!
If we have a .dockerignore file exists, during COPY/ADD instructions, Docker is going to remove files matching pattern defined in this file. If we have WORKDIR set, ignoring will start from this folder.
Here is a ready to use script for optimizing alpine:
FROM python:2.7-alpine

RUN mkdir /app
WORKDIR /app

COPY requirements.txt requirements.txt

RUN apk add --no-cache --virtual .build-deps \
    && pip install -r requirements.txt \
    && find /usr/local \
        \( -type d -a -name test -o -name tests \) \
        -o \( -type f -a -name '*.pyc' -o -name '*.pyo' \) \
        -exec rm -rf '{}' + \
    && runDeps="$( \
        scanelf --needed --nobanner --recursive /usr/local \
                | awk '{ gsub(/,/, "\nso:", $2); print "so:" $2 }' \
                | sort -u \
                | xargs -r apk info --installed \
                | sort -u \
    )" \
    && apk add --virtual .rundeps $runDeps \
    && apk del .build-deps

COPY . .

LABEL maintainer="Nick Janetakis <nick.janetakis@gmail.com>" \
      version="1.0"

VOLUME ["/app/public"]

CMD flask run --host=0.0.0.0 --port=5000ENTRYPOINT [""] declaration allows you to run a script, after your docker container starts.
For example when we are using postgreSQL, we will probably want to create a database, a database user and password in our container. We can achieve this with ENTRYPOINT declaration. Official postgreSQL image already offers an ENTRYPOINT for us.
docker-entrypoint.sh file:
#!/bin/sh

set -e

echo "The Dockerfile ENTRYPOINT has been executed!"
Dockerfile declarations to state entry point:
# copy entry point
COPY docker-entrypoint.sh /
RUN chmod +x /docker-entrypoint.sh
ENTRYPOINT ["/docker-entrypoint.sh"]
Default ENTRYPOINT for alpine image is /bin/sh -c. We are overriding this one by defining an ENTRYPOINT in our Dockerfile.
ENTRYPOINT allows us to run commands after our container runs. So basically we can use that for:
- Running database migrations
- Changing nginx config
etc. like tasks that has to be run after we start the container.
Show general status of Docker on your system:
docker system dfCleanup everything automatically:
docker system pruneMake it cronjob friendly with -f flag. It won't ask for confirmation this way:
docker system prune -fWe can stop multiple containers:
docker container stop aaa bbb cccStop all containers together:
docker container stop $(docker container ls -a -q)