Android Studio Robolectric Test Example
This example project shows how to use robolectric, junit and assertJ with your gradle-based Android Studio projects. Examine the top-level build.gradle and app/build.gradle files for a new project configuration gradle boilerplate.
Make sure you're running the most recent version of Android Studio from the Canary Channel for this to work correctly (1.2 Beta as of today).
To set up from a new Android Studio Project:
Add test dependencies on assertj-android and Robolectric to your module's build.gradle file. Your app module's app/build.gradle file would look something like this:
apply plugin: 'com.android.application'
android {
    compileSdkVersion 23
    buildToolsVersion "23.0.1"

    defaultConfig {
        applicationId "com.example.joshskeen.myapplication"
        minSdkVersion 16
        targetSdkVersion 23
        versionCode 1
        versionName "1.0"
    }

    buildTypes {
        release {
            minifyEnabled false
            proguardFiles getDefaultProguardFile('proguard-android.txt'), 'proguard-rules.pro'
        }
    }
}

dependencies {
    compile fileTree(dir: 'libs', include: ['*.jar'])
    testCompile 'junit:junit:4.12'
    testCompile 'com.squareup.assertj:assertj-android:1.1.0'
    testCompile 'org.robolectric:robolectric:3.0'
}- If they don't already exist, create directories matching src/test/java/ and add a package matching your project's packagename. E.g. src/test/java/com.example.joshskeen.myapplication
- Sync your gradle file by clicking 'Sync Project with Gradle Files'
- Select "Unit Tests" under "Build Variants"
-
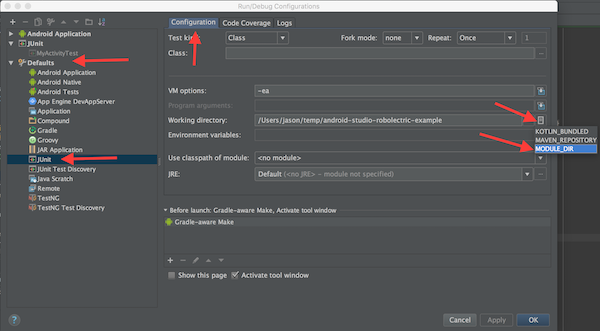
Update default JUnit working directory. Select Run/Debug Configurations, then Defaults, then JUnit, then Configurations tab, then Working directory, and finally MODULE_DIR.:

-
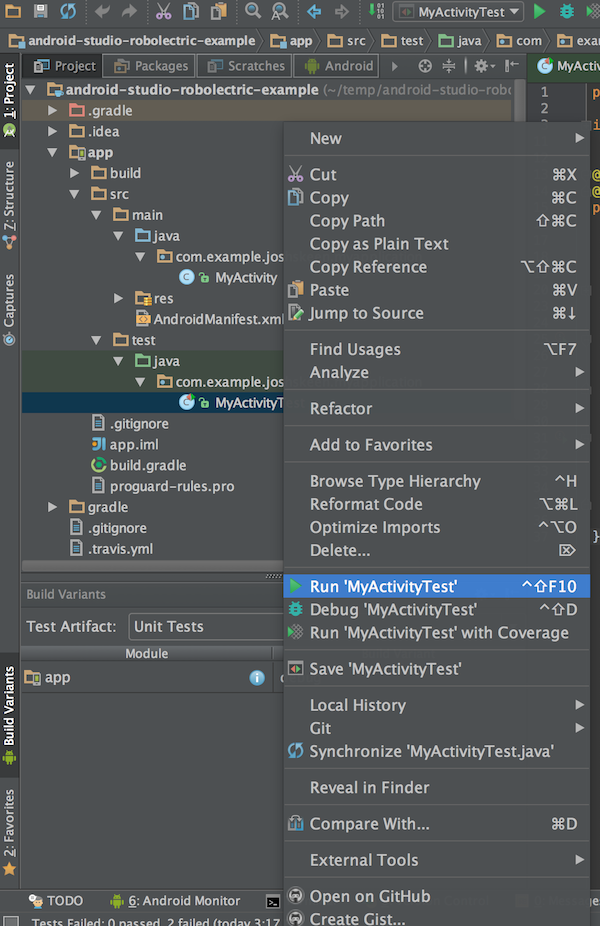
Create your unit test in src/test/java/com.example.joshskeen.myapplication/MyActivityTest.java:
@RunWith(RobolectricGradleTestRunner.class)
@Config(constants = BuildConfig.class, sdk = 21)
public class MyActivityTest {

    private MyActivity mActivity;

    @Before
    public void setup() {
        mActivity = Robolectric.buildActivity(MyActivity.class).create().get();
    }

    @Test
    public void myActivityAppearsAsExpectedInitially() {
        assertThat(mActivity.mClickMeButton).hasText("Click me!");
        assertThat(mActivity.mHelloWorldTextView).hasText("Hello world!");
    }

    @Test
    public void clickingClickMeButtonChangesHelloWorldText() {
        assertThat(mActivity.mHelloWorldTextView).hasText("Hello world!");
        mActivity.mClickMeButton.performClick();
        assertThat(mActivity.mHelloWorldTextView).hasText("HEY WORLD");
    }

}
Now write Robolectric tests! For more intel on how to write tests using robolectric + assertJ, check out http://blog.bignerdranch.com/2583-testing-the-android-way/
-0.8.4.png)
-0.8.1.png)

