This repository contains a facial keypoint detection project. Deep Convolutional Neural Networks (CNNs) are used to perform a regression which maps grayscale images to 68 facial landmarks with floating point (x,y) coordinates each. The original starter code comes from a project/challenge presented in the Udacity Computer Vision Nanodegree, which can be found here: P1_Facial_Keypoints. Pytorch is used as the deep learning framework.
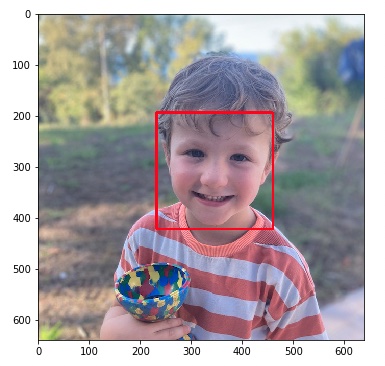
The final result is far from production deployment quality; among others, the architecture, the model hyperparameters and the training have a large margin of improvement, as one can deduce from the evaluation metrics -- the Improvements section provides some hints about what I'd try to change if I had time. However, I am impressed by how easy it is with the modern tools we have for free to address problems that not long ago were considered difficult. The fact that less than 30 minutes of GPU training are enough to achieve a plausible prediction is also astonishing. My son below finds it cool, too 😄
Images from the Youtube Faces Dataset are used used to train the network; the preprocessed pictures as well as their ground-truth facial keypoints can be downloaded from the Udacity repository P1_Facial_Keypoints, and they consist of 5770 face instances altogether.
In short, the following is implemented:
- Custom data loader class which yields images and facial keypoints.
- Custom transform classes.
- The definition of a CNN from scratch, as well as its training and evaluation.
- The implementation of face detection using the Haar cascades classifier from OpenCV.
- Image in-painting of funny objects (e.g., glasses, etc.) by using the predicted facial landmarks.
In summary, I think the project is a nice example of a computer vision application which leverages artifical neural networks.
For the original project implementation instructions and evaluation overview, see the file Instructions.md; instead, this text focuses on more general explanations related to the methods used in the project.
Table of contents:
The project is mainly implemented in four notebooks that guide the undertaking end-to-end and two python scripts; the latter consist of the data loader and model definition. Altogether, the folder contains the following files:
1. Load and Visualize Data.ipynb                        # Dataset preprocessing an loader
2. Define the Network Architecture.ipynb                # Network training
3. Facial Keypoint Detection, Complete Pipeline.ipynb   # Face detection and keypoint inference
4. Fun with Keypoints.ipynb                             # Image in-painting of objects
Instructions.md                                         # Original instructions
LICENSE                                                 # MIT license by Udacity
README.md                                               # Current file
data/                                                   # Dataset images and facial keypoints
data_load.py                                            # Data loader definition
detector_architectures/                                 # Haar cascades classifiers
images/                                                 # Auxiliary images
models.py                                               # Model definiton
requirements.txt                                        # Dependencies to be installed
The implementation has a research side-project character, thus, most of the code is contained in enumerated Jupyter notebooks which should be executed in order and from start to end; note that the data loader and the model definition are imported in the notebooks from separate scripts.
I you want to train the model, you should consider doing it on a machine with (powerful) GPUs, although that is not a necessary condition.
Please, have a look at the dependencies description in the repository P1_Facial_Keypoints.
A short summary of commands required to have all in place:
conda create -n faces python=3.6
conda activate faces
conda install pytorch torchvision -c pytorch
conda install pip
pip install -r requirements.txtThe final application can be broken down to two major steps:
- Face detection: given an image, the bounding boxes of the regions that contain human faces are returned.
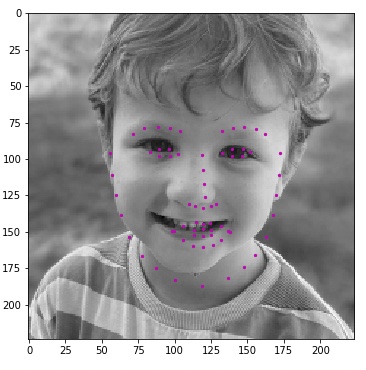
- Facial landmark estimation: given a Region of Interest (ROI) which contains an image patch under one of the detected bounding boxes, the trained network performs a regression of the parametrized 68 points to adjust them to the face in the ROI.
In order to implement the face detection, the Haar cascades classifier from OpenCV is employed. This classifier applies several pre-determined filters in sequence on the target image to determine whether it contains a face. In addition to that, bounding boxes with the likeliest face regions are returned.
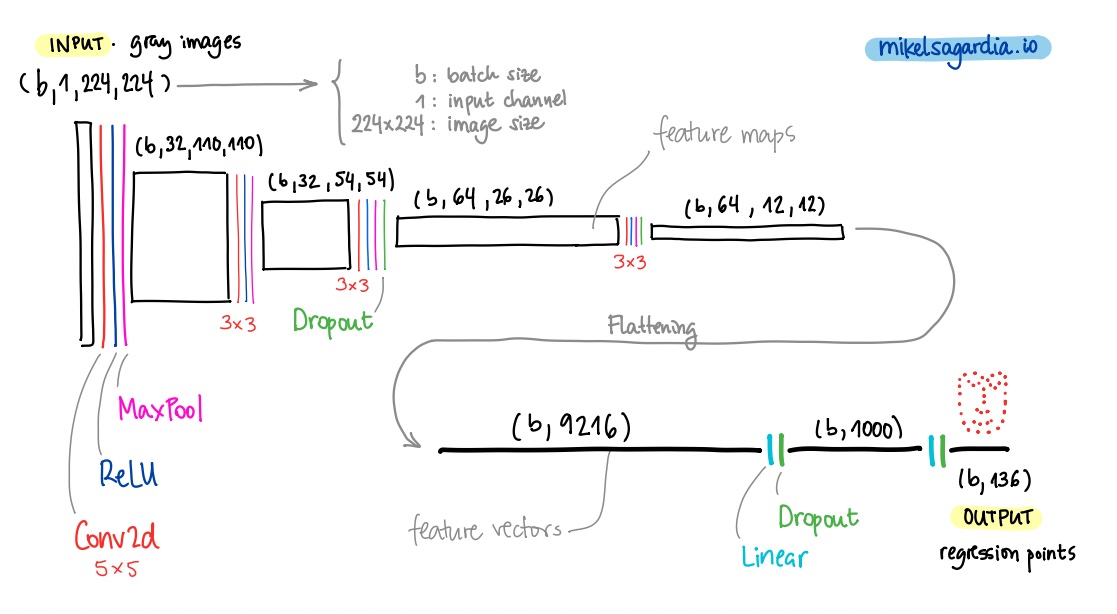
The second step works with a custom-defined Convolutional Neural Network (CNN) that follows the guidelines in the literature; it consists of 4 convolutional layers that repeat the basic formula Convolution (5x5 or 3x3) + ReLU + MaxPool, and a final sequence of two fully connected layers that map the feature maps of the four convolutional layer to the 136 = 68 x 2 facial keypoint coordinates. Dropout is also applied in the last two convolutional layers and after every linear layer to prevent overfitting. The model has around 9.4 million parameters.
This basic network resembles LeNet, one of the first CNNs; despite its simplicity it achieves a considerable performance after short training times. Several straightforward modifications are worth trying, e.g.:
- The extension of the architecture with at least one more convolutional layer and a linear one.
- The use of batch normalization to center weights, stabilize the training and avoid dropout in the convolutional layers.
- The use of transfer learning with backbone models pre-trained on the ImageNet dataset; e.g., VGG16, or even better, ResNet50.
More improvements are briefly summarized in the next section.
- Use data augmentation more extensively to improve generalization.
- Experiment with other methods for face detection and keypoint prediction. Another option could be MTCNN.
- Use Pytorch profiling.
- Use
nn.Sequentialin order to be cleaner in the network definition. - Try the learning rate scheduler for the from-scratch model training, since it seems to have a sub-optimal learning rate.
- Try different (more complex) architectures:
- More convolutional layers.
- Batch normalization to center weights, stabilize training and avoid dropout in the convolutional layers.
- Try transfer learning; an example of transfer learning using ResNet50 as backbone can be found in my side project on dog breed classification.
- Use randomness seeds and controlled weight initialization to allow reproducibility.
- Create a web app with Flask. To that end, the code needs to be transformed for production (i.e., use OOP, logging, etc.)
Mikel Sagardia, 2022.
No guarantees.
You are free to use this project, but please link it back to the original source.


