High precisión timestamping/trigger using raspberry GPIO.
It is based on pigpiod great daemon (http://abyz.co.uk/rpi/pigpio/index.html)
Nacho Mas - January 2016-2020
The Fire signal timestamp is available connetting to socket 9999. Telneting to that port return the last signal timestamp and close the connection.
Port 9998 is the alarm programing server. Valid commands: To program a alarma:
DATE 2018-06-10 22:23:23.123456#
MJD  float#
UNIXTIME float#
To delete all the programed alarms:
CLEAR#
To know what alarms are coming:
NEXT#
LIST#
To close the connection:
QUIT#
EXIT#
There is a http page showing the status is running on port 5000. Check it to know if GPS/ntp is ready.
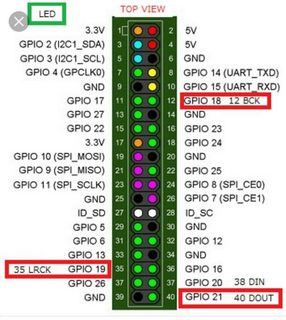
Connect the GPS serial port to the raspberry serial port. Connect also power supply (GND and +3.3V). PSS signal is wire to rasperry pin 18. Signal pin is the raspi pin 11. Detail connections:
GPS module to RPI conections:
| GPS Pin | RPI Pin |
|---|---|
| VCC | 1 (3.3V) |
| GND | 6 (GND) |
| TXD | 10 (UART_RXD GPIO15) |
| RXD | 8 (UART_TXD GPIO14) |
| PPS | 12 (GPIO18) |
Fire signal (probe connector):
| Probe | RPI Pin |
|---|---|
| GND | 25 (GND) |
| SIGNAL | 23 (GPIO11) (connect throught a 1.2kOhm resistor) |
Trip signal (probe connector):
| Probe | RPI Pin |
|---|---|
| GND | 9 (GND) |
| SIGNAL | 7 (GPIO4) (connect throught a 1.2kOhm resistor) |
Cable for Minidin8 conector for Apogee Alta:
| Probe | MiniDIN8 |
|---|---|
| Black | 2 |
| Red | 3 |
| Orange | GND |
Just burn your SD card with the provided image using raspberry standard way.
boot the raspberry. It will get the IP from DHCP, if fail to bring up the eth0 interface delete the /etc/udev/rules.d/70-persistent-net.rules file on the SD card. (see http://raspberrypi.stackexchange.com/questions/26155/cloning-sd-card-causes-interface-eth0-does-not-exist for futher information)
log as root (defaul passwd: 'albaricoque', change it soon) and run the following commands:
raspi-config
 ---> Expand Filesystem  -> //Do it
Then edit your /etc/network/interface to set the IP address and /home/cronos/cronostamper/config.py to customize the variables
cronostamper soft run under the user 'cronos' (passwd:albaricoque, change it soon)
Reboot again
First get minibian from https://minibianpi.wordpress.com/download/ and make and SD as raspberry usual
boot the raspberry log as root (defaul passwd: 'raspberry', change it soon) and run the following commands:
Update de system:
apt-get update
apt-get upgrade
Configure timezon to UTC:
raspi-config
 ---> Expand Filesystem  -> //Do it
 ---> Internationalisation Options --> Change Timezone -> Etc -> UTC
Install basic packages:
apt-get install nano apt-utils bash-completion rpi-update raspi-config
apt-get install minicom git unzip make gcc g++ python-pip
rpi-update
reboot
More information on: stasignal
Disable serial console:
raspi-config
---> Advanced Options -> Disable Serial Shell (optional)
Edit some files
nano /boot/cmdline.txt
(remove the two parameters including the string "ttyAMA0": console=ttyAMA0,115200 kgdboc=ttyAMA0,115200)
nano /etc/inittab
(Comment out the line like "2:23:respawn:/sbin/getty -L ttyAMA0 115200 vt100" by putting a hash (#) at the start of the line. Note that the line was not 2:23 on my version of Linux, so be sure to look for the actual line with ttyAMA0. It was the last line of the file, as it happens).
nano /boot/config.txt
Add dtoverlay=pps-gpio,gpiopin=18 on a new line
Add pps kernel module at startup:
nano /etc/modules
Add pps-gpio on a new line, if it is not already present.
nano /etc/default/gpsd
GPSD_OPTIONS="-n" and DEVICE='/dev/ttyAMA0'
Raspberry PI Model 3 has wifi and bluetooth. BT chip use the port /dev/ttyAMA0 internaly so some change are needed. There is two posibilites:
- Option 1: Enable a secondary uart puting this line in /boot/config.txt
enable_uart=1`
This enable a secondary UART on /dev/ttyS0. Then configure gpsd to use this port:
nano /etc/default/gpsd
GPSD_OPTIONS="-n" and DEVICE='/dev/ttyS0'
- Option 2: If you prefer to disable wifi and bluetooth and reused /dev/ttyAMA0 for the GPS in a raspberry PI 3 add this line in /boot/config.txt
dtoverlay=pi3-disable-bt
and then blacklist the wifi and bt modules in /etc/modprobe/raspi-blacklist.conf adding this lines:
nano /etc/modprobe/raspi-blacklist.conf
#wifi
blacklist brcmfmac
blacklist brcmutil
#bt
blacklist btbcm
blacklist hci_uart
reboot`
- Option 3 UPDATE(prefered): Raspberry 3+ works different. The best options is to change bluetooth serial port using miniuart-bt device tree overlay as explained in The Raspberry Pi UARTs
Add this line in /boot/config.txt
dtoverlay=miniuart-bt
This make /dev/ttyAMA0 available for GPS
Create symlink to pps0 and gps0 automatically at boot: Specifically, create the file: /etc/udev/rules.d/09.pps.rules with the following contents:
KERNEL=="ttyAMA0", SYMLINK+="gps0"
KERNEL=="pps0", OWNER="root", GROUP="tty", MODE="0660", SYMLINK+="gpspps0"
apt-get install pps-tools
apt-get install libcap-dev
apt-get install gpsd gpsd-clients ntp
The supplied version of NTPD on the Raspberry Pi doesn’t support PPS so we need to recompile it (Please note that the configure and compile steps may take up to 30 minutes).
Check last version from http://www.ntp.org/downloads.html
wget
tar zxvf ntp-4.2.8p6.tar.gz
cd ntp-4.2.8p6
./configure --enable-linuxcaps
make
make install
service ntp stop
cp /usr/local/bin/ntp* /usr/bin/ && cp /usr/local/sbin/ntp* /usr/sbin/
Edit the configuration file:
nano /etc/ntp.conf
at the end of the file include this lines:
#PPS driver
server 127.127.22.0 minpoll 4 maxpoll 4
fudge 127.127.22.0 flag3 1  refid PPS

# GPS Serial data reference
server 127.127.28.0 minpoll 4 maxpoll 4 prefer
fudge 127.127.28.0 time1 0.140 refid GPS
IMPORTANT: To avoid DHCP overwrite ntp.conf settings delete the word 'ntp-server' in the line 'request' of your /etc/dhcp/dhclient.conf
Close and restart
service ntp start
Get the pigpiod daemon pigpio and compile
wget abyz.co.uk/rpi/pigpio/pigpio.zip
unzip pigpio.zip
cd PIGPIO
make
sudo make install
Donwload FLASK for the embebeded web server
sudo apt-get install python-flask python-dev
Get latest version
Get zmq lastest. CONFLATE does not work on stock version
wget http://download.zeromq.org/zeromq-4.1.4.tar.gz
tar xvzf zeromq-4.1.4.tar.gz
cd zeromq-4.1.4
./configure --without-libsodium
./make
./make install
Install the python bindings
pip install pyzmq
Now add a new user to run cronostamper daemons under:
adduser cronos
Log in that user and get cronoStamper software (this)
git clone https://github.com/nachoplus/cronoStamper.git
In order to run some test you need aditional stuff:
apt-get install wiringpi gnuplot
nano /etc/rc.local
at the end of the file include this lines:
pigpiod
/home/cronos/cronostamper/start.sh

