A graphical deep learning library
Some of these dependencies, especially numpy, can be pretty finnicky to install with just pip. It is recommended you install these via Anaconda. To install all Deep-GUI dependencies, cd into the deep-gui directory, then do:
cd backend
pip install -r requirements.txt
It might take a while to install everything!
Next you'll need to install PyTorch, which is a popular deep learning library. For Windows the command should be:
pip install torch==1.7.1+cpu torchvision==0.8.2+cpu torchaudio===0.7.2 -f https://download.pytorch.org/whl/torch_stable.html
For Mac OS the command should be:
pip install torch torchvision torchaudio
For Linux the command should be:
pip install torch==1.7.1+cpu torchvision==0.8.2+cpu torchaudio==0.7.2 -f https://download.pytorch.org/whl/torch_stable.html
Neural networks have recently become an extremely popular machine learning technique, and are used to solve problems in image classification, natural language processing and robotics, among many others. This section gives a brief overview of how neural networks work; enough to understand how Deep-GUI works at least.
Neural networks take in an input, which is usually a matrix or a tensor (which is just a matrix but with an extra dimension, think of a matrix as a square and a tensor as a cube or even hypercube!), and spit out an output. For example, in the case of image classification, the input of the neural network might be an image of width 100 pixels x 100 pixels. In this case, the input to the network is a 3 x 100 x 100 element tensor (the 3 comes from the R, G and B color channels). Each number in the tensor is the intensity of the R, G or B value of a single pixel. The network output might be a single number, which is the probability that the given image is a dog.
Neural networks have inside them many parameters, which are numbers that tell the network what to do with its given input to produce an output. These parameters start out randomly initialized, which means the network probably will do quite poorly in the beginning. In the context of Deep-GUI, we typically use supervised learning to train networks.
When we give the network an input as well as the expected output (the correct, or groundtruth answer) of the network, we can see how our network’s output compares to its expected output. From this comparison, we can calculate how to change our parameters using a clever algorithm called backpropagation and gradient descent. If we give the network many of these examples, our parameters will slowly get better and better.
So how does our network compare its output to its expected output? This is a special function called a loss function. A common loss function is simply the squared distance between the expected output and the network output. Another loss function, which we’ll use in our example, is categorical cross entropy. This has a fancy definition, but what it is in simple terms is the natural log of the probability our network picks the correct answer, if it samples its answers from its output.
Typically, neural networks are created using libraries like PyTorch or Tensorflow, and require you to actually code the network. Deep-GUI attempts to turn this coding-only approach into a hybrid of coding and graphics. You create the network using a graphical interface, and insert that network into your code wherever you want. This maintains the flexibility of coding while allowing you to develop a network extremely quickly using drag and drop blocks.
WARNING: Since Deep-GUI is a work in progress, there is no ability to SAVE your network. That is, if you ever refresh your browser, your network progress will be erased, and you will have to start over again. This is a feature we’re hoping to add soon!
To start creating a network, open the application by doing
cd backend
python server.py
This will run the server as well as open up the web application in your default browser.
On the left there will be a series of blocks to choose from. This is currently a pretty limited list. On the right there is the parameter editor, where you can change the behavior of certain blocks. In the center is the actual graph editor, where you can drag and drop blocks, and connect blocks together.
We’ll start by creating a simple feedforward neural network and training it on the MNIST dataset (MNIST is a dataset of handwritten digits from 0 - 9, our network’s goal is to correctly classify these digits).
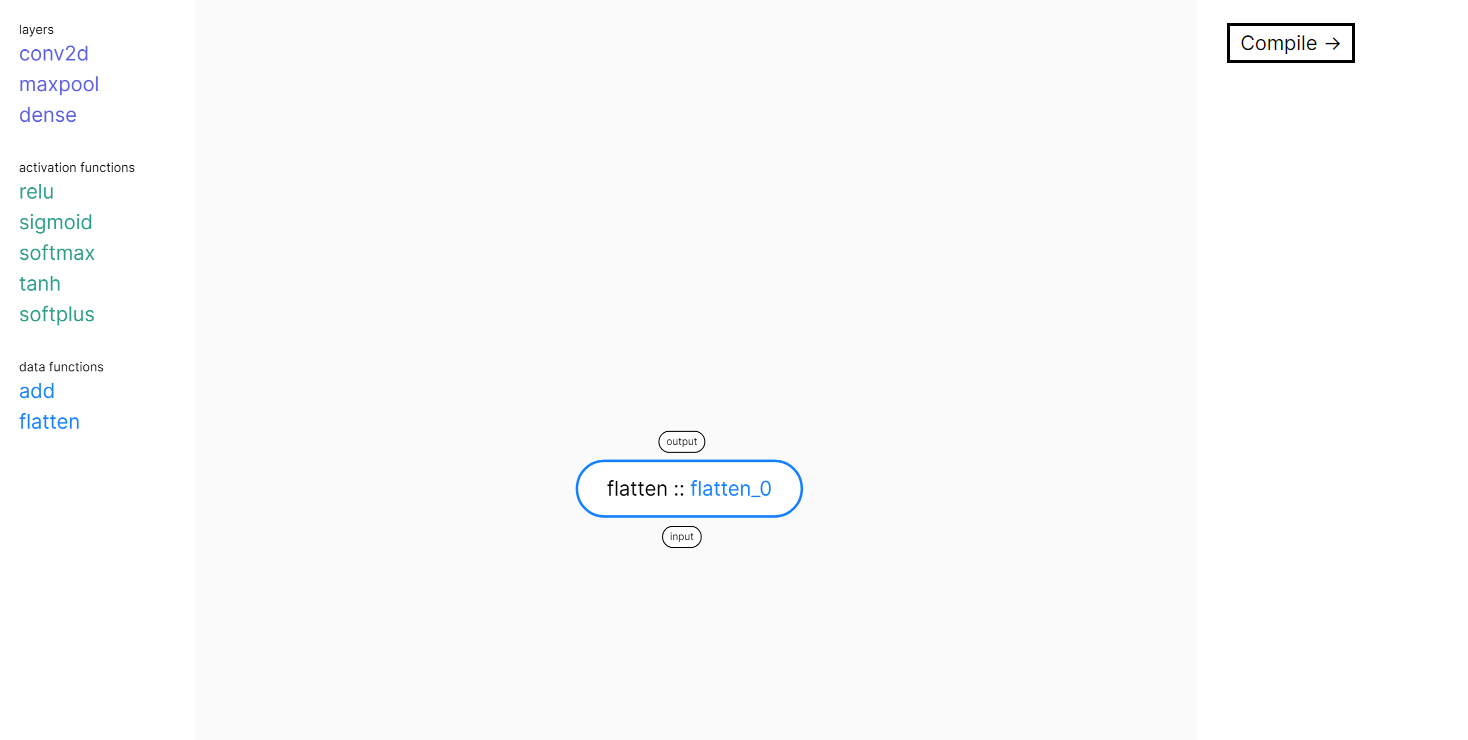
First, drag a “flatten” layer into the editor. The flatten layer transforms your 1 x 28 x 28 tensor into a 784 vector. This is because our next layer requires a vector input, not a tensor input. Your editor should look like this:
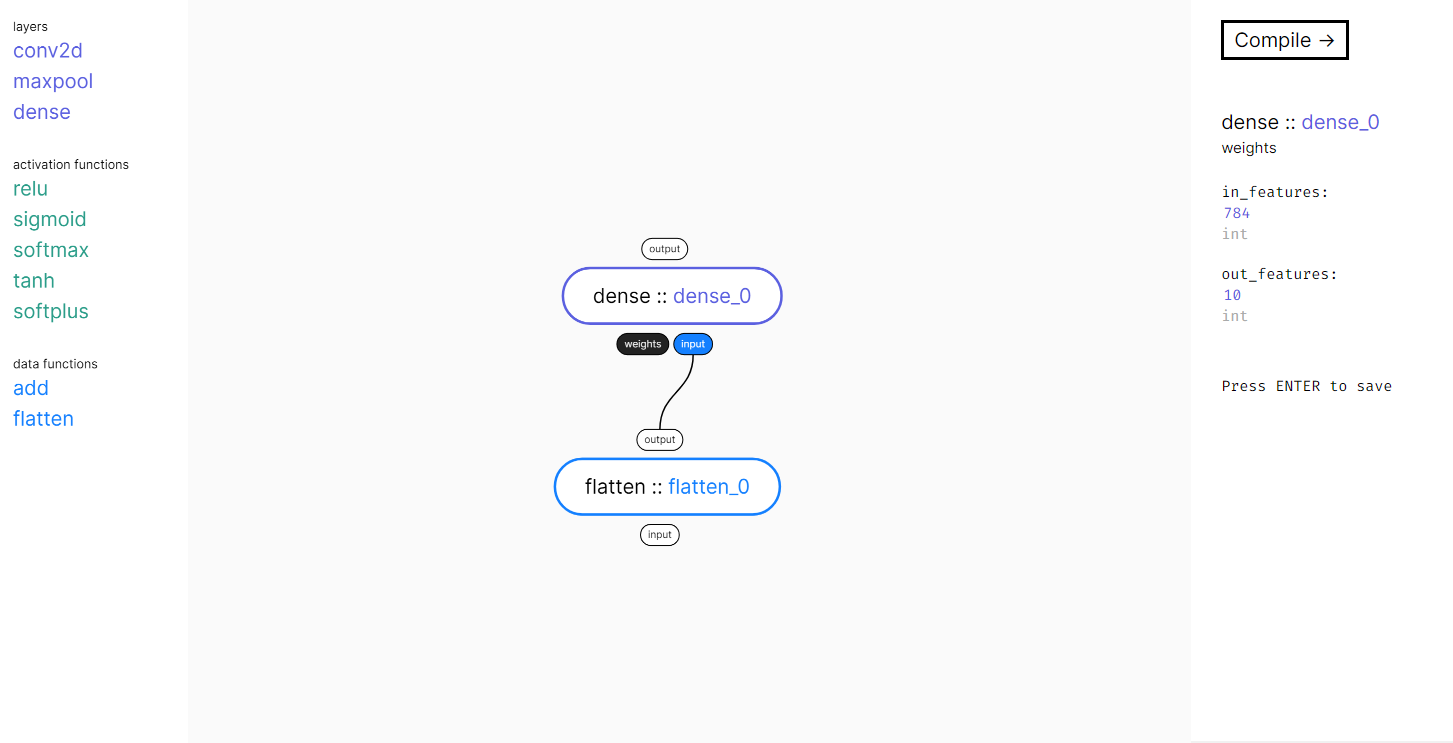
Next, drag a “dense” layer into the editor. Drag the “output” bubble from the “flatten” layer to the “input” bubble of your “dense” layer. This will connect the two. You’ll notice that it has two inputs under the block, named “weights” and “input”. The “weights” input is shaded black because it has parameters you can edit. You do NOT need to connect anything to an input that is shaded black. Click on the “weights” input to edit its parameters on the right of the screen. Go ahead and change the in_features value to 28*28. The reason why our value is 28*28 is because the digit images are 28 by 28 pixels in size. Next, change the out_features value to 10. Out_features defines how many output values our dense layer produces. The 10 output values correspond to how likely it thinks the input image is each digit from 0 - 9. As an example, if the 5th output value is especially high, the network is more confident that the image is a 5. Once you are done editing your parameters, press “enter” to save them all. Your editor should look like this:
❓ What is a "dense" layer?
A dense layer is a matrix multiplication. If you remember from linear algebra, a N x M matrix multplied with a M x P matrix produces an output with size N x P. In the case of our image, we are transforming a 28 x 28 image of a digit into a 1 x 784 vector (this is what the flatten layer does). When we define our
in_featuresandout_features, we are defining the size of the other matrix we are multiplying. Since we decidedin_features = 784andout_features=10, our other matrix is of size 784 x 10. If we multiply the 1 x 784 vector with the 784 x 10 matrix, we get a vector of size 1 x 10. Each of these ten numbers corresponds to how much the network thinks the input image is a certain digit.
The final step is to add a softmax layer. A softmax layer normalizes the output of your dense layer so that they add up to 1. The reason for this is that your network is actually outputting probabilities. Each output is the probability that the image is a certain digit. In order for the outputs to be valid probabilities, they must add up to 1. As an example, if our network outputs the following probabilities:
0    1    2    3    4    5    6    7    8    9

0.2, 0.2, 0.1, 0.1, 0.1, 0.1, 0.1, 0.1, 0.0, 0.0
The network thinks there is a 20% chance the image is a 0, a 20% chance the image is a 1, and a 10% chance that the image is a 2, 3, 4, 5, 6, or 7.
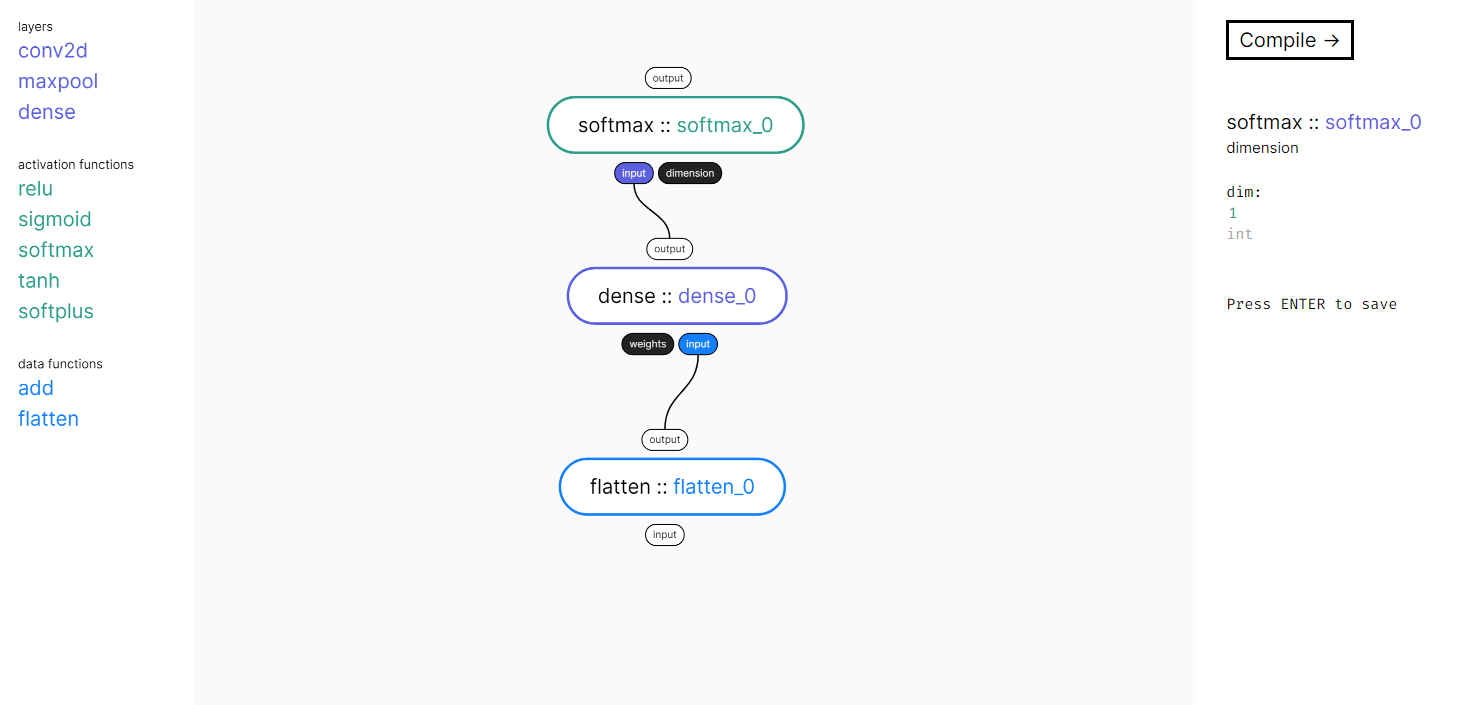
To add the softmax, just drag a softmax layer and connect the output of the dense layer to the input of the softmax, by dragging from the “output” bubble of the dense layer to the “input” bubble of the softmax. Next, click on the “dimension” input of the softmax, and change “dim” to 1. Your editor should now look like this:
Congratulations! It may not look like it, but you’ve made your first (albeit very simple) neural network in Deep-GUI! To actually compile your network, click on the “compile ->” button on the top right. There is one final thing to do, which is to change your example_workspace/template.py file. Deep-GUI works with two files: template.py and compiled.py. The template file is what the user actually edits. The compiled file is what is generated, and it's what you execute in Python. If the server is running (python server.py), updating template.py will automatically update compiled.py. The only difference between the two files is that there is a special line on line 27 of template.py that looks like:
27 net = @network(['flatten_0.input'], ['softmax_0.output'])Before we get into what this means, it's important to talk about another concept:
Below is a close up of a single block.
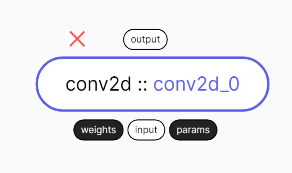
In Deep-GUI, each of these inputs and outputs are addressed based on the block's name, which is the text in purple. Since this block's name is conv2d_0, the weights input is addressed as conv2d_0.weights. The output of the layer is addressed as conv2d_0.output. Make sure you have the period (.) delimiting the block name and the input/output name.
Now let's bring it back to our curious line:
27 net = @network(['flatten_0.input'], ['softmax_0.output'])It is very important to understand what the flatten_0.input and softmax_0.output mean. flatten_0.input is the input the user needs to supply to the network for it to run properly. If you look at your network in the graphical editor, you might notice that every input bubble is filled (shaded black or some other color) except for the input field of the flatten_0 block. Since this block has no input, the user must define it. Therefore, the first array in the @network function is the list of dependencies the network requires before it can run. The softmax_0.output is the output the user expects the network to spit out. In this case, we want to know the probabilities the network computed, so we ask for it to return softmax_0.output. If we instead wanted to get the outputs of the dense layer before it goes into the softmax function, we would write
27 net = @network(['flatten_0.input'], ['dense_0.output'])We can even return multiple outputs by putting multiple elements into the output array. However, you will need to modify code elsewhere in the template.py file to make it all work. For the purposes of this tutorial, there should be no need to edit these. HOWEVER, if the names of your flatten and softmax blocks are not flatten_0 and softmax_0, be sure to change them in template.py. For example, if your network looked like:
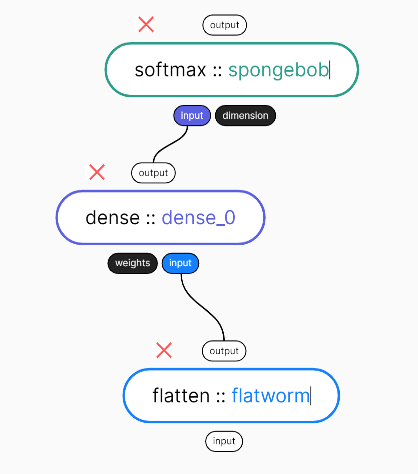
You would want to change line 27 to
27 net = @network(['flatworm.input'], ['spongebob.output'])❓ What does
27 net = @network(['flatten_0.input'], ['softmax_0.output'])actually do?This line is expanded in
compiled.pyinto an actual executable neural network model. In our example network, line 27 is expanded into the following lines:# compiled.py class Net(nn.Module): def __init__(self): super(Net, self).__init__() self.flatten_0 = nn.Flatten() self.dense_0 = nn.Linear(in_features=28*28, out_features=10,) def forward(self, flatten_0_input): flatten_0_output = self.flatten_0(flatten_0_input) dense_0_output = self.dense_0(flatten_0_output) softmax_0_output = F.softmax(dense_0_output, dim=1,) return softmax_0_output net = Net()
If you changed anything in the template.py file, make sure to save! To train and test your network, go to the example directory we’ve made by opening another terminal, navigating to the deep-gui directory and entering the commands:
cd example_workspace
python compiled.py
This will run your compiled file. If everything works nothing should happen for a while. After a minute or two the network will finish training and you should get output like this:
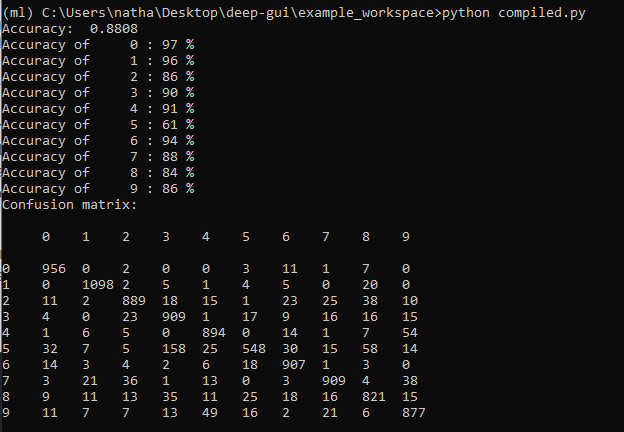
It looks like our simple network has accuracy of 88%. It is most accurate at detecting 0s (97%), and least accurate at detecting 5s (61%). The confusion matrix below tells you what digits are most commonly confused for others. For example, the row beginning with the digit ‘5’ and the column beginning with the digit ‘3’ is 158. This means that the digit 5 was confused for the digit 3 158 times during testing. This makes sense, since 5s actually look pretty similar to 3s. Take a look at the confusion matrix of your network and see if you can find any interesting insights!
This is a long guide and it's easy to miss things. Here is a general overview of the steps taken to run a network using Deep-GUI:
- Create the network using the drag and drop blocks.
- Click on the "Compile" button on the top right
- Edit your
template.pyso it matches your networks - Save
template.py - Run
compiled.py