WebdriverIO is an open source e2e (End-to-End) test automation utility for nodejs. It lets you control a browser or a mobile application with just a few lines of code. It makes it possible to write super easy selenium tests with Javascript in your favorite BDD or TDD test framework.
It basically sends requests to a Selenium server via the WebDriver Protocol and handles its response. These requests are wrapped in useful commands and can be used to test several aspects of your site in an automated way.
- WebDriverIO is a custom implementation of W3C webdriver API. This gives it an edge to have full control over implementation rather than depending on WebDriverJS implementation.
- It is fully extensible and is written to be as flexible and framework agnostic as possible. It can be applied in any context and serves not only the purpose of testing.
- It has a command line interface
wdiowhich makes test configuration as easy and simple as possible so that a non-programmer can configure the setup. - It has support for most BDD and TDD test frameworks.
- It has good support and enthusiastic developer community and end users which gives it an edge over NightwatchJS.
- It can be used with
webdrivercssto compare css stylings of an element in the webpage.
- It can be used for automating AngularJS apps but it is not as customized as Protractor.
- It doesn't have the full support of xPath like as NightwatchJS.
- Since it is a custom implementation, it is also a disadvantage as it deviates from generic syntax which may confuse selenium developers coming from other languages.
WebDriver is a general purpose library for automating web browsers. It was started as part of the Selenium project, which is a very popular and comprehensive set of tools for browser automation, initially written for Java but now with support for most programming languages.
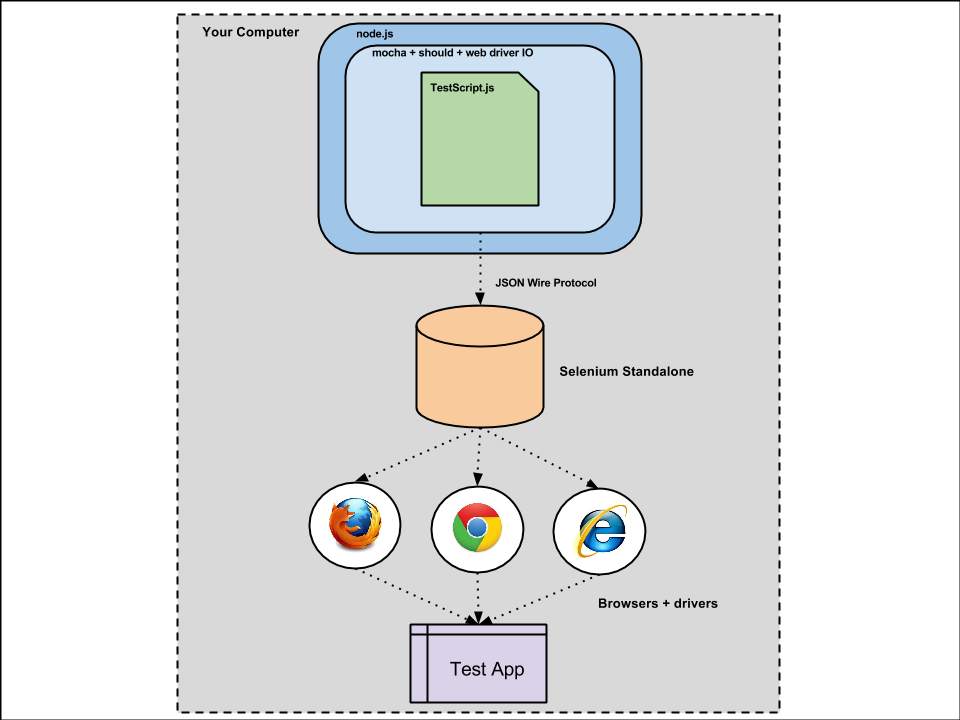
All software runs on your local computer:
- Node runs Mocha framework and runner of test script.
- Chai (should) is the assertion library.
- Web Driver IO communicates with Selenium Server using JSON Wire Protocol.
- Selenium Server invokes local browser using a driver to test the web application.
Please install Node.js and Java Development Kit (JDK) (Selenium Server is a Java application).
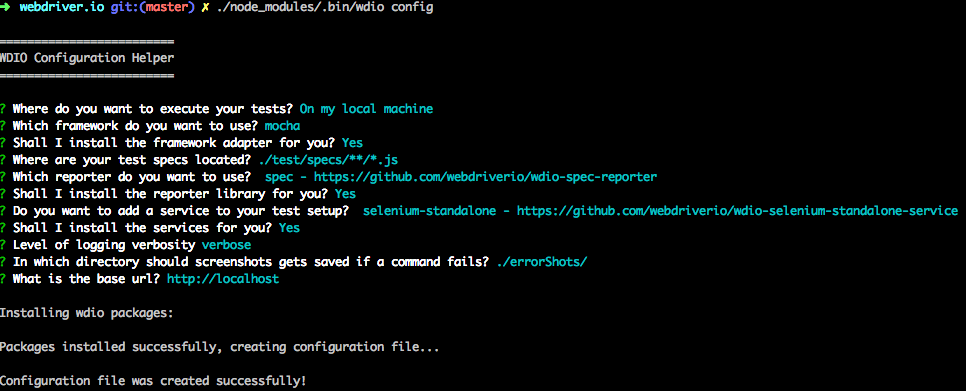
npm init -ynpm install webdriverio --save-dev./node_modules/.bin/wdio configNow you need to define a configuration file where all information about your tests, capabilities and settings are set. A question interface pops up. It will help to create the config easy and fast. If you are not sure what to answer follow this answers:
Q: Where do you want to execute your tests?
A: On my local machine

Q: Which framework do you want to use?
A: mocha

Q: Shall I install the framework adapter for you?
A: Yes (just press enter)

Q: Where are your test specs located?
A: ./test/specs/*/.js (just press enter)

Q: Which reporter do you want to use?
A: spec (use up/down arrow to navigate and press <space> bar to select and enter)

Q: Shall I install the reporter library for you?
A: Yes (just press enter)

Q: Do you want to add a service to your test setup?
A: selenium-standalone (use up/down arrow to navigate and press <space> bar to select and enter)

Q: Shall I install the service for you?
A: Yes (just press enter)

Q: Level of logging verbosity:
A: verbose (use up/down arrow to navigate and enter)

Q: In which directory should screenshots gets saved if a command fails?
A: ./errorShots/ (just press enter)

Q: What is the base url?
A: http://localhost (just press enter)
That’s it! The configurator now installs all required packages for you and creates a config file with the name wdio.conf.js.
npm install chai --save"scripts": {
"test": "./node_modules/.bin/wdio wdio.conf.js"
}// use chrome browser
capabilities: [{
browserName: 'chrome'
}]
// set the path for selenium log file
seleniumLogs: './logs/selenium.log',
// set TDD language for chai
mochaOpts: {
ui: 'tdd'
}
// set up chai
before: function (capabilities, specs) {
var chai = require('chai');
global.expect = chai.expect;
chai.Should();
}mkdir -p ./test/specs
touch ./test/specs/test.jssuite('my awesome website', function() {
test('should do some chai assertions', function() {
browser.url('https://nazmulb.wordpress.com/');
browser.getTitle().should.be.equal('Nazmul Basher\'s Website | Personal website of Md. Nazmul Basher');
});
});The last step is to execute the test runner. To do so just run:
npm testDone :)
mocha: We used Mocha as a testrunner for WebdriverIO. Now within your spec files or step definition you can access the webdriver instance using the global variablebrowser. You don’t need to initiate or end the Selenium session. This is taken care of by the wdio testrunner.chai: Mocha needs an additional assertion library to be installed like Chai to have more expressive tests.spec: A WebdriverIO plugin to report in spec style.selenium-standalone: This service helps you to run Selenium seamlessly when running tests with the WDIO testrunner. It automatically sets up the standalone server and all required drivers for you. By default, Google Chrome, Firefox and PhantomJS are available when installed on the host system.
WebdriverIO supports the following selector types:
browser.click('h2.subheading a');To get an anchor element with a specific text in it, query the text starting with an equal (=) sign. For example:
<a href="http://webdriver.io">WebdriverIO</a>console.log(browser.getText('=WebdriverIO')); // outputs: "WebdriverIO"
console.log(browser.getAttribute('=WebdriverIO', 'href')); // outputs: "http://webdriver.io"To find a anchor element whose visible text partially matches your search value, query it by using *= in front of the query string (e.g. *=driver)
<a href="http://webdriver.io">WebdriverIO</a>console.log(browser.getText('*=driver')); // outputs: "WebdriverIO"The same technique can be applied to elements as well, e.g. query a level 1 heading with the text “Welcome to my Page”:
<h1 alt="welcome-to-my-page">Welcome to my Page</h1>console.log(browser.getText('h1=Welcome to my Page')); // outputs: "Welcome to my Page"
console.log(browser.getTagName('h1=Welcome to my Page')); // outputs: "h1"or using query partial text
console.log(browser.getText('h1*=Welcome')); // outputs: "Welcome to my Page"
console.log(browser.getText('h1[alt*="welcome"]')); // outputs: "Welcome to my Page"
The same works for ids and class names:
<i class="someElem" id="elem">WebdriverIO is the best</i>console.log(browser.getText('.someElem=WebdriverIO is the best')); // outputs: "WebdriverIO is the best"
console.log(browser.getText('#elem=WebdriverIO is the best')); // outputs: "WebdriverIO is the best"
console.log(browser.getText('.someElem*=WebdriverIO')); // outputs: "WebdriverIO is the best"
console.log(browser.getText('#elem*=WebdriverIO')); // outputs: "WebdriverIO is the best"To query an element with a specific tag name use <tag> or <tag />
For querying elements with a specific name attribute you can either use a normal CSS3 selector or the provided name strategy from the JsonWireProtocol by passing something like [name="some-name"] as selector parameter
It is also possible to query elements via a specific xPath. The selector has to have a format like for example //BODY/DIV[6]/DIV[1]/SPAN[1]
In near future WebdriverIO will cover more selector features like form selector (e.g. :password,:file etc) or positional selectors like :first or :nth.
For more info, please read WebdriverIO Developer Guide.
Thanks!