- Use the free tier of AWS.
- Fully automate the creation of a Virtual Private Cloud and all necessary components.
- Automate, as much as possible, the installation and configuration of the webserver.
- Be security minded by restricting network access and creating a secure web server.
- Pull the website source data from github.
You should have a good understanding of the files involved and the filesystem used on your computer and the webserver. Also you will need to know how to edit the files. I am using atom in my examples, but you can replace if with code is you use VisualStudio Code.
*.tf - terraform files (infrastructure as code) to create a VPC, infrastructure components and an Ubuntu webserver in a Public Subnet
- The best practice is to separate out the terraform components into sections
- I can see a good practice in storing the variables in a separate .tf file - which is what terraform recommends
- install.sh - shell script to configure the NGINX web server with secure websites (https)
Your system and 'Hidden' files the system uses
You will need to understand what these files are and be able to edit these files
- ~/ - your home folder on both your computer (if using a Mac or Linux based system). On my Mac it is /home/neal/ and on the Ubuntu webserver it is /home/ubuntu
- ~/.ssh/web-site.pem - Private key for you only. Good idea to store a copy in your pwd mgr.
- ~/.ssh/web-site-pub-key.pem - Public key so you can connect to your server. This is stored on AWS and in Ubuntu.
- ~/.ssh/known_hosts - System file that stores a key fingerprint. (Note: If you delete and recreate the same instance many times, you'll have to remove 'offending' records from here.)
- ~/.aws/credentials - File that will store your automated AWS keys and secret keys.
Section 1 - AWS Account Setup.

- If you have a .edu email address you can sign up for an educational account. No credit card required!
- You must enter a credit card to create an account, but will still be given "free tier" credit. It is very easy to go out of the free tier! If you have a mishap and charges you, support might credit you. Ask nicely.
- Now, create your AWS root account!
Lets talk about billing. Even though you are using the Free Tier, it is your responsibility to understand the limits and stay within them.
- It's important to watch your use!
- Be prepared to be charged a few dollars if you don't pay attention to the terms.
- You can avoid charges by reading pricing documentation before you create anything.
- You can be notified immediately of charges if you setup alerts!
- Examples of overage charges:
- If you run more than 750 hours of EC2 instances in a month (there are 744 in a month) you can be charged.
- If you use more than 30 GB of space, irrelevant of the instance running, you will be charged.
- If you have an Elastic IP that isn't assigned to an active instance or gateway, you will be charged per hour.
- If you register a domain name and use the DNS service within AWS, you will be charged.
- Understand and watch billing and cost explorer.
- If you do see a few charges, don't panic and try to destroy everything. Seek guidance.
- If you destroy things, you may miss what is actually causing the charges. In some cases, you may cause MORE charges by improperly destroying resources!
First, you need a password manager! If you're not using a password manager, USE ONE! You will have keys and passwords to keep track of and a password manager is the best way!
-
Here's a good article on password managers... Consumer Reports: Everything You Need to Know About Password Managers
-
When you create an account, you will be shown a number of pieces of data. Store these in your password manager! The data is for your root account.
- AWS Console address: https://.signin.aws.amazon.com/console
- Username & Password
- Account ID
- Access Key ID
- Secret Access Key
- The IAM Dashboard will give you security status recomendations.
- Read them.
- Understand them.
- Put yourself in compliance.
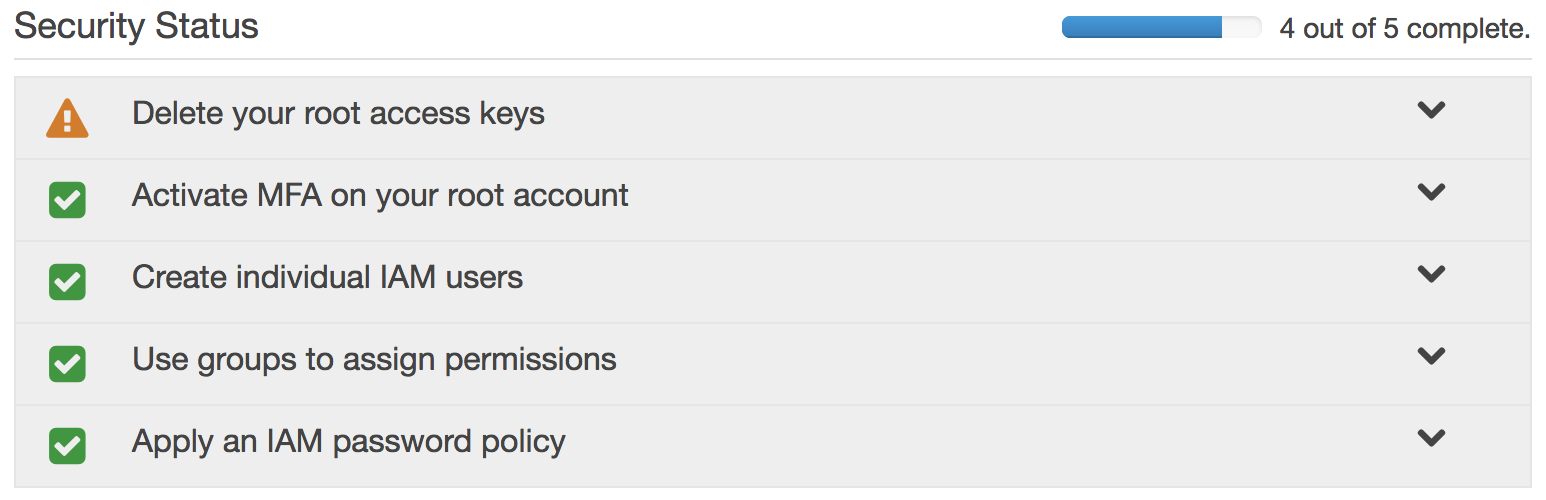
- It is recommended you setup MFA (Multi-factor Authentication) for your root account.
- A couple of soft token apps for your phone include:
- Last Pass Authenticator is perfect if you use LastPass as your password manager.
- Google Authenticator
Create new users in IAM
- This will actually be what you use for doing anything in AWS via a browser. The best practice is not to log in with your root account.
- I use my actual email address as my root and the first part (login) of my email as my main account.
- Select AWS access type: AWS Management Console
- This is what the script will use from your computer for access to AWS.
- Select AWS access type: Programmatic access

- Attach existing policies:
- AmazonVPCFullAccess
- AmazonEC2FullAccess
- Grab your "Access Key ID" and "Secret Access Key" now. Save them in your Password Manager!
- This will be the only opportunity for you to save the "Secret Access Key".

- Note: it is important that you don't share these keys for anything. You want to make sure the secret key is never exposed on a webpage or on github.
- These are seperate from the IAM access key! You will need to create a key pair for use with the web server.
- The public key will be stored on and used by the webserver.
- The private key will be used to connect from you computer to the web server.
- Use EC2: Key Pairs to generate a key for AWS storage and EC2 connectivity.
- This process will download a file such as web-site.pem - your private key
- Save your keys to your home folder under a subfolder called .ssh/
- IMPORTANT: DELETE THE KEY YOU CREATED FROM AWS: EC2: Key Pairs! If you don't, it will break terraform. (Terraform will put the key back.)
$ cd
$ mkdir .ssh
$ cd .ssh
# set the permissions on the key for it to be used by ssh utilities
$ chmod 500 web-site.pem
# generate a public key from the private key file
$ ssh-keygen -y -f web-site.pem > web-site-pub-key.pemThe cost is pretty cheap for first year and renewal years, as listed, for some "tld's" (top level domains).

You have a couple choices for domain names.
- Register and manage with GoDaddy or other registrar services. Or choose the cheapest one possible by searching "cheapest tld".
- Can save you a few dollars. If you search "setup godaddy point to aws" you will find instructions on how to use godaddy as your DNS instead of AWS.
- You have to setup the nameserver (NS) records on the registrar site to point to Amazon.
- You can always transfer them to AWS in the future.
- Registered and manager with AWS Route 53.
- Go to "Registered domains" and click "Register domain"
- A little more cost but less management necessary.
The hosted zone in route 53 has a monthly charge of about 50 cents. If you choose, you can manage your DNS records outside of AWS as mentioned in the last section.
- Go to "Hosted Zones" and click "Create Hosted Zone"
- Enter your domain name and click Create!
- Create your Start of Authority (SOA) and NameServer (NS) records. The NS records will be entered under the domain as the name servers to look for the DNS records.

- Create your A type record for domain.com and www.domain.com

- If you have a mail service setup that will host your mail, you can setup the MX records as shown.

- You should have a Projects folder on your computer, preferable in a "home" folder.
# IF NOT:
$ cd
$ mkdir Projects- If you're using a Mac, you could create it on your Desktop, in your Documents folder or in /home/neal/Projects/
- From the command line, you need to pull down the terraform script
$ cd Projects
# pull down the scripts
$ git clone https://github.com/nealalan/tf-nealalan.com.git-
You will see the progess of the download...

-
You should have the files locally in Projects/LAB-AWS_webserver_via_terraform/


Go to the Hashicorp Terraform site.
# if on a Mac, try
$ brew install terraformAdd the keys created in AWS IAM to your ~/.aws/credentials file.
$ cd
$ mkdir .aws
$ cd .aws
$ atom credentials
In the credentials file you want to add an entry:
[terraform]
aws_access_key_id = A*******************
aws_secret_access_key = z9************************************
We will be referring to these in our variables in our terraform script.
-
Go to VPC, Click Elastic IP, Click Allocate New Address and select Amazon Pool. Make a note of the IP address. You will need it later.
-
IMPORTANT: An elastic IP may incur an hourly charge ($0.003) if you take longer than an hour to submit the terraform script. - You are manually creating this Elastic IP. Terraform WILL NOT manage or delete this for you! Be prepared to manually delete the Elastic IP if you destroy your project or instance and won't implement it soon!!!
-
It's a benefit to keep an Elastic IP, so you don't have to go change your DNS records IP address anytime your instance is restarted.
-
SIDE NOTE: It is possible for Terraform to create an Elastic IP address and update your DNS records. I choose to manually create my own.
Most of the changes will take place in the variables.tf file.
- Remove documentation that is irrelevant to the your site.
- Change variables project_name. This is what your VPC will be named.
- Set your pub_key_path. This is the file you created from the private key in the .ssh/ folder.
- Set your creds_path and creds_profile. The creds fields are the AWS keys we saved.
- Add the instance_assigned_elastic_ip as the Elastic IP address you created.
- Find your local IP address as add_my_inbound_ip_cidr:
$ curl ifconfig.co- (optional) Set your CIDR ranges. For this project we only need a couple of IP addresses, but you also want to learn CIDR addressing from a scalable perspective.
- VPC CIDR Address and Public Subnet
- You can probably leave the CIDR ranges as listed.
- Change variables subnet_1_name and subnet_2_name.
- Name your pub_key_name what you want it to be called in the AWS Keys library. Likely best to keep it whatever the file of the key is called, without the .pem extension.
- The ami variable should be fine unless you want to install a different version of Ubuntu.
Regarding the rest of the script, as of now, you shouldn't have to edit any of it, at least not for the scope of this lab.
- TEST: This will show you potential errors and give you details of resources that will be created by terraform.
terraform plan- RUN the script for real! After the script complets, you can explore your new Infrascture on AWS under VPC and EC2.
$ terraform apply- CONNECT:
$ ssh -i ~/.ssh/web-site.pem ubuntu@ip- Since you are using your elastic IP, you can connect to it or you can replace IP with any domain name the DNS records list the IP address for. Think of it as a shortcut.
Note: If your IP changes, for example you're on a VPN, you will need to add your new IP address to the VPC Security Group. I do this nearly everytime I go to a new coffee shop.
Download the generic version of the script and then make the script executable.
$ curl https://raw.githubusercontent.com/nealalan/tf-nealalan.com/master/install.sh > install.sh
$ chmod +x ./install.sh$ nano install.sh- Remove documentation that is irrelevant to the your site.
- Change all references of nealalan.com to your domain name.
- Remove all reference to neonaluminum.com (or change it to another domain or subdomain or for whatever you have the Elastic IP assigned to a DNS record.)
- On the "sudo certbot --authenticator" line, PLEASE change the email address to your email address.
- Remove the "git clone" lines for nealalan.com and neonaluminum.com unless you want to clone your websites. If you do remove them you will simply need to create your own.
This will take a few minutes, and if you edited everything correctly, you should be kicked out of the ssh connection.
$ ./install.sh- After you reconnect using ssh, you should now be able to browse to your website in any browser.
- If you didn't load a page, you will not see a page.
In the script, links were automatically made to the folders holding your website. So, for example, from my ~/ (home directory) I can just perform:
$ cd nealalan.com
$ nano -m index.html- I can now directly edit my website.
- Note, if you haven't used nano before, you can use search how to. To summarize, you can use the arrow keys, type on lines and use Ctrl-X to exit
- Here's my page:
- My server is at static IP 18.223.13.99
- serving https://nealalan.com https://www.nealalan.com
- and https://neonaluminum.com https://www.neonaluminum.com
- with redirects from all http:// addresses
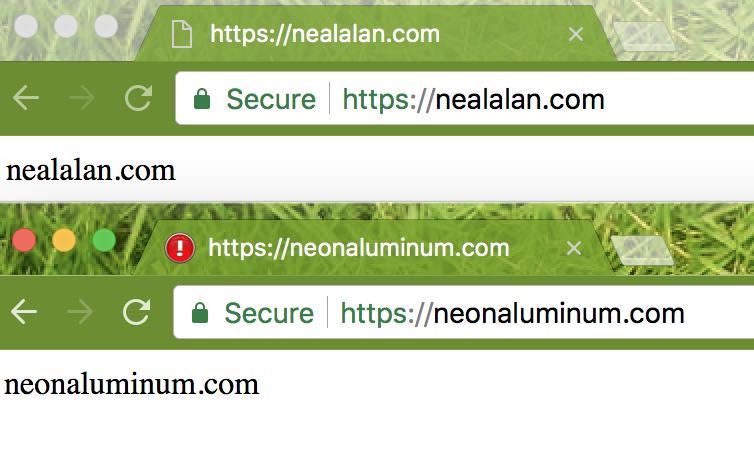
- Verify secure sites using: Sophos Security Headers Scanner and SSL Labs test .
To get rid of everything:
- A few simple commands from your local machine
$ terraform plan -destroy
$ terraform destroy- Make sure all your EC2 instances are stopped or gone!
- Remove your Elastic IPs.
- Ensure your Route 53 hosted zones are deleted.
- NOTE: Don't delete your account. You may want it again for another lab!
- Add a terraform resource to add an alarm:
- Threshold: StatusCheckFailed >= 1 for 2 datapoints within 30 minutes
- Period: 15 minutes
- Datapoints to alarm: 2 out of 2
- Action: When in alarm, reboot the instance with id
[edit]