Welcome to this repository! Yivi frontend packages is a collection of related packages, that together form a Javascript "client" to the IRMA server. The primary purpose of these packages is to have a very flexible Yivi client in the web browser, but you can also use them to build a NodeJS client.
The browser version, by default, will look like this:
The client is designed in such a way that you can combine the plugins you need and configure them in many useful ways. So the above design can easily be removed (for your NodeJS application) or swapped out for a popup version.
This library is designed to be flexible in usage. In this section we describe how some imaginable Yivi flows and how these flows map onto this library. We also mention points of attention for developers when implementing such a flow.
As a general best practice, we don't want to allow the web browser to freely initialize the Yivi flow. Also, in many cases we don't want the result of the disclosure or signing request to be revealed to the browser. The code that is running in the web browser could be compromized by the user or third party injected code.
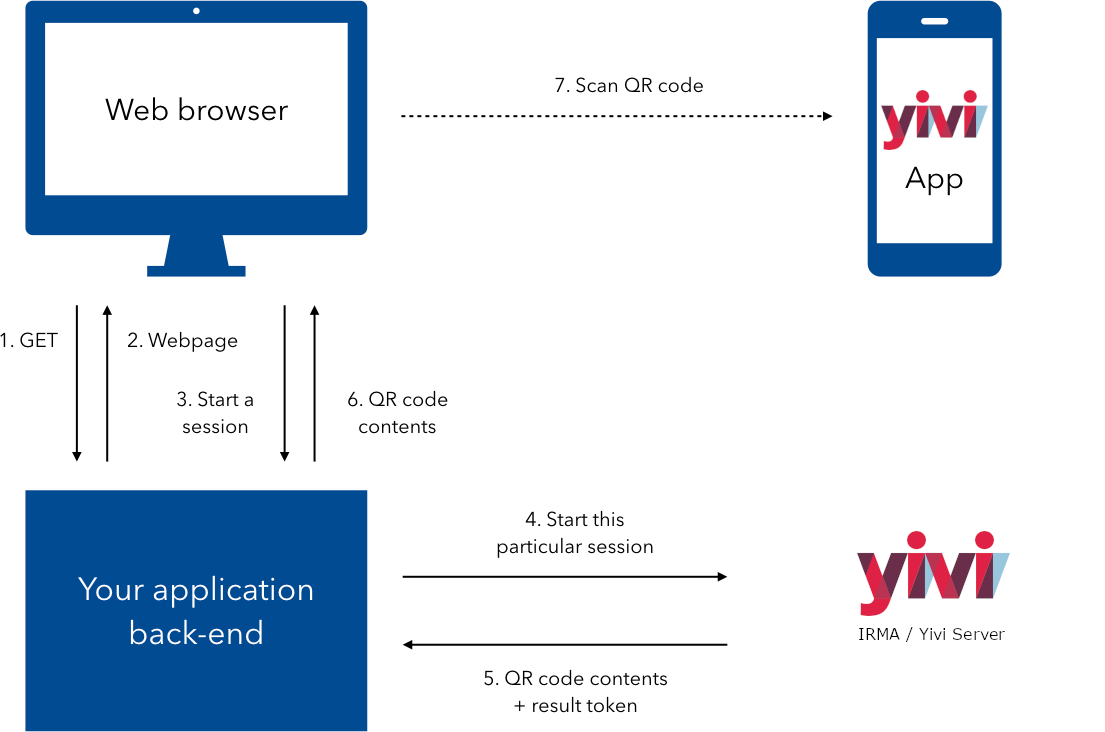
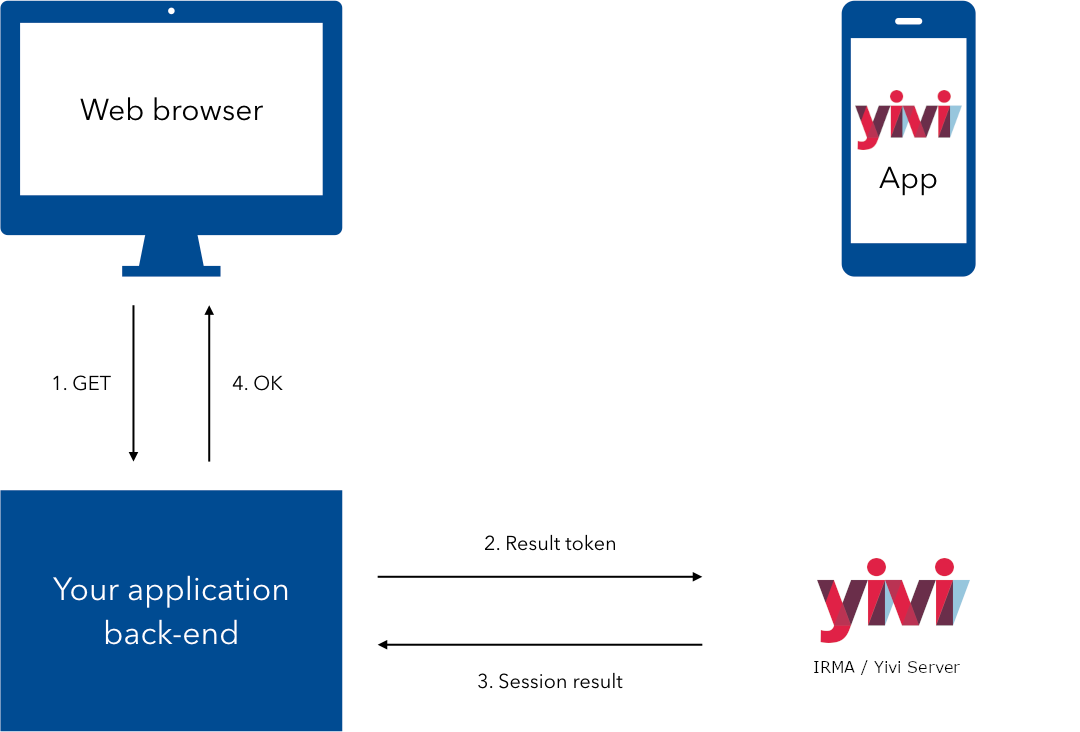
The most highly recommended flow that combats these issues is one where the Javascript client talks to the IRMA server through your own application back-end, that functions as a proxy.
 Starting a session through a proxy
In this flow the Yivi Javascript client requests the back-end for a new session to be started, and it is the back-end that actually starts the session. In this flow the web browser can't manipulate the session that gets started or see the contents of the resulting disclosure:
 Getting the session result through a proxy
How to implement this flow
You can use either the wrapper package yivi-frontend or
combine your own packages if you have a build system like webpack.
<script type="text/javascript" src="[link to yivi-frontend, see its readme]"></script>

<script type="text/javascript">
const yiviWeb = yivi.newWeb({
  debugging: false,            // Enable to get helpful output in the browser console
  element:   '#yivi-web-form', // Which DOM element to render to

  // Back-end options
  session: {
    // Point this to your controller:
    url: 'https://my-server.domain/irma-endpoint',

    start: {
      url: o => `${o.url}/start`,
      method: 'GET'
    },
    result: {
      url: (o, {sessionPtr, sessionToken}) => `${o.url}/result`,
      method: 'GET'
    }
  }
});

yiviWeb.start()
.then(result => console.log("Successful disclosure! 🎉", result))
.catch(error => console.error("Couldn't do what you asked 😢", error));
</script>$ npm install --save-dev yivi-css yivi-core yivi-web yivi-clientrequire('@privacybydesign/yivi-css');
const YiviCore = require('@privacybydesign/yivi-core');
const Web = require('@privacybydesign/yivi-web');
const Client = require('@privacybydesign/yivi-client');
const yivi = new YiviCore({
debugging: false, // Enable to get helpful output in the browser console
element: '#yivi-web-form', // Which DOM element to render to
// Back-end options
session: {
// Point this to your controller:
url: 'https://my-server.domain/yivi-endpoint',
start: {
url: o => `${o.url}/start`,
method: 'GET'
},
result: {
url: (o, {sessionPtr, sessionToken}) => `${o.url}/result`,
method: 'GET'
}
}
});
yivi.use(Web);
yivi.use(Client);
yivi.start()
.then(result => console.log("Successful disclosure! 🎉", result))
.catch(error => console.error("Couldn't do what you asked 😢", error));Then, on the server side, you have to implement the start and result
actions on your irma-endpoint controller.
start should make a call to the IRMA server and start the Yivi session
there. Then, strip the result token from the response JSON and send the rest
back in the response to the client.
results can fetch the result from the IRMA server using the result token
that we stripped off the response earlier. Whatever you return to the client
will be what the Promise on the last few lines resolves to.
As you saw in the snippets above, you can change the request types and URLs of
both actions. But you can also change the request body, headers and how to get
the QR code from the server's response. See the
yivi-client documentation for details.
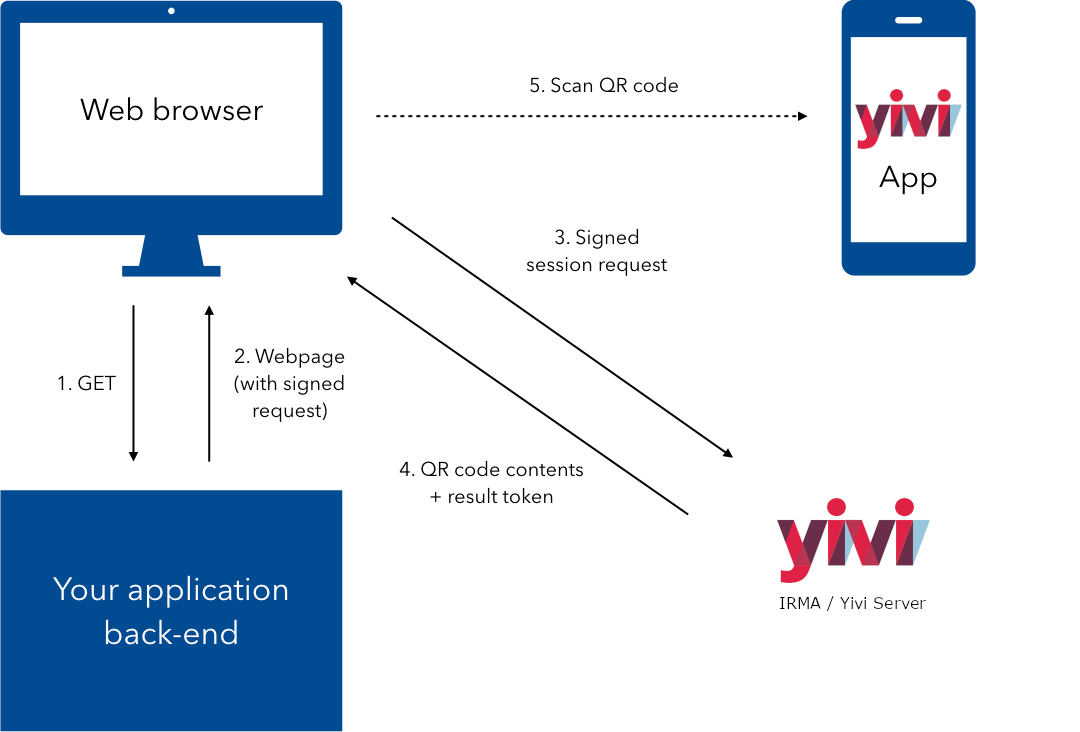
Another supported flow is one where the Javascript client talks to the IRMA server directly, and is itself responsible for starting the session there.
 Starting a session directly, with signed request
The payload that gets sent to the IRMA server to start the session is signed by your application back-end, so the web browser can't alter the request and the IRMA server can verify its authenticity.
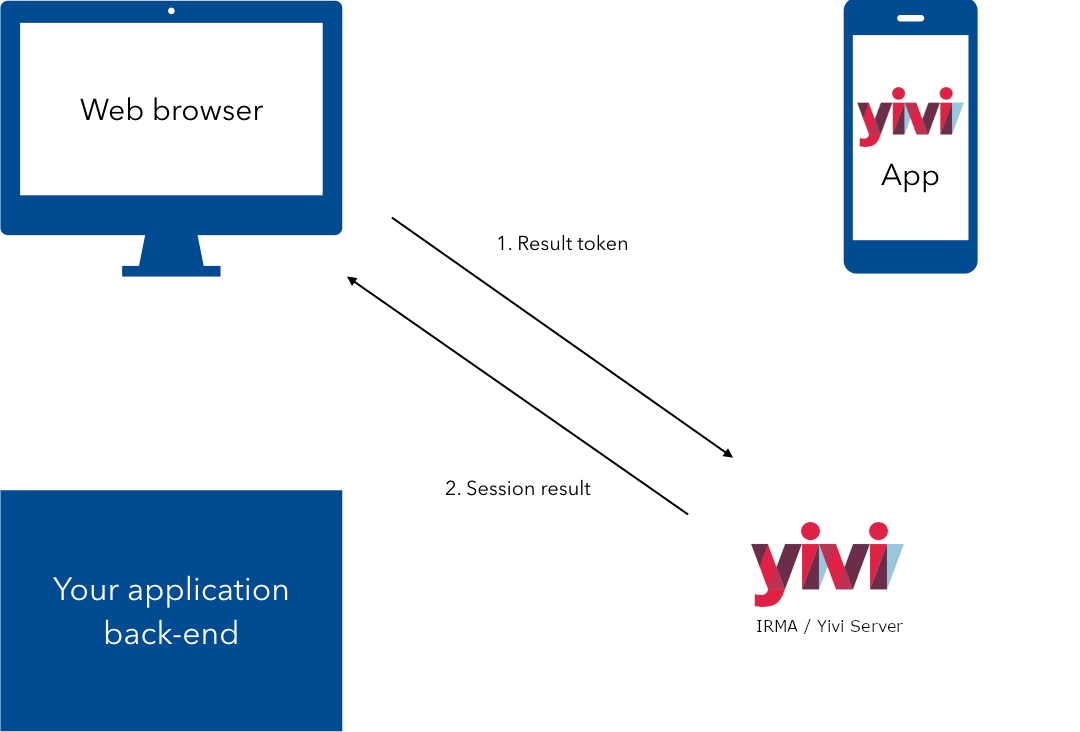
However, the web browser will be able to see the resulting disclosure or signed contract, because the web browser will be the one receiving the result token from the IRMA server. This may be an issue for some scenario's. In these scenarios you can get signed JWTs as result from the IRMA server. This flow with receiving JWTs as result is not elaborated in this example.
 Getting the session result directly
How to implement this flow
You can use either the wrapper package yivi-frontend or
combine your own packages if you have a build system like webpack.
<script type="text/javascript" src="[link to yivi-frontend, see its readme]"></script>

<script type="text/javascript">
const yiviRequest = 'signed request here';

const yiviWeb = yivi.newWeb({
  debugging: false,            // Enable to get helpful output in the browser console
  element:   '#yivi-web-form', // Which DOM element to render to

  // Back-end options
  session: {
    // Point this to your IRMA server:
    url: 'https://irma-server.my-server.domain/',

    start: {
      method: 'POST',
      body: yiviRequest,
      headers: { 'Content-Type': 'text/plain' },
    }
  }
});

yiviWeb.start()
.then(result => console.log("Successful disclosure! 🎉", result))
.catch(error => console.error("Couldn't do what you asked 😢", error));
</script>$ npm install --save-dev yivi-css yivi-core yivi-web yivi-clientrequire('@privacybydesign/yivi-css');
const YiviCore = require('@privacybydesign/yivi-core');
const Web = require('@privacybydesign/yivi-web');
const Client = require('@privacybydesign/yivi-client');
const yiviRequest = document.getElementById('yivi-request').value;
const yivi = new YiviCore({
debugging: false, // Enable to get helpful output in the browser console
element: '#yivi-web-form', // Which DOM element to render to
// Back-end options
session: {
// Point this to your IRMA server:
url: 'https://irma-server.my-server.domain/',
start: {
method: 'POST',
headers: { 'Content-Type': 'application/json' },
body: yiviRequest
}
}
});
yivi.use(Web);
yivi.use(Client);
yivi.start()
.then(result => console.log("Successful disclosure! 🎉", result))
.catch(error => console.error("Couldn't do what you asked 😢", error));On the server side you have to render the signed request in your view, or provide some other method of getting the signed request to the client. This is left as an exercise for the reader, because there are too many ways in which to do it.
The Promise in the last few lines of the code above will now resolve to the result of the disclosure or signing flow. Please note that it is now also up to you to transfer this information to your back-end and also to check that the result has been properly signed by your IRMA server and the browser has not altered the results in any way.
This flow is "tolerated" but not recommended in the browser. It's useful for making quick demos and for local development, but is probably not a good idea for production. Unless you're writing a NodeJS client, maybe.
The Javascript client talks directly to the IRMA server and starts an arbitrary session there. The back-end does not need to be involved at all.
How to implement this flow
You can use either the wrapper package yivi-frontend or
combine your own packages if you have a build system like webpack.
<script type="text/javascript" src="[link to yivi-frontend, see its readme]"></script>

<script type="text/javascript">
const yiviWeb = yivi.newWeb({
  debugging: false,            // Enable to get helpful output in the browser console
  element:   '#yivi-web-form', // Which DOM element to render to

  // Back-end options
  session: {
    // Point this to your IRMA server:
    url: 'https://irma-server.my-server.domain/',

    start: {
      method: 'POST',
      headers: { 'Content-Type': 'application/json' },
      body: JSON.stringify({
        '@context': 'https://irma.app/ld/request/disclosure/v2',
        'disclose': [
          [
            [ 'pbdf.pbdf.email.email' ],
            [ 'pbdf.sidn-pbdf.email.email' ],
          ]
        ]
      })
    }
  }
});

yiviWeb.start()
.then(result => console.log("Successful disclosure! 🎉", result))
.catch(error => console.error("Couldn't do what you asked 😢", error));
</script>$ npm install --save-dev yivi-css yivi-core yivi-web yivi-clientrequire('@privacybydesign/yivi-css');
const YiviCore = require('@privacybydesign/yivi-core');
const Web = require('@privacybydesign/yivi-web');
const Client = require('@privacybydesign/yivi-client');
const yivi = new YiviCore({
debugging: false, // Enable to get helpful output in the browser console
element: '#yivi-web-form', // Which DOM element to render to
// Back-end options
session: {
// Point this to your IRMA server:
url: 'https://irma-server.my-server.domain/',
start: {
method: 'POST',
headers: { 'Content-Type': 'application/json' },
body: JSON.stringify({
'@context': 'https://irma.app/ld/request/disclosure/v2',
'disclose': [
[
[ 'pbdf.pbdf.email.email' ],
[ 'pbdf.sidn-pbdf.email.email' ],
]
]
})
}
}
});
yivi.use(Web);
yivi.use(Client);
yivi.start()
.then(result => console.log("Successful disclosure! 🎉", result))
.catch(error => console.error("Couldn't do what you asked 😢", error));For development or testing purposes it is often easier to just skip having an
IRMA server at all. You can use the yivi-dummy package
to this end.
How to implement this flow
$ npm install --save-dev yivi-css yivi-core yivi-web yivi-dummyrequire('@privacybydesign/yivi-css');
const YiviCore = require('@privacybydesign/yivi-core');
const Web = require('@privacybydesign/yivi-web');
const Dummy = require('@privacybydesign/yivi-dummy');
const yivi = new YiviCore({
debugging: false, // Enable to get helpful output in the browser console
element: '#yivi-web-form', // Which DOM element to render to
dummy: 'happy path' // Specify which flow to emulate
});
yivi.use(Web);
yivi.use(Dummy);
yivi.start()
.then(result => console.log("Successful disclosure! 🎉", result))
.catch(error => console.error("Couldn't do what you asked 😢", error));See yivi-dummy for more options.
Want to know more about any of the packages? Each package has its own README file with features, options and purpose of the package:
yivi-coreyivi-cssyivi-frontend- User interaction plugins
- State and session management plugins
Also, we have several examples available that show how you can use specific combinations of plugins to achieve different effects:
- Web browser
yivi-consoleyivi-frontendyivi-popupyivi-web- For an
yivi-clientbrowser example, you can check theyivi-frontendexample
- Nodejs
When developing a certain package, you can test the package using one of the examples.
We provide development scripts to install all packages, configure all needed links between the packages and then build the packages. The setup is tested on Linux (debian), MacOS and Windows (in git bash).
These scripts require npm (Node.js) to be installed. We recommend you to use npm version 7 or above.
On npm version 6 (LTS) the --no-save option of npm install is not working correctly.
This leads to unintended changes being made to the package.json files.
These development scripts are automatically triggered when installing and building the examples.
npm install   # To install the dependencies for all packages
npm run link  # To make sure local changes in other yivi-frontend-packages propagate
npm run build # To trigger the building steps for yivi-css and yivi-frontendTo make a valid PR, your code changes should pass the linter and code formatter. We use ESLint for JavaScript and Stylelint for SCSS. You can run these in the following way:
npm install
npm run lintTo release a new version of the yivi-frontend-packages you have to run the scripts below.
You need access to the NPM repository in order to release new versions. Otherwise,
these scripts will fail.
./prepare-release.sh <command line parameters for npm version>
# Check whether all steps succeeded properly, otherwise undo changes and fix issues first.
./release.sh

./prepare-yivi-popup.sh
# Check whether all steps succeeded properly, otherwise fix issues in yivi-popup first.
cd ./plugins/yivi-popup && npm publish --access public

cd ../.. # Go back to root of the repository
./prepare-yivi-frontend.sh
# Check whether all steps succeeded properly, otherwise fix issues in yivi-frontend first.
cd ./yivi-frontend && npm publish --access public

cd .. # Go back to root of the repository
git add -u ./\*package.json ./\*package-lock.json
git commit -m "Version bump"More documentation on how to use this package can be found in the Yivi documentation.
