![]()
PyMLpipe is a Python library for ease Machine Learning Model monitoring and Deployment.
- Simple
- Intuative
- Easy to use
What's New in 0.2.7
- Explainable AI
- Data Pipeline
- AutoML support
Please Find the Full documentation here!
Use the package manager pip to install PyMLpipe.
pip install pymlpipe
or
pip3 install pymlpipe
-
Scikit-Learn
-
XGBoost
-
LightGBM
-
Pytorch
-
Tensorflow
-
Keras
- Load the python package
from pymlpipe.tabular import PyMLPipe- Initiate the
PyMLPipeclass
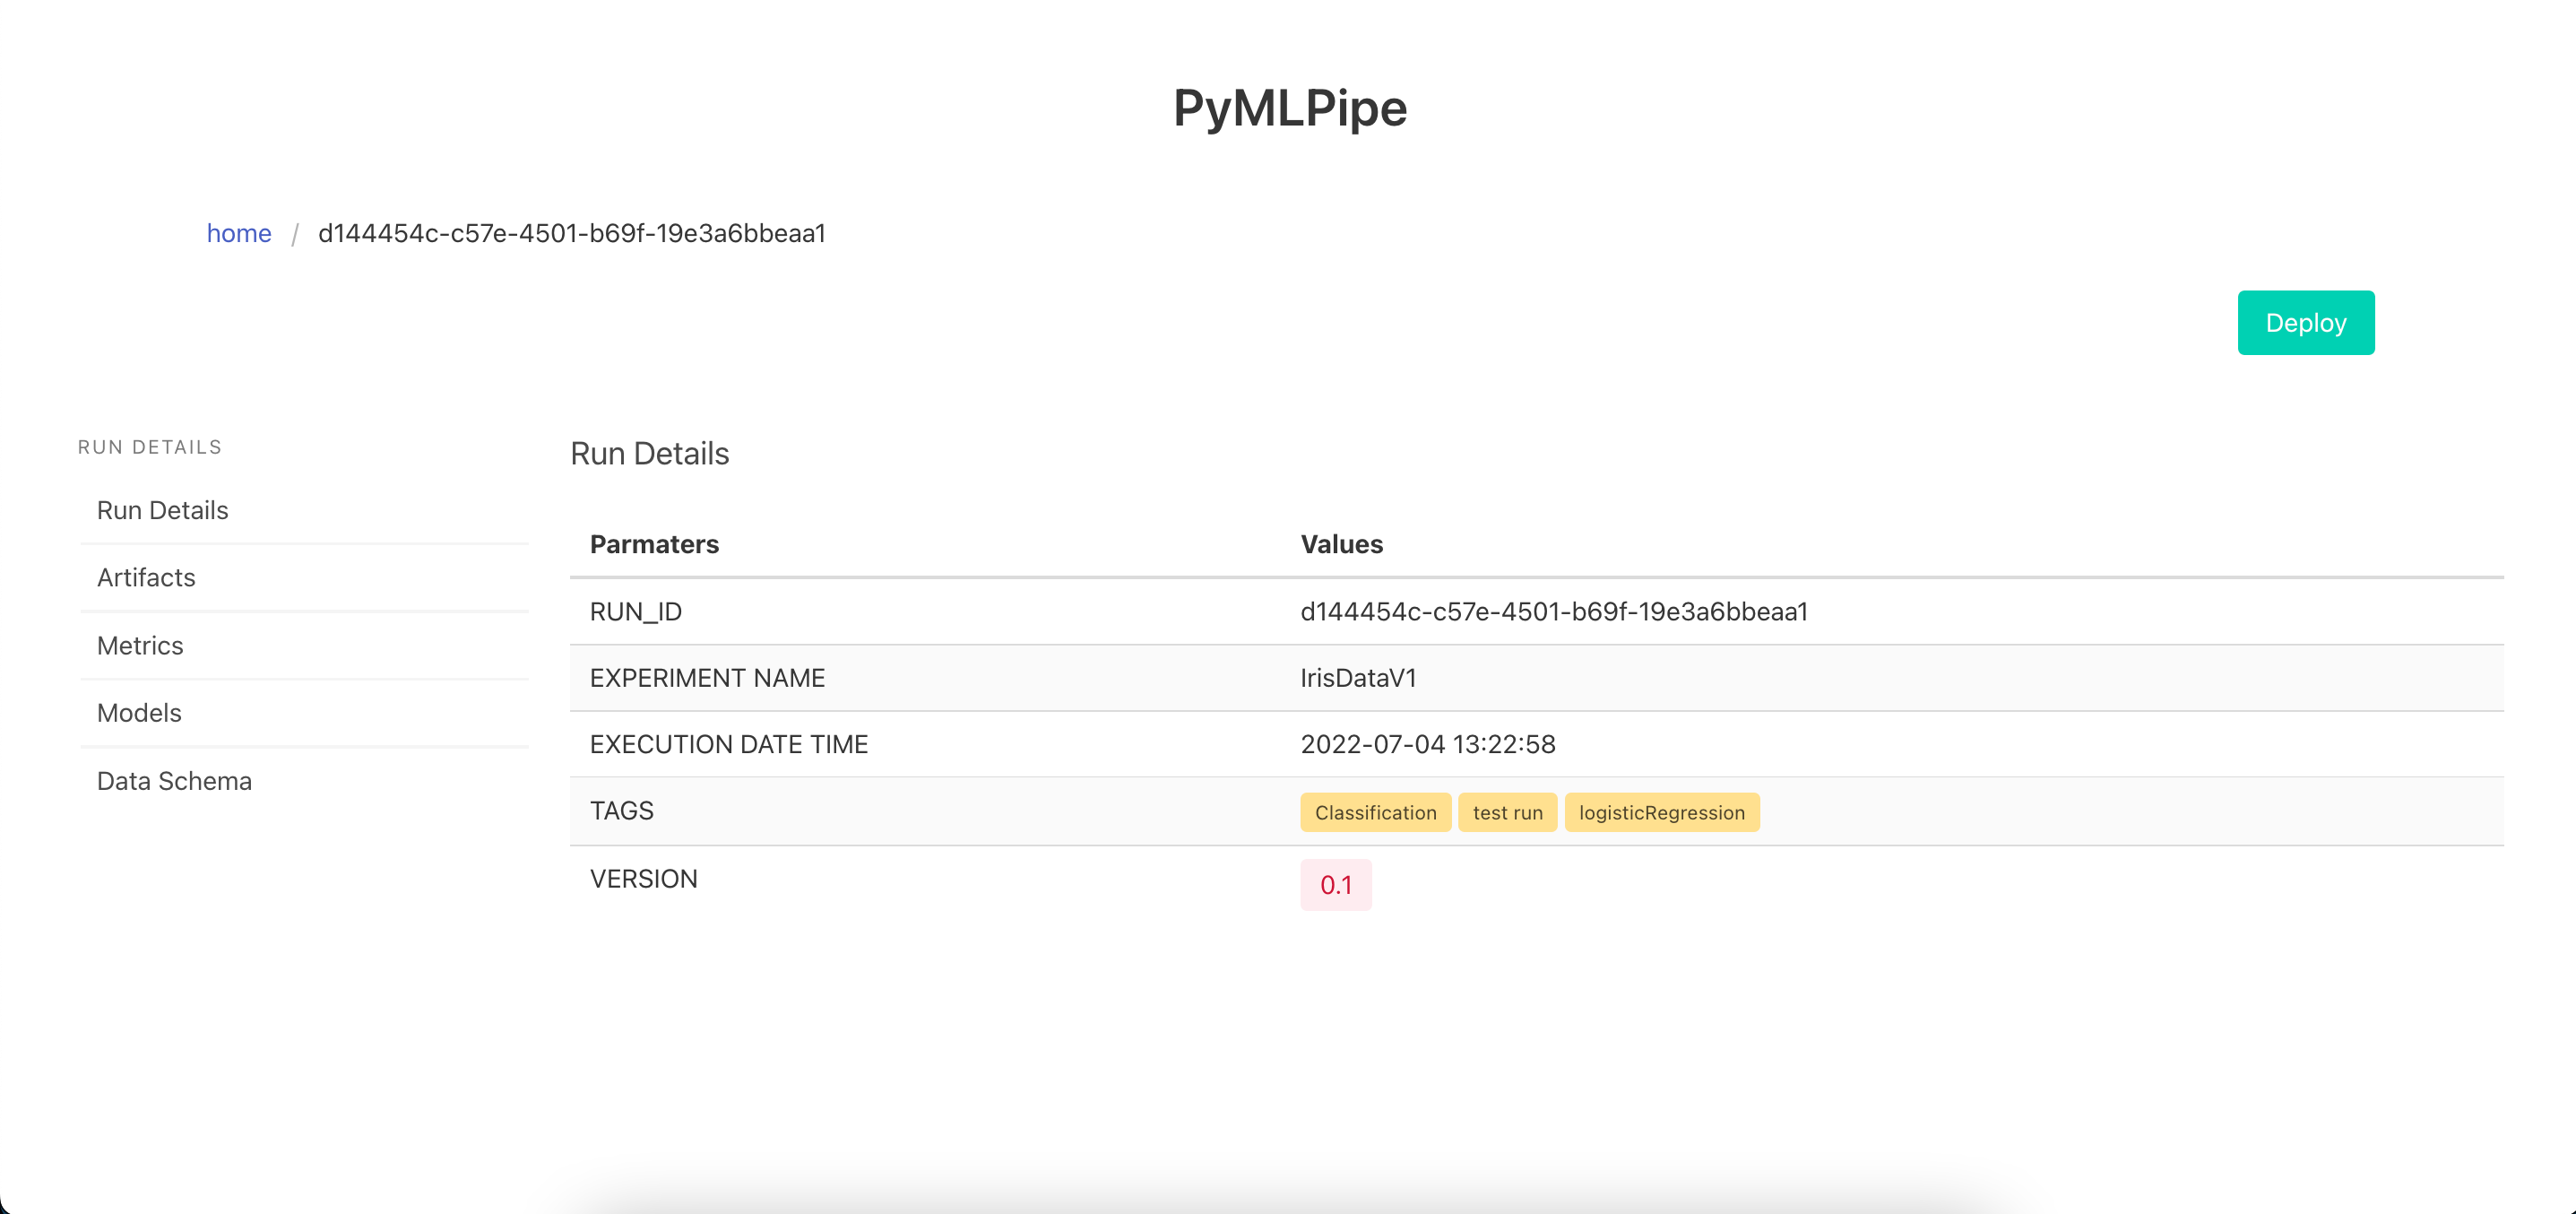
mlp=PyMLPipe()- Set an Experiment Name
[Optional]-Default experiment name is'0'
mlp.set_experiment("IrisDataV2")- Set a version
[Optional]-Default there is no version
mlp.set_version(0.1)- Initiate the context manager - This is create a unique ID for each model run.
-
when
.run()is used - Automatic unique ID is generated -
you can also provide
runidargument in the.run()this will the use the givenrunidfor next storing.
with mlp.run():Or
with mlp.run(runid='mlopstest'):- Set a Tag
[Optional]by usingset_tag()-Default there is no tags
mlp.set_tag('tag')Or
- Set multiple Tags
[Optional]by usingset_tags()-Default there is no tags
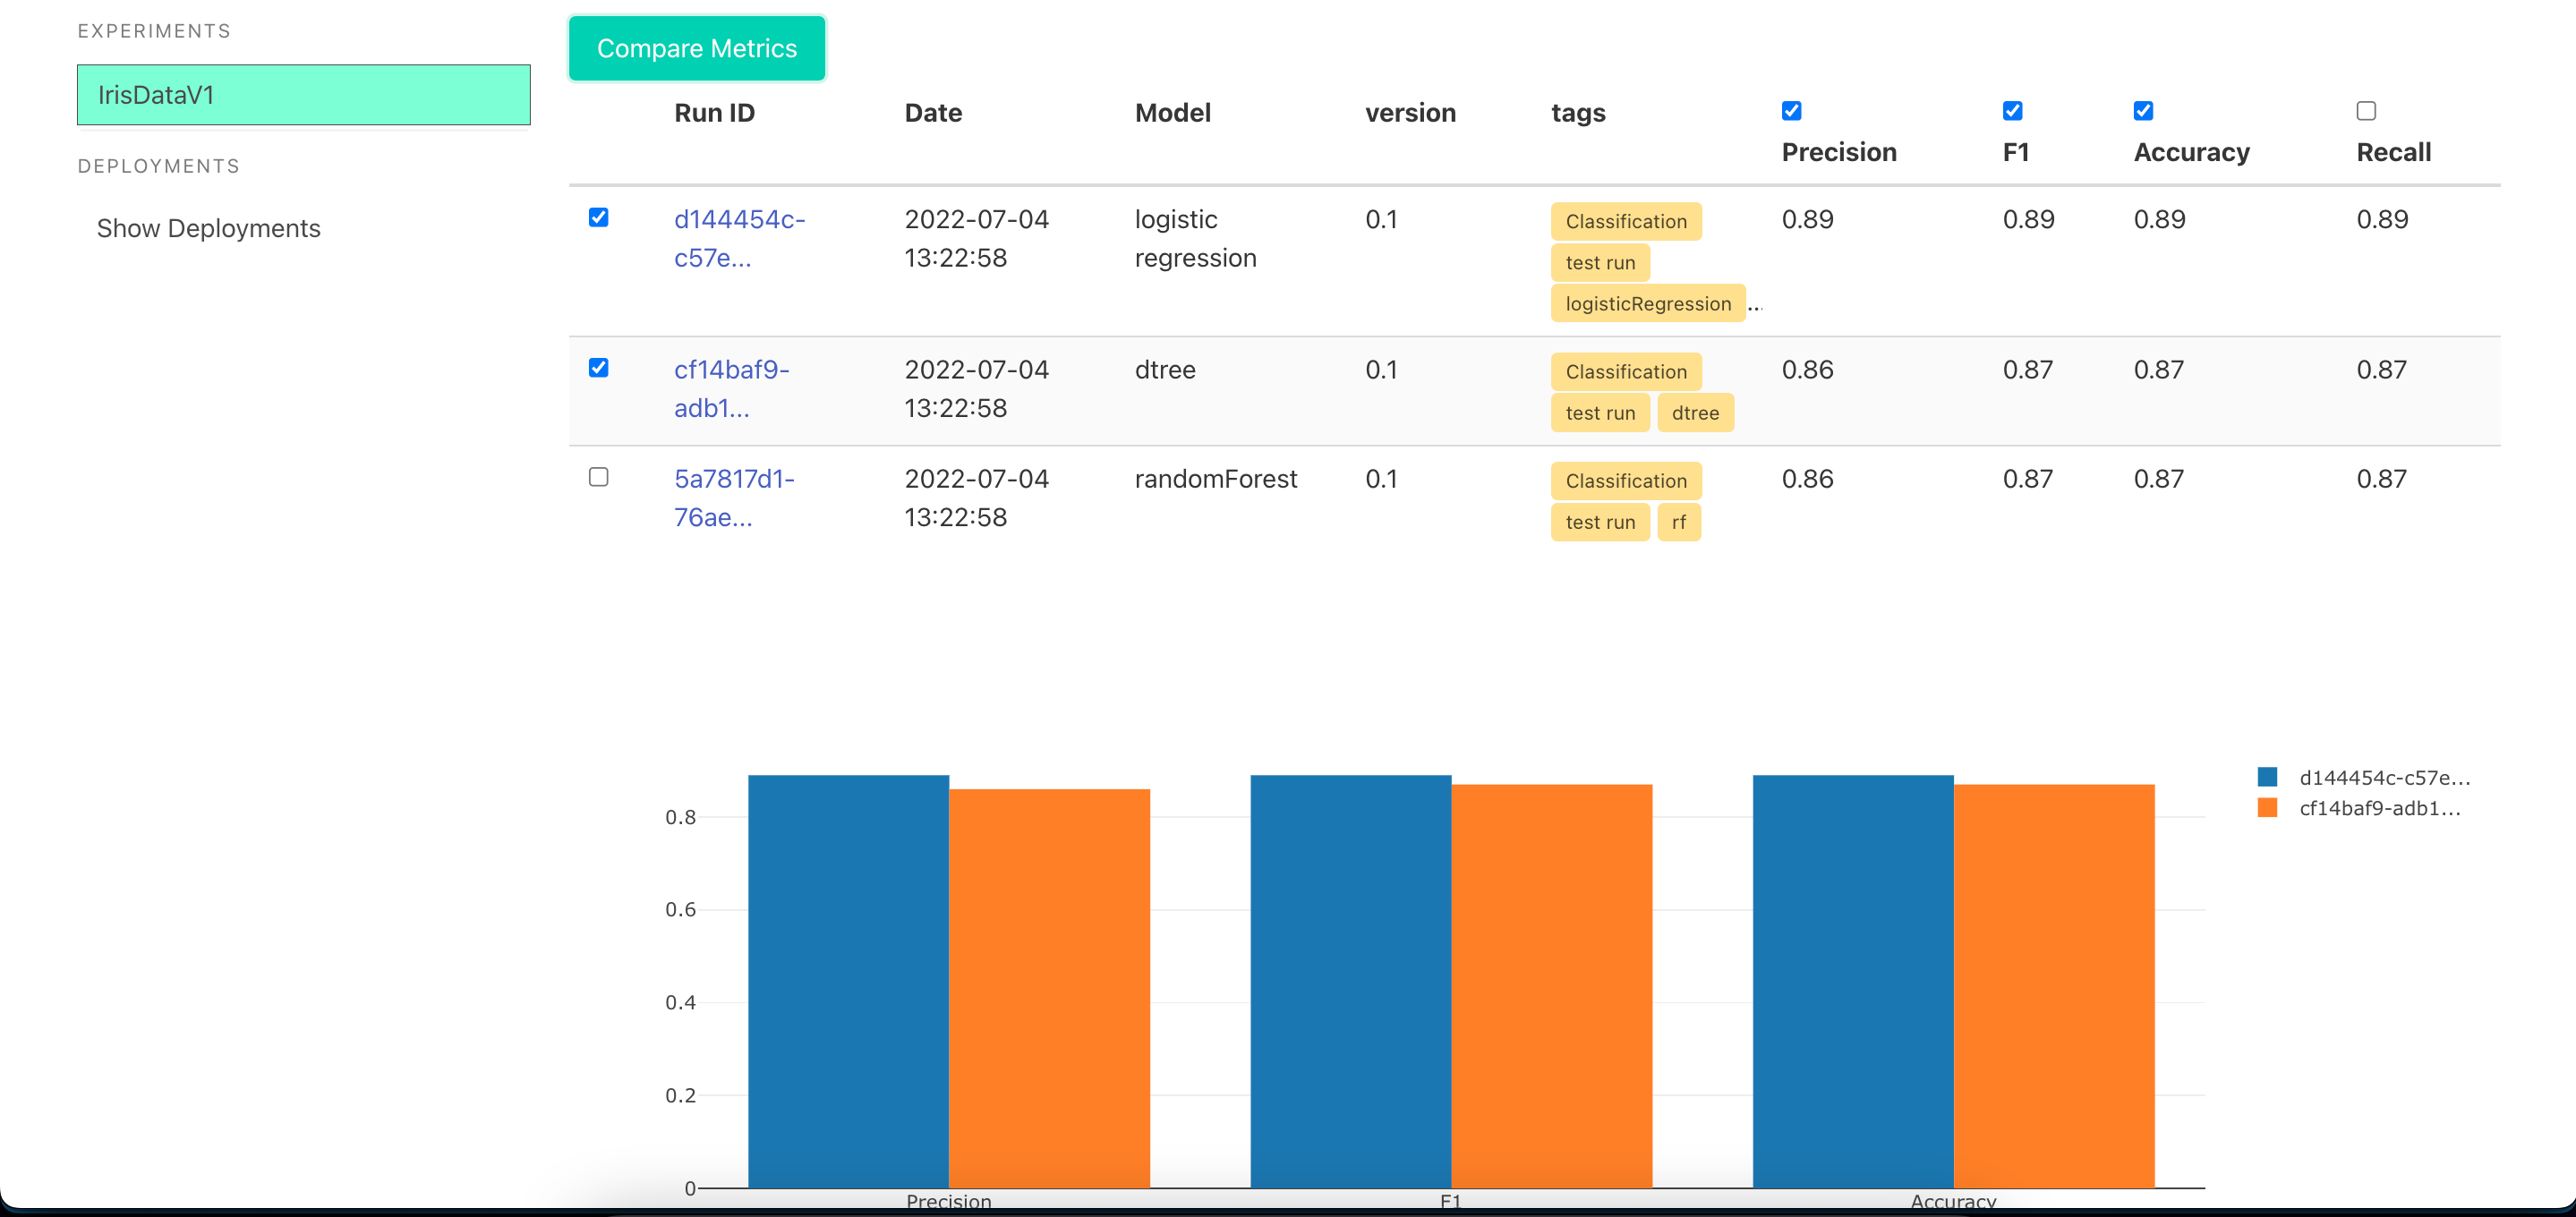
mlp.set_tags(["Classification","test run","logisticRegression"])
- Set Metrics values
[Optional]by usinglog_matric(metric_name,metric_value)-Default there is no metrics
This will help in comparing performance of different models and model versions
mlp.log_metric("Accuracy", accuracy_score(testy,predictions))


mlp.log_metric("Accuracy", .92)
- Set multiple Metrics values
[Optional]by usinglog_matrics({metric_name:metric_value})-Default there is no metrics
mlp.log_metrics(
	{
	"Accuracy": accuracy_score(testy,predictions),
	"Precision": precision_score(testy,predictions,average='macro'),
	"Recall": recall_score(testy,predictions,average='macro'),
	}
)

mlp.log_metrics({
	"Accuracy": .92,
	"Precision": .87,
	"Recall": .98,
	}
)- Save an artifact
[Optional]- You can save training/testing/validation/dev/prod data for monitoring and comparison
-
This will also help in generating
DATA SCHEMA -
register_artifact()-takes 3 arguments -
name of artifact
-
Pandas Dataframe
-
type of artifact -
[training, testing, validation, dev, prod] -
You can also use
register_artifact_with_path()- This will save the artifact from the disk. -
Path for the file
-
type of artifact -
[training, testing, validation, dev, prod]
mlp.register_artifact("train.csv", trainx)
mlp.register_artifact("train.csv", trainx)- Register Model
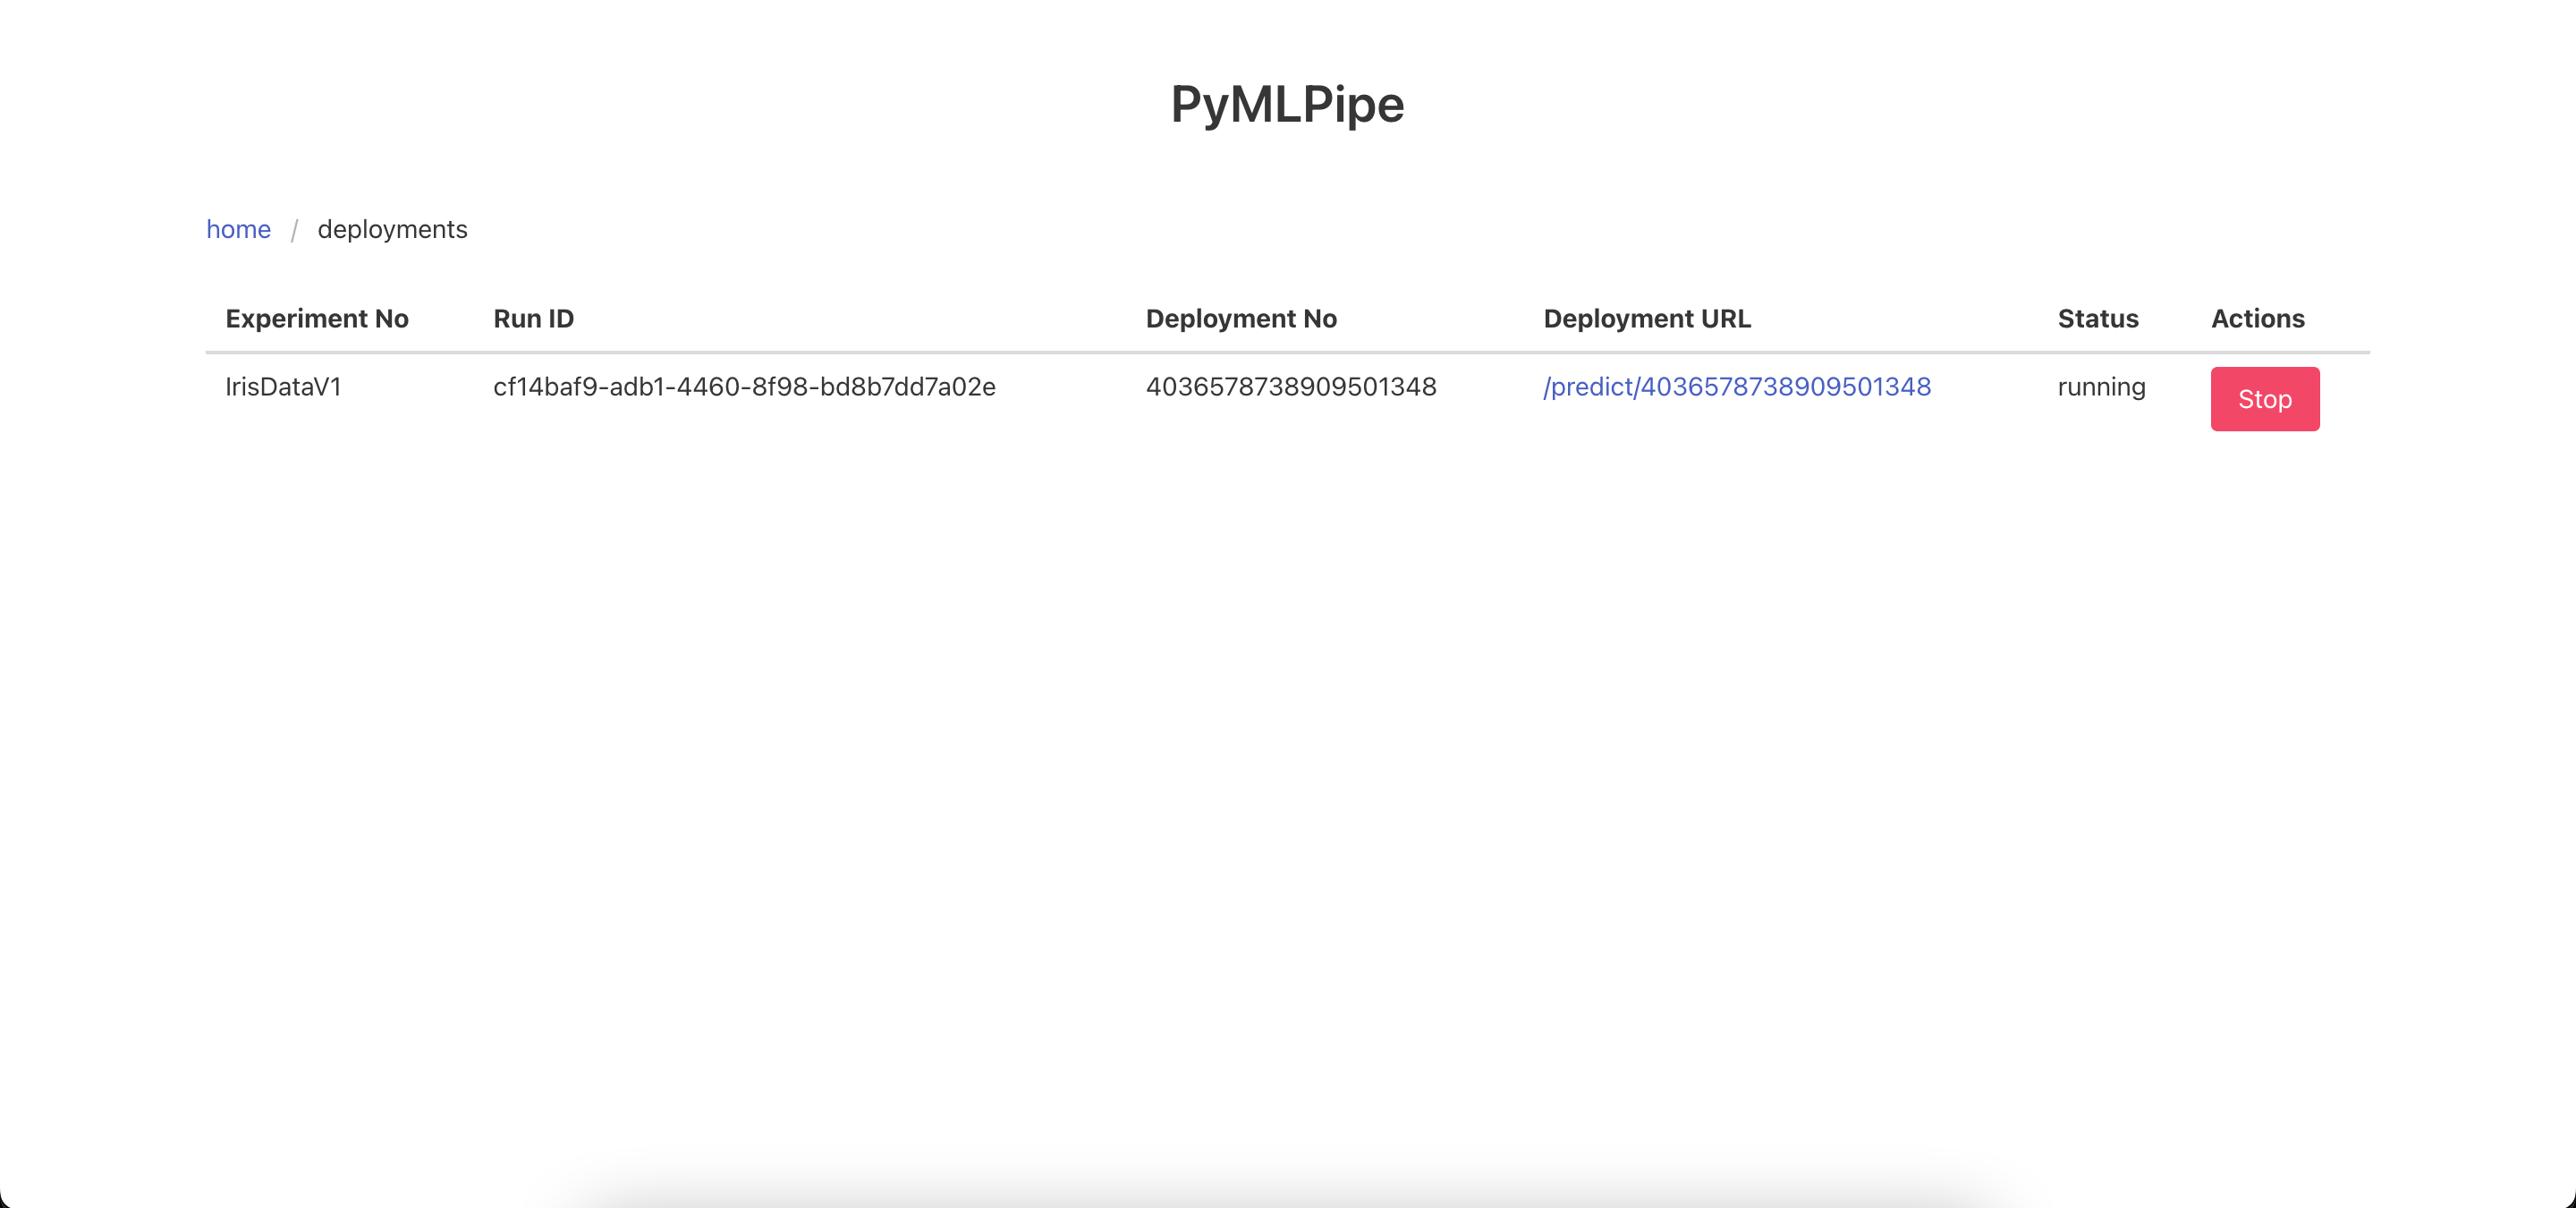
[Optional]- You can register the model. This will help in Quick deployment
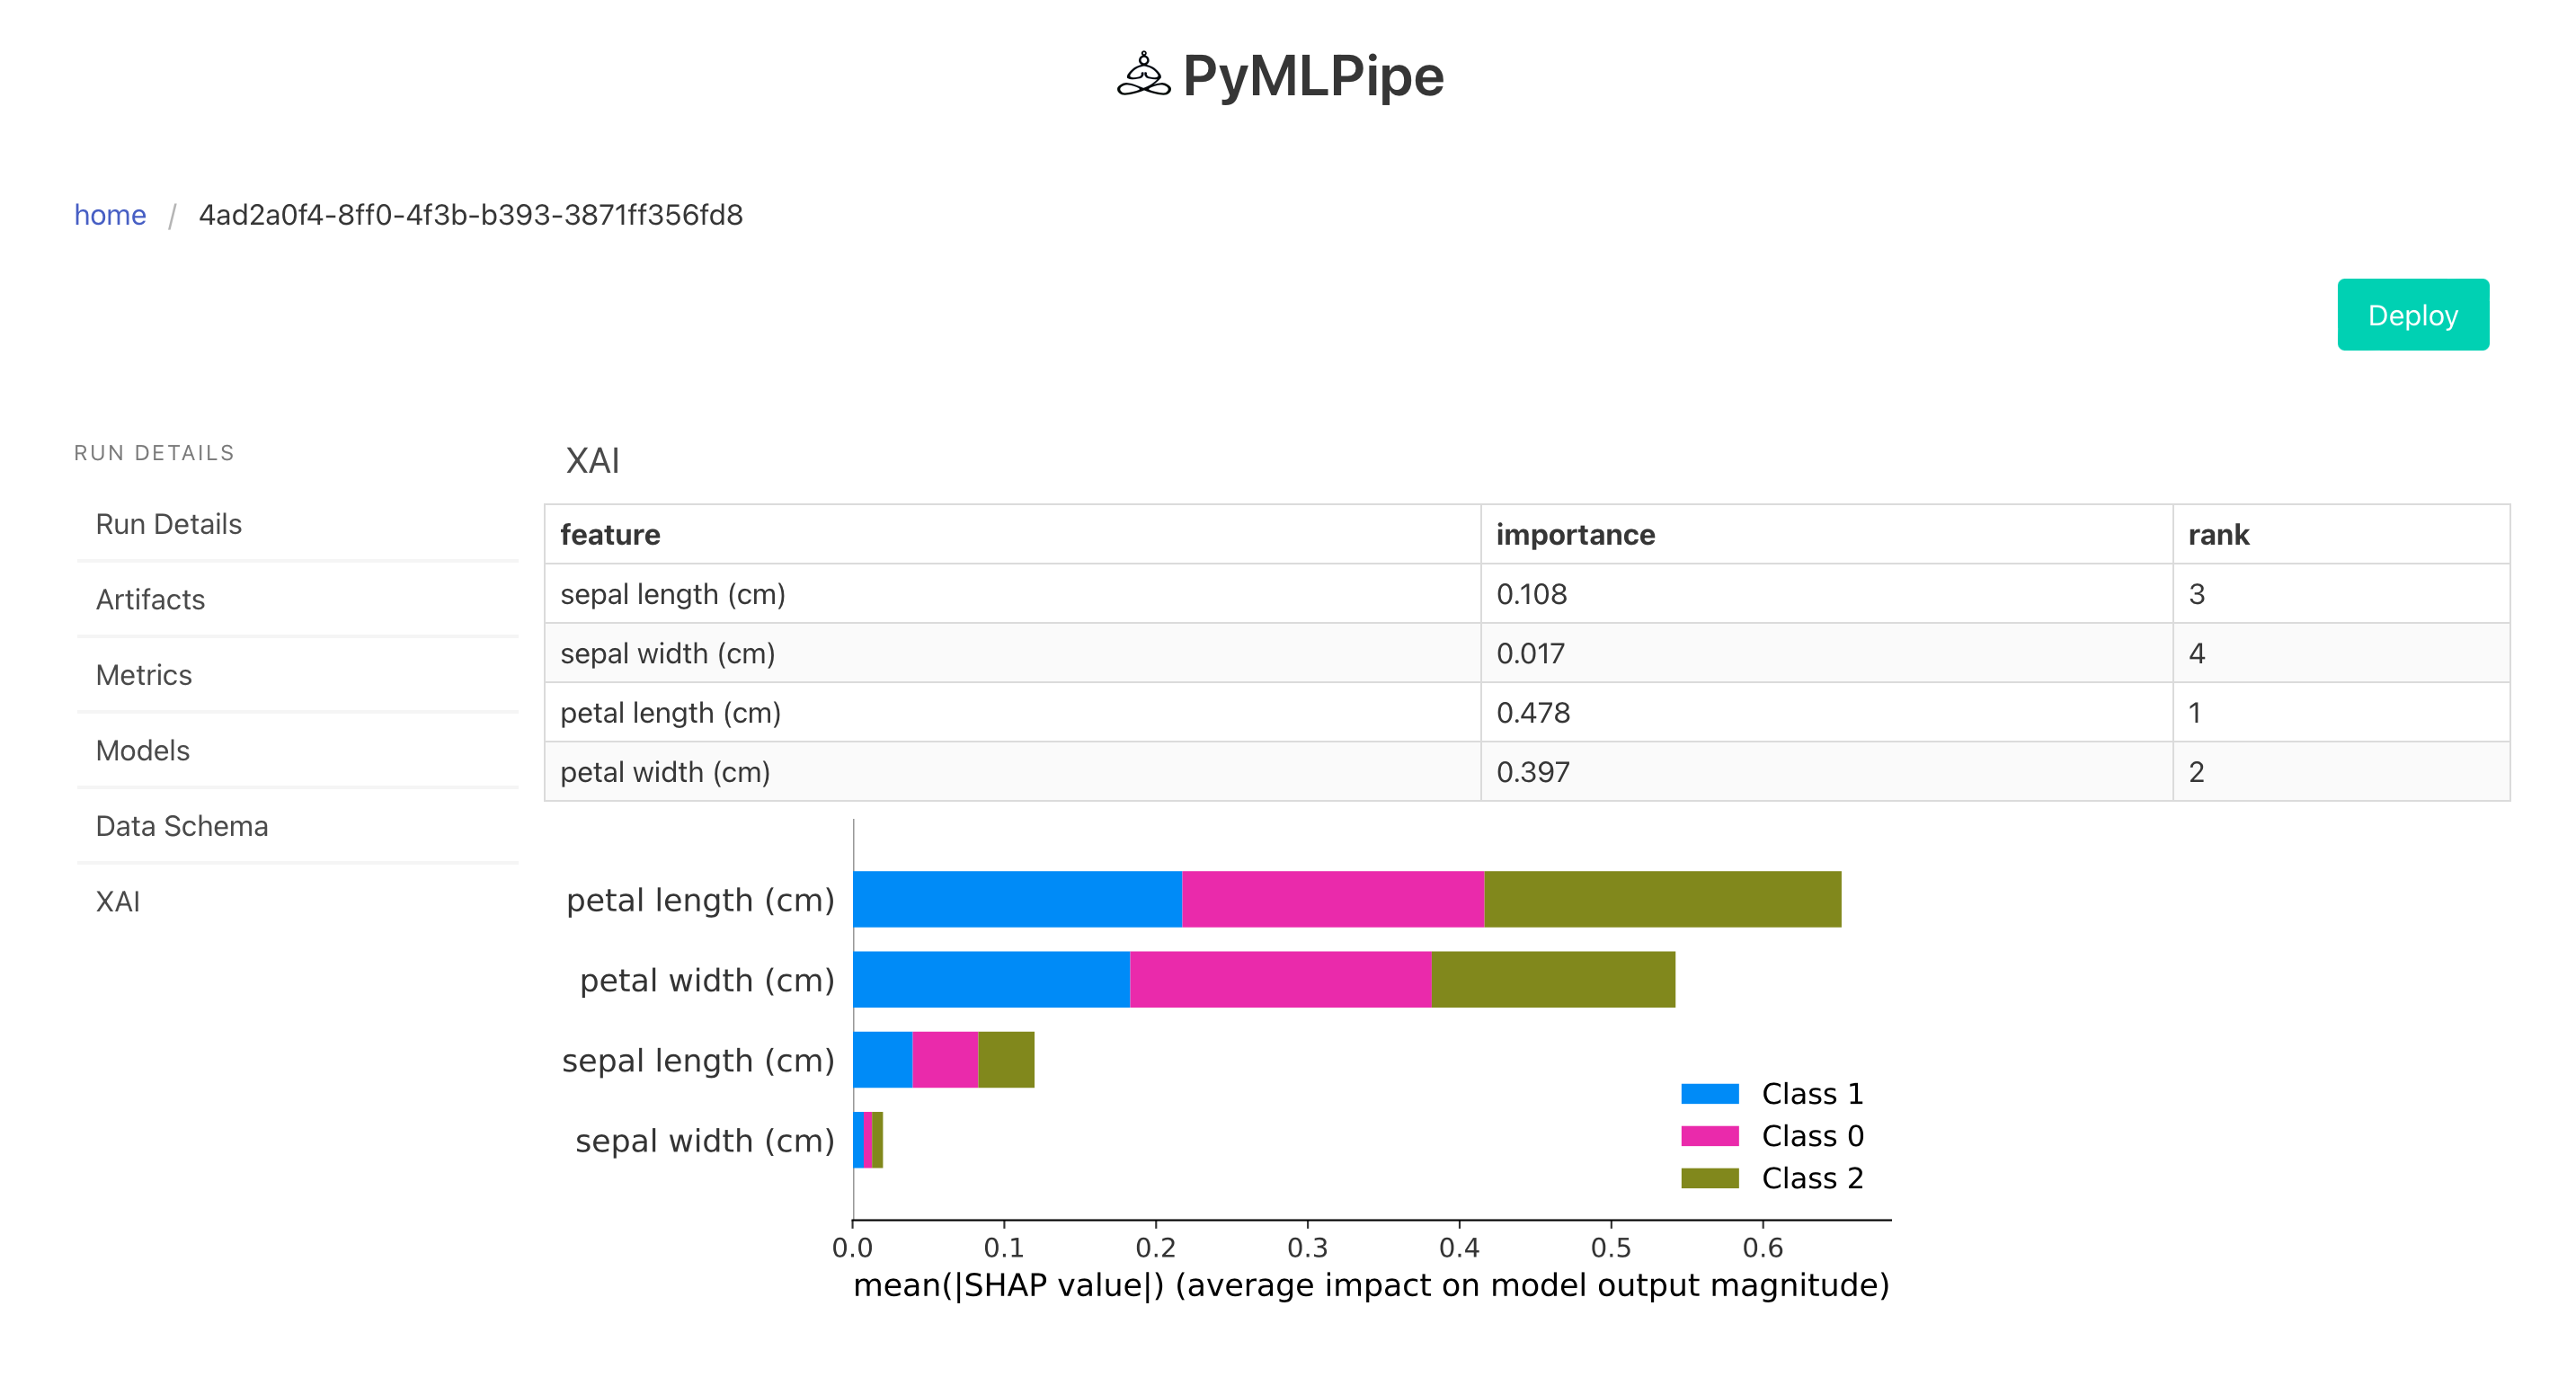
mlp.scikit_learn.register_model("logistic regression", model)To get model explaination , feature importance we can use explainer()
explainer takes two objects
- model - the model used for training
- trainx - the training data
mlp.explainer(model,trainx)from sklearn.datasets import load_iris
import pandas as pd
from sklearn.model_selection import train_test_split
from sklearn.linear_model import LogisticRegression
from sklearn.metrics import accuracy_score,precision_score,recall_score,f1_score
#import PyMLPipe from tabular
from pymlpipe.tabular import PyMLPipe
# Initiate the class
mlp=PyMLPipe()
# Set experiment name
mlp.set_experiment("IrisDataV2")
# Set Version name
mlp.set_version(0.2)
iris_data=load_iris()
data=iris_data["data"]
target=iris_data["target"]
df=pd.DataFrame(data,columns=iris_data["feature_names"])
trainx,testx,trainy,testy=train_test_split(df,target)
# to start monitering use mlp.run()
with mlp.run():
# set tags
mlp.set_tags(["Classification","test run","logisticRegression"])
model=LogisticRegression()
model.fit(trainx, trainy)
predictions=model.predict(testx)
# log performace metrics
mlp.log_metric("Accuracy", accuracy_score(testy,predictions))
mlp.log_metric("Precision", precision_score(testy,predictions,average='macro'))
mlp.log_metric("Recall", recall_score(testy,predictions,average='macro'))
mlp.log_metric("F1", f1_score(testy,predictions,average='macro'))
# Save train data and test data
mlp.register_artifact("train", trainx)
mlp.register_artifact("test", testx,artifact_type="testing")
# Save the model
mlp.scikit_learn.register_model("logistic regression", model)
# Model explainer
mlp.explainer(model,trainx)To start the UI
pymlpipeui
or
from pymlpipe.pymlpipeUI import start_ui

start_ui(host='0.0.0.0', port=8085)
XAI
- Each list is a row of data
{
	"data":[
		[5.6,3.0,4.5,1.5],
		[5.6,3.0,4.5,1.5]
	]
}
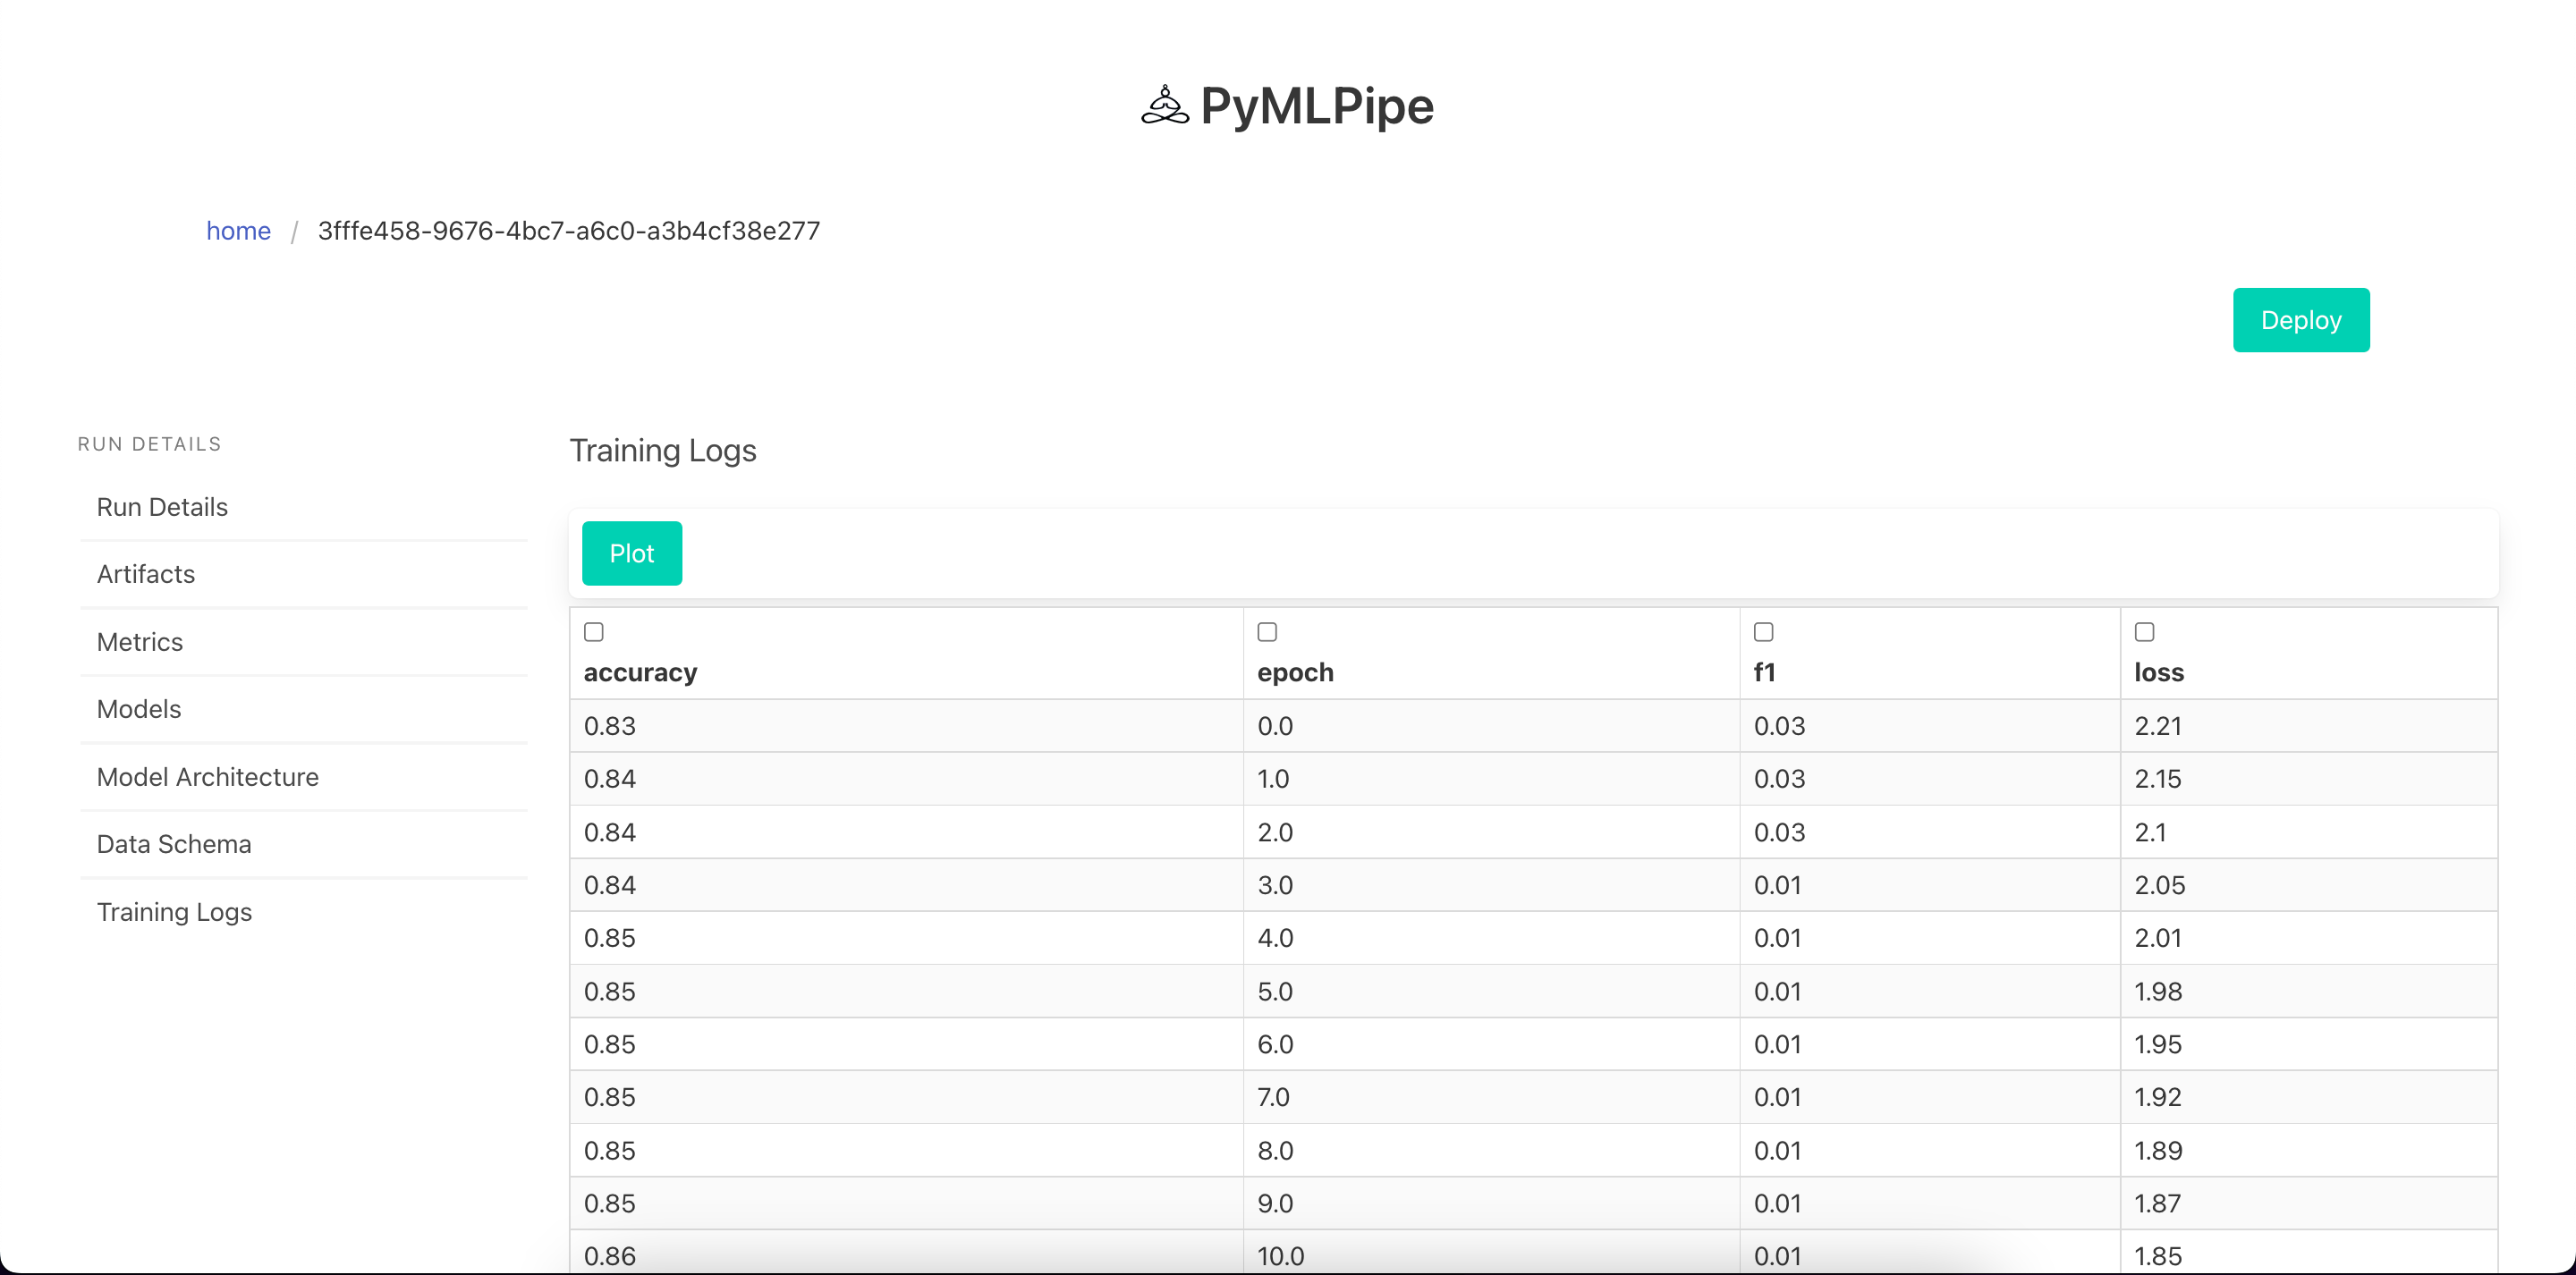
- Log continious Metrics
.log_metrics_continious(dict)--> dict of metrics\
- logs the metrics in a continious manner for each epoch
mlp.log_metrics_continious({

	"accuracy": .9,

	"precision": .8,

	"recall": .7

})
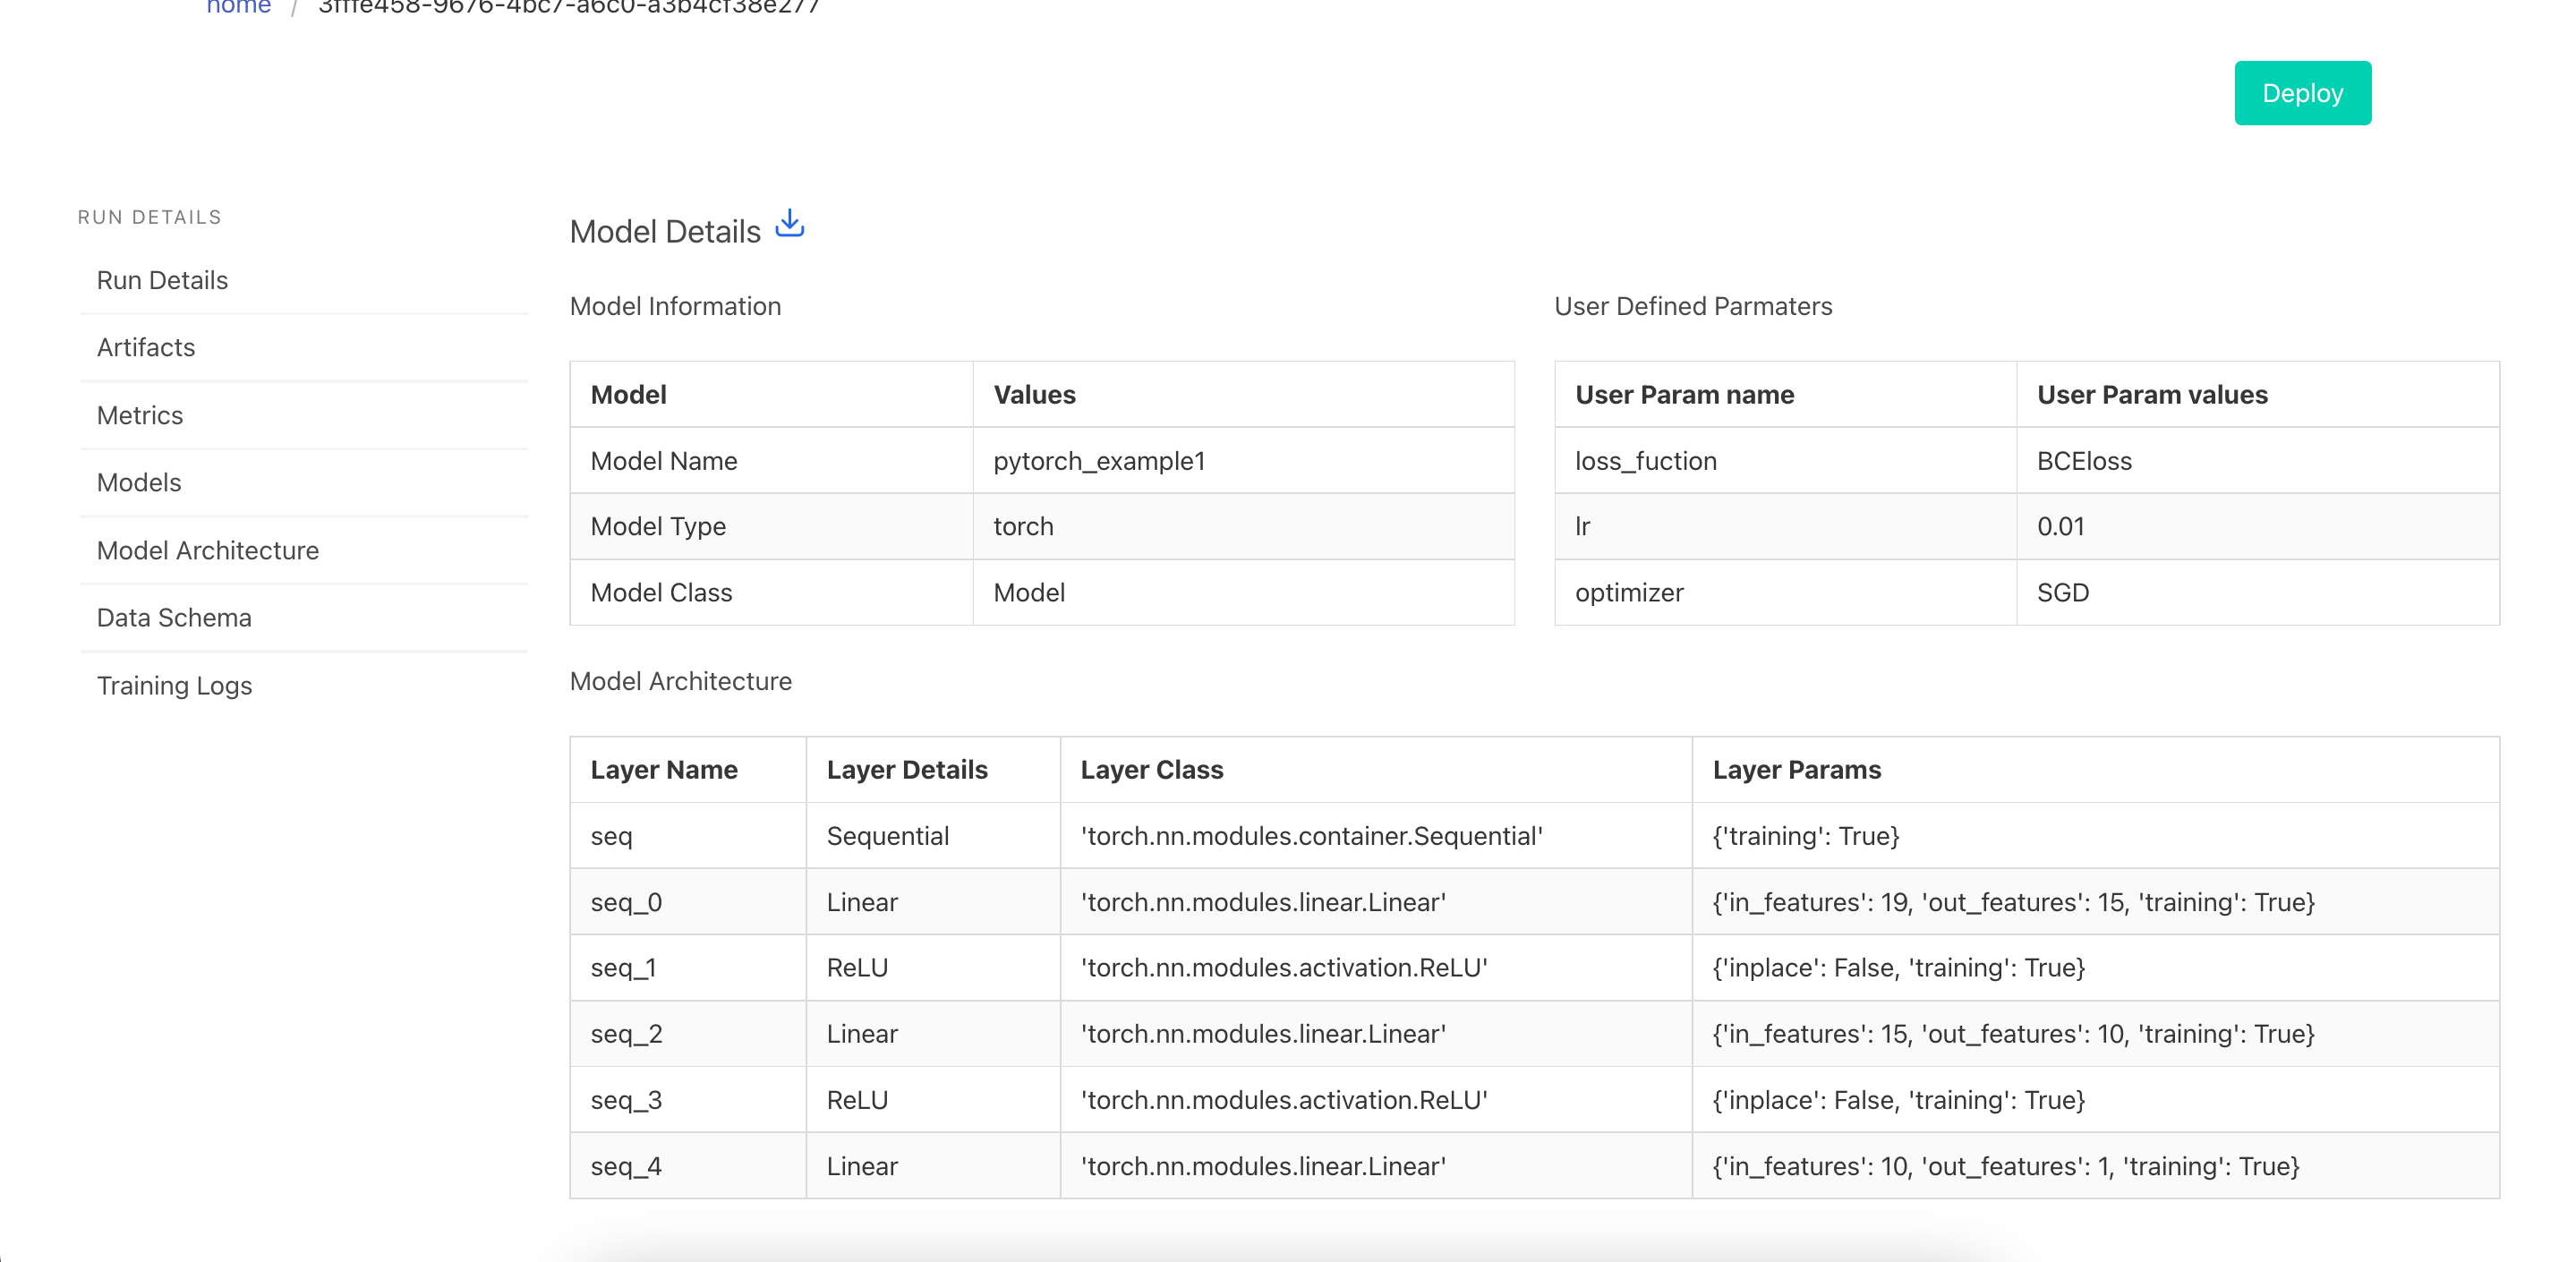
- To register a pytorch model use
.pytorch.register_model(modelname, modelobject)
- this will Save the model in a .pt file as a
torch.jitformat for serveing and prediction
mlp.pytorch.register_model("pytorch_example1", model)- To register a pytorch model use
.pytorch.register_model_with_runtime(modelname, modelobject, train_data_sample)
-
train_data_sample- is a sample of input data. it can be random numbers but needs tensor dimension -
This method is
preferredas infuture releasesthis models can be then converted to other formats as well ex: "onnx", "hd5"
mlp.pytorch.register_model_with_runtime("pytorch_example1", model, train_x)import torch
import pandas as pd
from sklearn.preprocessing import LabelEncoder
from sklearn.model_selection import train_test_split
from sklearn.metrics import accuracy_score,f1_score
from pymlpipe.tabular import PyMLPipe
df=pd.read_csv("train.csv")
encoders=["area_code","state","international_plan","voice_mail_plan","churn"]
for i in encoders:
le=LabelEncoder()
df[i]=le.fit_transform(df[i])
trainy=df["churn"]
trainx=df[['state', 'account_length', 'area_code', 'international_plan',
'voice_mail_plan', 'number_vmail_messages', 'total_day_minutes',
'total_day_calls', 'total_day_charge', 'total_eve_minutes',
'total_eve_calls', 'total_eve_charge', 'total_night_minutes',
'total_night_calls', 'total_night_charge', 'total_intl_minutes',
'total_intl_calls', 'total_intl_charge',
'number_customer_service_calls']]
class Model(torch.nn.Module):
def __init__(self,col_size):
super().__init__()
# using sequencial
self.seq=torch.nn.Sequential(
torch.nn.Linear(col_size,15),
torch.nn.ReLU(),
torch.nn.Linear(15,10),
torch.nn.ReLU(),
torch.nn.Linear(10,1)
)
#using torch layers
def forward(self,x):
out=self.seq(x)
return torch.sigmoid(out)
model=Model(len(trainx.columns))
train_x,test_x,train_y,test_y=train_test_split(trainx,trainy)
train_x=torch.from_numpy(train_x.values)
train_x=train_x.type(torch.FloatTensor)
train_y=torch.from_numpy(train_y.values)
train_y=train_y.type(torch.FloatTensor)
test_x=torch.from_numpy(test_x.values)
test_x=test_x.type(torch.FloatTensor)
test_y=torch.from_numpy(test_y.values)
test_y=test_y.type(torch.FloatTensor)
optimizer=torch.optim.SGD(model.parameters(),lr=0.001)
criterion=torch.nn.BCELoss()
def validate(model,testx,testy):
prediction=model(testx)
prediction=torch.where(prediction>.5,1,0
accu=accuracy_score(
prediction.detach().numpy(),test_y.unsqueeze(1).detach().numpy()
)
f1=f1_score(prediction.detach().numpy(),test_y.unsqueeze(1).detach().numpy())
return {"accuracy":accu,"f1":f1}
epochs=100
batch_size=1000
mlp=PyMLPipe()
mlp.set_experiment("Pytorch")
mlp.set_version(0.2)
with mlp.run():
mlp.register_artifact("churndata.csv",df)
mlp.log_params({
"lr":0.01,
"optimizer":"SGD",
"loss_fuction":"BCEloss"
})
for epoch in range(epochs):
loss_batch=0
for batch in range(1000,5000,1000):
optimizer.zero_grad()
train_data=train_x[batch-1000:batch]
output=model(train_data)
loss=criterion(output,train_y[batch-1000:batch].unsqueeze(1))
loss.backward()
optimizer.step()
loss_batch+=loss.item()
metrics=validate(model,test_x,test_y)
metrics["loss"]=loss_batch
metrics["epoch"]=epoch
mlp.log_metrics_continious(metrics)
mlp.pytorch.register_model("pytorch_example1", model)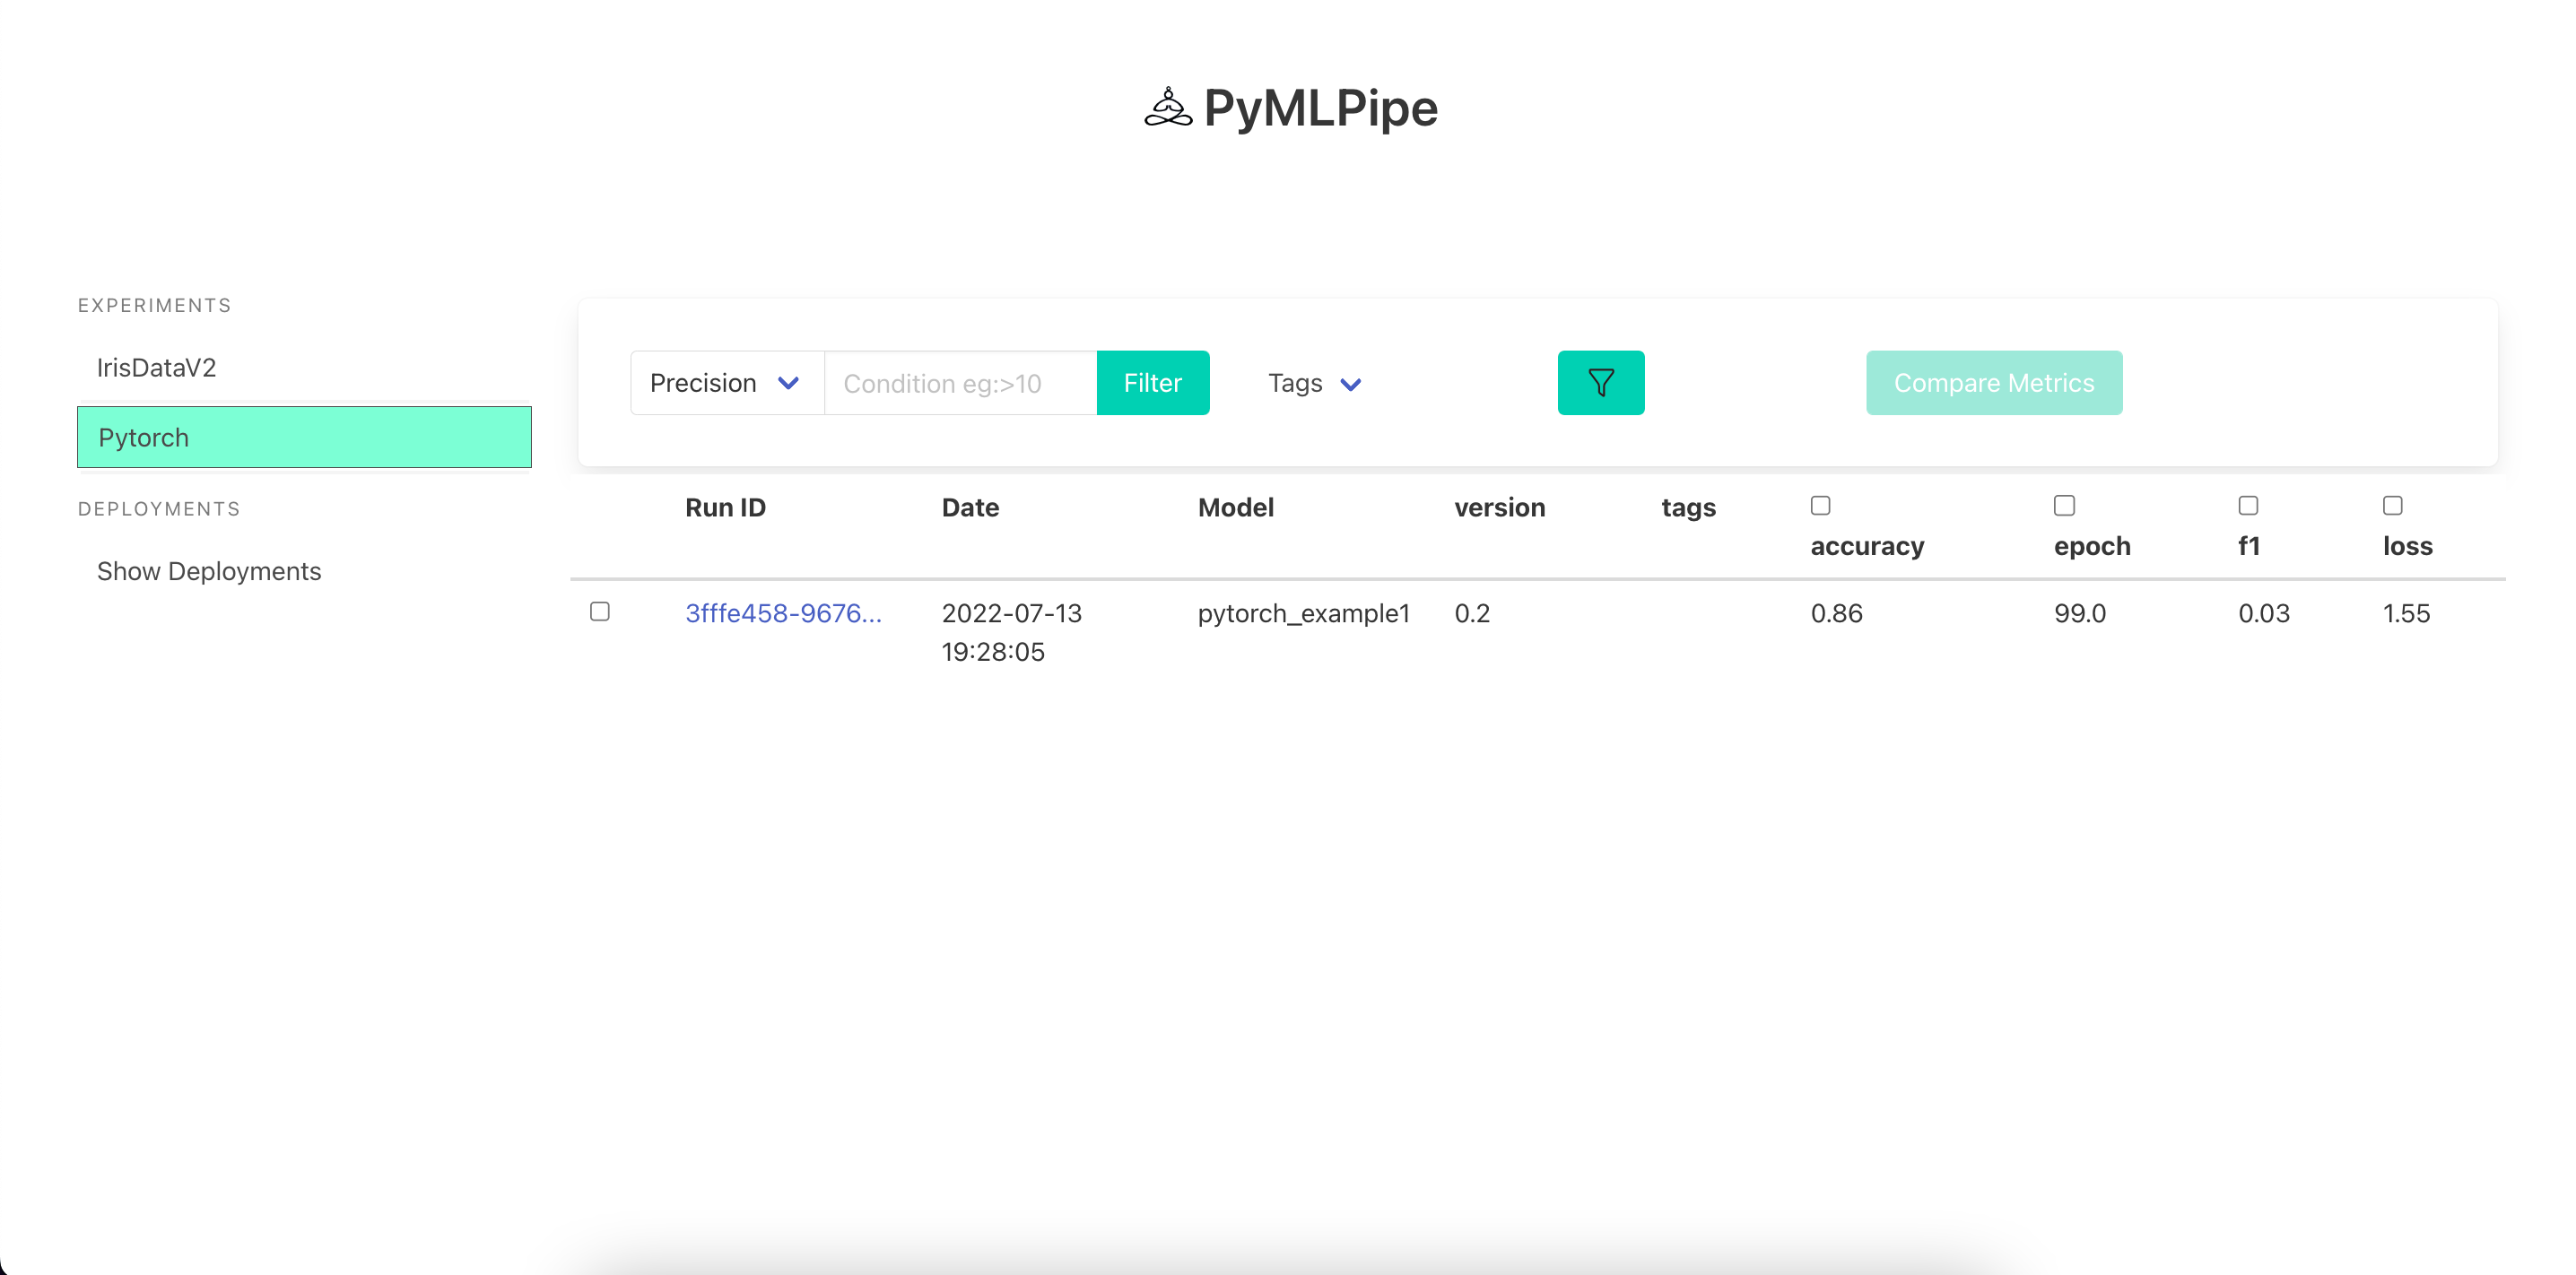
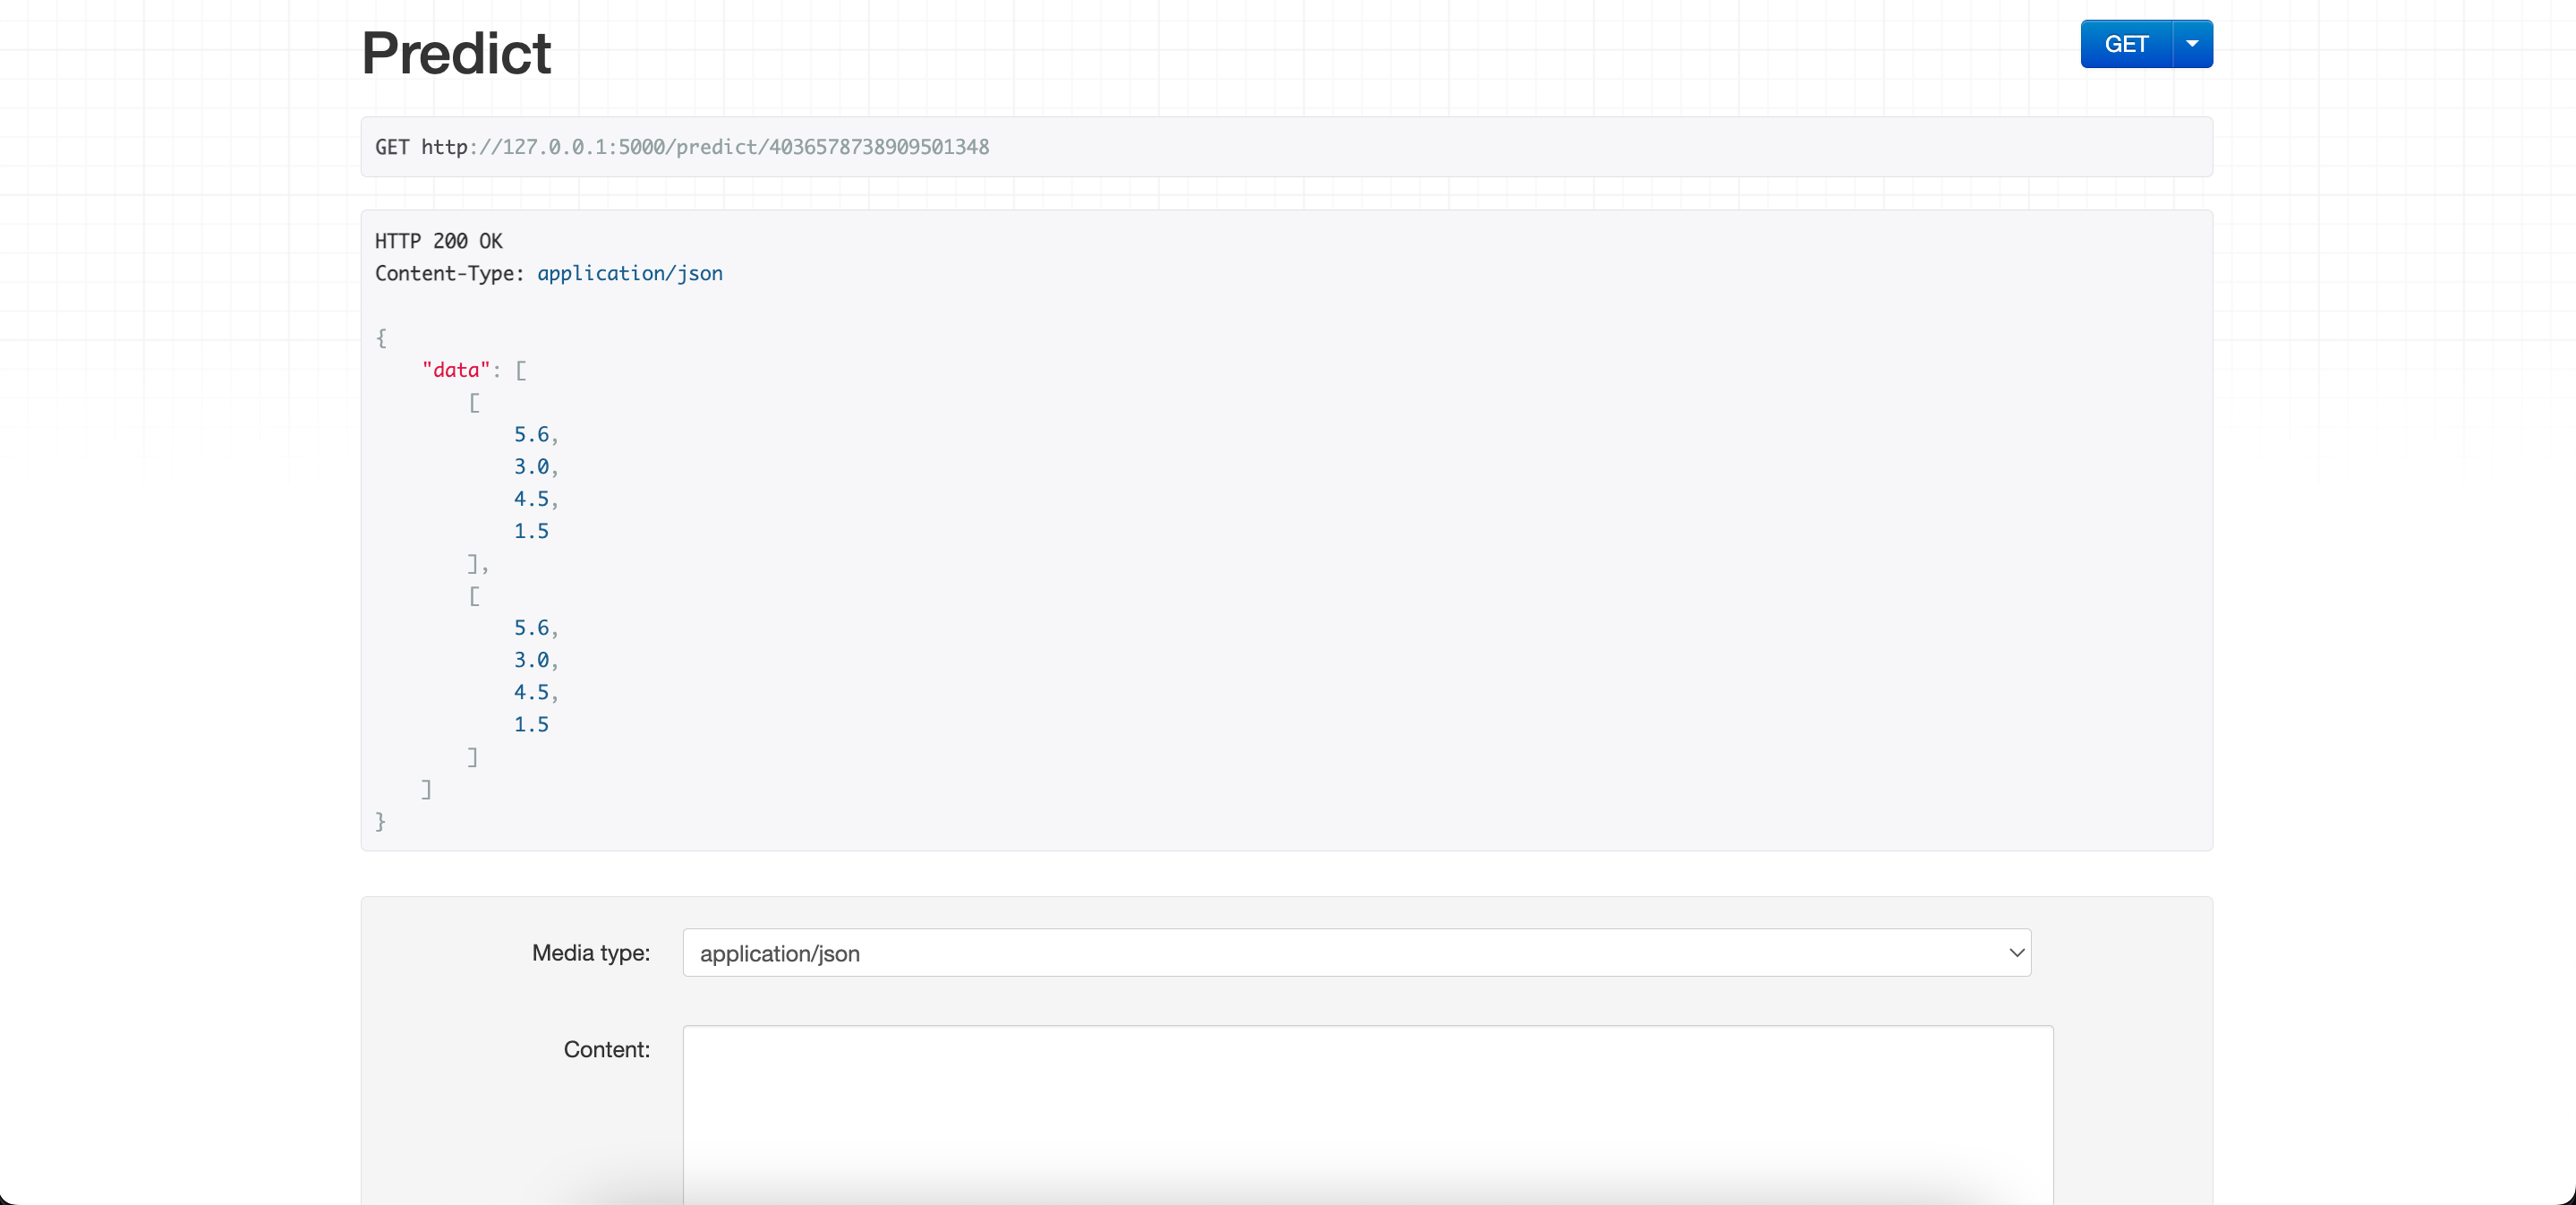
GET REQUEST - to get info for the model
-
info: Contains model information -
request_body: Sample post Request
{

"info": {

			"experiment_id": "Pytorch",

			"model_deployment_number": "51c186ddd125386c",

			"model_mode": "non_runtime",

			"model_type": "torch",

			"model_url": "/predict/51c186ddd125386c",

			"run_id": "3fffe458-9676-4bc7-a6c0-a3b4cf38e277",

			"status": "running"

	},

	"request_body": {
		"data": [
		[
			42.0,120.0,1.0,0.0,0.0,0.0,185.7,133.0,31.57,235.1,149.0,19.98,
			256.4,78.0,11.54,16.9,6.0,4.56,0.0
		]
	],
	"dtype": "float"
	}
}
For POST REQUEST
-data--> list: contains data rows for prediction supports both batch prediction and single instance ex: data --> [ [ 0,1,2,3],[3,4,56 ] ]
-dtype--> str: for type conversion converts the data into required data type tensor
{
"data": [
			[
			42.0,120.0,1.0,0.0,0.0,0.0,185.7,133.0,31.57,235.1,149.0,19.98,
			256.4,78.0,11.54,16.9,6.0,4.56,0.0
			]
		],
		"dtype": "float"
}
from automl import AutoMLPipe
from sklearn.datasets import load_iris,load_diabetes
import pandas as pd
import numpy as np

def main():

	load_data=load_diabetes()
	data=load_data["data"]
	target=load_data["target"]

	df=pd.DataFrame(data,columns=load_data["feature_names"])
	automl_obj=AutoMLPipe(
		exp_name="DiabAutoMLV1",
		task="regression",
		metric="RMSE",
		data=df,
		label=target,
		tags=["new_data","reg"],
		test_size=0.2,
		version=1.0,
		transform=True,
		scale='normalize',
		cols_to_scale=[],
		categorical_cols=[],
		register_model=True,
		explain=True,exclude=[]
	)
	preds,result=automl_obj.run_automl(tune=True,tune_best=False)
	#DataFrame with comparative metrics of all the models
	print(result)
	#Dictionary with model names and the predictions
	print(preds)
if __name__ == '__main__':

main()
The AutoML class is simple to run and with the help of few lines of code you'll be able to run several models on your data. You can even choose to hyperparameter tune every model or you can just tune the best model based on the metric that you provide. Below are the simple steps to start your AutoML experiment.
-
Load the data
-
Transform it into X & y datasets.
-
Instanciate the AutoMLPipe class:
-
exp_name: name of experiment -
task: regression/classification -
metric: for classification -> accuracy,recall,precision,f1/ for regression -> MAE,MSE,RMSE,R2 Score -
data: data on which the model to be fit -
label: target variable -
tags: list of custom-tags for the run -
test_size: size of test dataset -
version: experiment version -
transform: If transformation is to be applied on the dataset. -
scale: 'standard'/'minmax'/'normalize' -
cols_to_scale: list of columns to scale. Should be numeric or float -
categorical_cols: columns to one-hot encode -
register_model: register experiement model -
register_artifacts: register experiment artifacts -
explain: xai implementation -
exclude: models to be excluded during autoML runs -
run the experiment by calling the
run_automlfunction. -
tune=True: Every autoML models will be hyperparameter tuned. -
tune_best=True: Only the best model will be hyperparameter tuned. -
Now you can see the experiment running in the ui page and also in the console.
-
Once it is completed you will get results and predictions of the runs.
-
If
tune_best=False: Theresultwill have the dataframe with metrics of each model. Thepredwill contain the dictionary of all the prediction values of all the models. -
If
tune_best=True: Theresultwill have the dataframe with metrics of each model. Thepredwill contain the a list of prediction values of the hyperparameter tuned best model.
This is a sample code for data pipeline. Please don't take the code too seriously
#filename : sample.py
from pymlpipe import pipeline


pl=pipeline.PipeLine("TestCase")


# Just some random functions
def fetch_data():

	dict_data={

	"var":"this is a random string:",

	"path":"this is some random path"

	}

return dict_data

def get_dict_values(data_dict):

	new_var=[v for k,v in data_dict.items()]

return new_var


def get_dict_keys(data_dict):

	new_var=[k for k,v in data_dict.items()]

return new_var

def a_edge_node(values):

	print(values)

def dump_data(keys,values):

	dict_data_rev={k:v for k,v in zip(keys,values)}

	print(dict_data_rev)


pl.add_node("fetch_data",fetch_data,entry_node=True)

pl.add_node("get_dict_values",get_dict_values,input_nodes=["fetch_data"])

pl.add_node("get_dict_keys",get_dict_keys,input_nodes=["fetch_data"])

pl.add_node("a_edge_node",a_edge_node,input_nodes=["get_dict_values"])


pl.add_node("dump_data",dump_data,input_nodes=["get_dict_keys","get_dict_values"])


pl.register_dag()
To define a pipeline Object we can use:
We are nameing the pipeline TestCase
from pymlpipe import pipeline
pl=pipeline.PipeLine("TestCase")
The add_node function takes
node_name (str): Name of the node

function (_type_): Python function you want to execute

input_nodes (list, optional): List of nodes that are connected to this node. The connected nodes should return a value which will act as an input to the node . Defaults to None.

entry_node (bool, optional): boolean flag indicating if this is the starting node(first node). Defaults to False.

args (list, optional): Run time arguments . Defaults to None.
pl.add_node("fetch_data",fetch_data,entry_node=True)The register_dag function creates a Dag
pl.register_dag()StepRun : Once done you can run the file using python3 sample.py
To test the Code you can run
from pymlpipe import pipeline


ppl=pipeline.PipeLine("TestCase")

ppl.load_pipeline()

ppl.run()
The load_pipeline will load the pipeline dag saved after StepRun
The run function will run the given pipeline.
ppl.run()or you can go to web browser by running the command
~ pymlpipeuiOr starting the UI with
from pymlpipe.pymlpipeUI import start_ui

start_ui(host='0.0.0.0', port=8085,debug=True)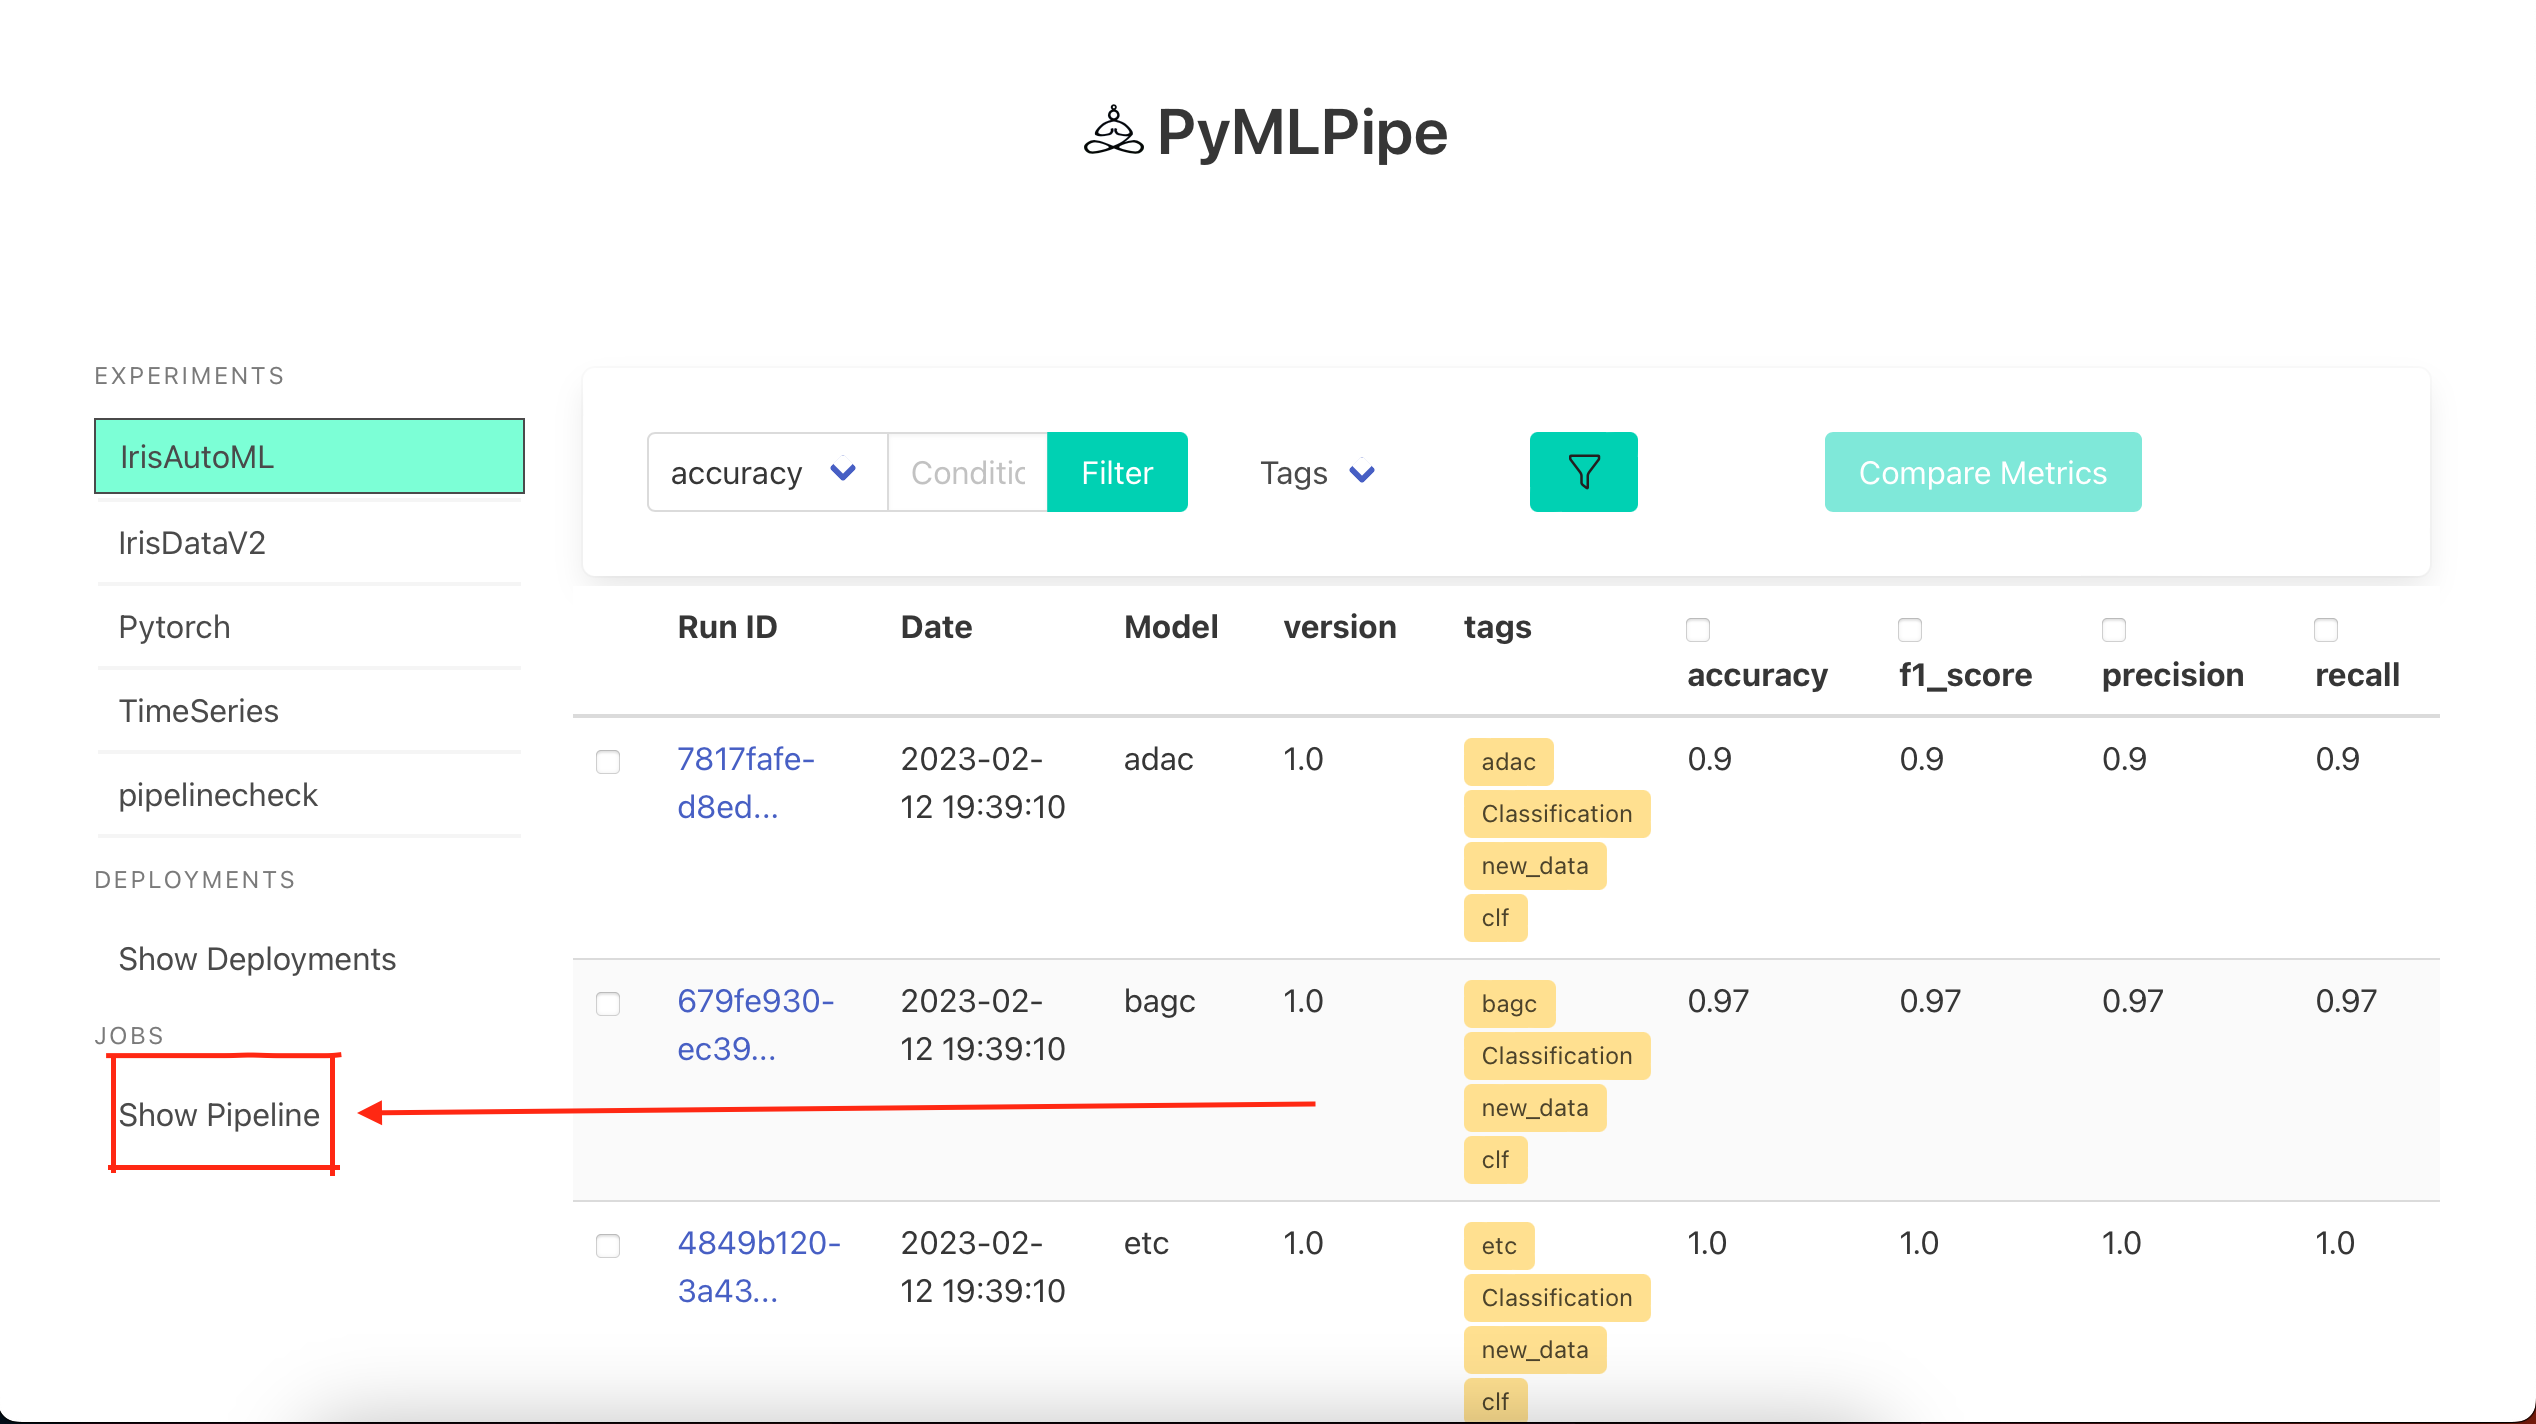
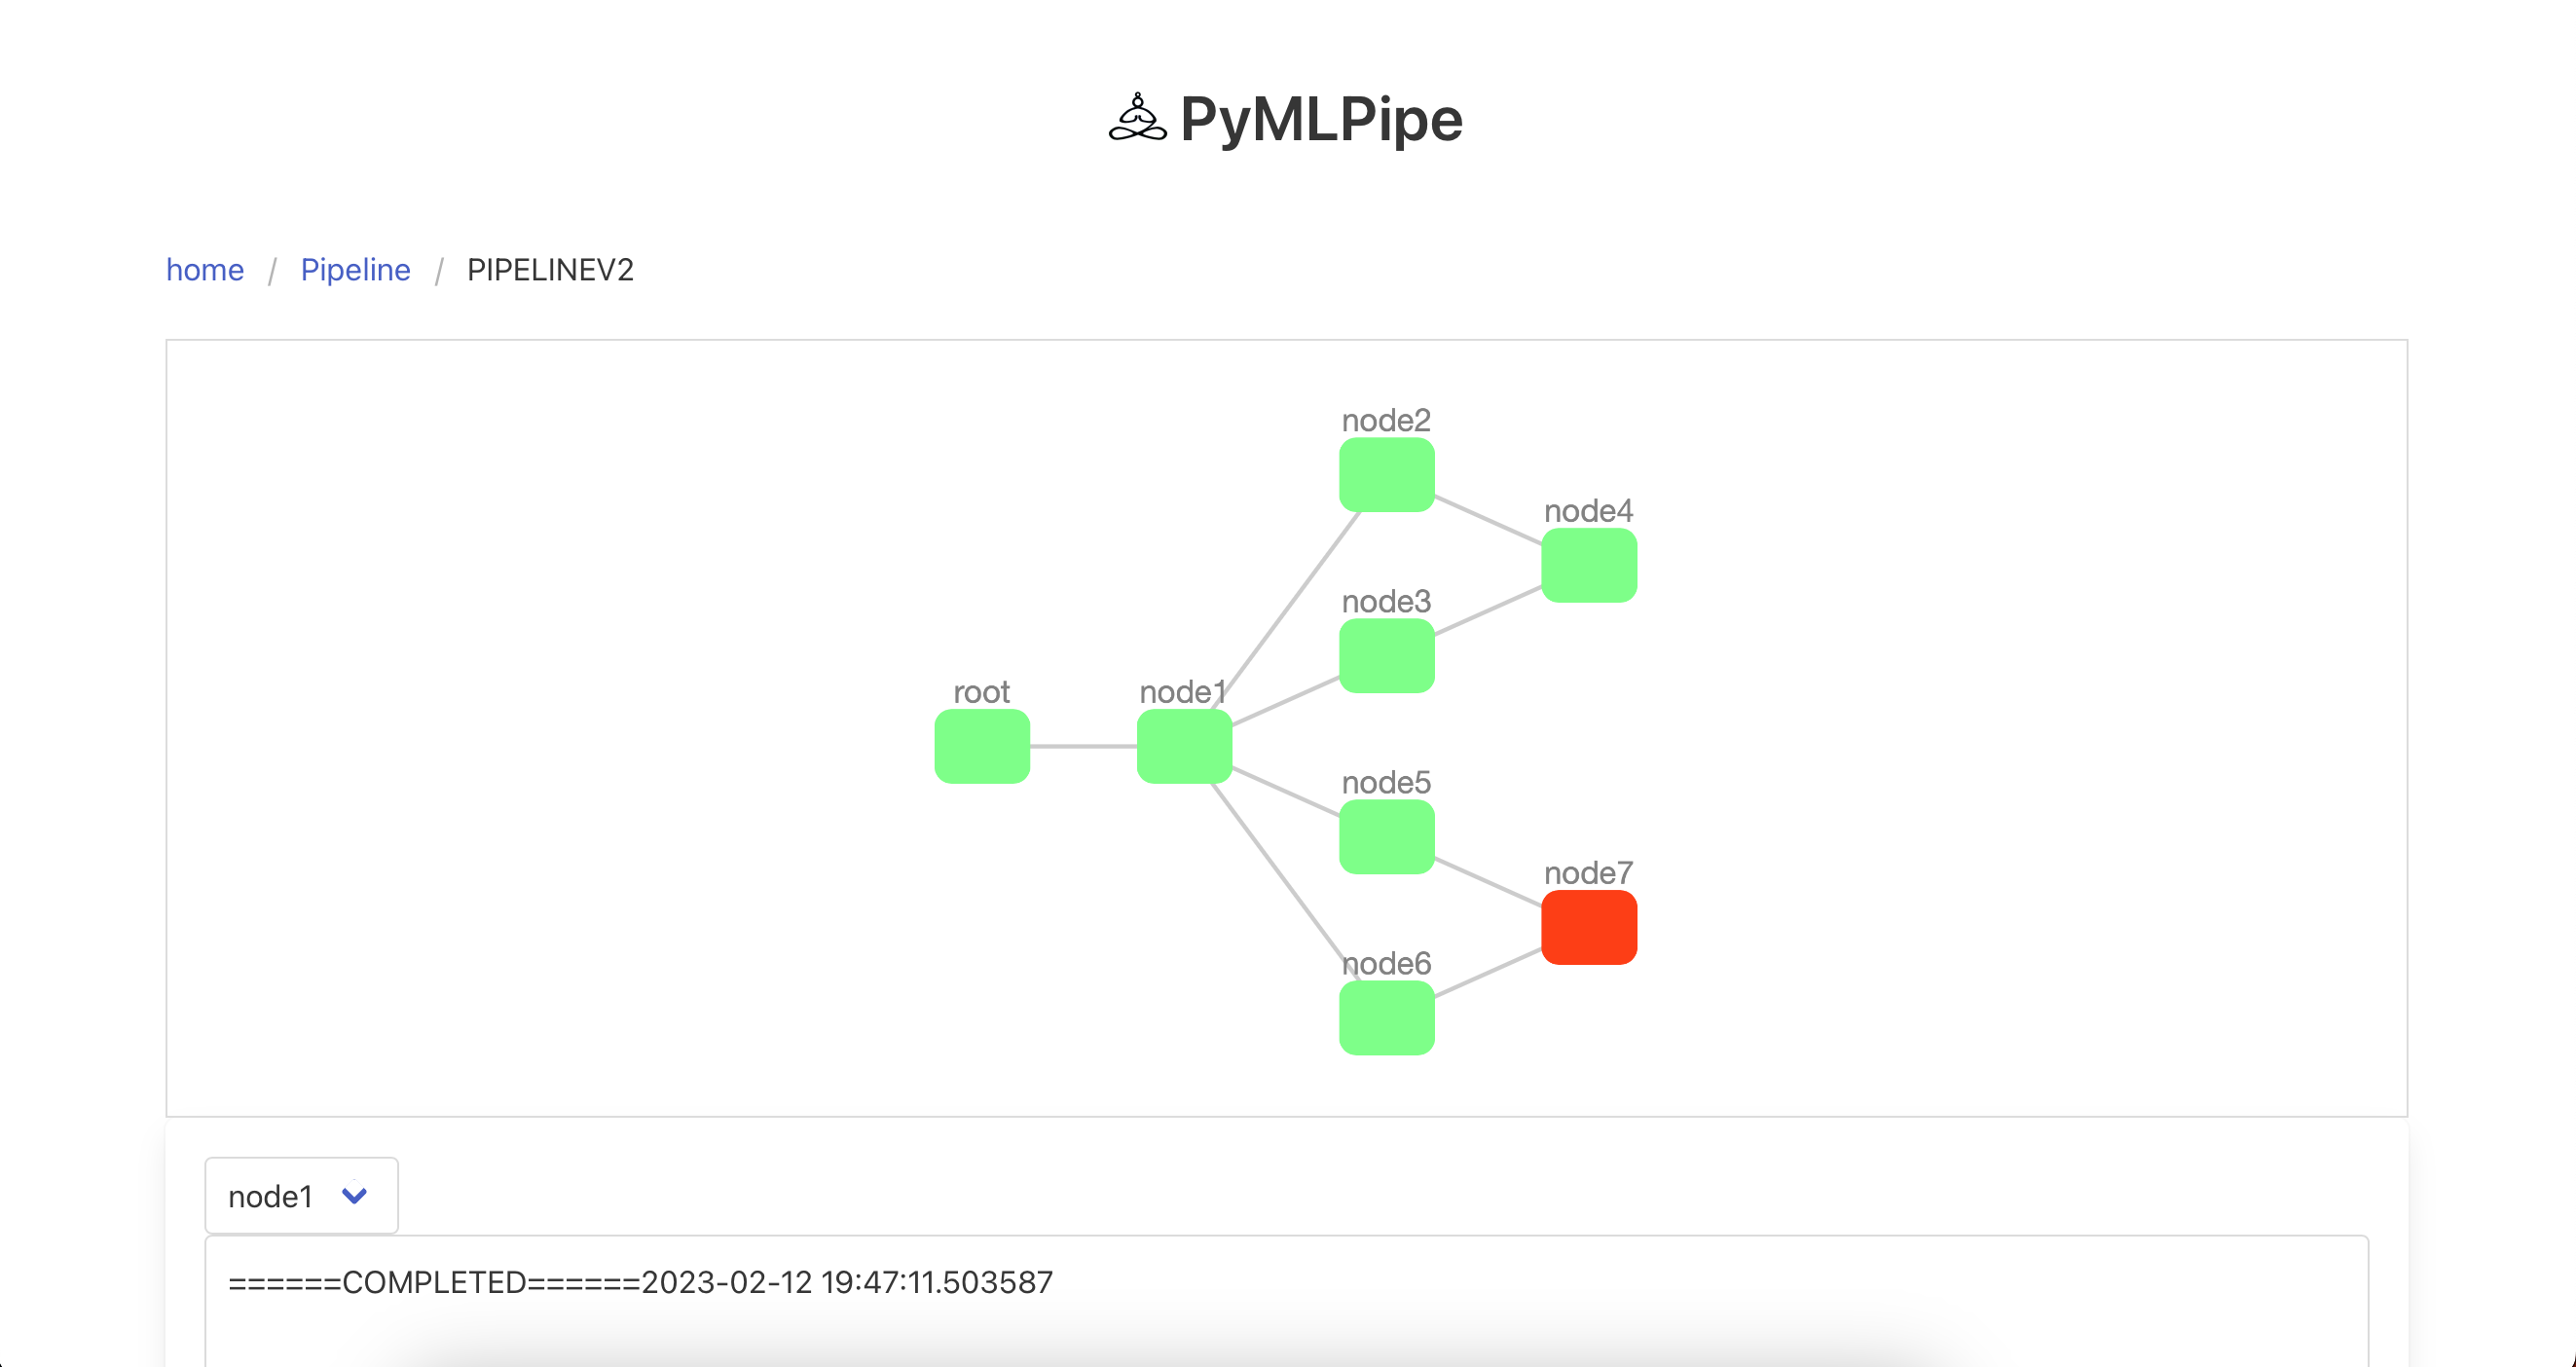
This is a sample control page for the pipeline

Sample Dag
Node in GREEN.--> Completed Node Node in RED. --> Failed Node
from pymlpipe import pipeline
import pandas as pd
from sklearn.datasets import load_iris
import pandas as pd
from sklearn.model_selection import train_test_split
from pymlpipe.tabular import PyMLPipe
from sklearn.linear_model import LogisticRegression
from sklearn.ensemble import RandomForestClassifier
from sklearn.tree import DecisionTreeClassifier
from xgboost import XGBClassifier
from sklearn.metrics import accuracy_score,precision_score,recall_score,f1_score
import time
ppl=pipeline.PipeLine("IrisData")
mlp=PyMLPipe()
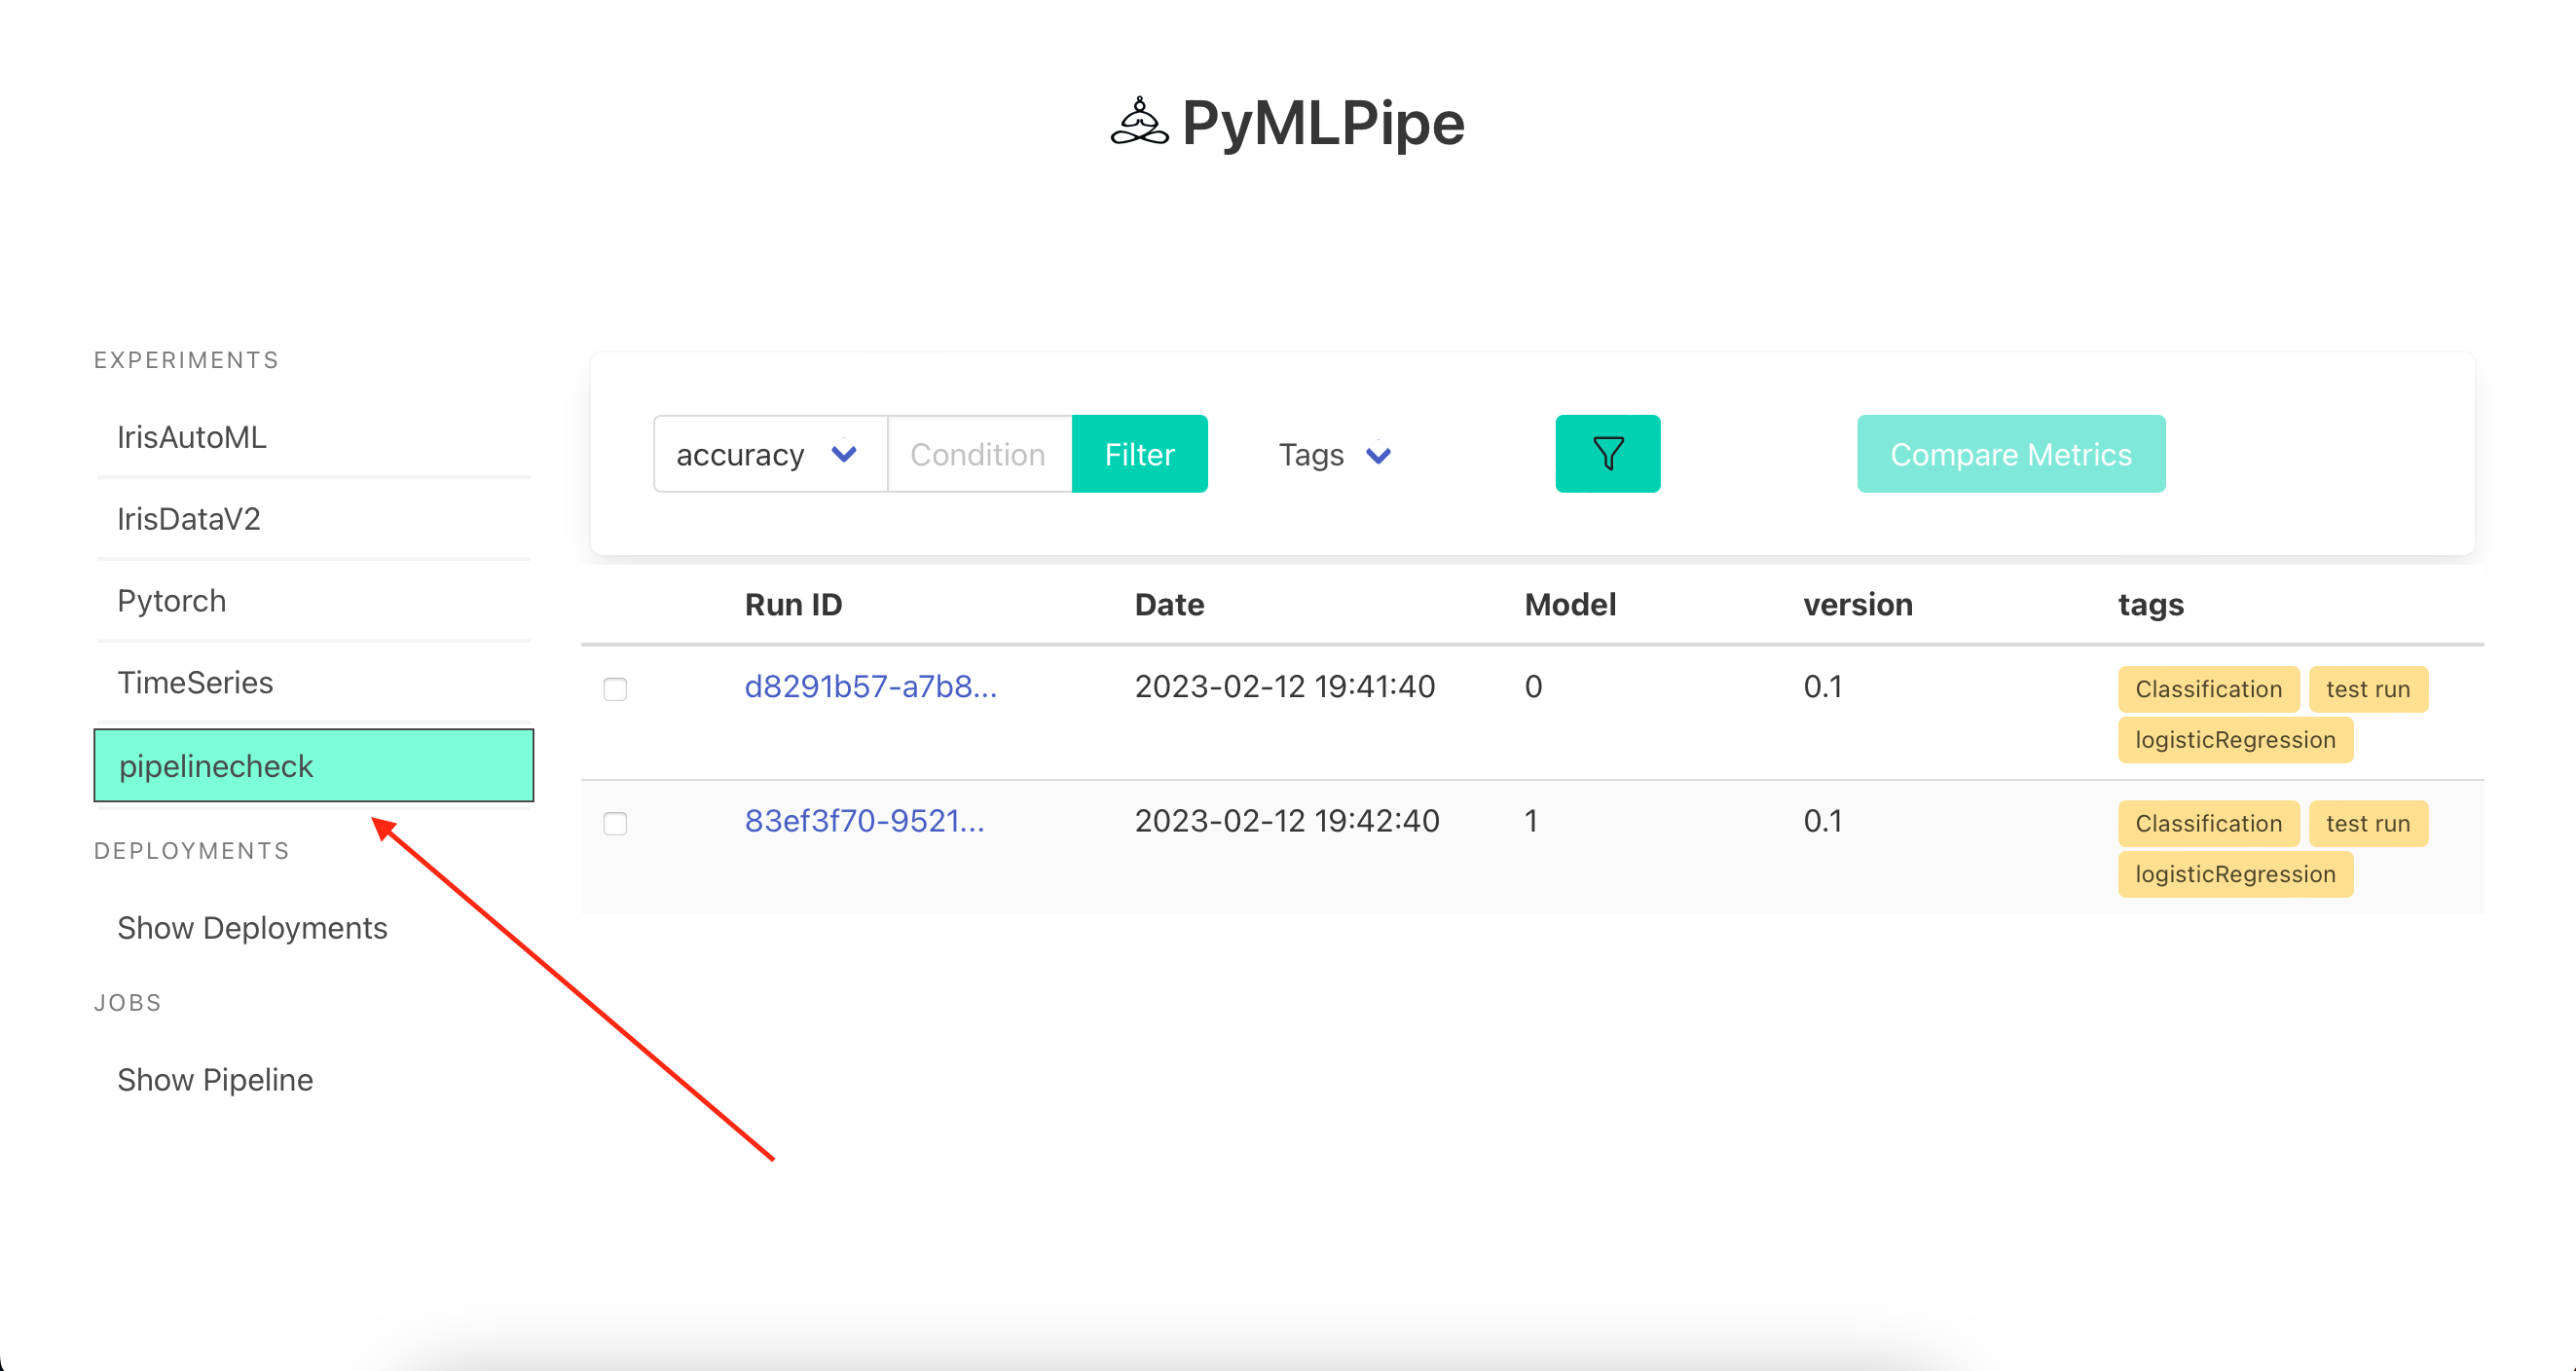
mlp.set_experiment("pipelinecheck")
mlp.set_version(0.1)
def get_data():
iris_data=load_iris()
data=iris_data["data"]
target=iris_data["target"]
df=pd.DataFrame(data,columns=iris_data["feature_names"])
trainx,testx,trainy,testy=train_test_split(df,target)
return {"trainx":trainx,"trainy":trainy,"testx":testx,"testy":testy}
def get_model(model):
if model==0:
return LogisticRegression()
elif model==1:
return RandomForestClassifier()
def train_model(data,model_name):
with mlp.run():
trainx,trainy=data["trainx"],data["trainy"]
mlp.set_tags(["Classification","test run","logisticRegression"])
model=get_model(model_name)
model.fit(trainx, trainy)
mlp.scikit_learn.register_model(str(model_name), model)
return model
def evaluate(data,model):
testx,testy=data["testx"],data["testy"]
print(model.predict(testx))
ppl.add_node("data", get_data,entry_node=True)
for idx,model in enumerate([0,1]):
ppl.add_node(
f"model_train{str(idx)}",
train_model,
input_nodes=["data"],
args={"model_name":model},
)
ppl.add_node(
f"eval_train{str(idx)}",
evaluate,
input_nodes=["data", f"model_train{str(idx)}"],
)
ppl.register_dag()You can integrate the pipeline with model monitering using the same format as we did for pymlpipe.tabular
mlp=PyMLPipe()
mlp.set_experiment("pipelinecheck")
mlp.set_version(0.1)
.
.
.
with mlp.run():
	trainx,trainy=data["trainx"],data["trainy"]
	mlp.set_tags(["Classification","test run","logisticRegression"])
	model=get_model(model_name)
	model.fit(trainx, trainy)
	mlp.scikit_learn.register_model(str(model_name), model)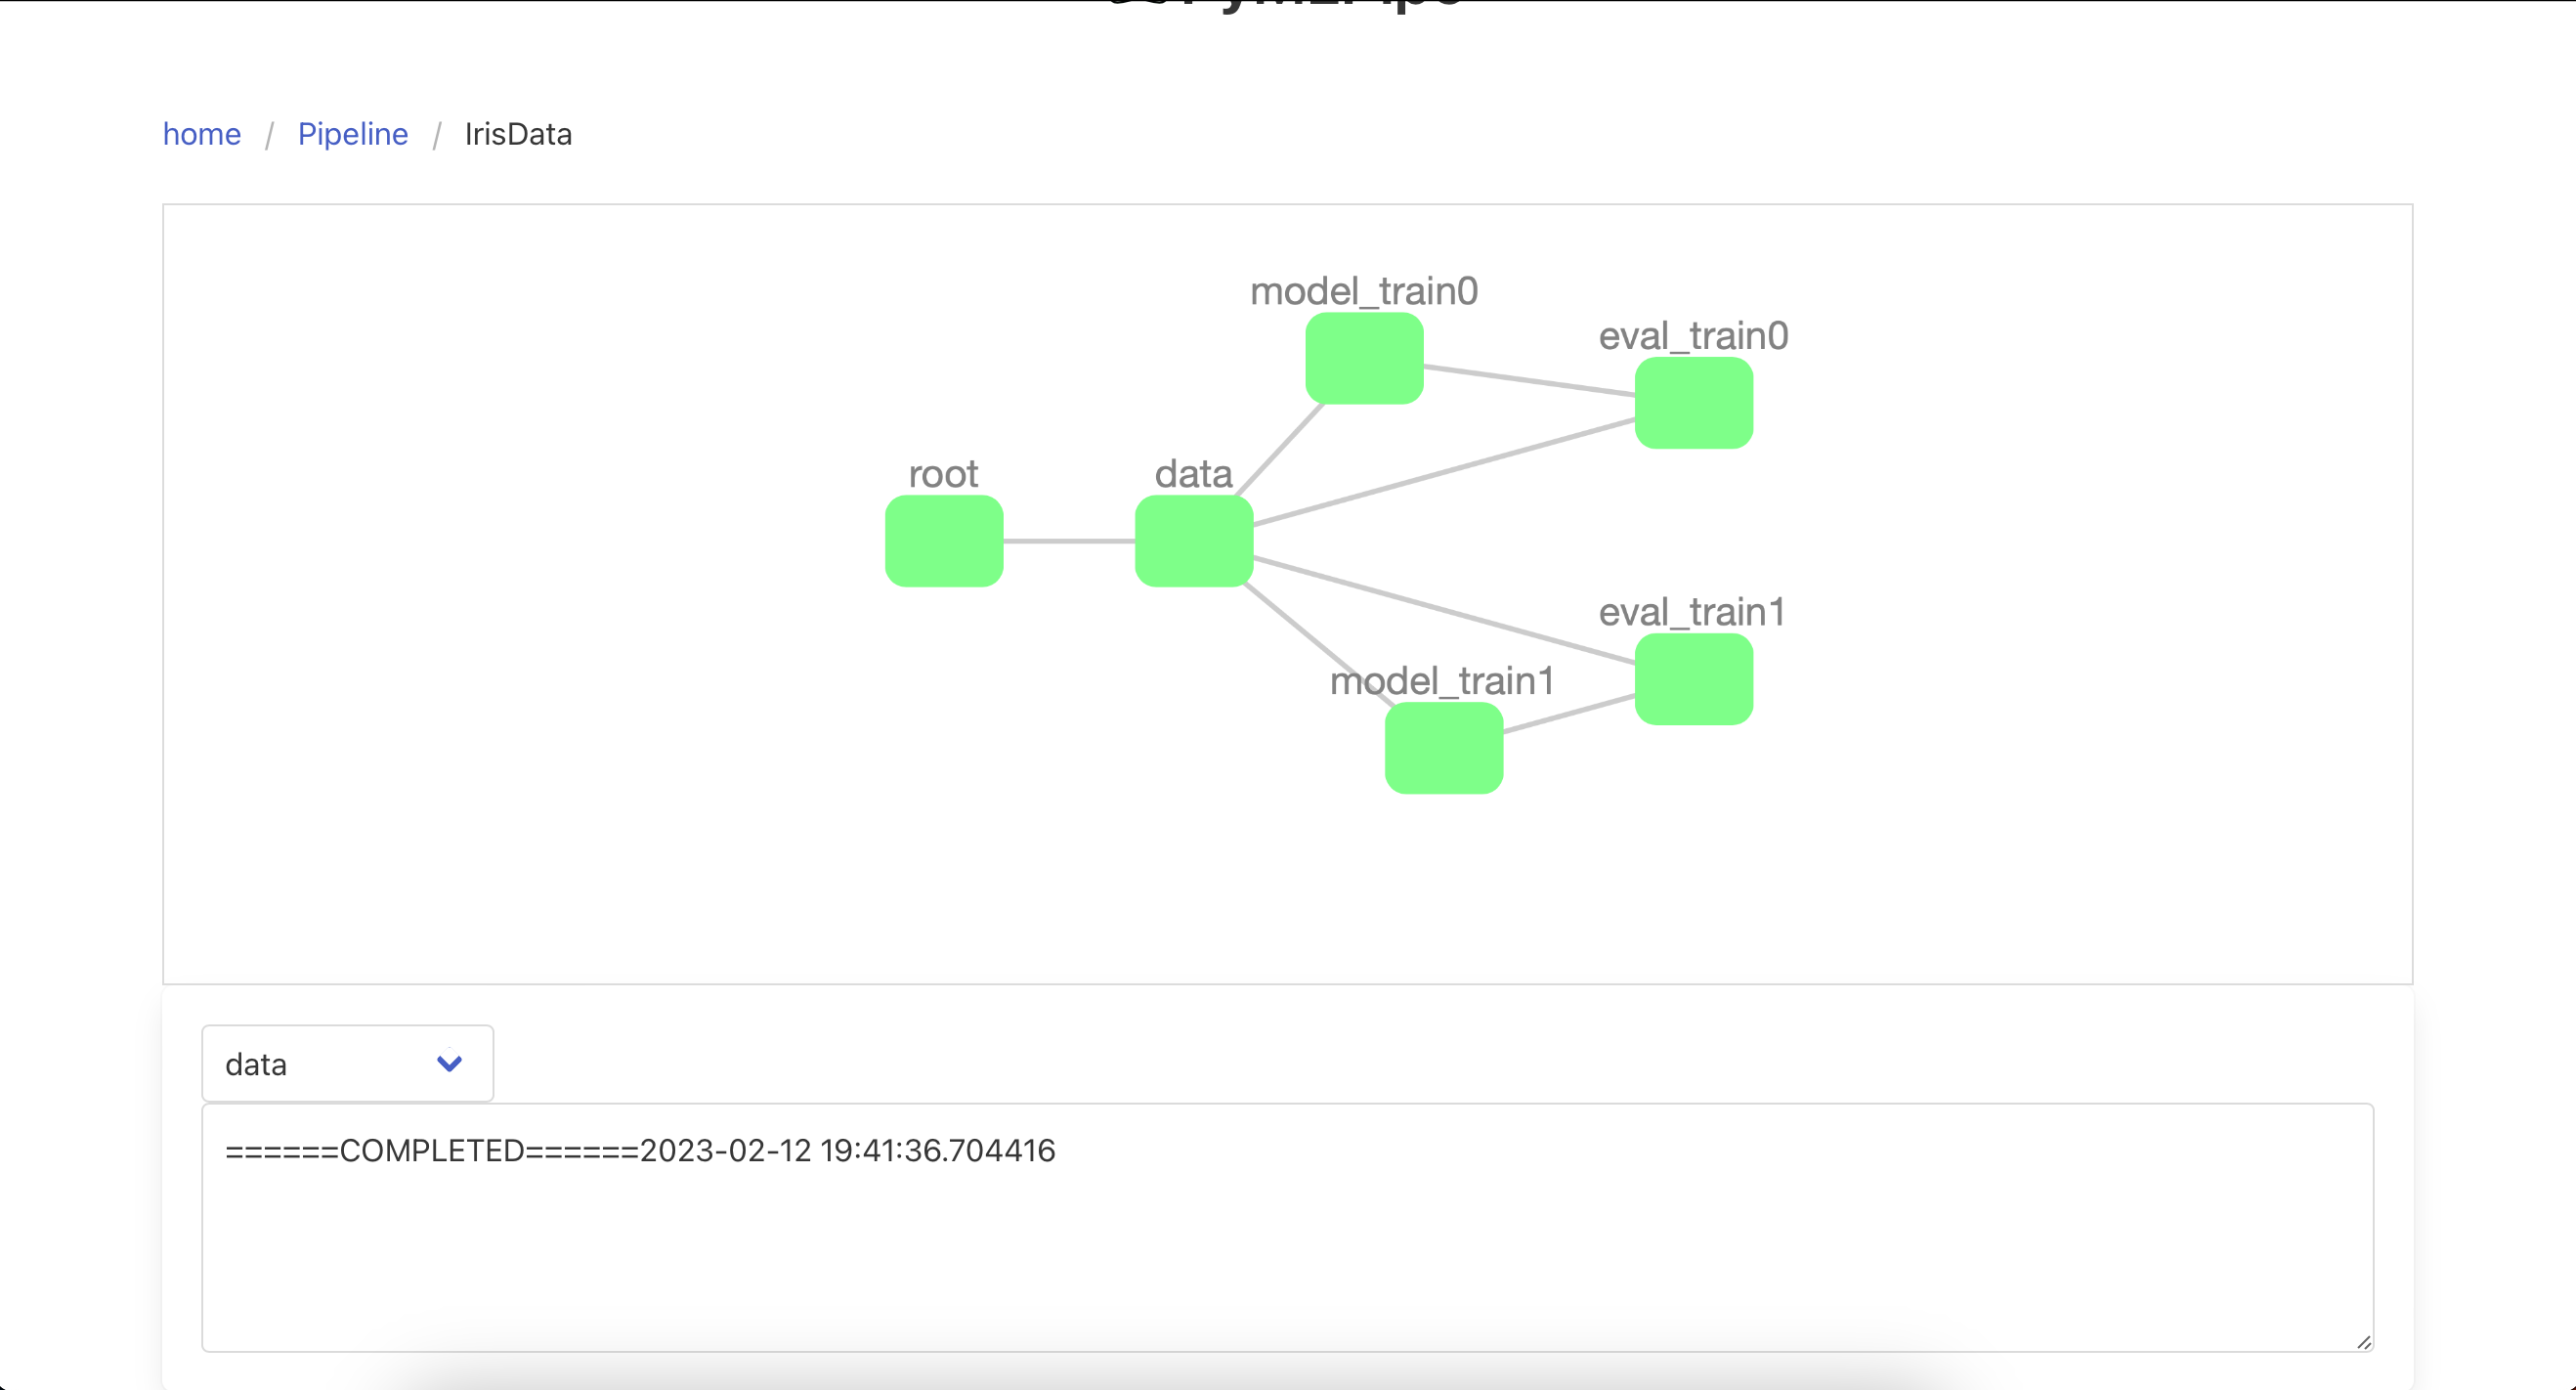
Pull requests are welcome. For major changes, please open an issue first to discuss what you would like to change.
Please make sure to update tests as appropriate.