- Introduction
- Key Features
- Before You Begin
- Installation
- Running and Modifying the Function
- Versioning and Aliasing the Function
- Using API Gateway to invoke the Function
- Using API Gateway with Lambda Aliases
- License
- Create AWS User to run Terraform
This project is a "Hello, World!" version of the architecture described in this blog post.
With it you can create an AWS Lambda function and surrounding IAM infrastructure with Terraform.
The Lambda function is managed with Gradle and boto3 scripts and run unit tests against your newly deployed function.
The Lambda function code can be found in the src/main/java/com/hootsuite/example/lambda/SampleLambda.java file. This Lambda code is meant to be a simple "Hello, World!" example which you can modify to your needs.
This project allows you to:
- Create an AWS Lambda function
- Deploy code to the function from S3
- Manage the AWS infrastructure through Terraform
- Manage the Lambda function through gradle and boto
- Run Unit Tests locally and through the Lambda fucntion
You will need an Amazon AWS account, you can sign up here.
In order to create the resources in this project, you will need to have permissions to create infrastructure in this account.
IMPORTANT Following the steps in this project may incur a small cost to the associated AWS account.
The AWS Lambda function is managed with Gradle scripts invoking boto3 scripts.
- If you do not have
python, you will need to install it, instructions can be found here - If you do not have
pip, you will need to install it, instructions can be found here - You will need to install
boto3. ** From your terminal, enter:sudo pip install boto3==1.4.4.
This is a yaml parser for python, used to read the AWS credentials from the configuration files.
- You will need to install
pyyaml. ** From your terminal, enter:sudo pip install pyyaml==3.12.
The infrastucture in this project is managed using HashiCorp's Terraform
- You will need to install
terraform. ** You can download it from HashiCorp here ** On macOS, you can also install it with brew by entering in the terminal:brew install terraform.
The AWS Lambda function in this project uses Java 8 and so you will need to install the Java 8 JDK.
In order to run this project, you will need to create an IAM user with sufficient AWS management permissions.
See the Create AWS User to run Terraform section of this README for details.
See the Create AWS User to run Terraform section of this README and complete those steps.
Here we will create an S3 bucket and folder to hold the AWS Lambda artifacts.
a. In your browser, navigate to https://console.aws.amazon.com/billing/home?#/account.
b. Copy the account number you see next to Account Id: into the terraform/env/staging.tfvars file, on the following line:
account = "<your-account-number>"
c. Choose a unique name for your S3 bucket, into which the Lambda files will be placed. The bucket name has to be unique across all buckets in AWS S3.
d. In the gradle.properties file, replace the <your-bucket-name> with a unique bucket name for the project.
bucketName=<your-bucket-name>
e. From the root directory of the project, run ./gradlew createS3Resources. This will create an S3 bucket with the name above, as well as a folder in the bucket for the Lambda resources.
f. After creating the bucket, you should place your bucket name into the terraform/env/staging.tfvars file, on the following line:
bucket = "<your-bucket-name>"
Now we have an S3 bucket and folder, into which our Lambda code will be placed.
Here we will build the .zip artifact of the AWS Lambda code.
a. From the root directory run ./gradlew clean buildZip in the terminal. This will compile the AWS Lambda function into a .zip artifact which we will later upload to AWS Lambda.
b. The build should succeed and you should see sample-lambda-1.0.0.zip in the build/distributions directory.
Now we have an initial .zip artifact of our Lambda source code which will be uploaded to create the AWS Lambda function.
In this step we will create the staging infrastructure in AWS, including our Lambda function, as well as the IAM resources to invoke and manage it.
a. From the project root directory, enter cd terraform into the the terminal.
b. To use terraform to plan the infrastructure that needs to be created, run the following command in your terminal:
terraform plan --var-file="../aws_secrets.tfvars" -var-file="env/staging.tfvars"
c. Ensure that the plan says Plan: 9 to add, 0 to change, 0 to destroy. This means that 9 resources are to be created when we apply the plan.
d. If the plan is successful, apply it by entering the following command into the terminal:
terraform apply -var-file="../aws_secrets.tfvars" -var-file="env/staging.tfvars"
e. If the apply is successful, you should see the following:
The state of your infrastructure has been saved to the path
below. This state is required to modify and destroy your
infrastructure, so keep it safe. To inspect the complete state
use the `terraform show` command.
Now we have created the infrastructure in AWS which will we use to run and manage the Lambda function.
Here we will extract the credentials from the newly created user which only has permissions to invoke the Lambda function. We will use this user with our Java test client to invoke the function.
a. In the terminal enter:
terraform show
b. You can scroll through the output and you should see that two sets of access keys have been created.
c. Look for the following block with sample_lambda_invoker in the output, with <id> and <password> being the real id and password in your output:
aws_iam_access_key.sample_lambda_invoker:
  id = <id>
  secret = <secret>
  ses_smtp_password = <password>
  status = Active
  user = sample_lambda_invoker_staging
d. This user has been created to only invoke the Lambda function and so we need to place it in the Java code where the unit tests will eventually invoke our AWS Lambda function.
e. Copy the value of the <id> and the <secret>.
f. Place them, in order, on line 16 of the AwsLambdaCredentialsProvider java class in the src/test/java/com/hootsuite/example/lambda/environment/ folder.
g. The line should look like:
return new BasicAWSCredentials("<id>", "<secret>");
Replace the <id> with the generated id and <secret> with the generated secret.
Now we have given permissions to the unit tests to invoke our Lambda function.
Here we will extract the user we use to manage the Lambda function. The user is named sample_lambda_jenkins. This is because in our production Lambda deployment, we are using Jenkins to run jobs which manage our Lambda code. The credentials generated here are embedded in our Jenkins machine. For this simple introduction, you will play the role of Jenkins, managing the AWS Lambda function yourself.
a. From the terraform directory, run the following command again:
terraform show
b. Now look for the following block.
aws_iam_access_key.sample_lambda_jenkins:
  id = <id>
  secret = <secret>
  ses_smtp_password = <password>
  status = Active
  user = sample_lambda_jenkins_staging
c. Again copy the <id> and <secret> values.
d. This time, we will place them in the aws_credentials.yml file. The file should look like:
staging_access_key = "<id>"
staging_secret_key = "<secret>"

production_access_key = ""
production_secret_key = ""
e. Place your <id> and <secret> into the file where marked above. For now, ignore the production access key and secret key as we are only creating a staging environment in this example.
Now we have a user which has permissions to manage the Lambda function which will be used when we invoke the boto3 scripts through gradle tasks.
Now that we have a user with permissions to do so, we will upload our artifact to S3.
a. Cd into the project's root directory.
b. From the root project directory run the following command in the terminal:
./gradlew uploadStaging
- The artifact we compiled should now be uploaded to S3.
Currently, our AWS Lambda function uses an artifact uploaded directly to AWS Lambda. In order to effectively manage and version our Lambda function, we will need to change the function to pull code from the S3 bucket we previously created.
a. In the terraform/main.tf file. Comment out line 4 with // or #:
filename = "../build/distributions/sample-lambda-1.0.0.zip"
b. Also uncomment lines 5 and 6 in the file.
   s3_bucket = "${var.bucket}"
   s3_key = "sample_lambda/${var.env}/sample-lambda-1.0.0.zip"
c. Switch to the terraform directory in your terminal:
cd terraform
d. We will now re-run the planning stage to change the infrastructure. Enter the following in the terminal:
terraform plan --var-file="../aws_secrets.tfvars" -var-file="env/staging.tfvars"
e. This time, you should only see that there is only 1 resource to change:
~ aws_lambda_function.sample_lambda
    filename:  "../build/distributions/sample-lambda-1.0.0.zip" => ""
    s3_bucket: "" => "<your bucket name>"
    s3_key:    "" => "sample_lambda/staging/sample-lambda-1.0.0.zip"


Plan: 0 to add, 1 to change, 0 to destroy.
f. If the plan is successful, apply it by entering the following command into the terminal:
terraform apply -var-file="../aws_secrets.tfvars" -var-file="env/staging.tfvars"
g. If the apply is successful, you should see the following:
The state of your infrastructure has been saved to the path
below. This state is required to modify and destroy your
infrastructure, so keep it safe. To inspect the complete state
use the `terraform show` command.
Now we have our function set to pull artifacts from S3 to run. This means that we should no longer need terraform to manage our Lambda function. From now on we will only use gradle tasks which invoke boto3 scripts underneath.
Here we will run the unit tests from src/test/java/com/hootsuite/example/lambda/SampleTest.java. These tests can be configured to run locally (without going through the Lambda function) or end-to-end (through the Lambda function).
a. Switch to the root directory of the project in your terminal.
b. From the project root directory, run the following command in the terminal:
./gradlew clean -PtestEnvironment=LOCAL test.
You should see that two of the local unit tests pass and two fail. You can look at the src/main/java/com/hootsuite/example/lambda/SampleLambda.java file. Right now we're only outputting either "ZERO" or "GREATER THAN ZERO" based on the input. We'll fix those other two tests later.
c. From the project root directory, run ./gradlew clean -PtestEnvironment=STAGING test.
These tests are hitting the newly deployed Lambda! Again two will pass and two fill fail. These are the first invocations of your Lambda function!
Now we will modify the Lambda function code to exhibit the expected behavior.
a. Now we'll change the Lambda function. In src/main/java/com/hootsuite/example/lambda/SampleLambda.java comment out line 9 and uncomment lines 11-16 inlcusive, so that the lines look like the following:
//         return (request.getInput() == 0) ? "ZERO" : "GREATER THAN ZERO";
        // TODO STEP 10 Comment out the line above and uncomment the lines below
        switch (request.getInput()) {
            case 0: return "ZERO";
            case 2: return "TWO";
            case 3: return "THREE";
            default: return "GREATER THAN ZERO";
        }
Now we're adding the expected behavior of outputting the numbers "TWO" and "THREE". In the real world this could be fixing a bug that we've previously deployed.
b. Switch to the project root directory in the terminal.
c. From the project root directory, run ./gradlew clean -PtestEnvironment=LOCAL test.
The tests should all now pass since we've fixed them locally.
d. From the project root directory, run ./gradlew clean -PtestEnvironment=STAGING test.
The two tests should still be failing since we haven't uploaded the new code to AWS Lambda.
a. Update the version of the code in the build.gradle file on line 6 to 1.0.1.
buildscript {
    ext {
        version = '1.0.1'
b. From the project root directory, run ./gradlew clean updateFunctionCodeStaging.
The above command will build a new zip file, version 1.0.1 and then upload it to S3. Our AWS Lambda Function will be updated to pull the new code from S3.
Our unit-testing client is set to invoke the latest version of the Lambda Function code, later we will see how we can lock clients to Aliases and versions.
This one command is all that is needed to update the Lamdba function code, after the initial runs, Terraform is not needed to manage the function.
c. From the project root directory, run ./gradlew clean -PtestEnvironment=STAGING test.
The tests should pass now with the new version of the function code deployed.
This section assumes that you have completed the the Installation section above.
In that section, we created a Lambda function with Terraform and updated it using Gradle and boto.
However, we are still pushing our Lambda code to the $LATEST bucket. In this section we will use Versioning and Aliases to target specific versions of our Lambda function.
Now we will publish Version 1 of our Lambda function.
a. From the root directory run ./gradlew publishLambdaStaging
The build should be successful and the version should be 1 as shown in the snippet below.
    "Runtime": "java8",
    "Timeout": 10,
    "Version": "1"
}

BUILD SUCCESSFUL
Now we will create an alias pointing to that version
b. From the root directory run ./gradlew createAliasStaging -PaliasName=SAMPLE_ALIAS -PlambdaVersion=1
This will create an alias named SAMPLE_ALIAS and point that at the Version 1 you just published.
You should see that the build succeeded with the following snippet in the output:
    "FunctionVersion": "1",
    "Name": "SAMPLE_ALIAS",
Now we will change the test client to invoke the SAMPLE_ALIAS version of the Lambda.
c. In the src/test/java/com/hootsuite/example/lambda/environment/AWSLambdaInvoker.java file, uncomment the line shown below to invoke the Function with the given alias.
                // TODO Uncomment to invoke Lambda with Alias
//                .withQualifier(ALIAS)
d. Run the unit tests and ensure that they are all still passing. ./gradlew clean -PtestEnvironment=STAGING test
Now we will add new expected behavior to our Lambda function. In the real world, this could be a bug that surfaced after publishing our Lambda client.
a. In the src/test/java/com/hootsuite/example/lambda/SampleTest.java file, uncomment the lines shown below to add a new test.
    // TODO Uncomment to add a new test
    @Test
    public void fourTest() {
        assertEquals(STRING_MISMATCH, "FOUR", lambdaGenerator.invoke(new SampleLambdaRequest(4)));
    }
b. Now run the unit tests and see that the new test is failing. ./gradlew clean -PtestEnvironment=STAGING test
Next, we will modify our function and redeploy it to fix the test.
a. In the src/main/java/com/hootsuite/example/lambda/SampleLambda.java file, uncomment the lines below and comment out the rest of the function above.
        // TODO Comment out the lines above and uncomment the lines below
        switch (request.getInput()) {
            case 0: return "ZERO";
            case 2: return "TWO";
            case 3: return "THREE";
            case 4: return "FOUR";
            default: return "GREATER THAN ZERO";
        }
Now we have added the functionality our tests expect.
b. Run ./gradlew clean -PtestEnvironment=LOCAL test. Verify that all 5 tests now pass.
c. Update the function version in the build.gradle file. Set the version to 1.0.2
version = '1.0.2'
d. Upload the new function code to Staging run ./gradlew updateFunctionCodeStaging
e. Run the unit tests in the Staging Environment, run ./gradlew clean -PtestEnvironment=STAGING test.
One test should fail. Now that we have set our Java client to invoke the function alias, we will need to update the alias to fix the broken test.
Now we will publish a new version of the function and update the alias to point to the new version.
a. From the root directory run ./gradlew publishLambdaStaging
The build should be successful and the version should be 2 as shown in the snippet below.
    "Runtime": "java8",
    "Timeout": 10,
    "Version": "2"
}

BUILD SUCCESSFUL
Now we will update the alias pointing to that version
b. From the root directory run ./gradlew updateAliasStaging -PaliasName=SAMPLE_ALIAS -PlambdaVersion=2
This will update the SAMPLE_ALIAS alias to point that at the Version 2 you just published.
You should see that the build succeeded with the following snippet in the output:
    "FunctionVersion": "2",
    "Name": "SAMPLE_ALIAS",
c. Now run the unit tests again by running, ./gradlew clean -PtestEnvironment=STAGING test.
This time all 5 tests should pass as the alias now points to the updated version of the function. The benefit of using aliases is that they are mutable, they can be updated to point to a new version of the function code and the client will automatically invoke the new version, without needing to be updated.
This section assumes you have previously completed the steps in the Versioning and Aliasing section above.
In this section we will create an API Gateway which invokes the Lambda function we created in the previous steps. We will then be able to invoke the Lambda function with REST calls.
a. In the terraform/gateway.tf file, uncomment the contents of the file.
b. In your terminal, cd into the terraform directory.
c. Run the terraform plan: terraform plan --var-file="../aws_secrets.tfvars" -var-file="env/staging.tfvars"
If successful, you should see:
Plan: 9 to add, 0 to change, 0 to destroy.
d. Apply the plan: terraform apply --var-file="../aws_secrets.tfvars" -var-file="env/staging.tfvars"
In the output of the previous apply, you should see a aws_api_gateway_deployment.sample_lambda_deployment section.
In that section, look for rest_api_id
a. Copy the rest_api_id, it should look something like c8gm8f8us9.
b. In the terminal enter the following curl command and replace <rest_api_id> with the id you just copied.
curl -d '{"input": 4}' -H "Content-Type: application/json" -X POST https://<rest_api_id>.execute-api.us-east-1.amazonaws.com/staging/sample_lambda
You should see "FOUR" as the output, just as if you had invoked the Lambda directly.
This section assumes you have previously completed the steps in the Using API Gateway section above.
In the previous section we saw that we could create an API Gateway which allows us to invoke our AWS Lambda function through REST calls. We tested this by using curl to send a request to API Gateway.
In this section we will see how we can set-up API Gateway deployments to point to AWS Lambda aliases.
a. In the terraform/deployments.tf file, uncomment the contents of the file.
There are two blocks in this file, one is the gateway deployment and the other is the permission for API Gateway to invoke the given Lambda alias.
The first block is used to expose the Lambdas alias through a specified request url path.
The second is to allow your lambda function to be invoked through calls from API Gateway.
b. cd into the terraform directory
c. Run the terraform plan: terraform plan --var-file="../aws_secrets.tfvars" -var-file="env/staging.tfvars"
If successful, you should see:
Plan: 3 to add, 0 to change, 1 to destroy.
d. Apply the plan: terraform apply --var-file="../aws_secrets.tfvars" -var-file="env/staging.tfvars"
In the output of the previous apply, you should see a aws_api_gateway_deployment.sample_lambda_deployment section.
In that section, look for rest_api_id
a. Copy the rest_api_id, it should look something like c8gm8f8us9.
b. In the terminal enter the following curl command and replace <rest_api_id> with the id you just copied.
curl -d '{"input": 4}' -H "Content-Type: application/json" -X POST https://<rest_api_id>.execute-api.us-east-1.amazonaws.com/SAMPLE_ALIAS/sample_lambda
You should see "FOUR" as the output, just as if you had invoked the Lambda directly.
If you wanted to add additional deployments to different Lambda aliases, you can do so by creating a new Lambda alias and adding two blocks to the terraform/deployments.tf file.
We will create a new Lambda alias, NEW_ALIAS to point to the same Lambda version as SAMPLE_ALIAS. In a real production environment they would point at two different versions.
a. Run ./gradlew createAliasStaging -PaliasName=NEW_ALIAS -PlambdaVersion=2 from the root project directory.
You should see that the build is successful, now we have a new alias, NEW_ALIAS for our Lambda function.
Next we will add two blocks to the terraform/deployments.tf file. Anytime you wish to invoke a new alias from API Gateway, you will need to add these two blocks.
One is for the actual API Gateway deployment to invoke the given alias. The other gives permission to API Gateway to invoke the Lambda alias of your function.
If you add your own alias, you will need to change all instances of NEW_ALIAS to your alias name.
b. Add the blocks below to the terraform/deployments.tf file.
resource "aws_api_gateway_deployment" "sample_lambda_deployment_NEW_ALIAS" {
  depends_on = ["aws_api_gateway_integration.sample_lambda_integration"]

  rest_api_id = "${aws_api_gateway_rest_api.sample_lambda_api.id}"
  stage_name = "NEW_ALIAS"

  variables {
    "lambdaAlias" = "NEW_ALIAS"
  }

  # forces a new deployment each run
  stage_description = "${timestamp()}"
}

resource "aws_lambda_permission" "sample_lambda_permission_NEW_ALIAS" {
  statement_id = "AllowExecutionFromAPIGateway"
  action = "lambda:InvokeFunction"
  function_name = "${aws_lambda_function.sample_lambda.arn}"
  principal = "apigateway.amazonaws.com"

  source_arn = "arn:aws:execute-api:${var.region}:${var.account}:${aws_api_gateway_rest_api.sample_lambda_api.id}/*/*/*"

  qualifier = "NEW_ALIAS"
}
After adding the blocks, you will need to run terraform to create the additional infrastructure.
b. cd into the terraform directory
c. Run the terraform plan: terraform plan --var-file="../aws_secrets.tfvars" -var-file="env/staging.tfvars"
If successful, you should see:
Plan: 4 to add, 0 to change, 2 to destroy.
d. Apply the plan: terraform apply --var-file="../aws_secrets.tfvars" -var-file="env/staging.tfvars"
After running terraform your new alias will be part of the url path:
https://<rest_api_id>.execute-api.us-east-1.amazonaws.com/NEW_ALIAS/sample_lambda
You can then curl the new alias with the curl call below.
curl -d '{"input": 4}' -H "Content-Type: application/json" -X POST https://<rest_api_id>.execute-api.us-east-1.amazonaws.com/NEW_ALIAS/sample_lambda
e. You should see "FOUR" as the curl result.
If you add your own Lambda Alias deployments to API Gateway, they will each have their own path.
This project is released under the Apache License, Version 2.0. See LICENSE for details.
a. In a browser window, navigate to https://console.aws.amazon.com/console/home. Sign into the console.
b. After signing in, navigate to https://console.aws.amazon.com/iam/home?region=us-east-1#/home. This is where we will create the user we need to run Terraform to manage our AWS Infrastructure.
Now that you are signed in, we create the user.
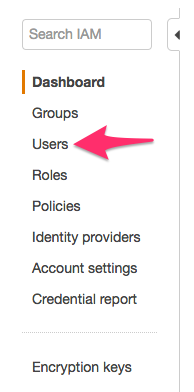
a. Click on Users in the side bar, see the image below.
b. Click on Add user as shown in the image below.
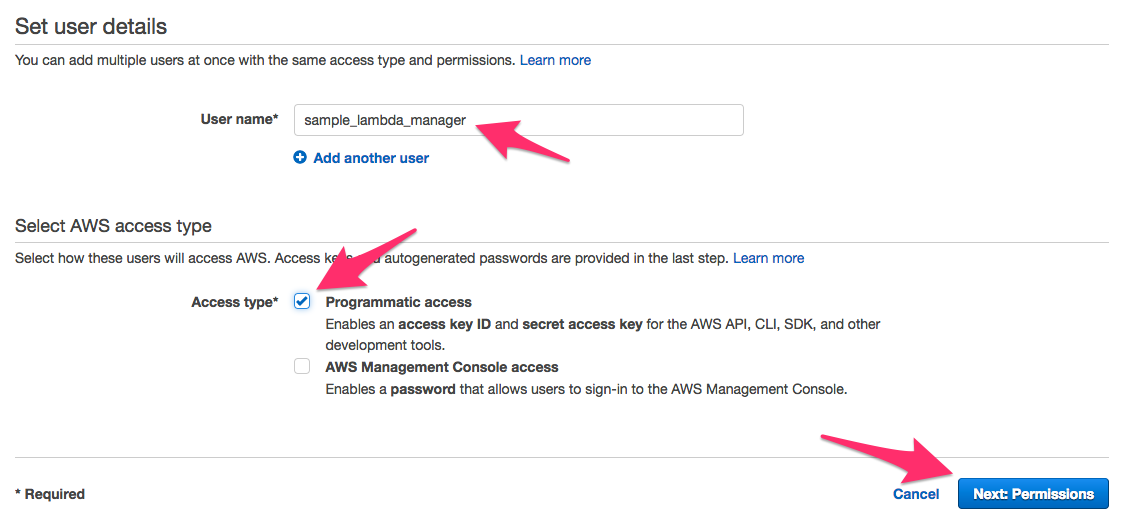
c. Type the name of the user sample_lambda_manager into the User name field and check the Programmatic access box. See the image below.
d. Click the Next: Permissions box to proceed.
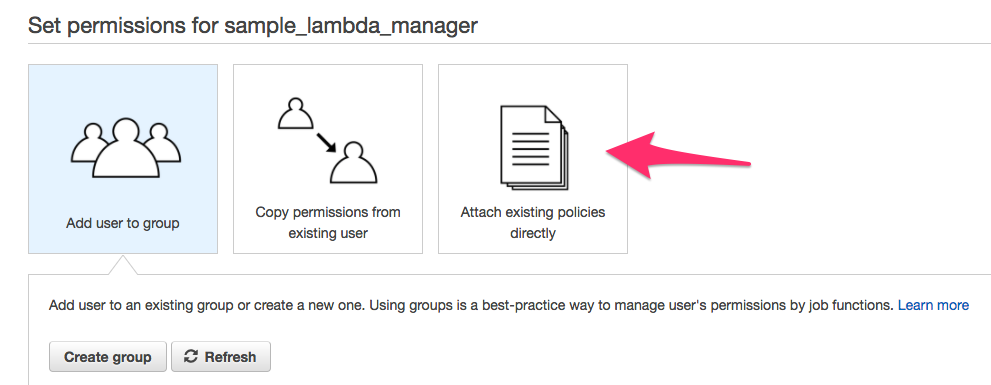
e. As shown in the image below, tap on Attach existing policies directly.
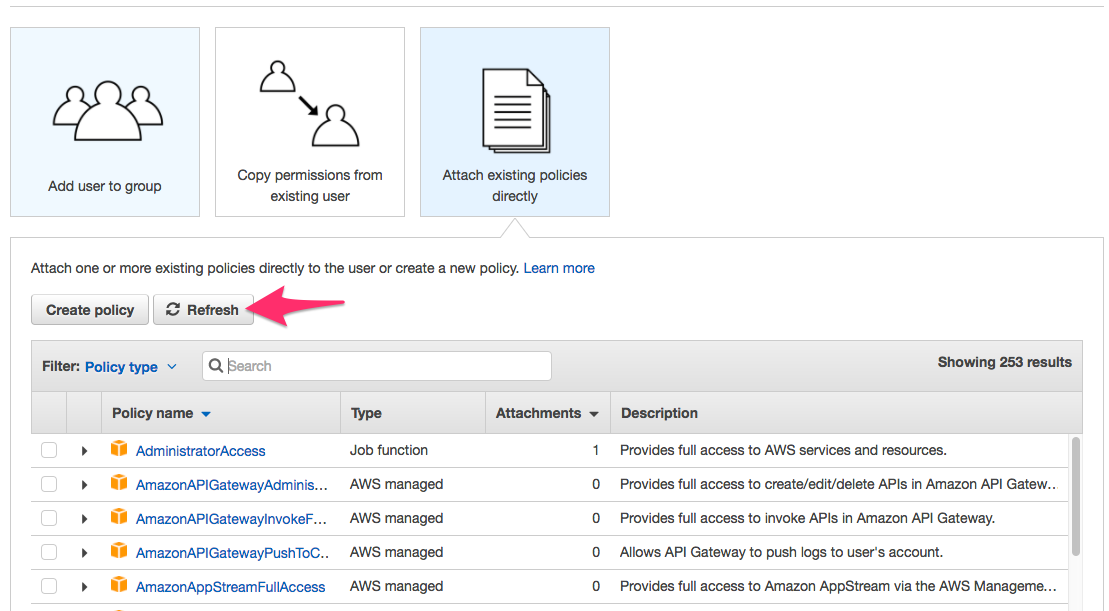
f. Now click the Create policy button as shown below.
This should open a new browser window where we will create the policy that your Terraform user will need to create and manage the project infrastructure.
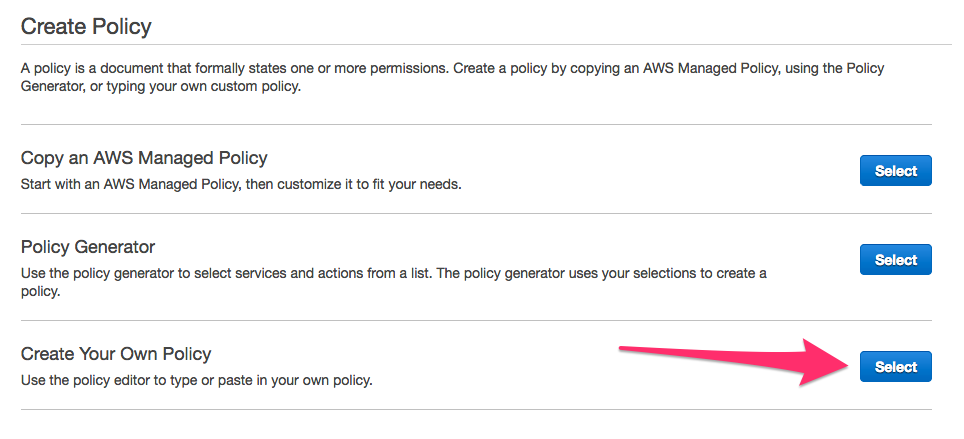
a. In the new tab, click Select next to Create Your Own Policy as shown below.
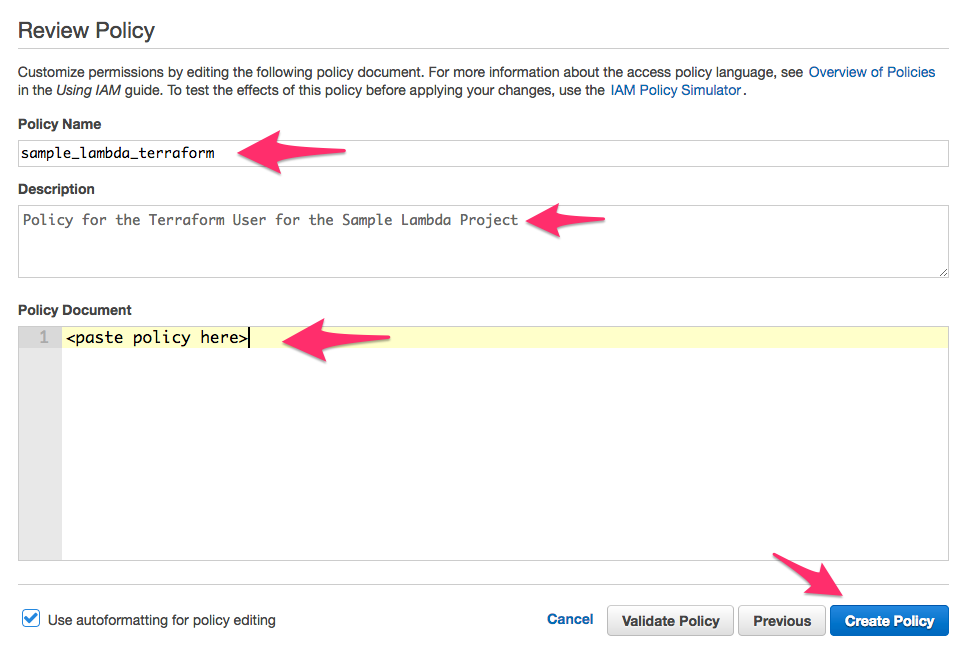
b. In the next screen, enter the name of the policy sample_lambda_terraform and a short description. This is shown in the image below.
c. Where it says <paste policy here>, paste the JSON snippet below.
{
    "Version": "2012-10-17",
    "Statement": [
        {
            "Sid": "LambdaCreateLogs",
            "Effect": "Allow",
            "Action": [
                "logs:CreateLogGroup",
                "logs:CreateLogStream",
                "logs:PutLogEvents"
            ],
            "Resource": "*"
        },
        {
            "Sid": "S3Management",
            "Effect": "Allow",
            "Action": [
                "s3:CreateBucket",
                "s3:PutObject",
                "s3:GetBucketLocation",
                "s3:GetObject",
                "s3:GetObjectAcl",
                "s3:GetObjectVersion",
                "s3:ListAllMyBuckets",
                "s3:ListBucket",
                "s3:ListBucketVersions",
                "s3:PutObject"
            ],
            "Resource": [
                "*"
            ]
        },
        {
            "Sid": "Stmt1490105011000",
            "Effect": "Allow",
            "Action": [
                "lambda:AddPermission",
                "lambda:CreateFunction",
                "lambda:GetFunction",
                "lambda:GetFunctionConfiguration",
                "lambda:CreateAlias",
                "lambda:DeleteAlias",
                "lambda:GetAlias",
                "lambda:GetPolicy",
                "lambda:InvokeFunction",
                "lambda:ListAliases",
                "lambda:ListVersionsByFunction",
                "lambda:PublishVersion",
                "lambda:RemovePermission",
                "lambda:UpdateAlias",
                "lambda:UpdateFunctionCode"
            ],
            "Resource": [
                "*"
            ]
        },
        {
            "Sid": "Stmt1490105149000",
            "Effect": "Allow",
            "Action": [
                "iam:AttachRolePolicy",
                "iam:AttachUserPolicy",
                "iam:CreateAccessKey",
                "iam:CreatePolicy",
                "iam:CreatePolicyVersion",
                "iam:CreateRole",
                "iam:CreateUser",
                "iam:GetRole",
                "iam:GetRolePolicy",
                "iam:GetUser",
                "iam:GetUserPolicy",
                "iam:ListAccessKeys",
                "iam:ListPolicies",
                "iam:ListUserPolicies",
                "iam:ListUsers",
                "iam:PutUserPolicy",
                "iam:PassRole",
                "iam:PutRolePolicy"
            ],
            "Resource": [
                "*"
            ]
        },
        {
            "Sid": "APIGatewayManagement",
            "Effect": "Allow",
            "Action": [
                "apigateway:POST",
                "apigateway:GET",
                "apigateway:PUT",
                "apigateway:DELETE"
            ],
            "Resource": [
                "*"
            ]
        }
    ]
}
d. Now click on the Create Policy button and we are done creating the policy, you can close the tab.
Now that we created the policy we will attach it to the user.
a. Click Refresh to refresh the list of policies to include our newly created policy.
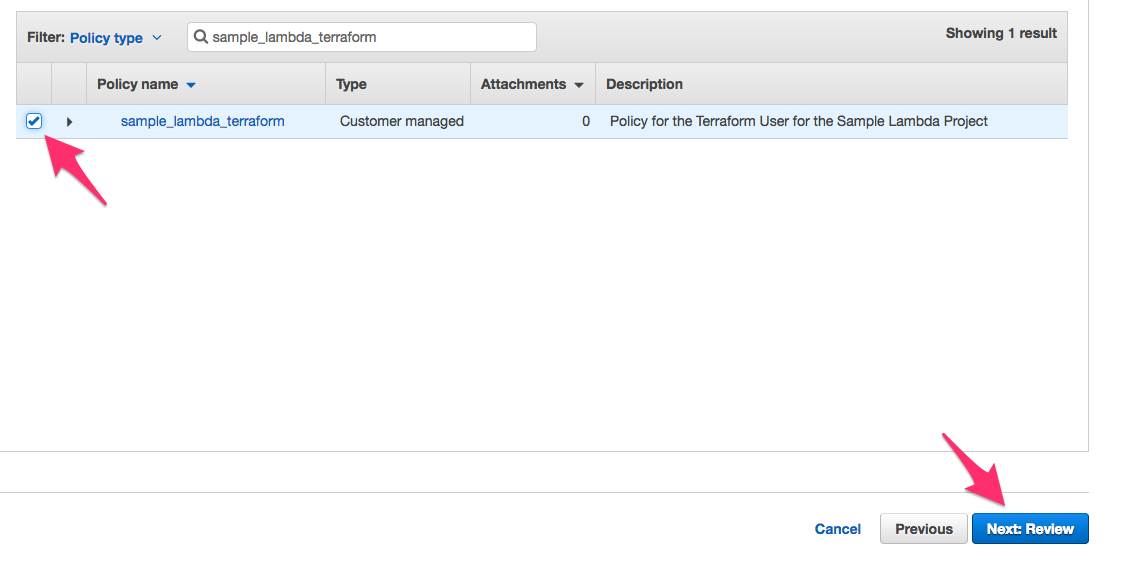
b. Type the name of our policy as as shown below: sample_lambda_terraform.
c. Check the box next to the policy as shown below and then click Next: Review.
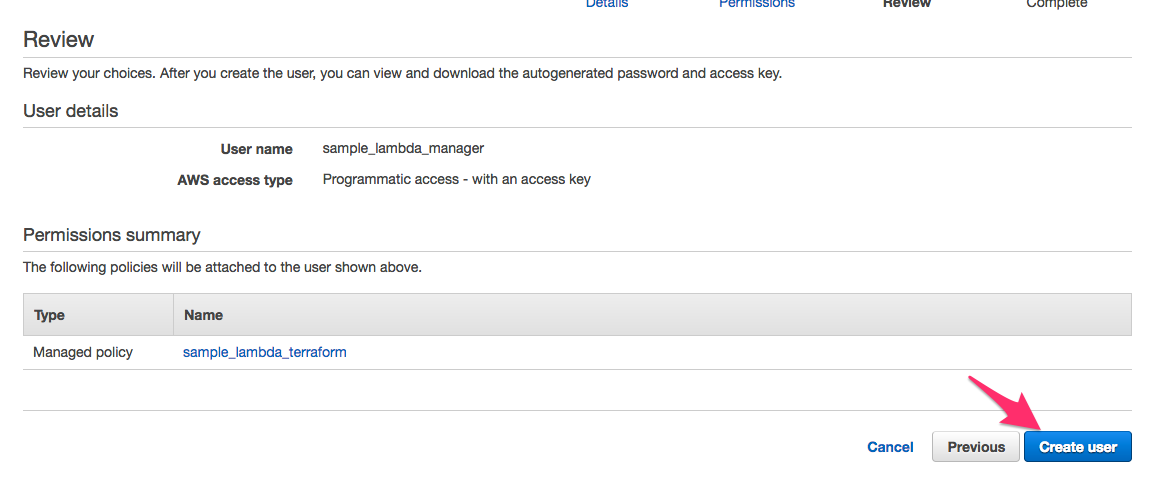
d. On the next screen, click Create User as shown below.
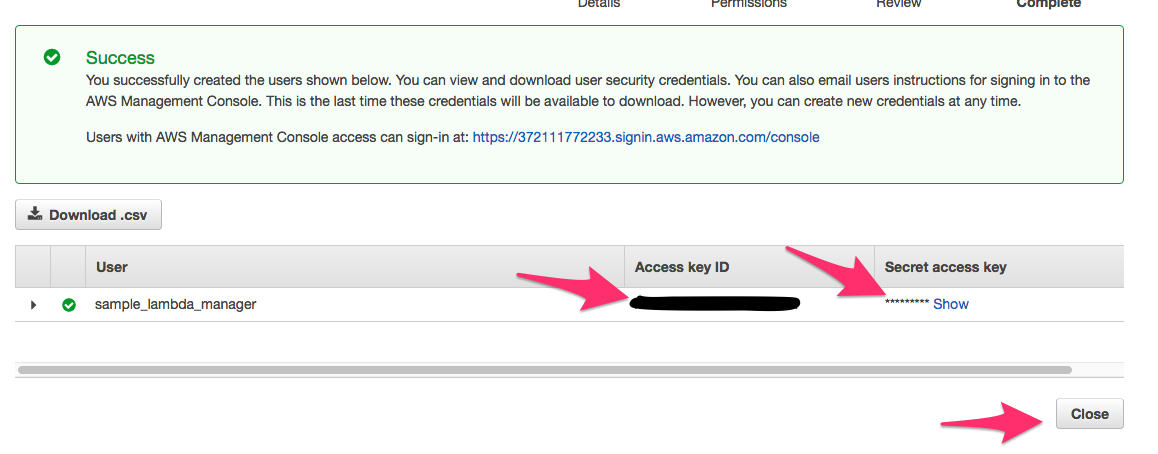
Now we have our user, we only need to copy the keys to this project.
a. As shown in the image below, copy the Access key ID of the newly created user.
b. Open up the aws_secrets.tfvars file in the root directory of this project and replace the <your_access_key> with your copied access key. The file is shown below:
access_key = "<your_access_key>"
secret_key = "<your_secret_key>"
c. As shown in the image above, click Show to reveal the Secret Key of the user, copy it and place it into the <your_secret_key> in the file as well.
d. Click Close and you're finished creating your IAM user to manage AWS infrastructure with Terraform! You should now be able to proceed with the Installation section above.
