ASV-Subtools is developed based on Pytorch and Kaldi for the task of speaker recognition, language identification, etc.
The 'sub' of 'subtools' means that there are many modular tools and the parts constitute the whole.
Copyright: XMU Speech Lab (Xiamen University, China)
Apache 2.0Author : Miao Zhao (Snowdar), Jianfeng Zhou, Zheng Li, Hao Lu
Co-author: Lin Li, Qingyang Hong
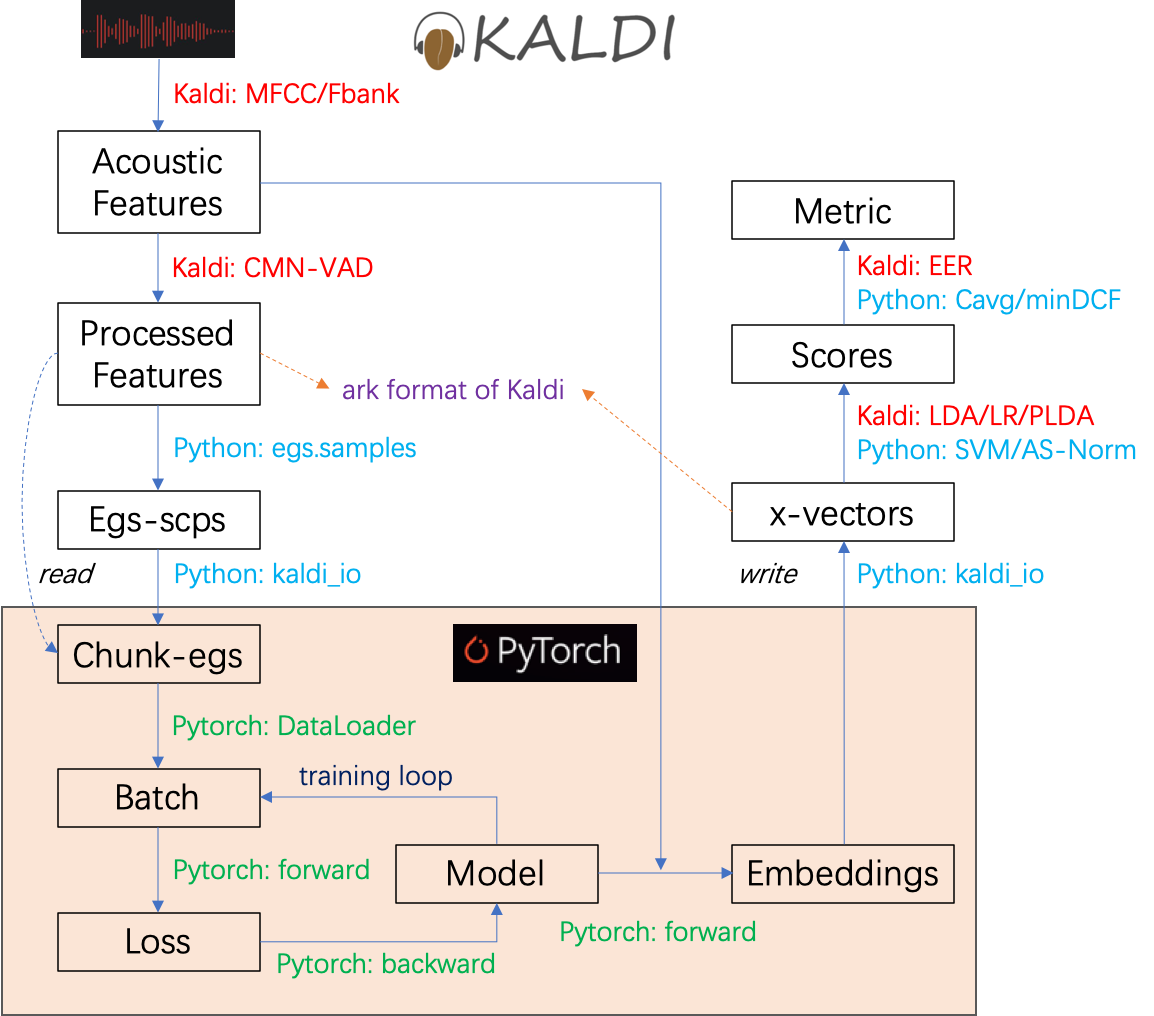
In ASV-Subtools, Kaldi is used to extract acoustic features and scoring in the back-end. And Pytorch is used to build a model freely and train it with a custom style.
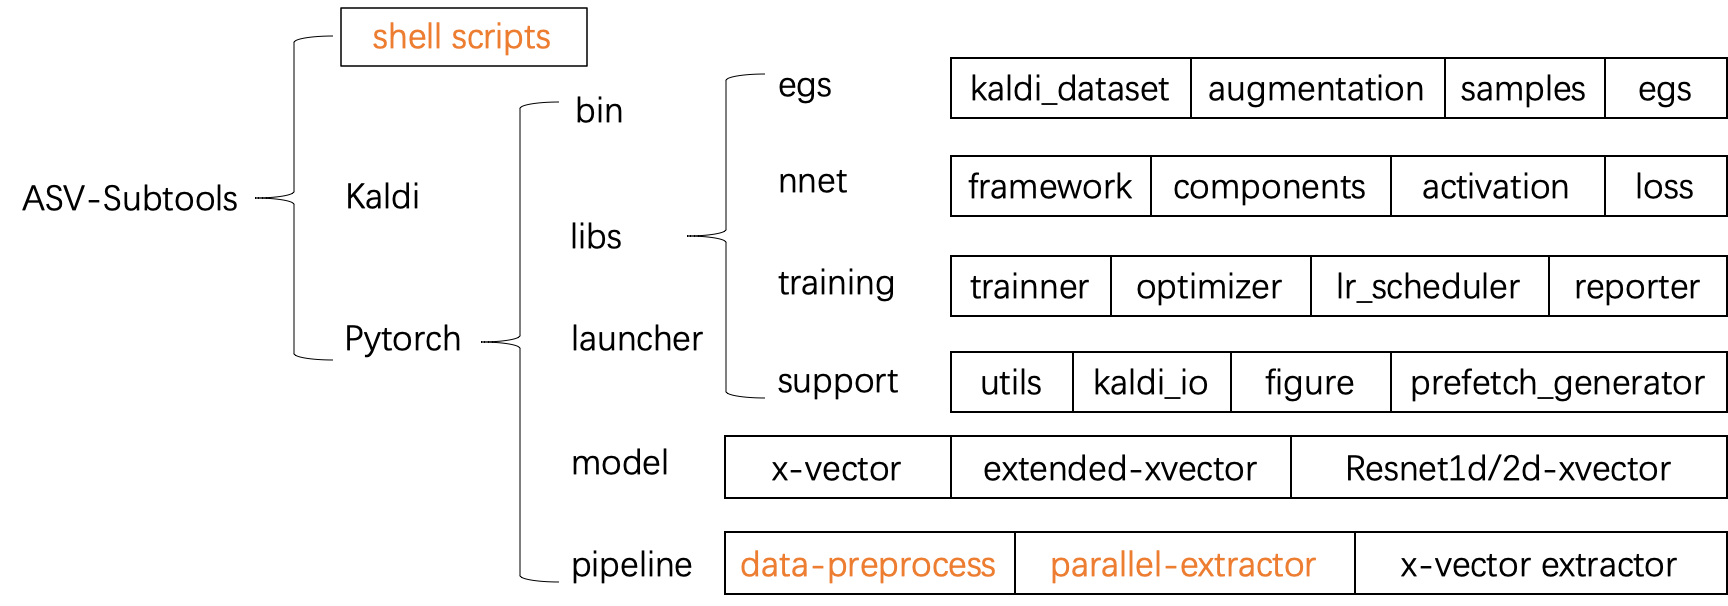
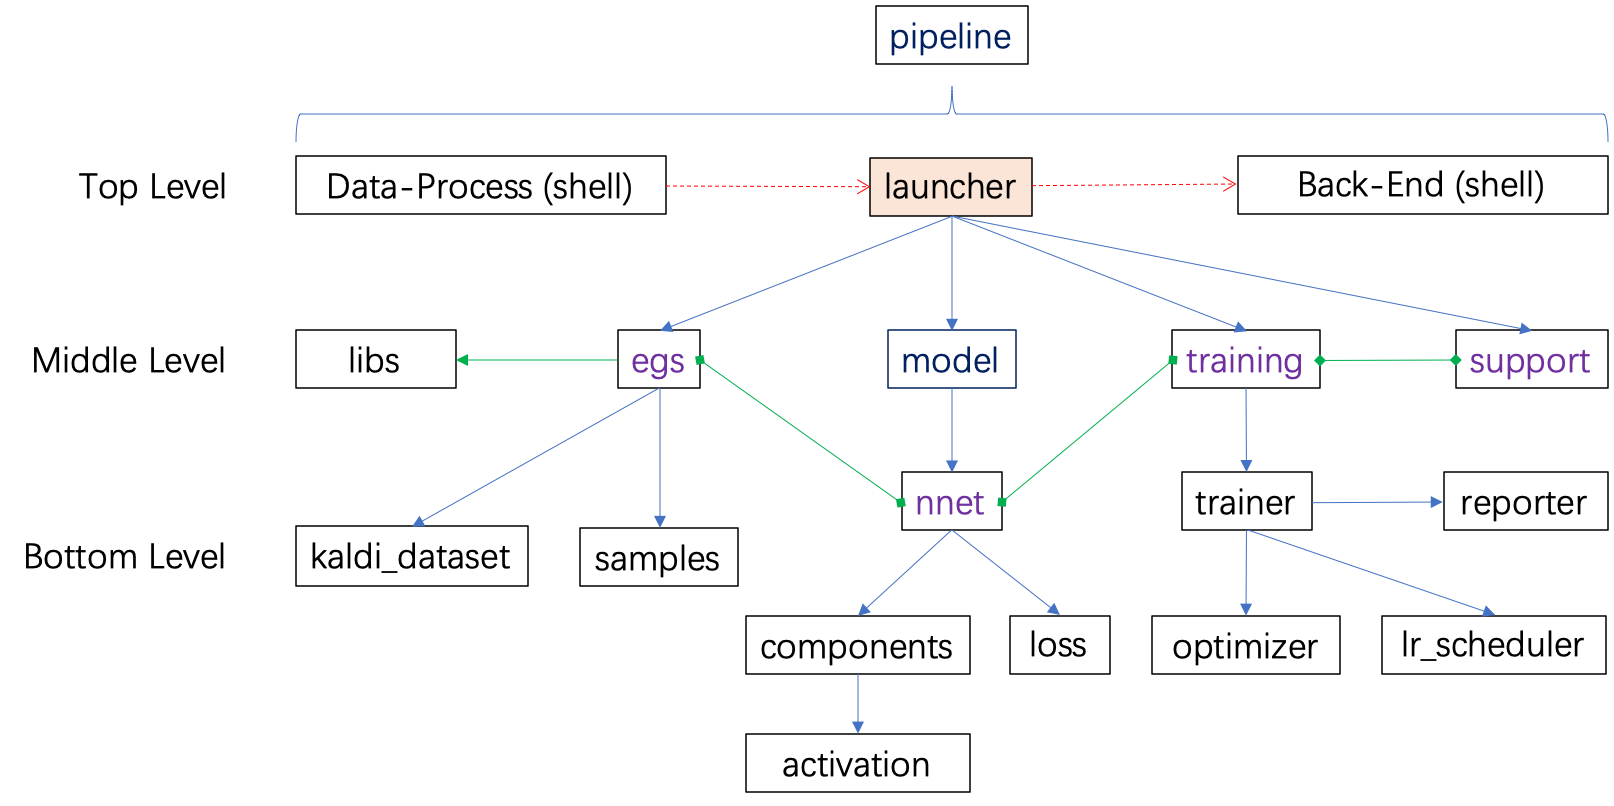
The project structure, training framework and data pipeline shown as follows could help you to have some insights into ASV-Subtools.
By the way, if you can not see the pictures in Github, maybe you should try to check the DNS of your network or use a VPN agent. If you are a student of XMU, then the VPN of campus network could be very helpful for these types of problems (see https://vpn.xmu.edu.cn for a configuration). Of course, there is also an absolute final way that cloning ASV-Subtools to your local notebook.
ASV-Subtools contains three main branches:
- Basic Shell Scripts: data processing, back-end scoring (most are based on Kaldi)
- Kaldi: training of basic model (i-vector, TDNN, F-TDNN and multi-task learning x-vector)
- Pytorch: training of custom model (less limitation)
For pytorch branch, there are two important concepts:
- Model Blueprint: the path of
your_model.py - Model Creation : the code to init a model class, such as
resnet(40, 1211, loss="AM")
In ASV-Subtools, the model is individual. This means that we should know the the path of model.py and how to init this model class at least when using this model in training or testing module. This structure is designed to avoid modifying codes of static modules frequently. For example, if the embedding extractor is wrote down as a called program and we use a inline method from my_model_py import my_model to import a fixed model from a fixed model.py , then it will be not free for model_2.py, model_3.py and so on.
Note that, all model (torch.nn.Module) shoud inherit libs.nnet.framework.TopVirtualNnet class to get some default functions, such as auto-saving model creation and blueprint, extracting emdedding of whole utterance, step-training, computing accuracy, etc.. It is easy to transform the original model of Pytorch to ASV-Subtools model by inheriting. Just modify your model.py w.r.t this x-vector example.
The basic training framework is provided here and the relations between every module are very clear. So it will be not complex if you want to change anything you want to have a custom ASV-Subtools.
Note that, libs/support/utils.py has many common functions, so it is imported in most of *.py.
Here, a data pipeline is given to show the relation between Kaldi and Pytorch. There are only two interfaces, reading acoustic features and writing x-vectors, and both of them are implemented by kaldi_io.
Of course, this data pipeline could be also followed to know the basic principle of xvector-based speaker recognition.
-
Multi-GPU Training Solution
- DistributedDataParallel (DDP) [Built-in function of Pytorch]
- Horovod
-
Front-end
-
Model
-
Component
- Attentive Statistics Pooling
- Learnable Dictionary Encoding (LDE) Pooling
- Sequeze and Excitation (SE) [An example of speaker recognition based on Resnet1d by Jianfeng Zhou.]
- Multi-head Attention Pooling
-
Loss Function
- Softmax Loss (Affine + Softmax + Cross-Entropy)
- AM-Softmax Loss
- AAM-Softmax Loss
- Double AM-Softmax Loss
- Ring Loss
- Curricular Margin Softmax Loss
-
Optimizer [Out of Pytorch built-in functions]
- Lookahead [A wrapper optimizer]
- RAdam
- Ralamb [RAdam + Layer-wise Adaptive Rate Scaling (LARS)]
- Novograd
- Gradient Centralization [Extra bound to optimizer]
-
Training Strategy
- AdamW + WarmRestarts
- SGD + ReduceLROnPlateau
- Training with Magin Decay Stratagy
- Heated Up Strategy
- Multi-task Learning with Phonetic Information (Kaldi) [Source codes was contributed by Yi Liu. Thanks.]
- Multi-task Learning with Phonetic Information (Pytorch)
- Generative Adversarial Networks (GAN)
-
Back-End
- LDA, Submean, Whiten (ZCA), Vector Length Normalization
- Cosine Similarity
- Basic Classifiers: SVM, GMM, Logistic Regression (LR)
- PLDA Classifiers: PLDA, APLDA, CORAL, CORAL+, LIP, CIP [Python versions was contributed by Jianfeng Zhou. For more details, see the note.]
- Score Normalization: S-Norm, AS-Norm
- Calibration
- Metric: EER, Cavg, minDCF
-
Others
- Learning Rate Finder
- Plot DET Curve with
matplotlibw.r.t the Format of DETware (Matlab Version) of NIST's Tools - Accumulate Total MACs and Flops of Model Based on
thop
The Pytorch-training has less relation to Kaldi, but we have not provided other interfaces to concatenate acoustic features and training now. So if you don't want to use Kaldi, you could change the libs.egs.egs.ChunkEgs class where the features are given to Pytorch only by torch.utils.data.Dataset. Besides, you should also change the interface of extracting x-vector after training done. Note that, most of scripts which require Kaldi could be not available in this case, such as subtools/makeFeatures.sh and subtools/augmentDataByNoise.sh.
If you prefer to use Kaldi, then install Kaldi firstly w.r.t http://www.kaldi-asr.org/doc/install.html.
Here are conclusive stages:
# Download Kaldi
git clone https://github.com/kaldi-asr/kaldi.git kaldi --origin upstream
cd kaldi

# You could check the INSTALL file of current directory for more details of installation
cat INSTALL

# Compile tools firstly
cd tools
sh extras/check_dependencies.sh
make -j 4

# Config src before compiling
cd ../src
./configure --shared

# Check depend and compile
make depend -j 4
make -j 4
cd ..Create your project with 4-level name relative to Kaldi root directory (1-level), such as kaldi/egs/xmuspeech/sre. It is important for the project environment. For more details, see subtools/path.sh.
# Suppose current directory is kaldi root directory
mkdir -p kaldi/egs/xmuspeech/sreASV-Subtools could be seen as a set of tools like 'utils' or 'steps' of Kaldi, so there are only two extra stages to complete the final installation:
- Clone ASV-Subtools to your project.
- Install the requirements of python (Python3 is recommended).
Here is the method cloning ASV-Subtools from Github:
# Clone asv-subtools from github
cd kaldi/egs/xmuspeech/sre
git clone https://github.com/Snowdar/asv-subtools/.git- Pytorch>=1.2:
pip3 install torch - Other requirements: numpy, thop, pandas, progressbar2, matplotlib, scipy (option), sklearn (option)
pip3 install -r requirements.txt
ASV-Subtools provide both DDP (recommended) and Horovod solutions to support multi-GPU training.
Some answers about how to use multi-GPU taining, see subtools/pytorch/launcher/runSnowdarXvector.py. It is very convenient and easy now.
Requirements List:
- DDP: Pytorch, NCCL
- Horovod: Pytorch, NCCL, Openmpi, Horovod
An Example of Installing NCCL Based on Linux-Centos-7 and CUDA-10.2
Reference: https://docs.nvidia.com/deeplearning/sdk/nccl-install-guide/index.html.
# For a simple way, there are only three stages.
# [1] Download rpm package of nvidia
wget https://developer.download.nvidia.com/compute/machine-learning/repos/rhel7/x86_64/nvidia-machine-learning-repo-rhel7-1.0.0-1.x86_64.rpm

# [2] Add nvidia repo to yum (NOKEY could be ignored)
sudo rpm -i nvidia-machine-learning-repo-rhel7-1.0.0-1.x86_64.rpm

# [3] Install NCCL by yum
sudo yum install libnccl-2.6.4-1+cuda10.2 libnccl-devel-2.6.4-1+cuda10.2 libnccl-static-2.6.4-1+cuda10.2
These yum-clean commands could be very useful when you get some troubles when using yum.
# Install yum-utils firstly
yum -y install yum-utils

# Stop unfinished transactions
yum-complete-transaction --cleanup-only

# Clean duplicate and conflict
package-cleanup --cleandupes

# Clean cached headers and packages
yum clean all
If you want to install Openmpi and Horovod, see https://github.com/horovod/horovod for more details.
There are some extra installations for some special applications.
Use subtools/kaldi/runMultiTaskXvector.sh to train a model with multi-task learning, but it requires some extra codes.
# Enter your project, such as kaldi/egs/xmuspeech/sre and make sure ASV-Subtools is cloned here
# Just run this patch to compile some extra C++ commands with Kaldi's format
cd kaldi/egs/xmuspeech/sre
sh subtools/kaldi/patch/runPatch-multitask.shIt will spend so much time to compile nnet3 models for the utterances with different frames when extracting x-vectors based on Kaldi. To optimize this problem, ASV-Subtools provides an offine modification (MOD) in subtools/kaldi/sid/nnet3/xvector/extract_xvectors.sh to accelerate extracting. This MOD requires two extra commands, nnet3-compile-xvector-net and nnet3-offline-xvector-compute. When extracting x-vectors, all model with different input chunk-size will be compiled firstly. Then the utterances which have the same frames could share a compiled nnet3 network. It saves much time by avoiding a lot of duplicate dynamic compilations.
Besides, the scp spliting type w.r.t length of utterances (subtools/splitDataByLength.sh) is adopted to balance the frames of different nj when multi-processes is used.
# Enter your project, such as kaldi/egs/xmuspeech/sre and make sure ASV-Subtools is cloned here
# Just run this patch to compile some extra C++ commands with Kaldi's format

# Target *.cc:
#     src/nnet3bin/nnet3-compile-xvector-net.cc
#     src/nnet3bin/nnet3-offline-xvector-compute.cc

cd kaldi/egs/xmuspeech/sre
sh subtools/kaldi/patch/runPatch-base-command.shIf you have run subtools/kaldi/patch/runPatch-base-command.sh, then it dosen't need to run again.
# Enter your project, such as kaldi/egs/xmuspeech/sre and make sure ASV-Subtools is cloned here
# Just run this patch to compile some extra C++ commands with Kaldi's format

# Target *.cc:
#    src/gmmbin/gmm-global-init-from-feats-mmi.cc
#    src/gmmbin/gmm-global-est-gaussians-ebw.cc
#    src/gmmbin/gmm-global-est-map.cc
#    src/gmmbin/gmm-global-est-weights-ebw.cc

cd kaldi/egs/xmuspeech/sre
sh subtools/kaldi/patch/runPatch-base-command.shIf you have completed the Ready to Start stage, then you could try to train a model with ASV-Subtools.
For kaldi trainig, some launcher scripts named run*.sh could be found in subtoos/Kaldi/.
For pytorch training, some launcher scripts named run*.py could be found in subtools/pytorch/launcher/. And some models named *.py could be found in subtools/pytorch/model/. Note that, model will be called in launcher.py.
Here is a pytorch training example, but you should follow a pipeline of recipe to prepare your data and features before training. The part of data preprocessing is not complex and it is same with Kaldi.
# Suppose you have followed the recipe and prepare your data and faetures, then the training could be run by follows.
# Enter your project, such as kaldi/egs/xmuspeech/sre and make sure ASV-Subtools is cloned here

# Firsty, copy a launcher to your project
cp subtools/pytorch/launcher/runSnowdarXvector.py ./

# Modify this launcher and run
# In most of time, there are only two files, model.py and launcher.py, will be changed.
subtools/runLauncher.sh runSnowdarXvector.py --gpu-id=0,1,2,3 --stage=0Voxceleb is a popular dataset for the task of speaker recognition. It has two part now, Voxceleb1 and Voxceleb2.
There are two recipes for Voxceleb:
i. Test Voxceleb1-O only
It means the trainset could be sampled from both Voxceleb1.dev and Voxceleb2 with a fixed training condition. The training script is available in subtools/recipe/voxceleb/runVoxceleb.sh.
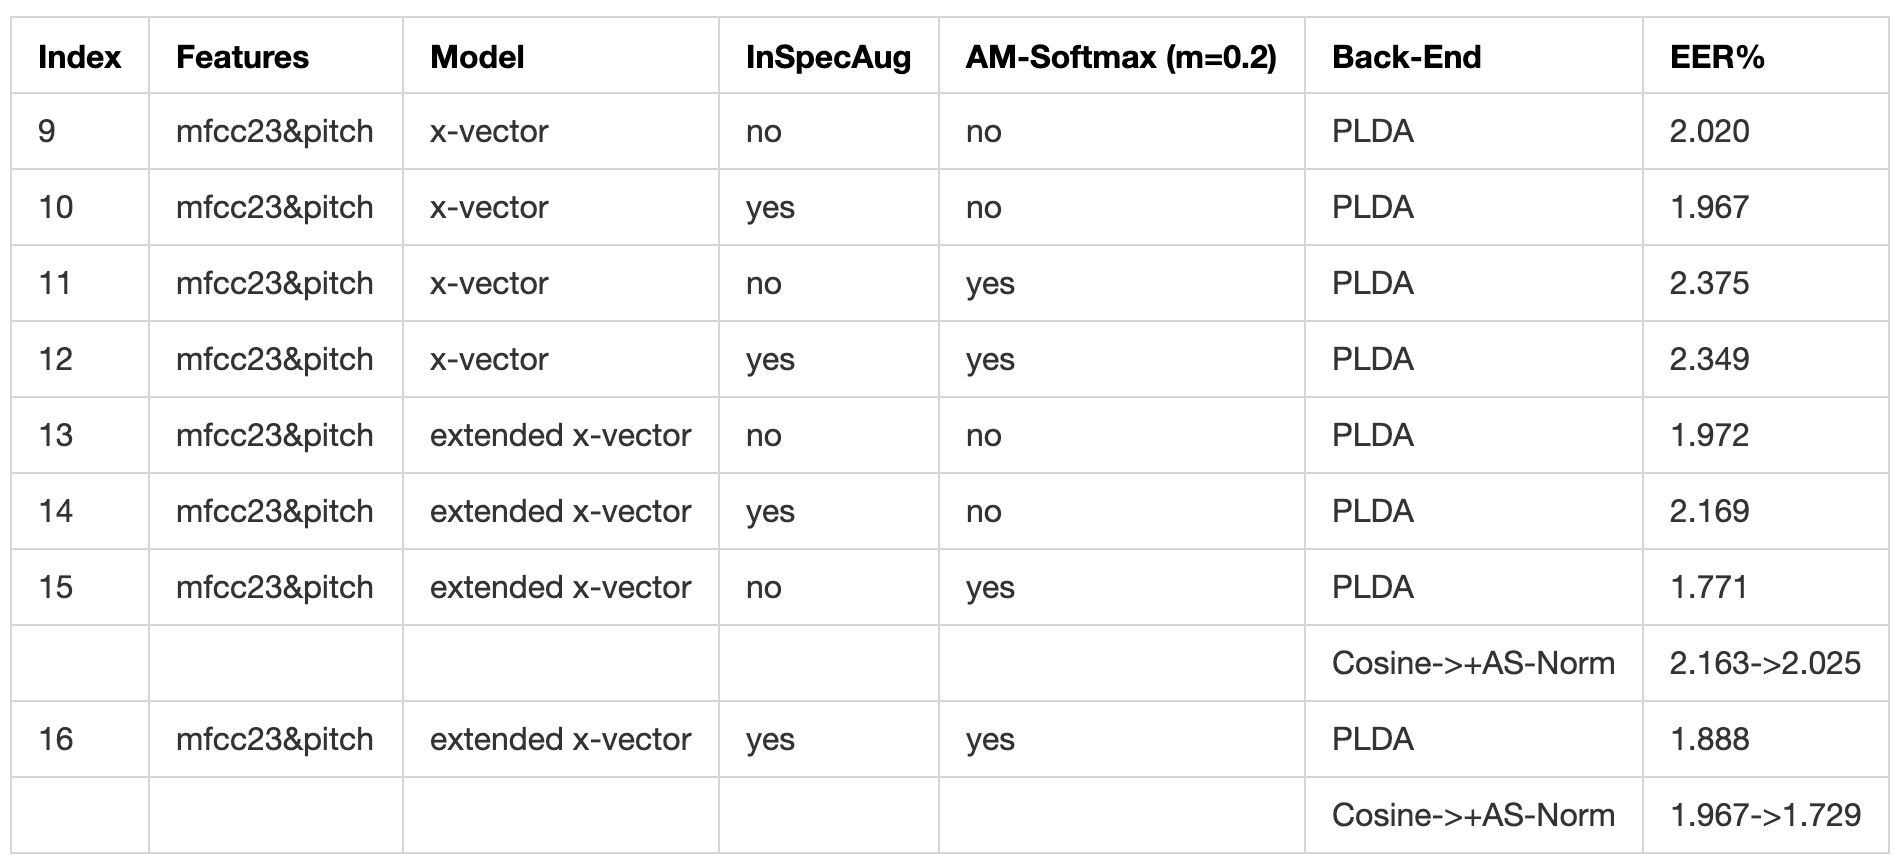
Results of Voxceleb1-O with Voxceleb1.dev.aug1:1 Training only
Results of Voxceleb1-O with Voxceleb1&2.dev.aug1:1 Training
Note, 2000 utterances are selected from no-aug-trainset as the cohort set of AS-Norm, the same below.
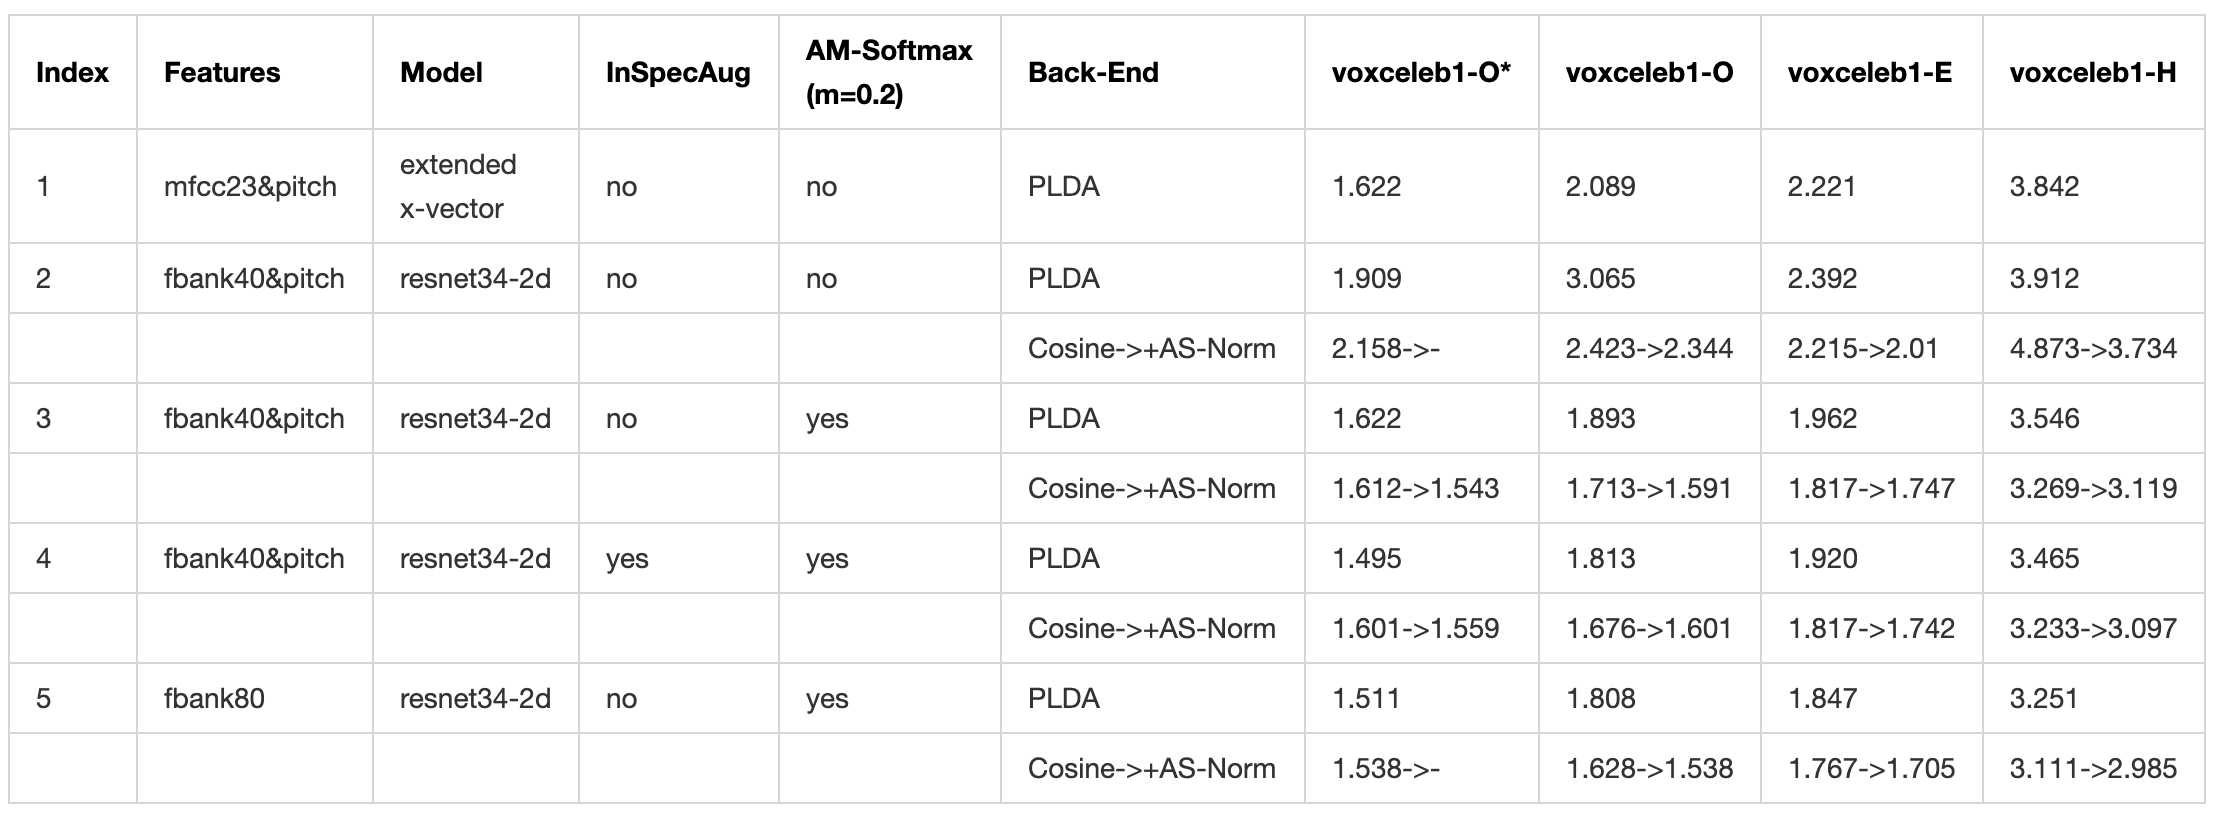
ii. Test Voxceleb1-O/E/H
It means the trainset could only be sampled from Voxceleb2 with a fixed training condition. The training script is available in subtools/recipe/voxcelebSRC/runVoxcelebSRC.sh.
Results of Voxceleb1-O/E/H with Voxceleb2.dev.aug1:4 Training (EER%)
Note, Voxceleb1.dev is used as the trainset of back-end for the Voxceleb1-O* task and Voxceleb2.dev for others.
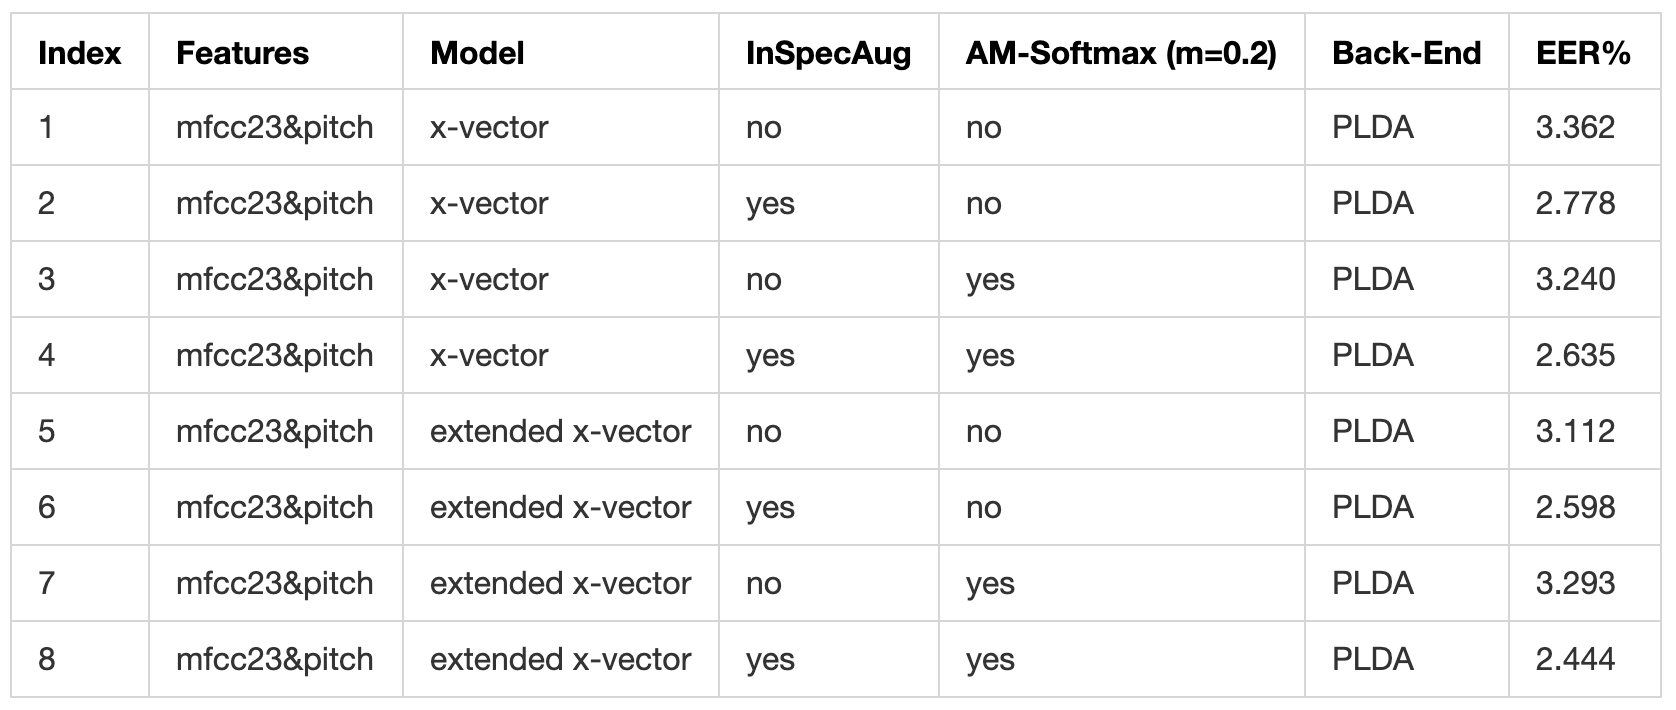
These basic models performs good but the results are not the state-of-the-art yet. I found that training strategies could have an important influence to the final performance, such as the number of epoch, the value of weight decay, the selection of optimizer, and so on. Unfortunately, I have not enough time and GPU to fine-tune so many models, especially training model with a big dataset like Voxceleb2 whose duration is more than 2300h (In this case, it will spend 1~2 days if to train one fbank80-based Resnet2d model for 6 epochs with 4 V100 GPUs).
--#--Snowdar--2020-06-02--#--
AP-OLR Challenge 2020 is opened now, welcome to register by the home page.
Baseline: subtools/recipe/ap-olr2020-baseline.
The top training script of baseline is available in subtools/recipe/ap-olr2020-baseline/run.sh. And the baseline results could be seen in subtools/recipe/ap-olr2020-baseline/results.txt.
Plan: Zheng Li, Miao Zhao, Qingyang Hong, Lin Li, Zhiyuan Tang, Dong Wang, Liming Song and Cheng Yang: AP20-OLR Challenge: Three Tasks and Their Baselines, submitted to APSIPA ASC 2020.
Important Dates:
Jun. 1, AP20-OLR training/dev data release.
Oct. 1, register deadline.
Oct. 20, test data release.
Nov. 1, 24:00, Beijing time, submission deadline.
Nov. 27, convening of seminar.
Dec. 10, results announcement.
For previous challenges (2016-2019), see http://olr.cslt.org.
- If you find bugs or have some questions, please create a github issue in this repository to let everyone know it, so that a good solution could be contributed.
- If you have questions to me, you can also send e-mail to snowdar@stu.xmu.edu.cn and I will reply in my free time.
- Thanks to everyone who contribute their time, ideas and codes to ASV-Subtools.
- Thanks to XMU Speech Lab providing machine and GPU.
- Thanks to the excelent projects: Kaldi, Pytorch, Kaldi I/O, Numpy, Pandas, Horovod, Progressbar2, Matplotlib, Prefetch Generator, Thop, GPU Manager, etc.
