Create your bucket using the AWS Management Console or by using the following AWS CLI command:
aws s3api create-bucket --bucket it-bucket-demo --region us-east-1
You can change it-bucket-demo to something else and change the region to any other S3 AWS region you wish
This part is better done using the Atlas UI. Let's check it out.
-
Open your Atlas Project Integrations
-
Select AWS IAM Role Access
-
Click on Authorize an AWS IAM Role
-
The Authorize AWS IAM Role wizard takes you through setting up your AWS role pretty easily. Click Next.
-
This is where things get interesting... In the page shown below you are:
a) Creating Cloud Provider Access in Atlas, and
b) Creating an AWS IAM Role with a trust policy (for Atlas to assume your role)
You can also do this using the API. Check out the documentation for more info:
Note: Keep the value of input box 2 handy. You will need it later in step 8.
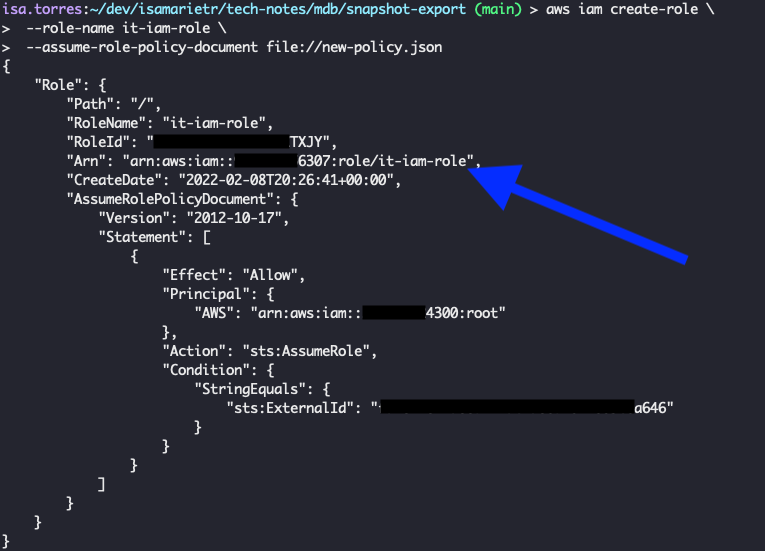
Note: Once you issue the command is Step 3, you will get a JSON back. You will enter the value of "Arn" in Step 4.
-
Once you've validated and finished the setup, you should get the following message.
-
You can check out the Role Details for this newly created role.
-
Conimg/figure your newly created IAM Role to have read/write access to your S3 bucket. You can use the following policy template.
{
  "Version": "2012-10-17",
  "Statement": [
    {
      "Effect": "Allow",
      "Action": [
        "s3:ListBucket",
        "s3:GetObject",
        "s3:GetObjectVersion",
        "s3:GetBucketLocation"
      ],
      "Resource": [
        "arn:aws:s3:::BUCKET_NAME",
        "arn:aws:s3:::BUCKET_NAME/*"
      ]
    },
    {
      "Effect": "Allow",
      "Action": [
        "s3:PutObject",
        "s3:DeleteObject"
      ],
      "Resource": [
        "arn:aws:s3:::BUCKET_NAME",
        "arn:aws:s3:::BUCKET_NAME/*"
      ]
    }
  ]
}
Replace BUCKET_NAME with the name of your bucket and save it to a file called s3-policy.json. Then, from the command line you can issue the command below.
aws iam put-role-policy --role-name YOUR-ROLE-NAME --policy-name YOUR-POLICY-NAME --policy-document file://s3-policy.json
YOUR-ROLE-NAME will be the same name you used when you created the IAM Role in step 5 (input #2 in the dialog)
You can do this via the management console or the command line. For more information, see the AWS documentation.
To Export an existing snapshot to your S3 bucket you need to create an export bucket and create an export job.
Check out Cloud Backup Snapshot Export API documentation for more info.
You can also import the Export Snapshot Collection to Postman. If you have the MongoDB APIs Postman Collection already in your Postman workspace, you can use the same environment variables, otherwise use this environment file.
Use the Cloud Provider Access Roles API to see your recently created AWS IAM Role
curl --user "{PUBLIC-KEY}:{PRIVATE-KEY}" -X GET --digest \
     --header "Accept: application/json" \
     "https://cloud.mongodb.com/api/atlas/v1.0/groups/{GROUP-ID}/cloudProviderAccess/?pretty=true"
Find the IAM Role that you created previously and copy the value for roleId. This will be the value you will use for the iamRoleId attribute when you create an export bucket.

This step does not create an S3 bucket, you should've created a S3 bucket in the Setup section. This is simply telling Atlas which buckets can be used for exporting snapshots.
Make sure that bucketName is the simple name of your S3 bucket (not the ARN) and that the iamRoleId equals the value of roleId returned from the cloudProviderAccess API)
curl --user "{PUBLIC-KEY}:{PRIVATE-KEY}" -X POST --digest \
     --header "Accept: application/json" \
     --header "Content-Type: application/json" \
     "https://cloud.mongodb.com/api/atlas/v1.0/groups/{GROUP-ID}/backup/exportBuckets?pretty=true" \
     --data '{
       "iamRoleId": "{CLOUD-PROVIDER-ROLE-ID}",
       "bucketName": "{YOUR-BUCKET-NAME}",
       "cloudProvider": "AWS"
     }'
From the results, capture the value for _id, this will be your exportBucketId value when exporting the snapshot.
To export a snapshot, you will need a Snapshot ID. Use the Get All Cloud Backups API to retrieve the ID of the snapshot to be exported.
curl --user "{PUBLIC-KEY}:{PRIVATE-KEY}" --digest --include \
     --header "Accept: application/json" \
     --request GET "https://cloud.mongodb.com/api/atlas/v1.0/groups/{GROUP-ID}/clusters/{CLUSTER-NAME}/backup/snapshots?pretty=true"
From the results, find the Snapshot ID for the snapshot you want to export, this will be your snapshotId value when exporting the snapshot.
Once the export bucket has been conimg/figured, you can start an export job.
curl --user "{PUBLIC-KEY}:{PRIVATE-KEY}" --digest \
     --header "Accept: application/json" \
     --header "Content-Type: application/json" \
     --include \
     --request POST "https://cloud.mongodb.com/api/atlas/v1.0/groups/{GROUP-ID}/clusters/{CLUSTER-NAME}/backup/exports/" \
     --data '{
              "snapshotId" : "{SNAPSHOT-ID}",
                "exportBucketId" : "{BUCKET-ID}",
                "customData": [
                  {
                    "key": "exported by",
                    "value": "myName"
                  }
               ]
            }'
Then the job will be Queued and later on started!
This doesn't seem to be possible from the restoreJobs API at the time...
{
    "detail": "This resource requires access through an access list of ip ranges.",
    "error": 403,
    "errorCode": "RESOURCE_REQUIRES_ACCESS_LIST",
    "parameters": [
        "100.40.199.197"
    ],
    "reason": "Forbidden"
}
However, you can use mongorestore to restore a cluster using these files. Some alternatives are: 1) Download and restore, or 2) Pipe S3 to mongoimport
Note: You may be tempted to add your S3 bucket to an Atlas Data Lake and use $out to write the data to a cluster, but considering that all data sources in a Data Lake are read-only, this won't work.
Download and mongoimport:
> gzip -d your_snapshot_file.json.gz
> mongoimport -d database -c collection "mongodb+srv://user:pwd@cluster_host" your_snapshot_file.json
OR...
Pipe S3 to mongoimport:
aws s3 cp s3://your_snapshot_file_s3_uri - | gzip -d - | mongoimport -d database -c collection "mongodb+srv://user:pwd@cluster_host"
Check out the docs for Import Archive from S3.


