LAB: F5 Essential App Protect Service
Table of Contents
- Pre-Requisites
- Lab Environment Overview
- Lab Environment Setup
- F5 Essential App Protect Service
- 1. Create F5 Essential App Protect Service via the F5 Cloud Services Portal
- 2. Update DNS Settings using CNAME
- 3. Review the JSON via UI
- 4. Review the JSON via Postman
- 5. Attacks
- 6. Update Monitoring to Blocking via UI
- 7. Update Monitoring to Blocking via Postman
- 8. Geolocation Enforcement via UI
- 9. Geolocation Enforcement via Postman
- 10. Update IP Enforcement Rules via UI
- 11. Update IP Enforcement Rules via Postman
- 12. Customize Blocked Page
- 13. Add New Endpoints
- 14. Test New Endpoint via Postman
- 15. Attacks via Browser
- 16. Check the Map
- 17. Start Attacks via Postman
- 18. View Events via Postman
- 19. View Events via UI
- 20. Specify SSL Certificate via Postman
- Clean Up
Pre-Requisites
- Any modern browser: for working with the UI (and this document)
- Postman: for working with the API of the F5 Cloud Services
Lab Environment Overview
1. APIs and Services
This Lab utilizes standard F5 Cloud Services API, as well as a Lab Service API, which was custom-built just for executing this lab:
- F5 Cloud Services API: create, use, and remove the services in scope of this lab
- Lab service API: facilitates auxiliary functions for the lab only: creating DNS entries, sending targeted requests & traffic to the apps/services, etc.
The following diagram captures the core components of this Lab:

Lab Environment Setup
1. F5 Cloud Services Portal
a) Login
In order to use F5 Essential App Protect service, you need access to F5 Cloud Services and be logged in with a valid user account. If you need to sign up, or if you already have one, proceed to the F5 Cloud Services portal. ˚ .. figure:: _figures/1-1.png
Once you've logged in with an account, you will be using the user name and password values in the lab to authenticate with the F5 Cloud Services and the API.
b) Subscribe to Catalogs
In order to access specific F5 Cloud Services, you need to subscribe to the corresponding service catalogs. The focus of this lab is on F5 Essential App Protect service, so you will need to subscribe to it. At the time of writing you can take advancate of a 10-day free trial offer to work with this service -- no payment method required!
1. Click on the Your F5 Cloud tab in the left navigation panel and you will see the available service catalogs, as well as services you have subscribed to, if any. For this lab you will need to subscribe to Essential App Protect services.
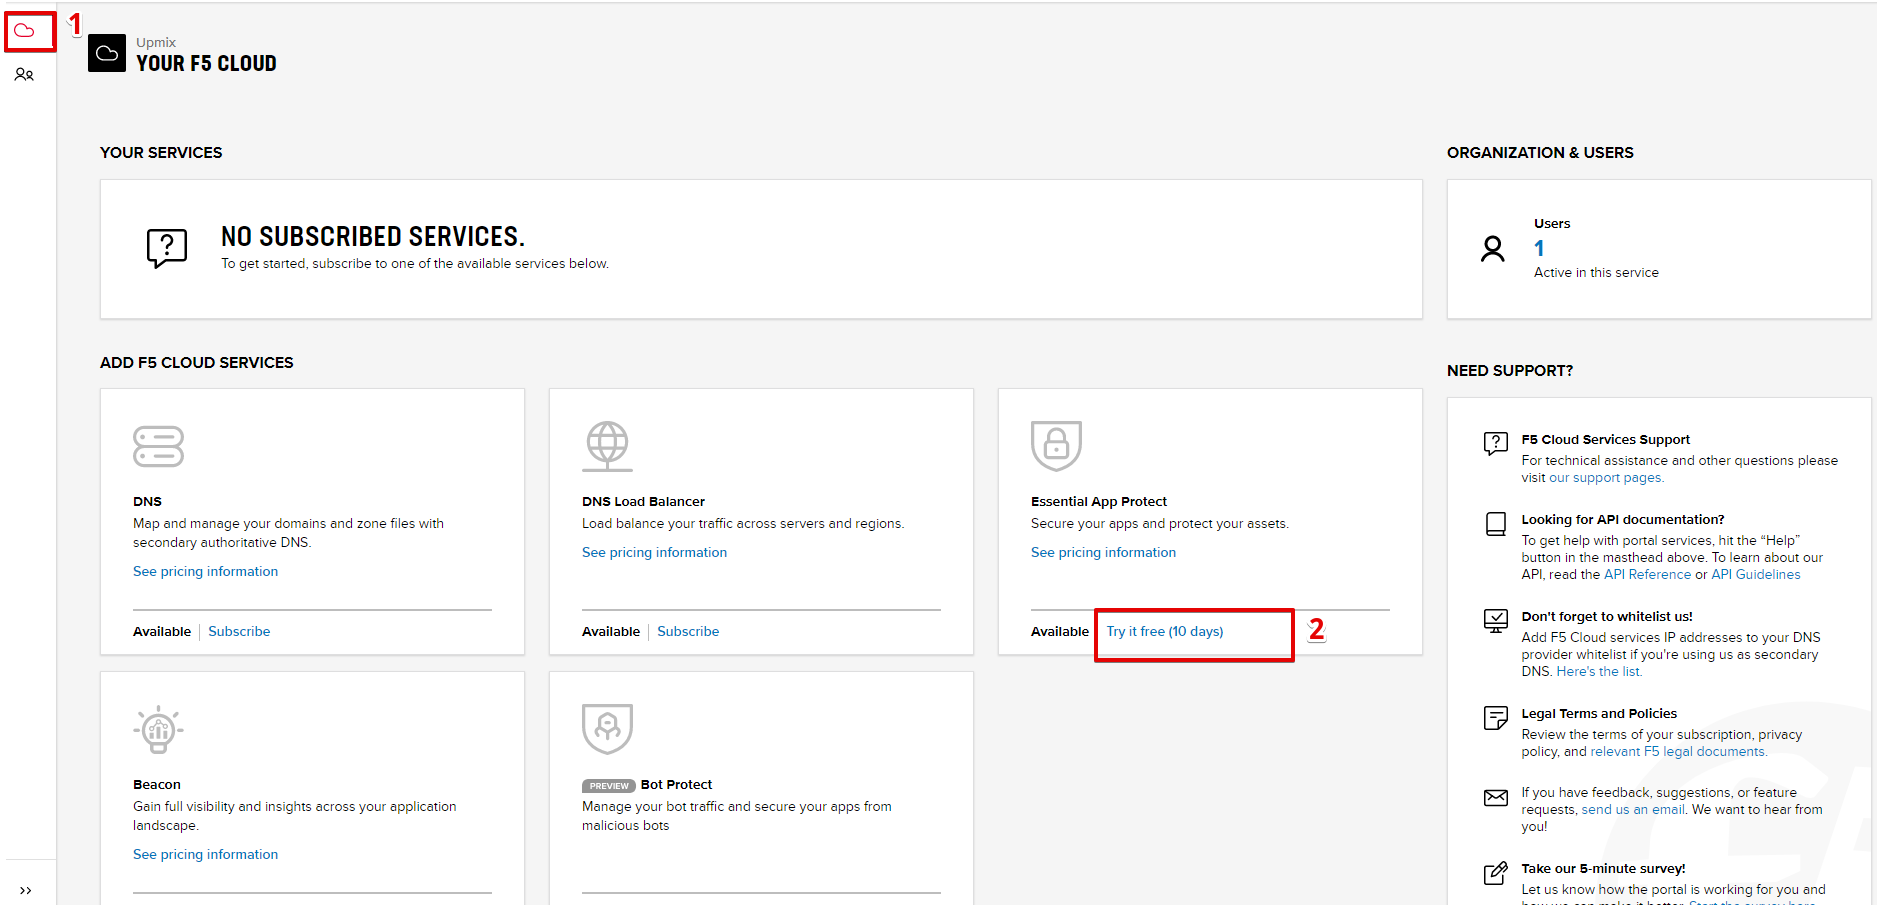
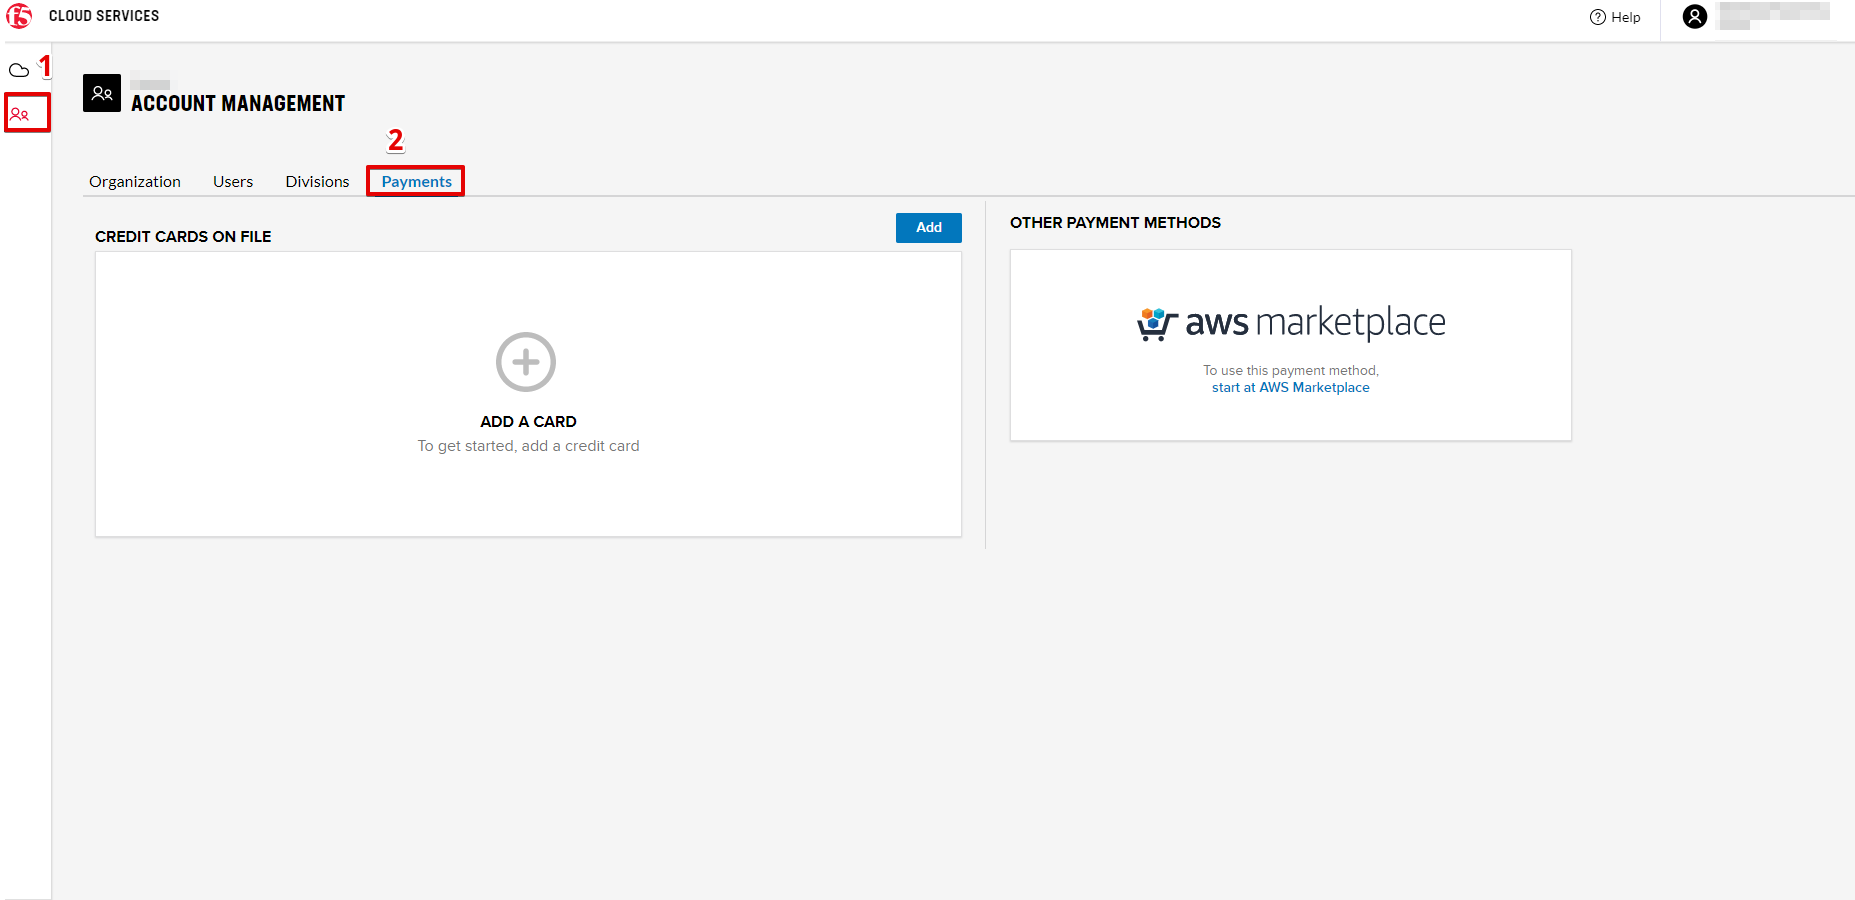
2. You can subscribe to the service, or start a free trial (if available). For full subscription you will need to provide payment information in the Accounts - Payments section, by adding a credit card, or alternatively subscribing through AWS Marketplace.
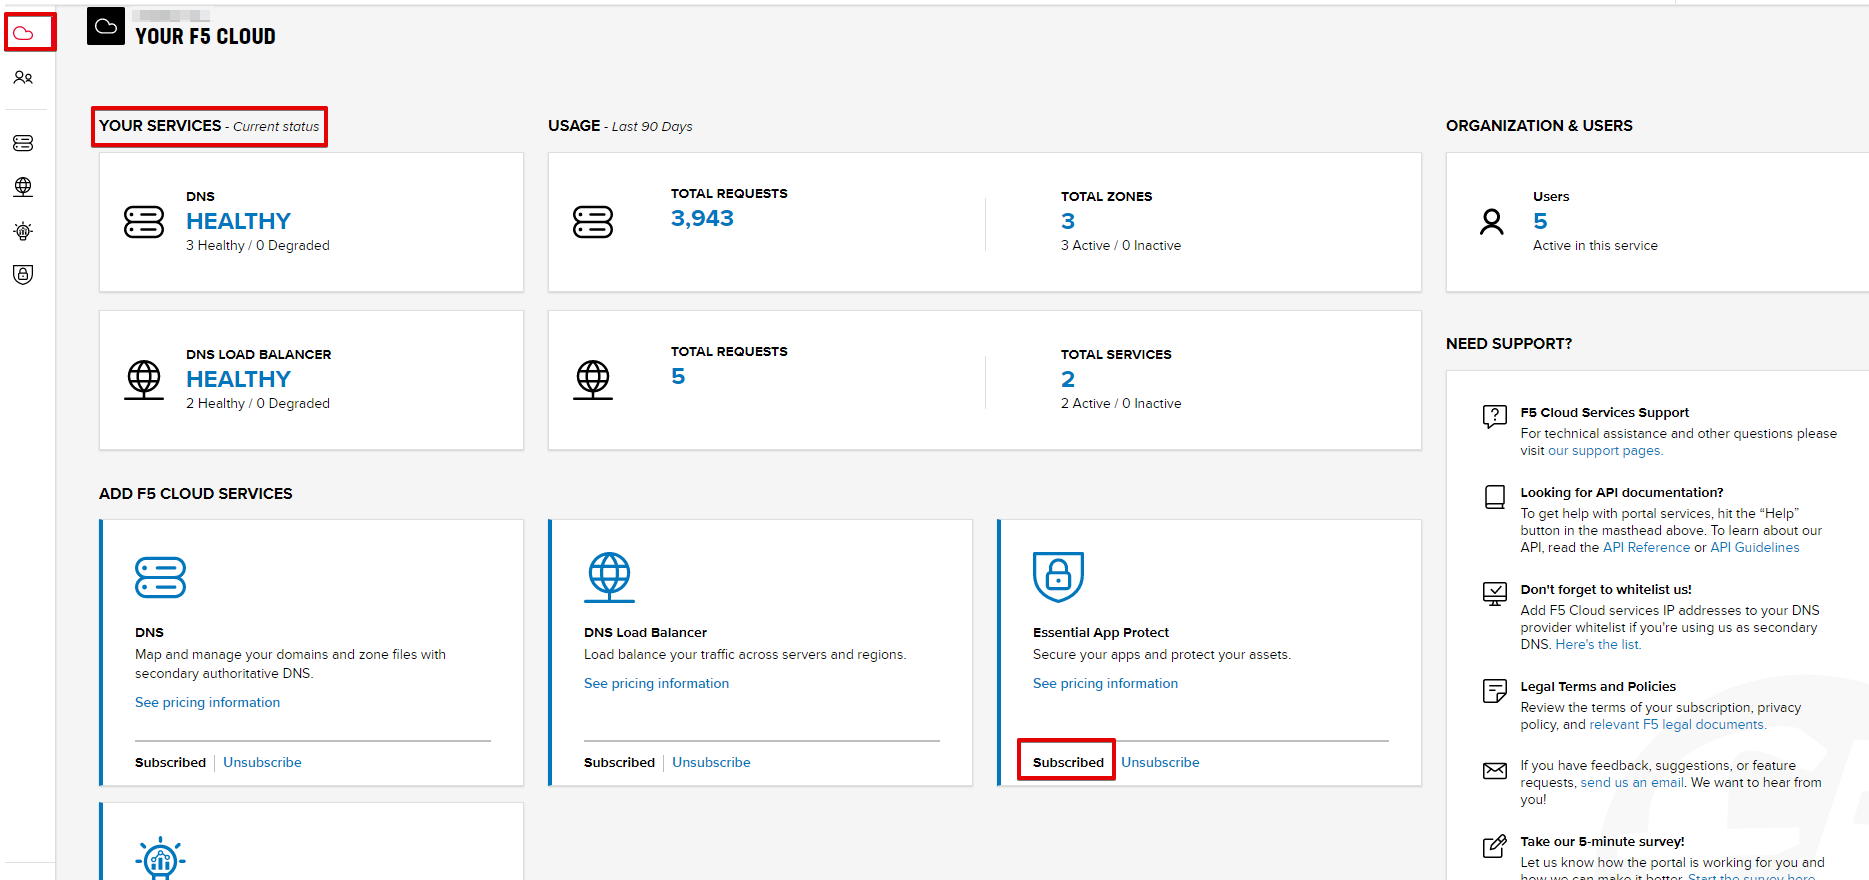
After successfully subscribing, your services will appear in the Your F5 Cloud tab. You will also see their current status.


2. Postman Configuration
a) Download Postman here, open it, create a Postman account if you don’t have one and choose to do so, and sign in.
b) Download collection F5 Cloud Services EAP LAB.postman_collection.json and environment F5 Cloud Services EAP LAB.postman_environment.json for Postman here. Import them to your Postman.

You will now see your collection (left side) with calls in several categories, as well as environment variables (top right).

You are now ready to interface with the F5 Cloud Services using Postman.
3. Fully Qualified Domain Name (FQDN)
In order to create Essential App Protect instance in the F5 Cloud Services portal, you need to have a FQDN. Use Postman and follow the steps below to get FQDN from the Lab service API.
a) Open the “F5 Cloud Services EAP LAB” environment variables by clicking the “Environment Quick Look”, click into the field of the corresponding variable, and type the value of user email in the variable “USER_EMAIL” (click Enter after typing the values).

Repeat the same for the “USER_PASSWORD”.
b) Select the Login request in the sidebar to login to your F5 Cloud Services profile and click Send to get the authorization token. More detailed information on this API request can be found here.

A successful login will result in Postman returning the tokens from the API, shown in the response body below:

These tokens are then stored for subsequent calls using a function inside Postman to set environment variables. You can see the test function in the “Tests” tab:

NOTE: If any of the subsequent Postman calls return a blank response or "status": "unauthorized" response (see the screenshot below), it means your user token has expired and you will need to re-login. To do that you just need to re-send the Login request.

c) Retrieve User ID & Account ID
Select the Get Current User request and click Send to retrieve User ID and Account ID to be used in the further requests.

The response returns the following detail:

The retrieved User ID and Account ID are then stored for subsequent calls.

More detailed information on this API request can be found here.
d) Let’s now retrieve FQDN with the Get FQDN Record type (lab) API call. Click Send. This call will pass your “ACCESS_TOKEN” in the header of the request to the Labs API in order to get a record that will be used to create F5 Essential App Protect instance in the F5 Cloud Services portal. Request:

The response will return your record name, its status, current type and IP.

Note that in subsequent requests record type will be changed to CNAME in order to change DNS settings and let traffic go through Essential App Protect. Record IP will be used by the F5 Cloud Services portal to find the nearest available instance when creating Essential App Protect service.
Sending this request will automatically capture of the Record variables:

This record name will be used for creating Essential App Protect service in the F5 Cloud Services portal, as well as throughout the lab as the domain name for your test applications.
e) Test via Browser
Let's now test our app using the FQDN we have just got. Copy the "record" name from the Postman response and paste into your browser.

You will see your app which is not protected for now and goes directly to its server.

f) Get User Membership to F5 Cloud Services accounts
In Postman, send the Get User Membership (optional) request which returns info on your user’s access to Cloud Services accounts.

You will see account ids, names, roles and other information in the body of response.

Your "account_id" will be retrieved using "account_name" and used in the subsequent requests.

More detailed information on this API request can be found here.
g) Retrieve information on available catalogs and their IDs
Select the Get Catalogs request and click Send to retrieve data about the available Catalogs and their IDs.

You can see available catalogs:

The retrieved IDs are then stored for subsequent calls using a function inside Postman to set environment variables. You can see the test function in the "Tests" tab:

More detailed information on this API request can be found here.
F5 Essential App Protect Service
1. Create F5 Essential App Protect Service via the F5 Cloud Services Portal
a) In order to create Essential App Protect service, open the Get FQDN Record type (lab) request in Postman and copy "record" name in the response.
b) Go to the F5 Cloud Services portal, open the Essential App Protect tab and click Start protecting your app.

c) Paste the record name you copied in step 1.a) above into "Fully Qualified Domain Name (FQDN)" field and click Save & Continue.

Using record IP, the system will look for the nearest instance, gather app endpoint and region detail, show them and ask you to Save & Continue.

As you can see, the endpoint belongs to North America, US East (N. Virginia) and is deployed on Amazon AWS.
d) The system will ask you to provide an SSL/TLS certificate. Let’s tick “I will provide certificate details later” and Save & Continue.

e) Enable all the methods of protection and click Save & Continue. In case you need to update this property, you can do it later in the PROTECT APPLICATION section.

f) Click Done and Essential App Protect service will be created and ready for use.

Note that this process may take some time. You can check the status in the All my applications option of the dropdown menu:

g) Test via Browser
When the system shows that your instance is active, let's test it. Select your instance in the dropdown menu, go to the PROTECT APPLICATION tab, then DNS Settings and copy the CNAME.

Paste it into your browser and you will get to the instance:

Now that your Essential App Protect instance is created, we need to change DNS settings using CNAME and start routing the traffic through Essential App Protect. In order to do that follow the steps below.
2. Update DNS Settings using CNAME
a) Let's test if DNS settings are updated and the traffic is protected by Essential App Protect. In the F5 Cloud Services portal, open the DNS Settings tab in PROTECT APPLICATION and click Test updated DNS.

As you can see, it's not successful. We will update DNS settings using Postman to fix that.
b) Go back to Postman to change the DNS settings. Send the Get EAP Subscription request to get the "subscription_id" and "CNAME" using your "ACCESS_TOKEN".

The response will return all information on your instance which we have created via UI:

The retrieved CNAME will be used to update DNS settings:

More detailed information on this API request can be found here.
c) Send the Update CNAME Record (lab) request to update DNS Settings with CNAME generated when creating Essential App Protect instance in the F5 Cloud Services portal and retrieved in the step above:

The response will show the updated type ("CNAME") and value:

d) Let's now re-send the Get FQDN Record type (lab) request to see the current type of the record.

The response will show that record type is changed from "A" to "CNAME" (see step 3.d) above), as well as "value" is updated, which means that app traffic now goes through Essential App Protect instance and is actively protected.

e) Test CNAME change via UI
Return to the F5 Cloud Services portal, open the Essential App Protect tab, select your app from the dropdown menu and click PROTECT APPLICATION. Then open the DNS Settings tab and click Test updated DNS.

You will see successful status of testing.
f) Test via Browser
Let's now test the updated DNS setting via browser. Return to the F5 Cloud Services portal, open the General tab and copy the FQDN.

Paste it into your browser and you will see the NA2 instance of the Auction website and all of the requests will now be flowing through the Essential App Protect, which means your app is now protected. However, any malicious requests will not be blocked, as we have not turned on "Blocking" mode yet.

3. Review the JSON via UI
If you would like to see the full configuration of your Essential App Protect or edit some properties, you can review the JSON either via UI or via Postman. If you prefer to do that via Postman, then proceed to the next section.
In order to view the JSON via the F5 Cloud Services portal, open PROTECT APPLICATION and go to the JSON configuration tab.

Let's take a look at different sections available in the JSON. In order to collapse or expand a section, click the small arrows next to the line numbers.
The main sections are "application" and "policy".

In the "application" section, we can see our FQDN, region our instance belongs to, IP endpoints and port.

In the "policy" section, we can learn all the information about our protection and its settings, as well as about each attack type.

More detailed information on attack types can be found in Section 5 below.
4. Review the JSON via Postman
If you prefer to use Postman to review the JSON, go back to Postman and send the Get JSON request:

The response will retrieve the JSON containing all the Essential App Protect instance information:

The returned JSON provides some general information on subcription_id, user_id, and instance name, as well as all configuration details (CNAME, FQDN, etc) and protection settings.

More detailed information on this API request can be found here.
5. Attacks
There are three types of attacks:
1) SQL Injection
This attack inserts a SQL query via the input data field in the web application. Such attacks could potentially read sensitive data, modify and destroy it. More detailed information can be found here.
2) Illegal Filetype
This attack combines valid URL path segments with invalid input to guess or brute-force download of sensitive files or data. More detailed information can be found here.
3) Threat Campaign
These types of attacks are the category that F5 Labs tracks as coordinated campaigns that exploit known vulnerabilities. This particular attack simulates using a known Tomcat backdoor vulnerability. The complete list of such threats can be found here.
Let’s now simulate an attack.
Go back to Postman and send the Attack: Illegal Filetype request.

You can see the status of the attack in the VIEW EVENTS section of the F5 Cloud Services portal.

As you see, our "Illegal file type" attack has appeared on the list and its status is "Not blocked" for now.
6. Update Monitoring to Blocking via UI
For now all the threats of your app are only monitored without any actions taken. You can change monitoring to blocking both via the F5 Cloud Services portal and via Postman. Let's change monitoring to blocking for High-risk Attack Mitigation via the F5 Cloud Services portal, and for Malicious IP and Threat Campaigns via Postman in the next section.
a) In order to start blocking attacks, go to the PROTECT APPLICATION tab, then open High-risk Attack Mitigation and toggle Blocking Mode on. Click Update:

b) Testing the status
Now that the protection mode is "blocking" for High-risk Attack Mitigation, you can re-send the Attack: Illegal Filetype request in Postman. After that go back to the F5 UI, open VIEW EVENTS and you will see the new attack with the "Blocked" status:

Note that its status is also updated in the PROTECT APPLICATION data card.
7. Update Monitoring to Blocking via Postman
Let's now change monitoring to blocking for Malicious IP and Threat Campaigns via Postman.
a) Go back to Postman and send the Update Monitor to Block request which uses your “account_id” and "EAP record" retrieved a few steps above.

You will see the updated "blocked" status of attacks in the response.

You can also notice that their status changed in the F5 UI:

More detailed information on this request can be found here.
b) Testing the status
Now that the protection mode is "blocking" for all the attacks, you can send the Attack: Threat Campaign request in Postman:

Also send the Attack: SQL Injection request:

After that go back to the F5 UI, open VIEW EVENTS and you will see the new attacks with the "Blocked" status:

8. Geolocation Enforcement via UI
You can create a list of countries traffic from which will be blocked via UI or via Postman. If you prefer to do so via Postman, proceed to the next section.
a) Go back to the F5 Cloud Services portal, the PROTECT APPLICATION tab, then go to High-risk Attack Mitigation and click Deny requests from specific countries. This will activate the Manage countries button.

b) Now click the Manage countries button:

c) Let's add France as a country whose requests you want to deny and click Update.

d) If you prefer to deny requests from OFAC-sanctioned countries without creating your own list, just tick the option in the F5 Cloud Servcies portal and Update.

9. Geolocation Enforcement via Postman
a) If you would like to block requests on a country-basis via Postman, then send the Block country list request which will use your "account_id" and "EAP record":

The response will show the countries blocked:

More detailed information on this request can be found here.
b) Let's now go to the F5 Cloud Services portal and see the updated geolocation enforcement:

Click Manage countries to see the countries that are blocked:

c) Let's test how country-base blocking works. Go back to Postman and send the Test Country Blocking (lab) request which uses your "EAP record".

Let's open the F5 UI and go to VIEW EVENTS section to see the newly blocked attack based on geolocation:

10. Update IP Enforcement Rules via UI
If you need to block specific IP addresses or add them to the whitelist, you can do it in two ways: via Postman or UI. If you prefer to do it via Postman, then proceed to the next section. If your choice is UI, then follow the steps below:
a) Go to PROTECT APPLICATION-> the High-risk Attack Mitigation tab and click Manage rules.

b) Add "34.229.48.248" IP for blocking and "77.120.157.224" IP to the whitelist. Add a short description for each, tick those which you prefer to be logged and click Update.

11. Update IP Enforcement Rules via Postman
a) Go to Postman and send the Update IP Enforcement Rules request which uses your "account_id" and "EAP record".

In the response you will see four blocked and one allowed IPs.

More detailed information on this request can be found here.
12. Customize Blocked Page
If you prefer to customize your blocked page acc to your wish, you can do it using Postman.
a) First, let's see the page prior to sending the request. To do that, let's simulate an attack via the browser. Paste "Fully Qualified Domain Name (FQDN)/nginx.config" address to your browser. The result will be the following:

b) Go back to Postman and send the Customize blocked page request which uses your account_id and EAP record.

c) Refresh the page in the browser opened one step above and you will see:

Note: It may take some time due to updating the service.
13. Add New Endpoints
Let's imagine your website is to function both in the USA and in Europe which requires two endpoints. But for now, you have only one IP endpoint added to Essential App Protect - North America, US East (N. Virginia).

If you need to add the second one, say, in Europe, you can do it via Postman.
Send the Add new endpoints request in Postman:

You will see the Endpoint added in the returned response located in Europe and deployed on AWS:

More detailed information on this request can be found here.
You will also see the new endpoint in the F5 Cloud Services portal:

Note that this operation may take up to a few minutes due to its deployment.
14. Test New Endpoint via Postman
Let's now test the endpoint we've just created via Postman.
Send the Test Second Endpoint (lab) request:

Here's what you should see in the response:

15. Attacks via Browser
Let's now simulate some attacks via browser and follow them in the dashboard of the F5 Cloud Services portal.
a) In order to simulate Illegal File type, paste "Fully Qualified Domain Name (FQDN)/nginx.config" address to your browser and the page will be blocked:

Now let's go back to the F5 Cloud Services portal and see the dashboard with the new attack:

You can see the type of attack and some more detailed information in the VIEW EVENTS tab:

b) Let's now simulate SQL Injection attack via browser and our "BuyTime Auction" app. Copy your FQDN from the F5 Cloud Services portal and paste to your browser.

Fill in ' OR 1=1; ' as login and fill in any password. Click Login.

And you will see that SQL Injection attack is blocked.

You can see the details of this attack in the VIEW EVENTS tab in the F5 Cloud Services portal:

16. Check the Map
Now let’s see the map of our attacks on the F5 Cloud Services portal. You need to select the MONITOR APPLICATION tab where you will see the dashboard.
You can see our latest attacks on the map:

If you wish to see more detailed information, you can hover over a specific attack and its information will appear:

To the left of the map, you can see the legend showing the number of application endpoints and their details, as well as different types of attacks shown on the map.

The yellow lines on the map show the attacks within the last five minutes.
17. Start Attacks via Postman
a) Let’s now return to Postman and simulate the attacks by sending the Start EAP Attack (lab) request.

And the response will be "ok" which means that attacks have been activated:

b) Check the map
Let’s go back to the F5 Cloud Services portal and check the map in the MONITOR APPLICATION tab.
You can see our two endpoints and the latest attacks on the map:

If an endpoint is being attacked at the moment, the type of attack is shown over it. You can see it by hovering over:

In MONITOR APPLICATION you will find information on malicious requests received by the application. The histogram shows the history of malicious activity over the last two hours in five-minute increments. The donut chart shows the percentage of malicious requests blocked during the last time period as well as the specific numbers of blocked and not blocked requests.

In case you need to zoom in some cluster of attacks, just click on an attack cluster and the map will be zoomed in:

18. View Events via Postman
Now return to Postman to get more detailed information on the simulated attacks. Send the Get EAP Events Stream request which uses “subscription_id” and “service_instance_id”.

You can see different attack characteristics in the response, including number, type, country, source IPs, etc.

More detailed information on this request can be found here.
19. View Events via UI
You can also see the attacks via UI. All the detailed information can be found in the VIEW EVENTS tab of the F5 Cloud Services portal.

You can also set some specific rules for each attack and its IP individually:

20. Specify SSL Certificate via Postman
When creating Essential App Protect instance in one of the steps above, we skipped providing an SSL/TLS certificate. Let's now get and implement it via Postman.
a) Let's send the Get SSL Certificate (lab) request:

You will get the certificate information in the response:

The retrieved certificate details are then stored for subsequent calls using a function inside Postman. You can see the test function in the Tests tab:

b) Now we'll upload the certificate to the F5 Cloud Services portal. In order to do that, send the Upload SSL Certificate request:

The response will return the certificate ID which will be used for updating the certificate in the portal:

c) The next step will associate the certificate with the Essential App Protect app. In order to do that, send the Update EAP SSL Certificate request from Postman which uses certificate ID retrieved above:

The response shows all the information regarding instance the certificate is connected to:

d) Now we need to restart our instance for the certificate to become active.
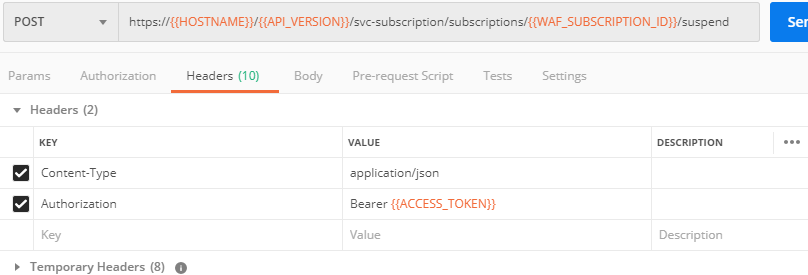
1. In order to do that, go back to Postman and send the Suspend EAP Subscription request:
In the response you will see new "disabled" status:

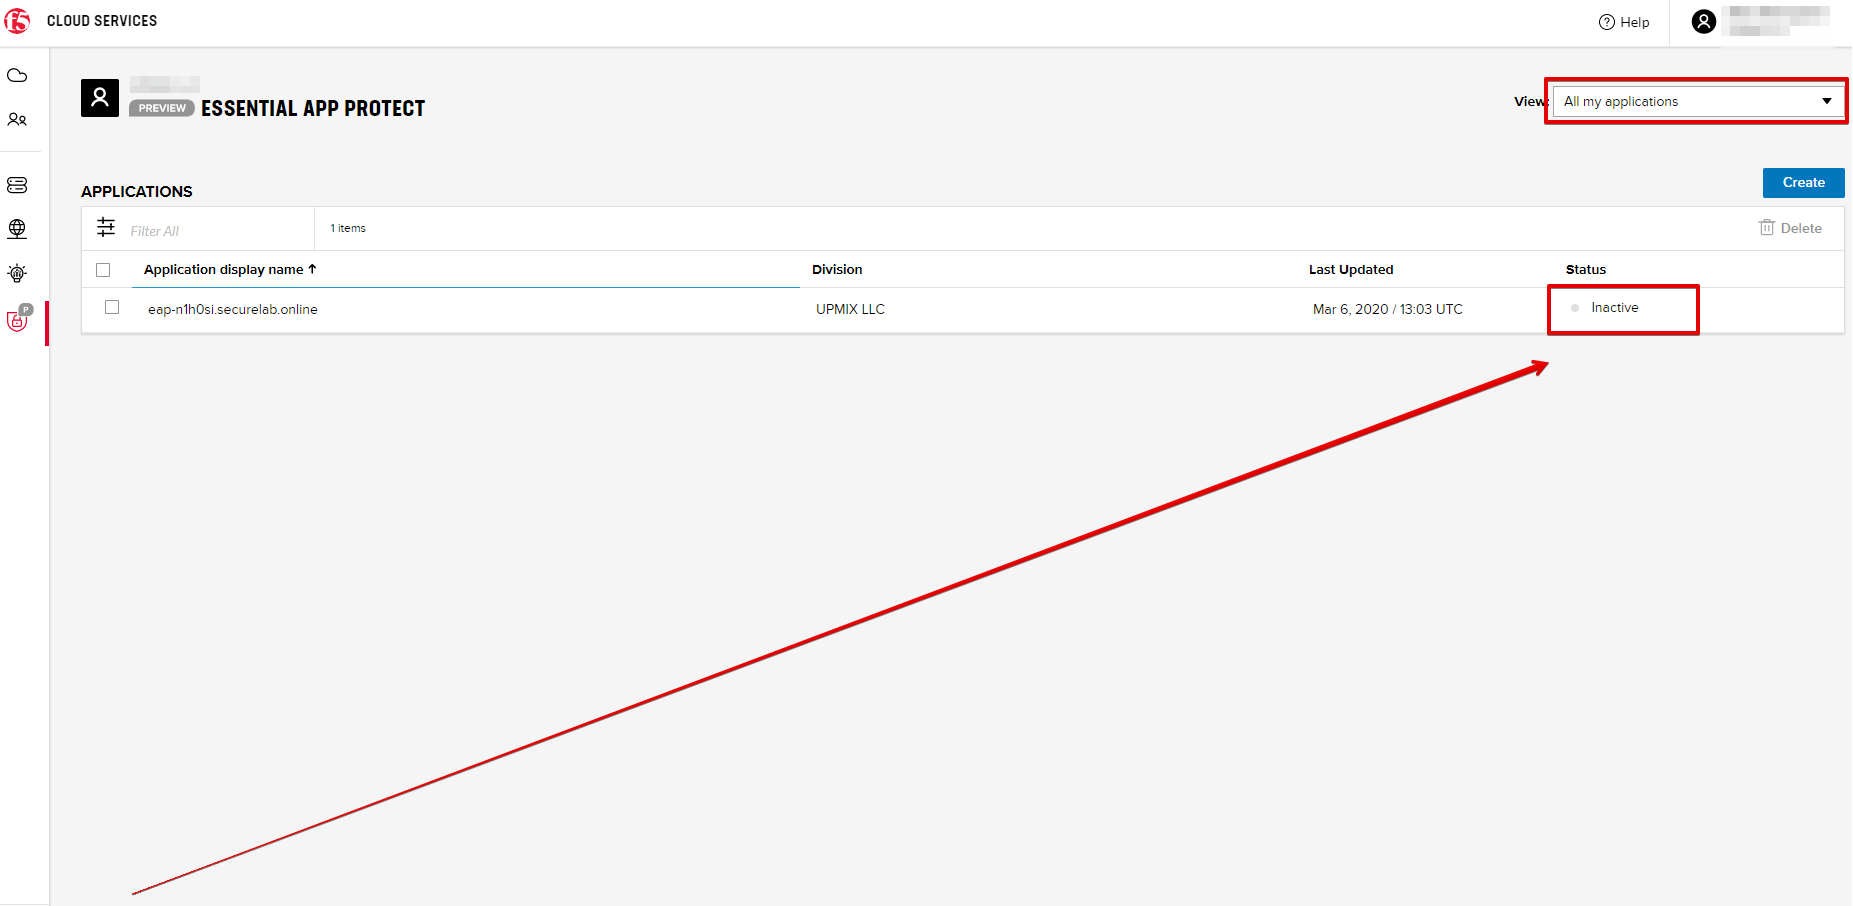
Note that this operation may take some time. Proceed to the next step after the status of your instance is changed to "Inactive" in the F5 Cloud Services portal. The status can be seen in the All my applications option of the dropdown menu.
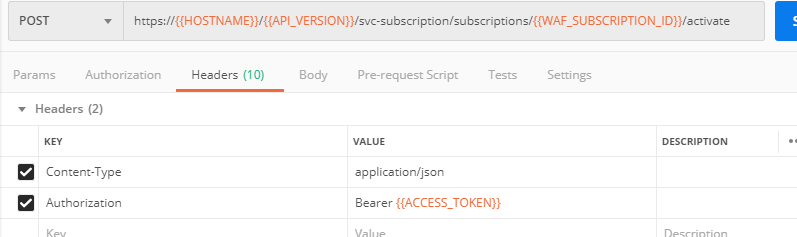
2. Let's now activate the service with the SSL certificate. Send the Activate EAP Subscription request:
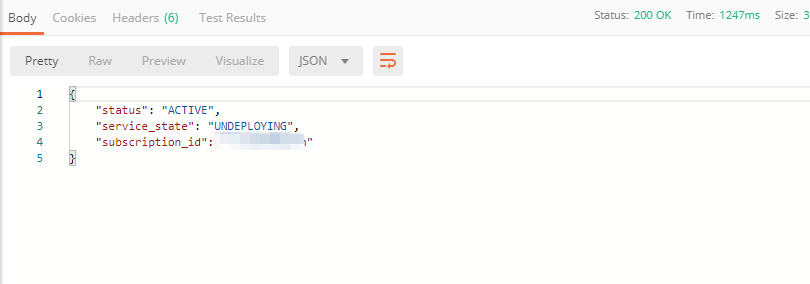
And the response will return the updated status:
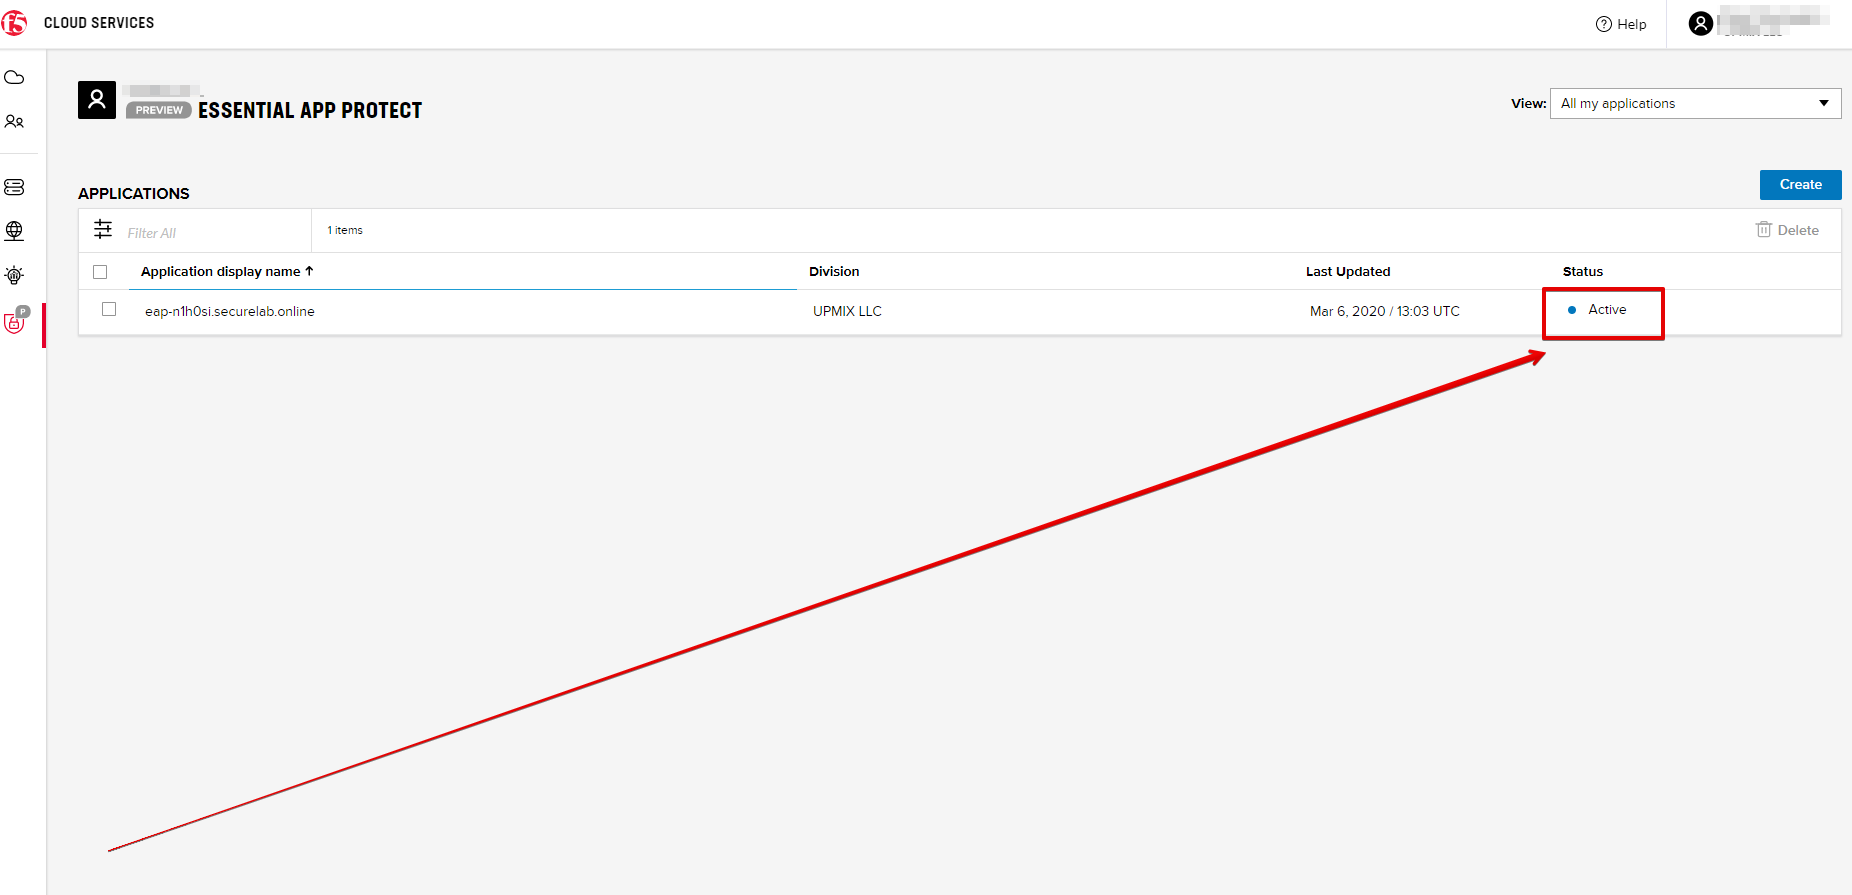
Note that this operation may take some time. Proceed to the next step after the status of your instance is changed to "Active" in the F5 Cloud Services portal. The status can be seen in the All my applications option of the dropdown menu.


e) Check SSL Certificate via UI
Let's now check the certificate via UI. Open PROTECT APPLICATION and go to the General tab. You will see the uploaded and updated certificate:

f) Now we can check our "BuyTime Auction" app with the SSL certificate via browser. Copy your FQDN from the General tab in the F5 Cloud Services portal and paste to your browser starting with "https://".

You can see that the connection is safe. Now let's click the Certificate and see its details:

Clean Up
At this point feel free to explore and repeat any of the previous steps of the lab, but should you want to clean up the resources you've created and remove your services, then follow the steps below.
1. Clean Up via Postman
a) In order to clean up Essential App Protect instance we've created and remove the subscription, send the Retire EAP Subscription request which uses the relevant “subscription_id”:

You will see “retired” status in the response body which means that it’s not available on the F5 Cloud Services portal anymore.

More detailed information on these API requests can be found here.
b) Change Essential App Protect Record type
Let's send the Reset EAP Record (lab) request to change record type from CNAME to A back:

The request will show the reset type and IP value:

2. Clear Tokens from the Lab Service API
We recommend that you clear your tokens from the Lab Service API for security purposes. In order to do that, send the Logout request, which uses your ACCESS_TOKEN:

You will get the following response with the status showing "200 OK":

Your ACCESS_TOKEN will be considered invalid:

More detailed information on these API requests can be found here.