The pedestrian counter uses a thermal camera to count pedestrians by sensing human body heat and applying computer vision algorithm, and it transmits the counting data through (LoRa) low power and long-range wireless network.
-
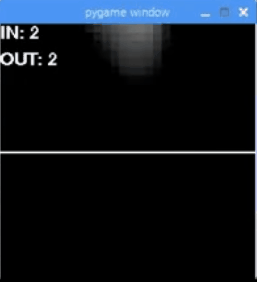
Single running speed pedestrian
-
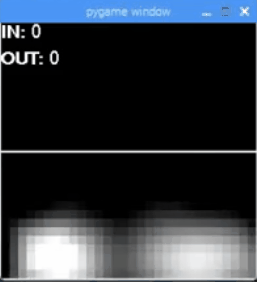
Two pedestrian walking same direction
-
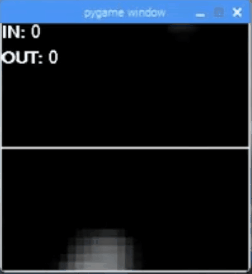
Two pedestrian walking opposite direction


-
./start_csv.sh /path/to/python_virtualenv: CSV data saving mode, saves counting data to csv file locally. For example, /path/to/python_virtualenv is ped-detector -
./start_data_save.sh /path/to/python_virtualenv: Video saving mode, records and saves video locally from the pygame window (for debugging) -
./start_mysql.sh /path/to/python_virtualenv: WiFi(Mysql database) mode, connects to network through WiFi, connects to Mysql Database, inserts count data to the database. (Put the database config in mysql_config.json) -
./start.sh path/to /path/to/venv: LoRa mode, connects to the LoRaWAN Network, sends the count data through uplink messages. (Put the LoRa config in dragino.ini.default)
Create the service Unit File by copying the content of file pedestrian-counter.service.txt to pedestrian-counter.service and then copy the Unit File to /etc/systemd/system folder and give it permissions by running:
sudo cp pedestrian-counter.service /etc/systemd/system/pedestrian-counter.service
sudo chmod 644 /etc/systemd/system/pedestrian-counter.service
Once you have a unit file, you are ready to test the service:
sudo systemctl start pedestrian-counter.service
Check the status of the service:
sudo systemctl status pedestrian-counter.service
The service can be stopped or restarted using standard systemd commands:
sudo systemctl stop pedestrian-counter.service
sudo systemctl restart pedestrian-counter.service`
Finally, use the enable command to ensure that the service starts whenever the system boots:
sudo systemctl enable pedestrian-counter.service
├── dragino.ini.default: LoRa config file for the dragino LoRa Hat module, used in LoRa Mode
├── mysql_config.json: config file for the Mysql database, used in WiFi mode
├── pedestrian-counter.service.txt: linux service file for auto-start
│
├── start_csv.sh: CSV data saving mode start scipt
├── start_data_save.sh: Video saving mode start scipt
├── start_mysql.sh: WiFi(Mysql database) mode start scipt
├── start.sh: : LoRa mode start scipt
│
├── src
│   ├── plot_hourly_bar_graph.py: plotting script
│   ├── plot_hourly_line_graph.py: plotting script
│
│   ├── thermal_save_csv.py: CSV data saving mode source code
│   ├── thermal_save_mysql.py: WiFi(Mysql database) mode source code
│   ├── thermal_save.py: Video saving mode source code
│   ├── thermal_tracker.py: LoRa mode source code
│
│   ├── CentroidTracker.py: object detection/tracking library
│   └── trackableobject.py: object detection/tracking library
│
│   * * *
│   the following are from LoRaWAN library for Dragino LoRa Hat, https://github.com/computenodes/dragino
│   ├── dragino
│   ├── setup.py
│   ├── test.py
│   ├── MANIFEST.in
│   ├── overlay
│   │   └── spi-gpio-cs-overlay.dts
│   * * *
│
├── documents
│   └── images: demo gifs used in README
│       ├── pedestrian-counter-fast.gif
│       ├── pedestrian-counter-opposite-direction.gif
│       └── pedestrian-counter-same-direction.gif
├── LICENSE
├── README.md
└── requirements.txt
Use the latest Github release, dowload all the attached zip files and unzip to get .img file. Use Win32DiskImager to write the .img file to the SD card.
The image includes the pedestrian counter and Raspbian, put your credentials in the config files to use. Rpi deafult username: pi, default passwd: raspberry
Ensure you are using virtualenv, as it makes these dependencies so much easier to manage. create virtual environment with
python3 -m venv /path/to/new/virtual/environment
Setting up the development environment for working with ped-counter requires multiple dependencies.
Run the following in a shell to install them:
sudo apt-get update
sudo apt-get install python-opencv
sudo apt-get install python-matplotlib
sudo apt-get install python-gi python-gi-cairo python3-gi python3-gi-cairo gir1.2-gtk-3.0
sudo apt-get install libqtgui4git clone https://github.com/adafruit/Adafruit_AMG88xx_python.git
cd Adafruit_AMG88xx_python
python setup.py installThen, check setup success from the python cli interpreter
import Adafruit_AMG88xxsudo apt-get install build-essential cmake pkg-config
sudo apt-get install libjpeg-dev libtiff5-dev libjasper-dev libpng12-dev
sudo apt-get install libavcodec-dev libavformat-dev libswscale-dev libv4l-dev
sudo apt-get install libxvidcore-dev libx264-dev
sudo apt-get install libgtk2.0-dev libgtk-3-dev
sudo apt-get install libatlas-base-dev gfortransudo apt-get install python2.7-dev python3-devGrab the most recent version of OpenCV from their repo. Feel free to use something more recent than 3.4.2.
cd ~
wget -O opencv.zip https://github.com/opencv/opencv/archive/3.4.2.zip
unzip opencv.zip
After extracting the Open CV source, we need to create a new Python3 environment.
virtualenv -p python3 opencv-env
source opencv-env/bin/activate
Ensure you are using the new opencv-env environment and switch to the OpenCV source directory.
cd ~/opencv-3.4.2/
mkdir build
cd build
cmake -D CMAKE_BUILD_TYPE=RELEASE \
    -D CMAKE_INSTALL_PREFIX=/usr/local \
    -D INSTALL_PYTHON_EXAMPLES=ON \
    -D BUILD_EXAMPLES=ON ..
The guide referenced in this wiki mentions something important: ensure the output of the last command makes sense. Specifically, ensure cmake knows where your python interpreter is.
{INSERT PYTHON CLI IMAGE HERE}
Open /etc/dphys-swapfile and increase the CONF_SWAPSIZE to 1024.
Then, restart the service:
sudo /etc/init.d/dphys-swapfile stop
sudo /etc/init.d/dphys-swapfile start
Finally, we're ready to compile Open CV for our environment. This takes ~1.5 hours.
make -j4Now install the built package. Run this from inside the build folder.
sudo make install
sudo ldconfig
After running make install , your OpenCV + Python bindings should be installed in /usr/local/lib/python3.5/site-packages. According to some, the shared library that is generated from Open CV's compilation is icorrectly named. Rename cv2.cpython-35m-arm-linux-gnueabihf.so to cv2.so.
Now we need to add a sym link between the global Python install, and the virtual env for our project.
ln -s /usr/local/lib/python3.5/site-packages/cv2.so ${PATH_TO_VENV_SITE_PACKAGES}/cv2.soTo verify the install worked, from your virtual environment, run the Python interpreter. Import cv2 and check cv2.version.
The final thing to do is to clean up the swap size. Leaving it large can reduce the lifespan of your storage. Same as last time, restart the service.
https://www.pyimagesearch.com/2017/09/04/raspbian-stretch-install-opencv-3-python-on-your-raspberry-pi/ In the future, also build opencv-contrib from source? https://github.com/opencv/opencv_contrib
Object tracking algorithom from https://www.pyimagesearch.com/2018/08/13/opencv-people-counter/
Blob detection algorithom from https://www.learnopencv.com/blob-detection-using-opencv-python-c/
LoRaWAN library for Dragino LoRa Hat from https://github.com/computenodes/dragino