


Visually simulate Git operations in your own repos with a single terminal command.
This generates an image (default) or video visualization depicting the Git command's behavior.
Command syntax is based directly on Git's command-line syntax, so using git-sim is as familiar as possible.
Example: $ git-sim merge <branch>
- Visualize Git commands to understand their effects on your repo before actually running them
- Prevent unexpected working directory and repository states by simulating before running
- Share visualizations (jpg image or mp4 video) of your Git commands with your team, or the world
- Save visualizations as a part of your team documentation to document workflow and prevent recurring issues
- Create static Git diagrams (jpg) or dynamic animated videos (mp4) to speed up content creation
- Help visual learners understand how Git commands work
- Combine with bundled command git-dummy to generate a dummy Git repo and then simulate operations on it
- Run a one-liner git-sim command in the terminal to generate a custom Git command visualization (.jpg) from your repo
- Supported commands:
log,status,add,restore,commit,stash,branch,tag,reset,revert,merge,rebase,cherry-pick - Generate an animated video (.mp4) instead of a static image using the
--animateflag (note: significant performance slowdown, it is recommended to use--low-qualityto speed up testing and remove when ready to generate presentation-quality video) - Choose between dark mode (default) and light mode
- Specify output formats of either jpg, png, mp4, or webm
- Combine with bundled command git-dummy to generate a dummy Git repo and then simulate operations on it
- Animation only: Add custom branded intro/outro sequences if desired
- Animation only: Speed up or slow down animation speed as desired
Note: If you prefer to install git-sim with Docker, skip steps (1) and (2) here and jump to the Docker installation section below, then come back here to step (3).
-
Install Manim and its dependencies for your OS / environment:
-
Install
git-sim:
$ pip3 install git-simNote: For MacOS, it is recommended to NOT use the system Python to install Git-Sim, and instead use Homebrew to install a version of Python to work with Git-Sim. Virtual environments should work too.
- Browse to the Git repository you want to simulate Git commands in:
$ cd path/to/git/repo- Run the program:
$ git-sim [global options] <subcommand> [subcommand options]Optional: If you don't have an existing Git repo to simulate commands on, use the bundled git-dummy command to generate a dummy Git repo with the desired number of branches and commits to simulate operations on with git-sim:
$ git-dummy --name="dummy-repo" --branches=3 --commits=10
$ cd dummy-repo
$ git-sim [global options] <subcommand> [subcommand options]
Or if you want to do it all in a single command:
$ git-dummy --no-subdir --branches=3 --commits=10 && git-sim [global options] <subcommand> [subcommand options]-
Simulated output will be created as a
.jpgfile. Output files are named using the subcommand executed combined with a timestamp, and by default are stored in a subdirectory calledgit-sim_media/. The location of this subdirectory is customizable using the command line flag--media-dir=path/to/output. Note that when the--animateglobal flag is used, render times will be much longer and a.mp4video output file will be produced. -
For convenience, environment variables can be set for any global command-line option available in git-sim. All environment variables start with
git_sim_followed by the name of the option.
For example, the --media-dir option can be set as an environment variable like:
$ export git_sim_media_dir=~/DesktopSimilarly, the --speed option can be set like:
$ export git_sim_speed=2Boolean flags can be set like:
$ export git_sim_light_mode=trueIn general:
$ export git_sim_option_name=option_valueExplicitly specifying options at the command-line takes precedence over the corresponding environment variable values.
- See global help for list of global options/flags and subcommands:
$ git-sim -h- See subcommand help for list of options/flags for a specific subcommand:
$ git-sim <subcommand> -h- Python 3.7 or greater
- Pip (Package manager for Python)
- Manim (Community version)
Basic usage is similar to Git itself - git-sim takes a familiar set of subcommands including "log", "status", "add", "restore", "commit", "stash", "branch", "tag", "reset", "revert", "merge", "rebase", "cherry-pick", along with corresponding options.
$ git-sim [global options] <subcommand> [subcommand options]The [global options] apply to the overarching git-sim simulation itself, including:
--light-mode: Use a light mode color scheme instead of default dark mode.
--animate: Instead of outputting a static image, animate the Git command behavior in a .mp4 video.
--media-dir: The path at which to store the simulated output media files.
-d: Disable the automatic opening of the image/video file after generation. Useful to avoid errors in console mode with no GUI.
--reverse, -r: Display commit history in the reverse direction.
--img-format: Output format for the image file, i.e. jpg or png. Default output format is jpg.
--stdout: Write raw image data to stdout while suppressing all other program output.
Animation-only global options (to be used in conjunction with --animate):
--video-format: Output format for the video file, i.e. mp4 or webm. Default output format is mp4.
--speed=n: Set the multiple of animation speed of the output simulation, n can be an integer or float, default is 1.5.
--low-quality: Render the animation in low quality to speed up creation time, recommended for non-presentation use.
--show-intro: Add an intro sequence with custom logo and title.
--show-outro: Add an outro sequence with custom logo and text.
--title=title: Custom title to display at the beginning of the animation.
--logo=logo.png: The path to a custom logo to use in the animation intro/outro.
--outro-top-text: Custom text to display above the logo during the outro.
--outro-bottom-text: Custom text to display below the logo during the outro.
The [subcommand options] are like regular Git options specific to the specified subcommand (see below for a full list).
The following is a list of Git commands that can be simulated and their corresponding options/flags.
Usage: git-sim log
- Simulated output will show the most recent 5 commits on the active branch by default
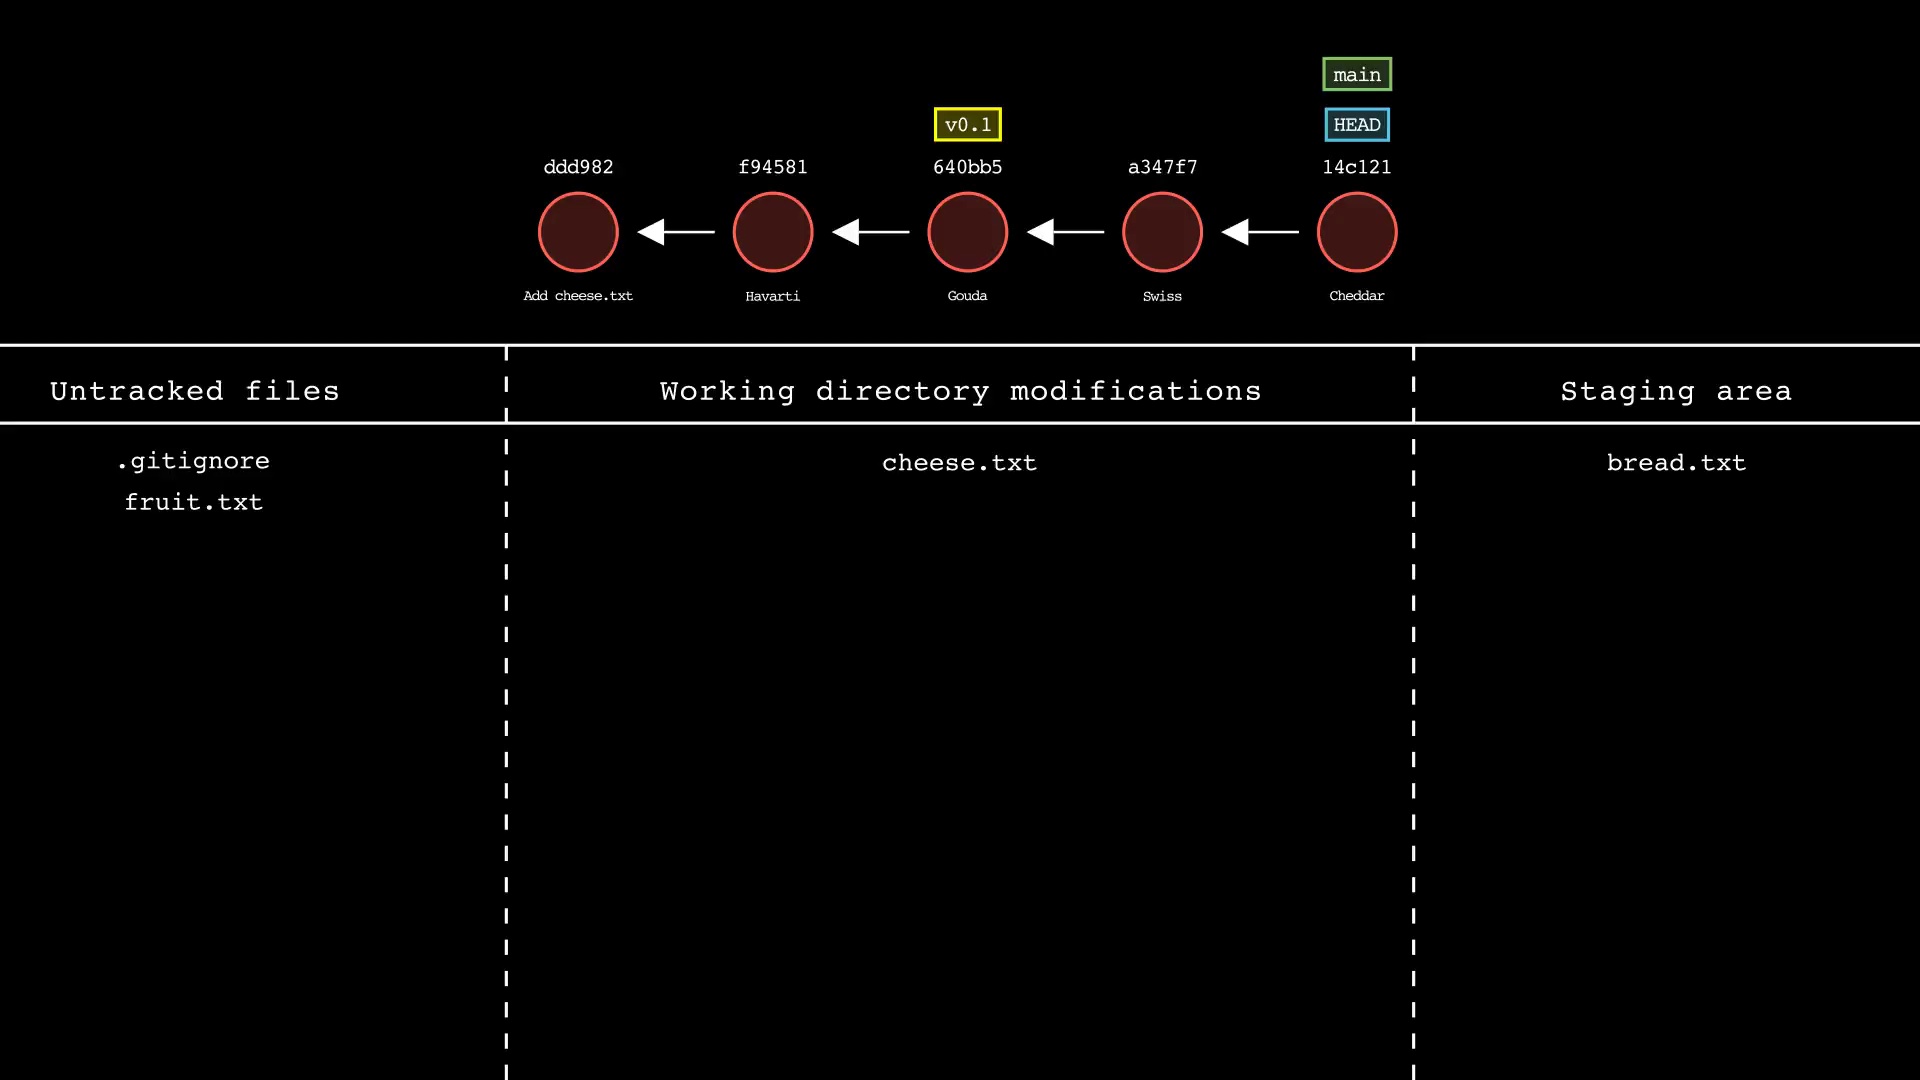
Usage: git-sim status
- Simulated output will show the state of the working directory, staging area, and untracked files
- Note that simulated output will also show the most recent 5 commits on the active branch
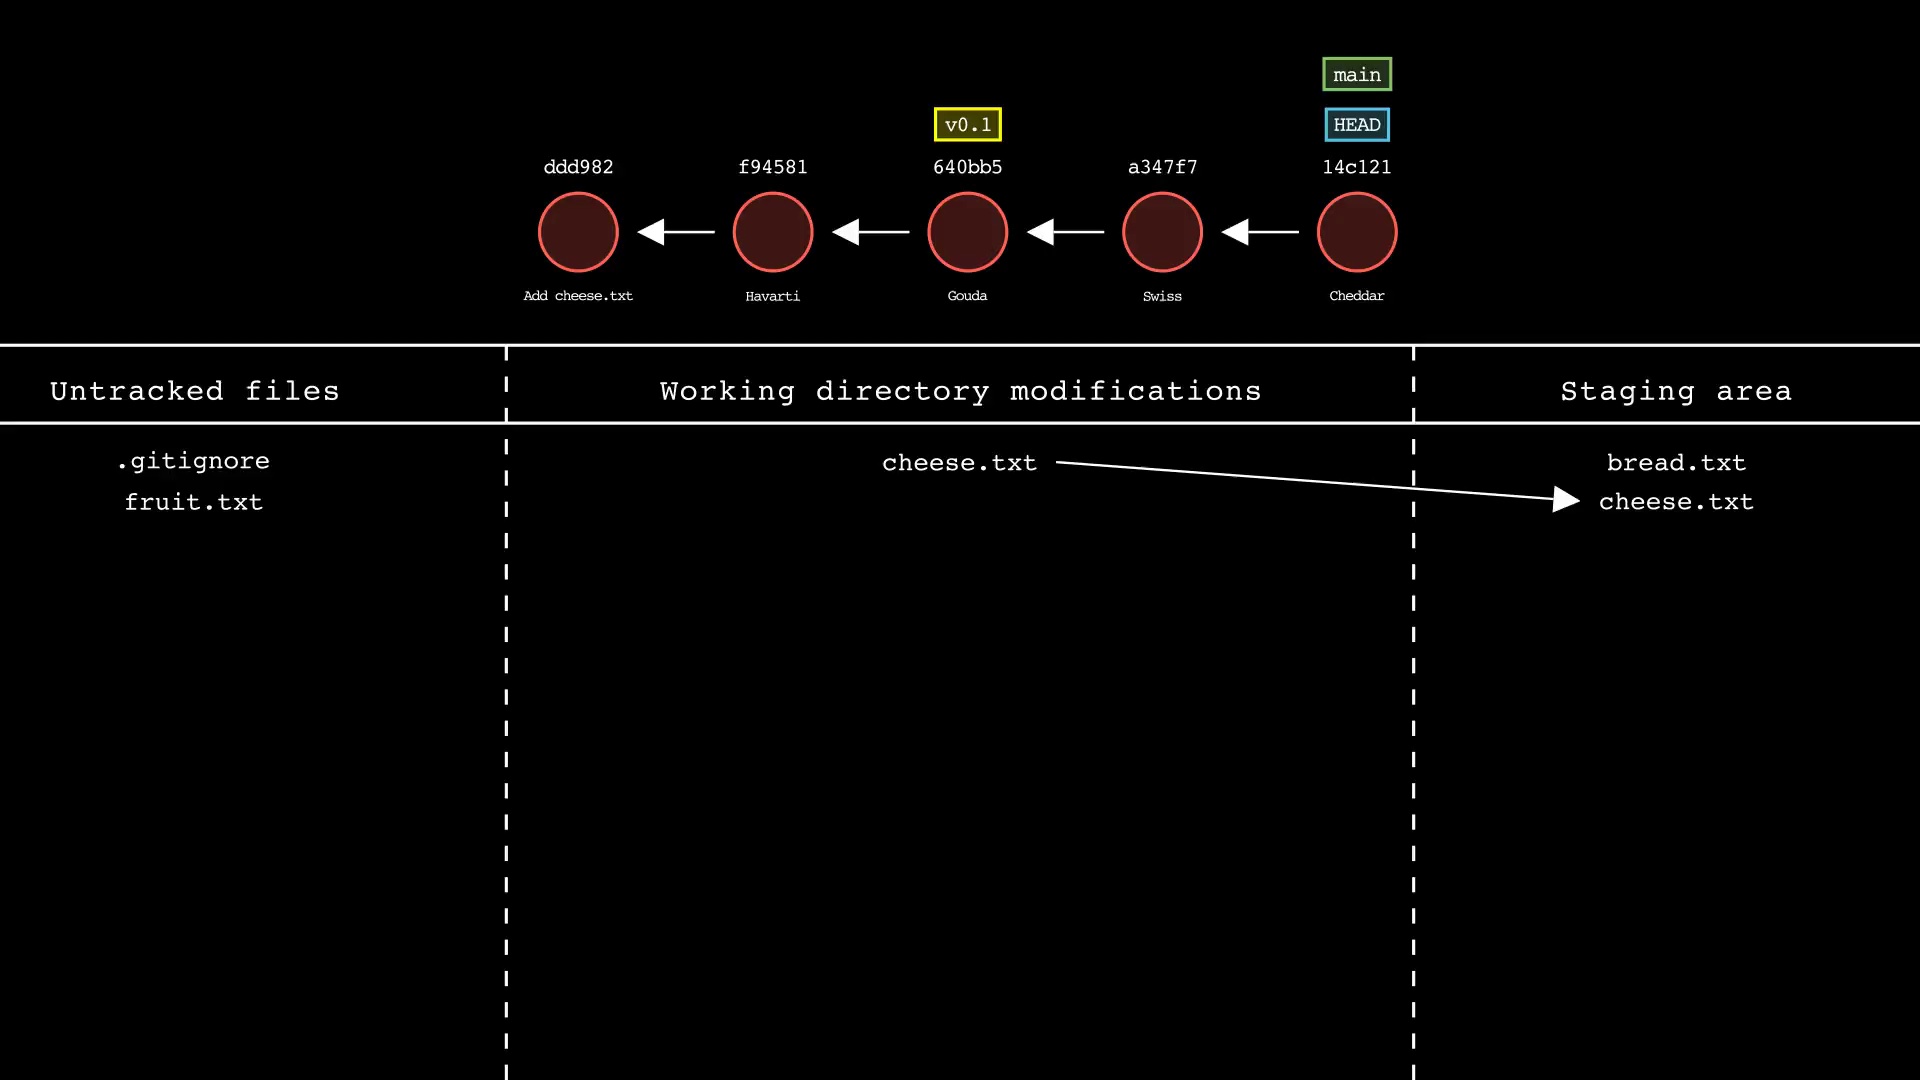
Usage: git-sim add <file 1> <file 2> ... <file n>
- Specify one or more
<file>as a modified working directory file, or an untracked file - Simulated output will show files being moved to the staging area
- Note that simulated output will also show the most recent 5 commits on the active branch
Usage: git-sim restore <file 1> <file 2> ... <file n>
- Specify one or more
<file>as a modified working directory file, or staged file - Simulated output will show files being moved back to the working directory or discarded changes
- Note that simulated output will also show the most recent 5 commits on the active branch
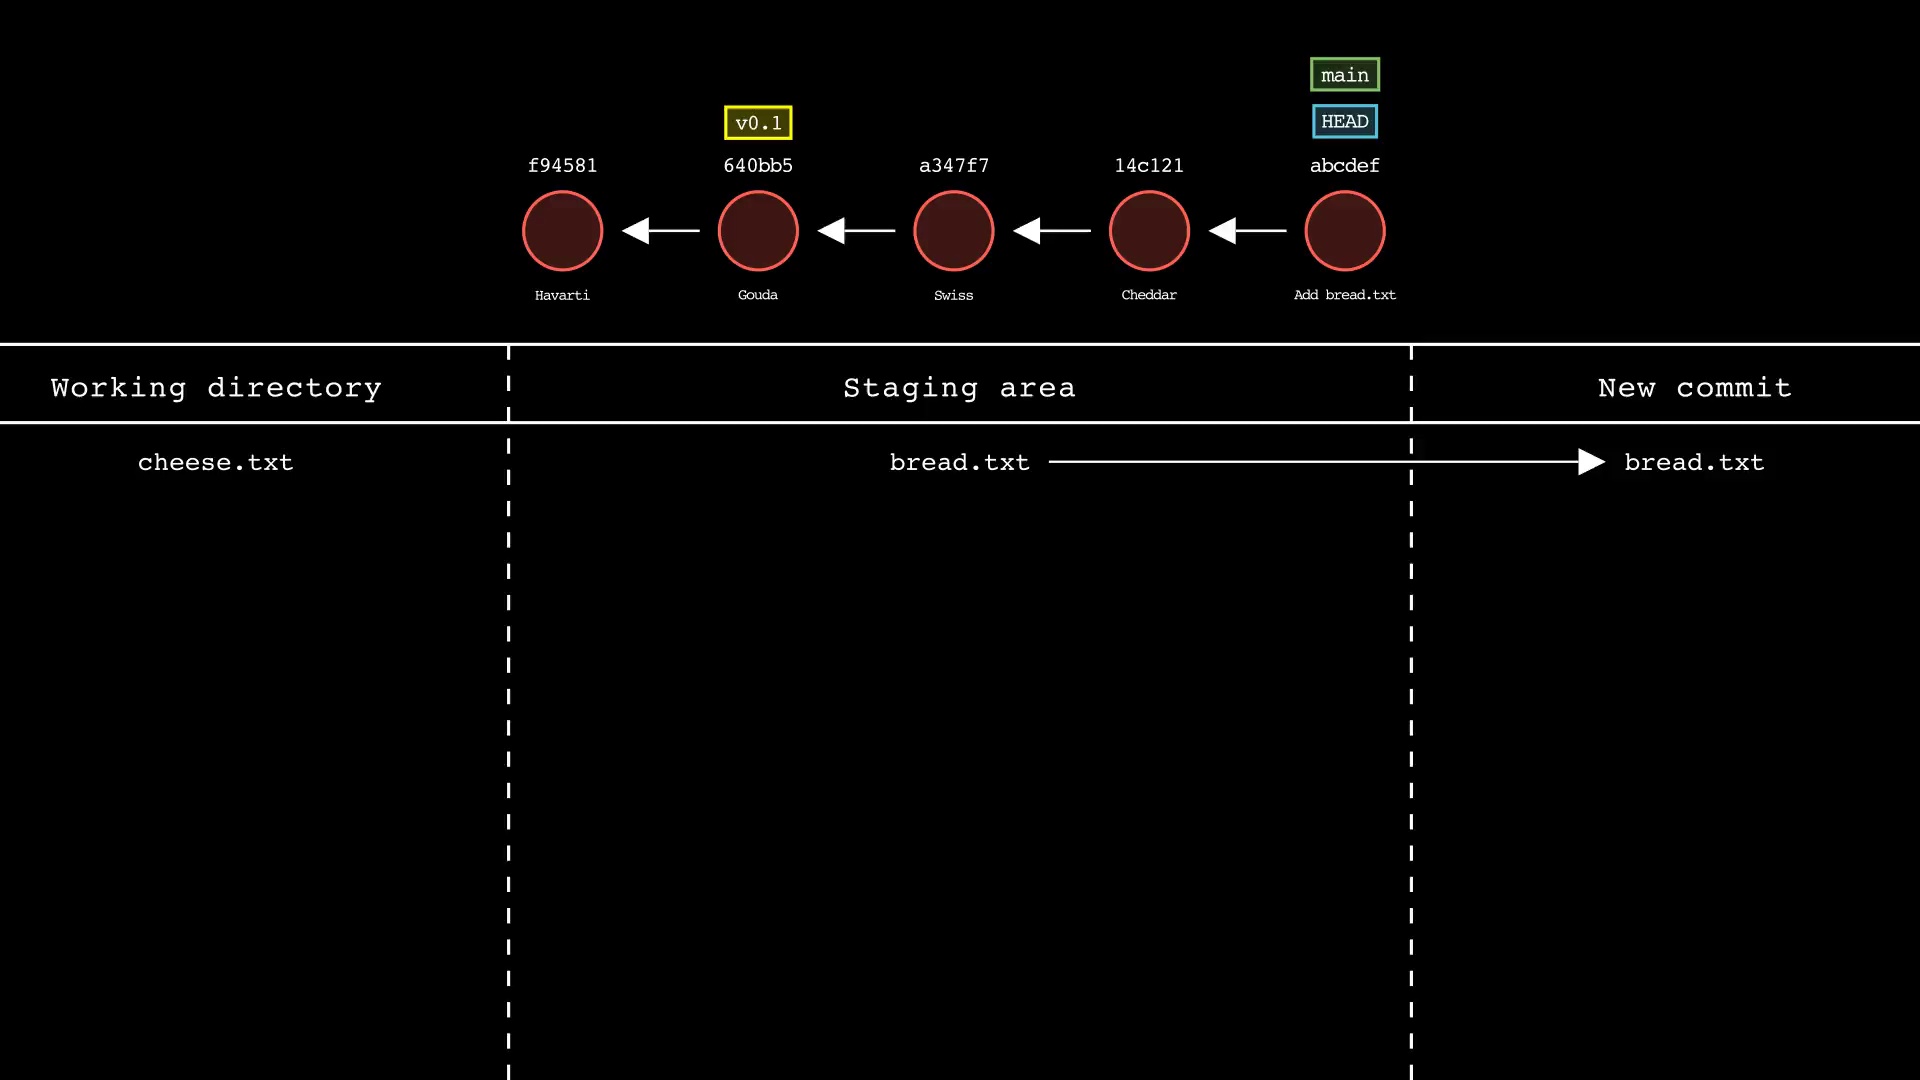
Usage: git-sim commit -m "Commit message"
- Simulated output will show the new commit added to the tip of the active branch
- Specify your commit message after the -m option
- HEAD and the active branch will be moved to the new commit
- Simulated output will show files in the staging area being included in the new commit
- Supports amending the last commit with:
$ git-sim commit --amend -m "Amended commit message"
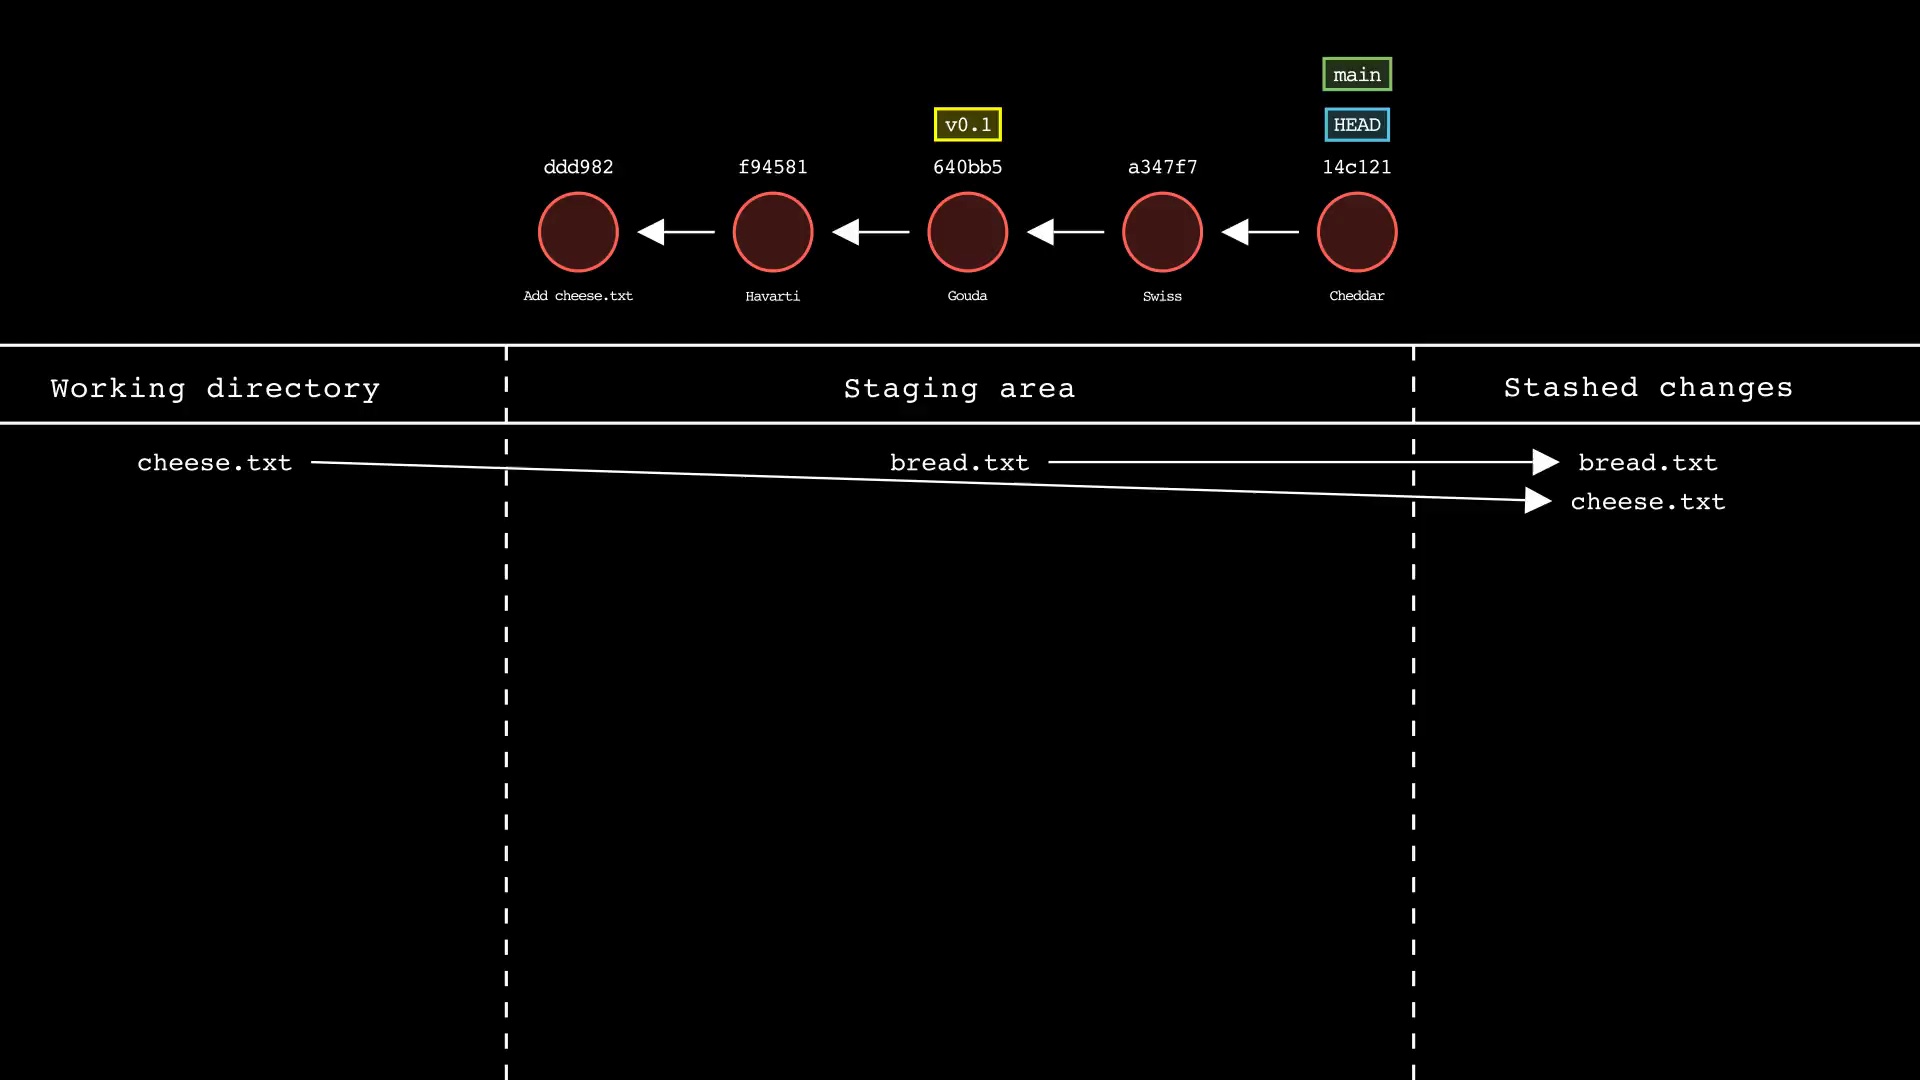
Usage: git-sim stash [push|pop|apply] <file>
- Specify one or more
<file>as a modified working directory file, or staged file - If no
<file>is specified, all available files will be included - Simulated output will show files being moved in/out of the Git stash
- Note that simulated output will also show the most recent 5 commits on the active branch
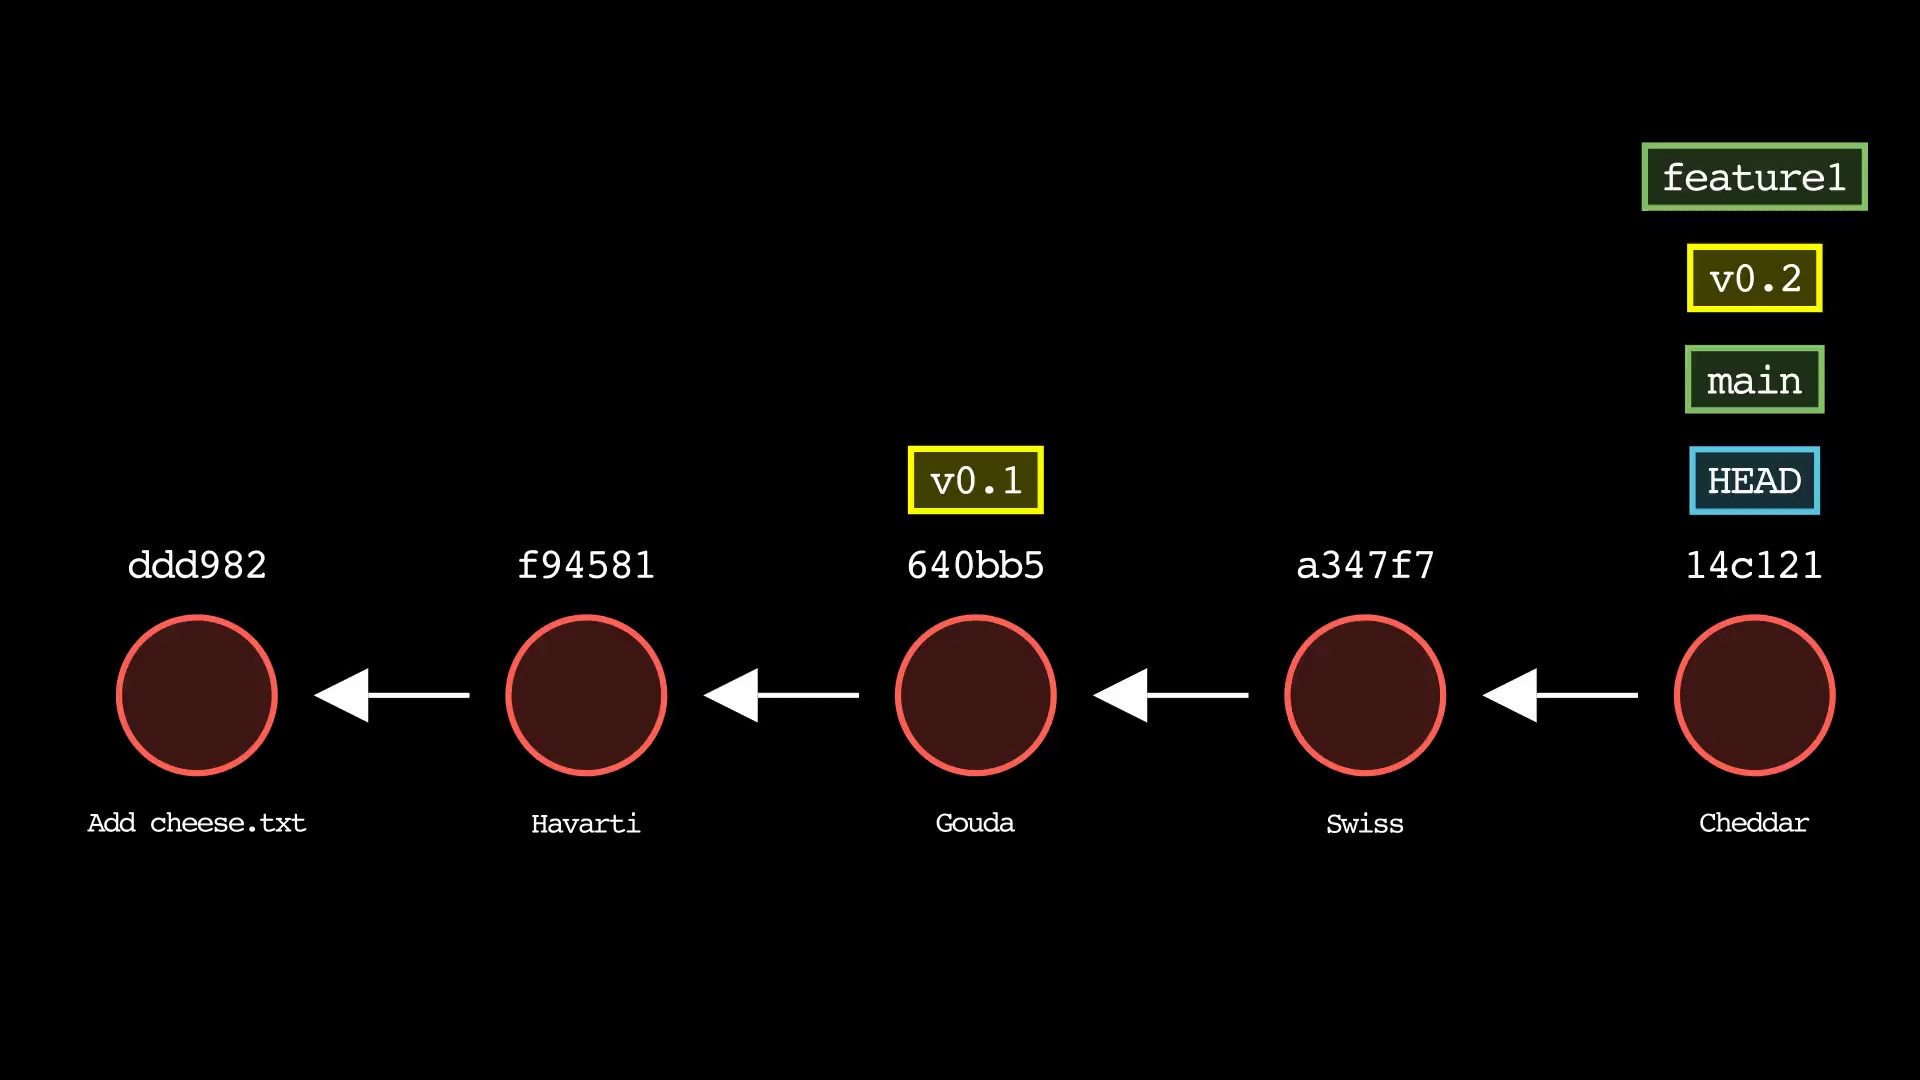
Usage: git-sim branch <new branch name>
- Specify
<new branch name>as the name of the new branch to simulate creation of - Simulated output will show the newly create branch ref along with most recent 5 commits on the active branch
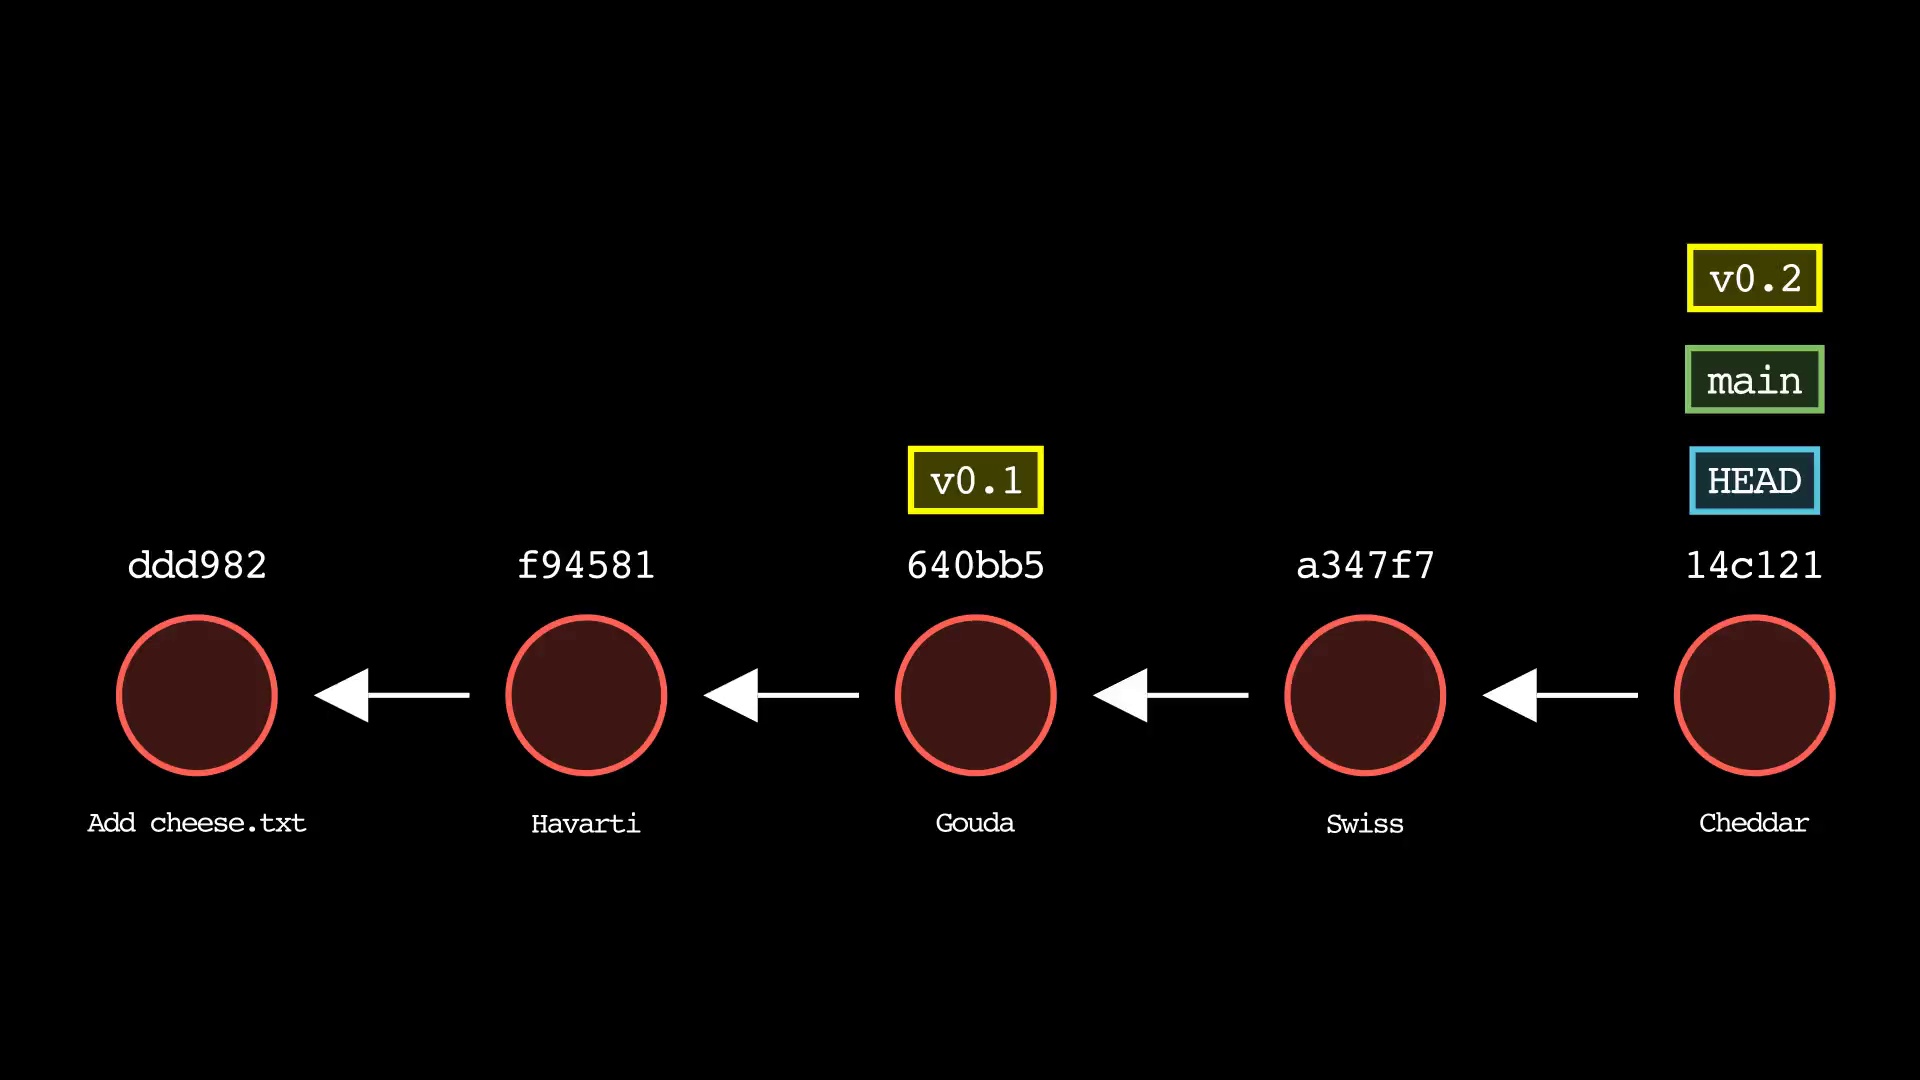
Usage: git-sim tag <new tag name>
- Specify
<new tag name>as the name of the new tag to simulate creation of - Simulated output will show the newly create tag ref along with most recent 5 commits on the active branch
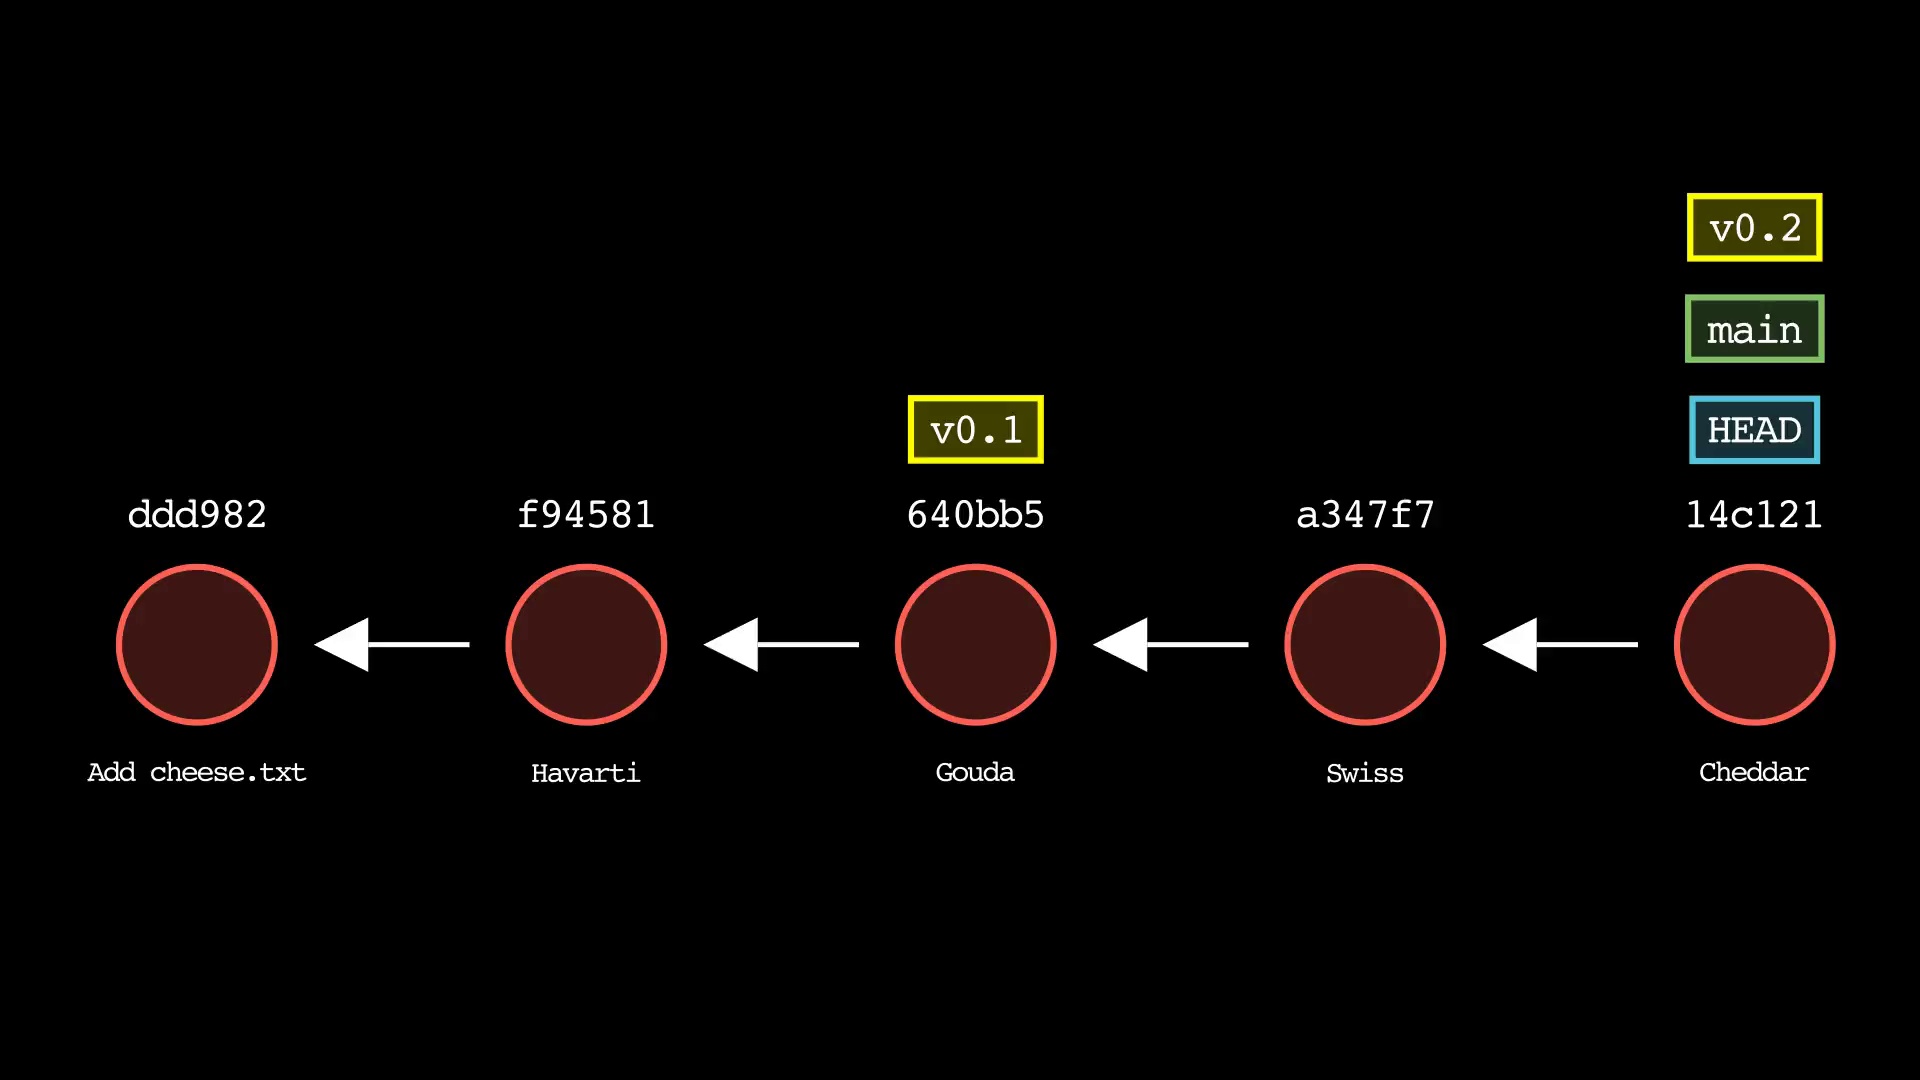
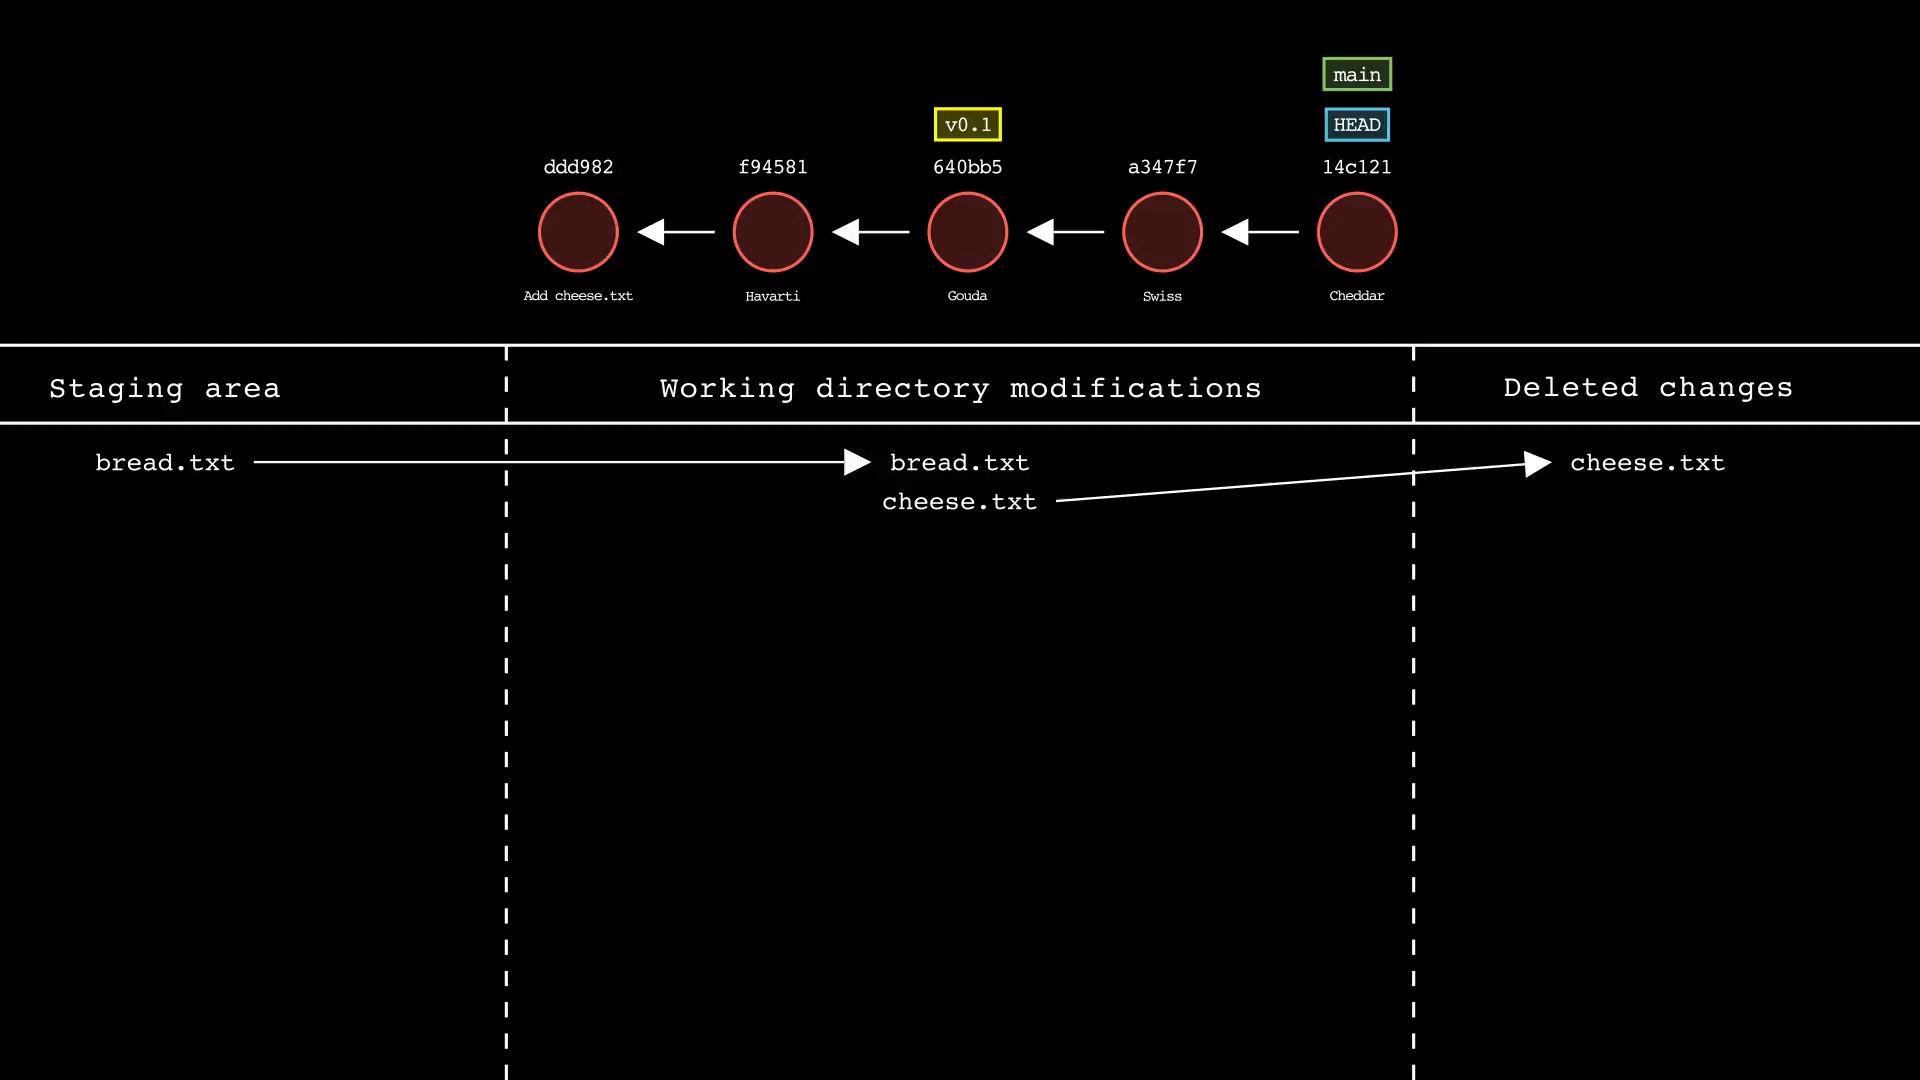
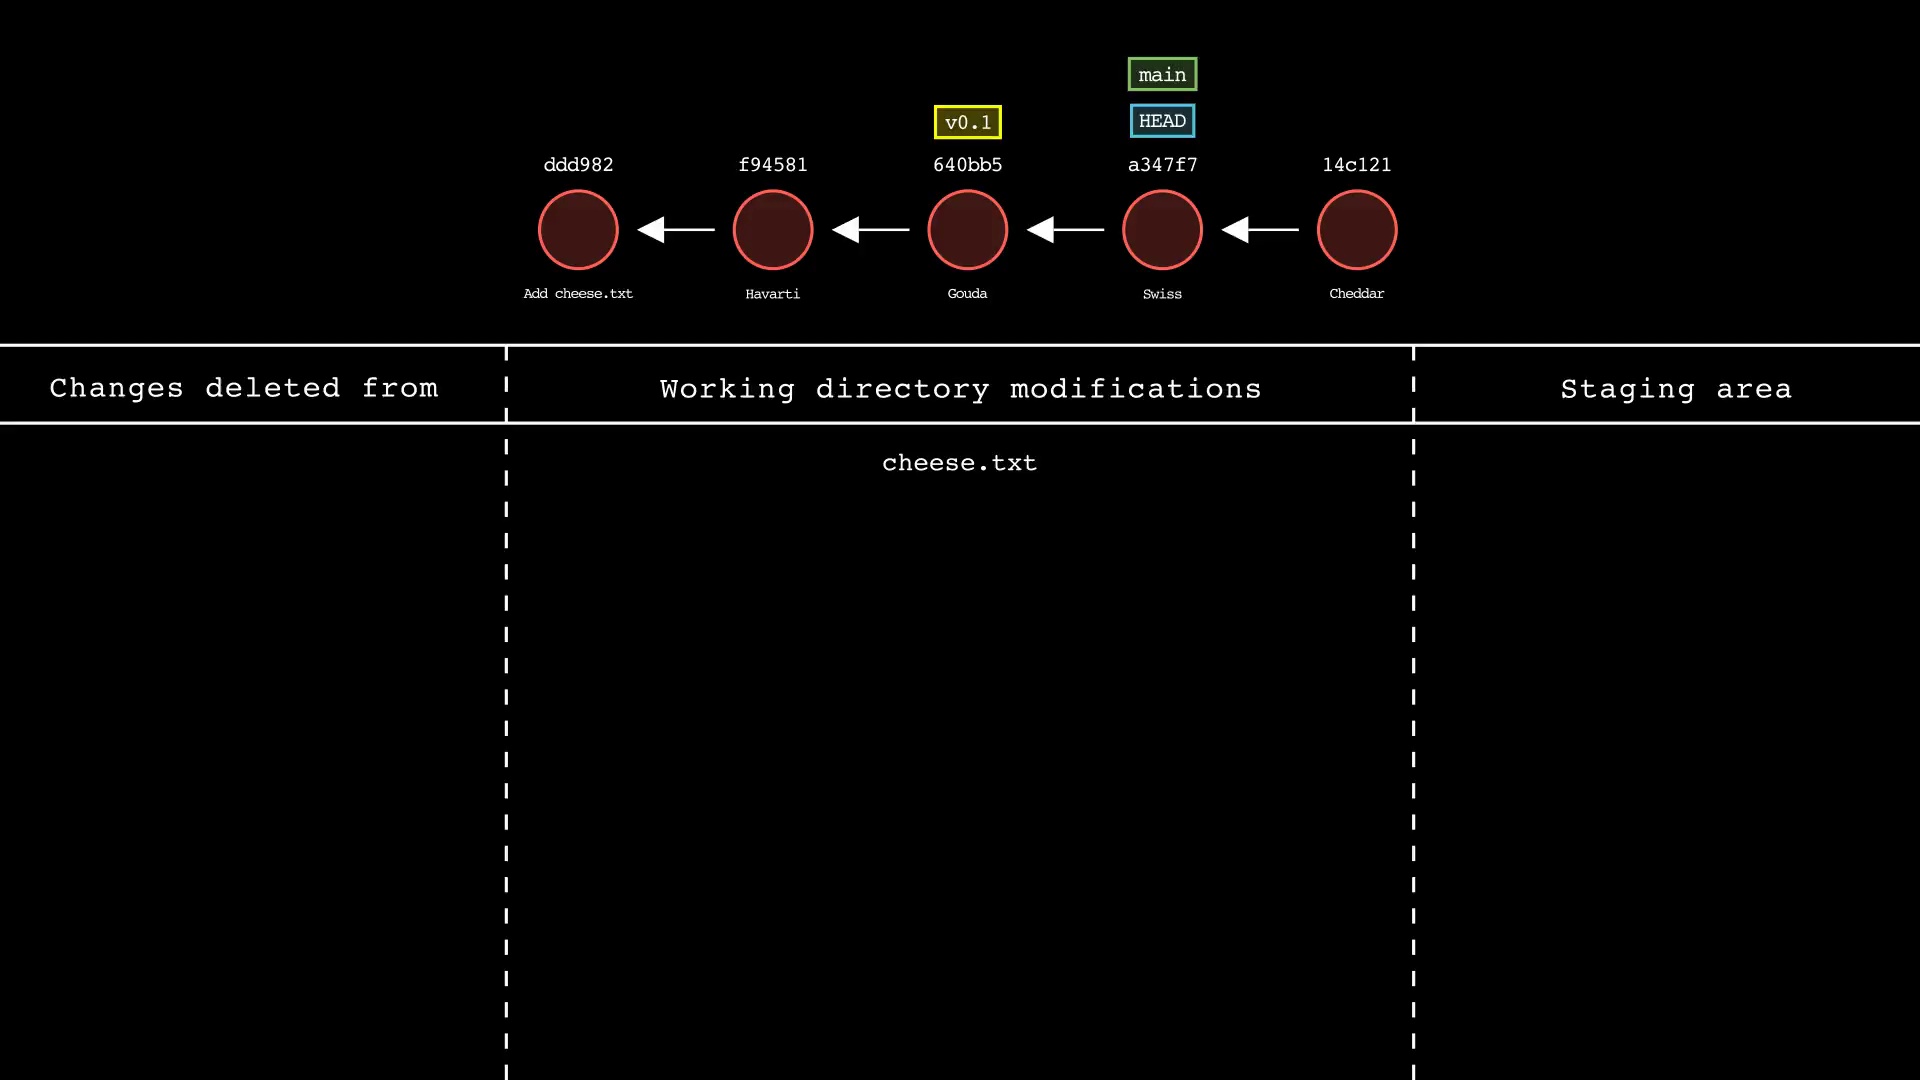
Usage: git-sim reset <reset-to> [--mixed|--soft|--hard]
- Specify
<reset-to>as any commit id, branch name, tag, or other ref to simulate reset to from the current HEAD (default:HEAD) - As with a normal git reset command, default reset mode is
--mixed, but can be specified using--soft,--hard, or--mixed - Simulated output will show branch/HEAD resets and resulting state of the working directory, staging area, and whether any file changes would be deleted by running the actual command
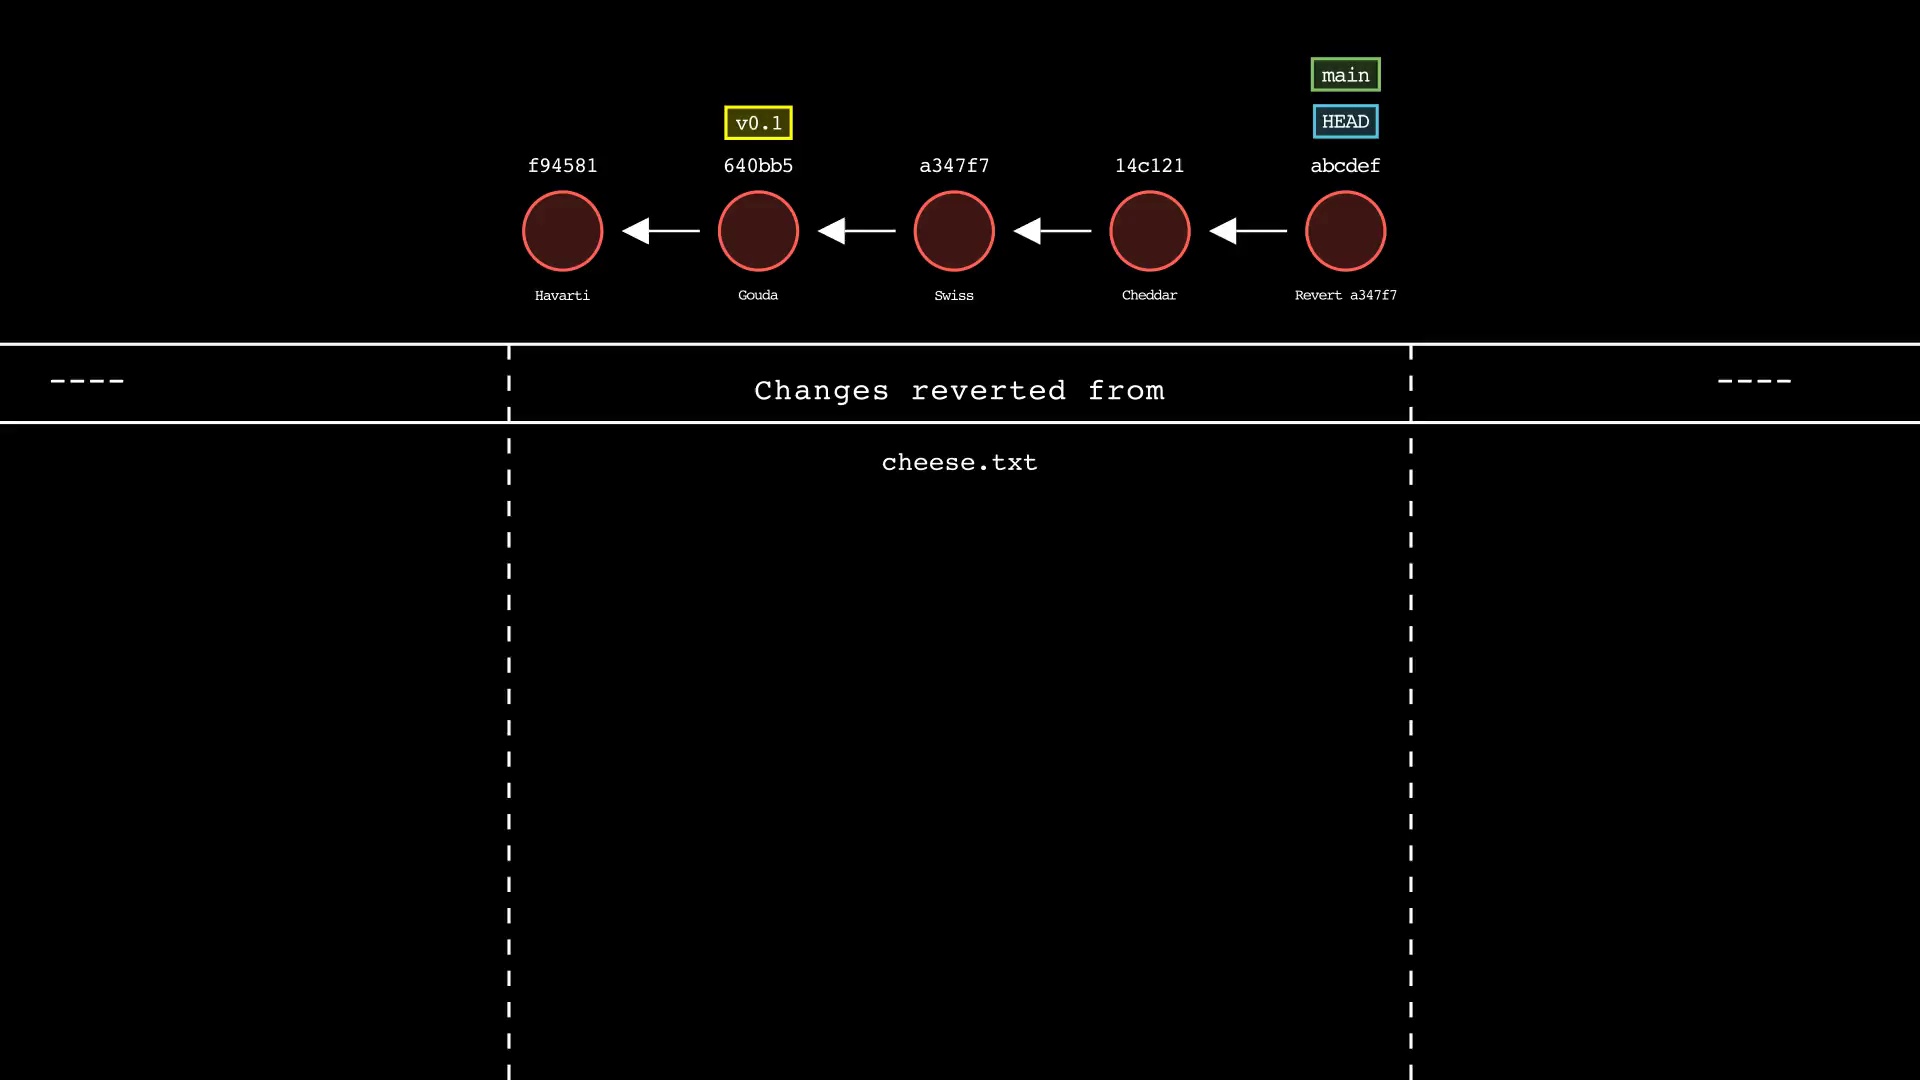
Usage: git-sim revert <to-revert>
- Specify
<to-revert>as any commit id, branch name, tag, or other ref to simulate revert for - Simulated output will show the new commit which reverts the changes from
<to-revert> - Simulated output will include the next 4 most recent commits on the active branch
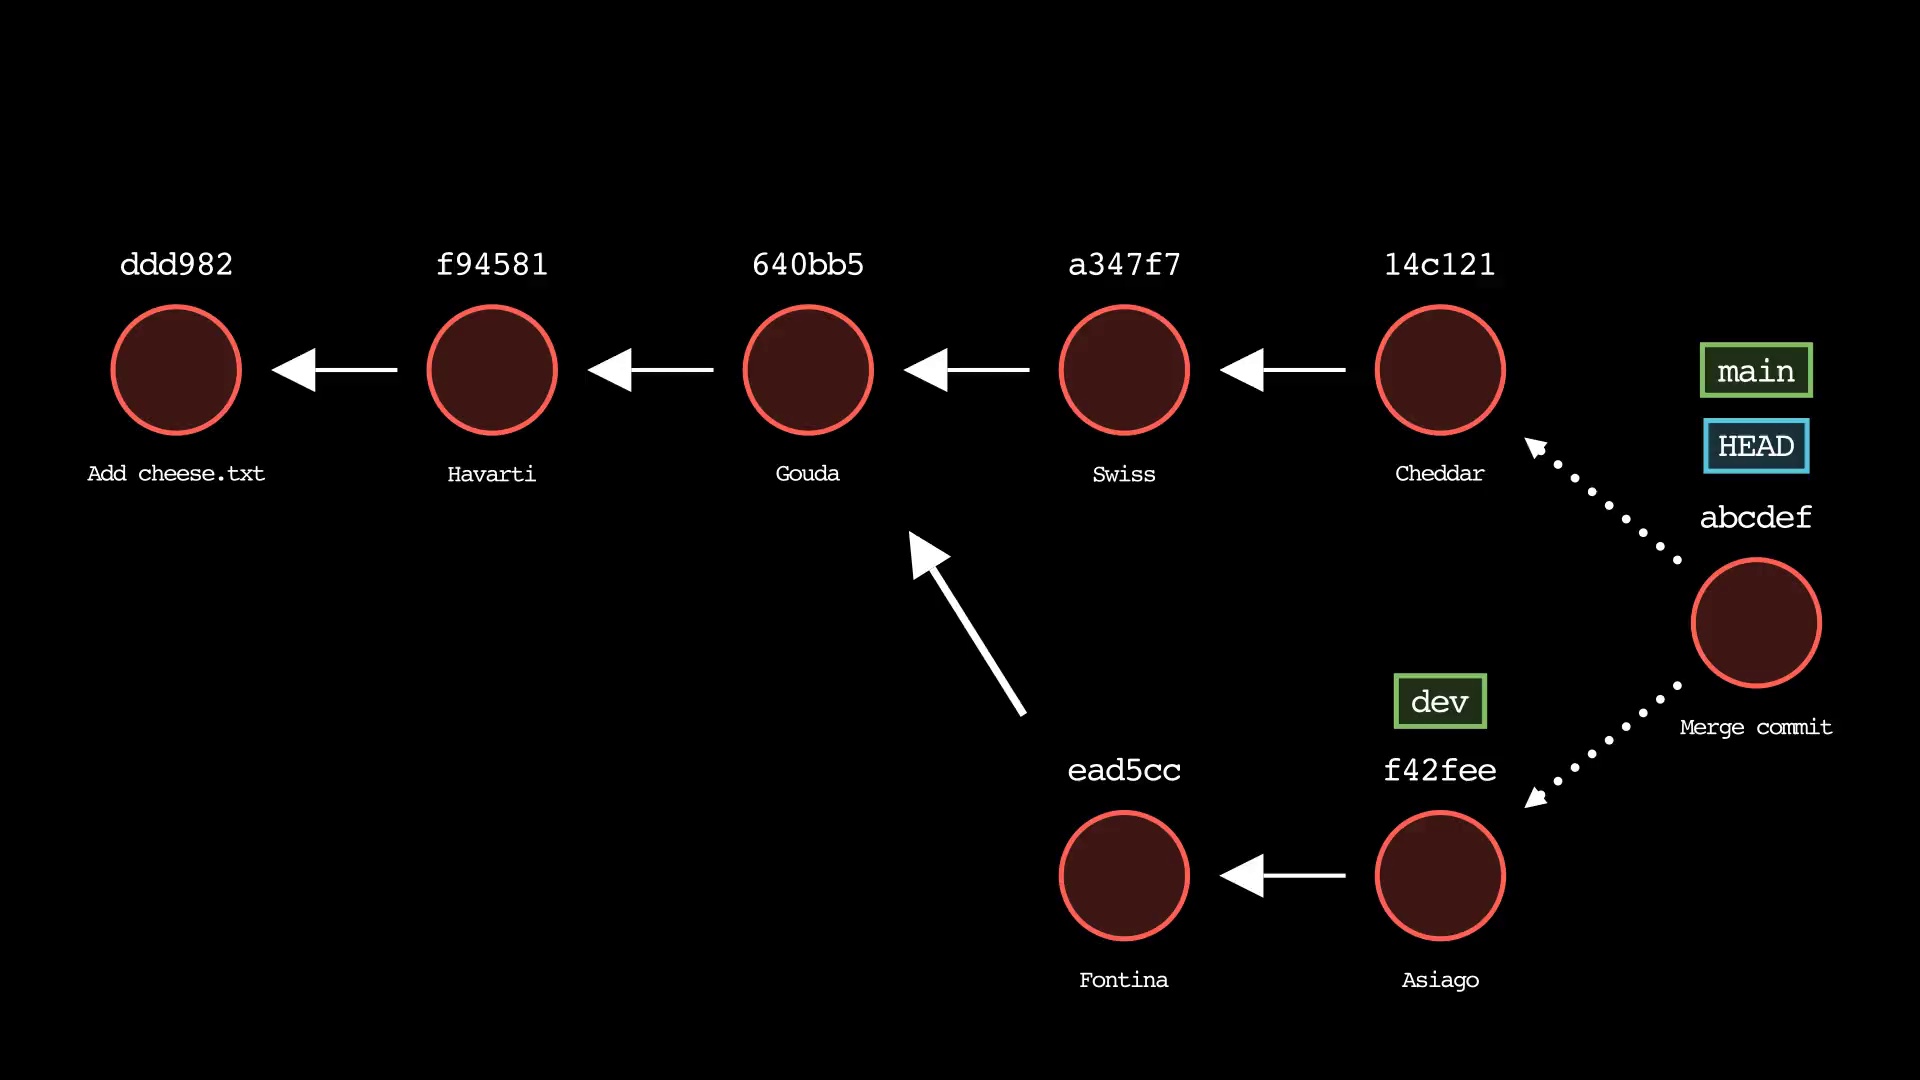
Usage: git-sim merge <branch>
- Specify
<branch>as the branch name to merge into the active branch - Simulated output will depict a fast-forward merge if possible
- Otherwise, a three-way merge will be depicted
- To force a merge commit when a fast-forward is possible, use
--no-ff

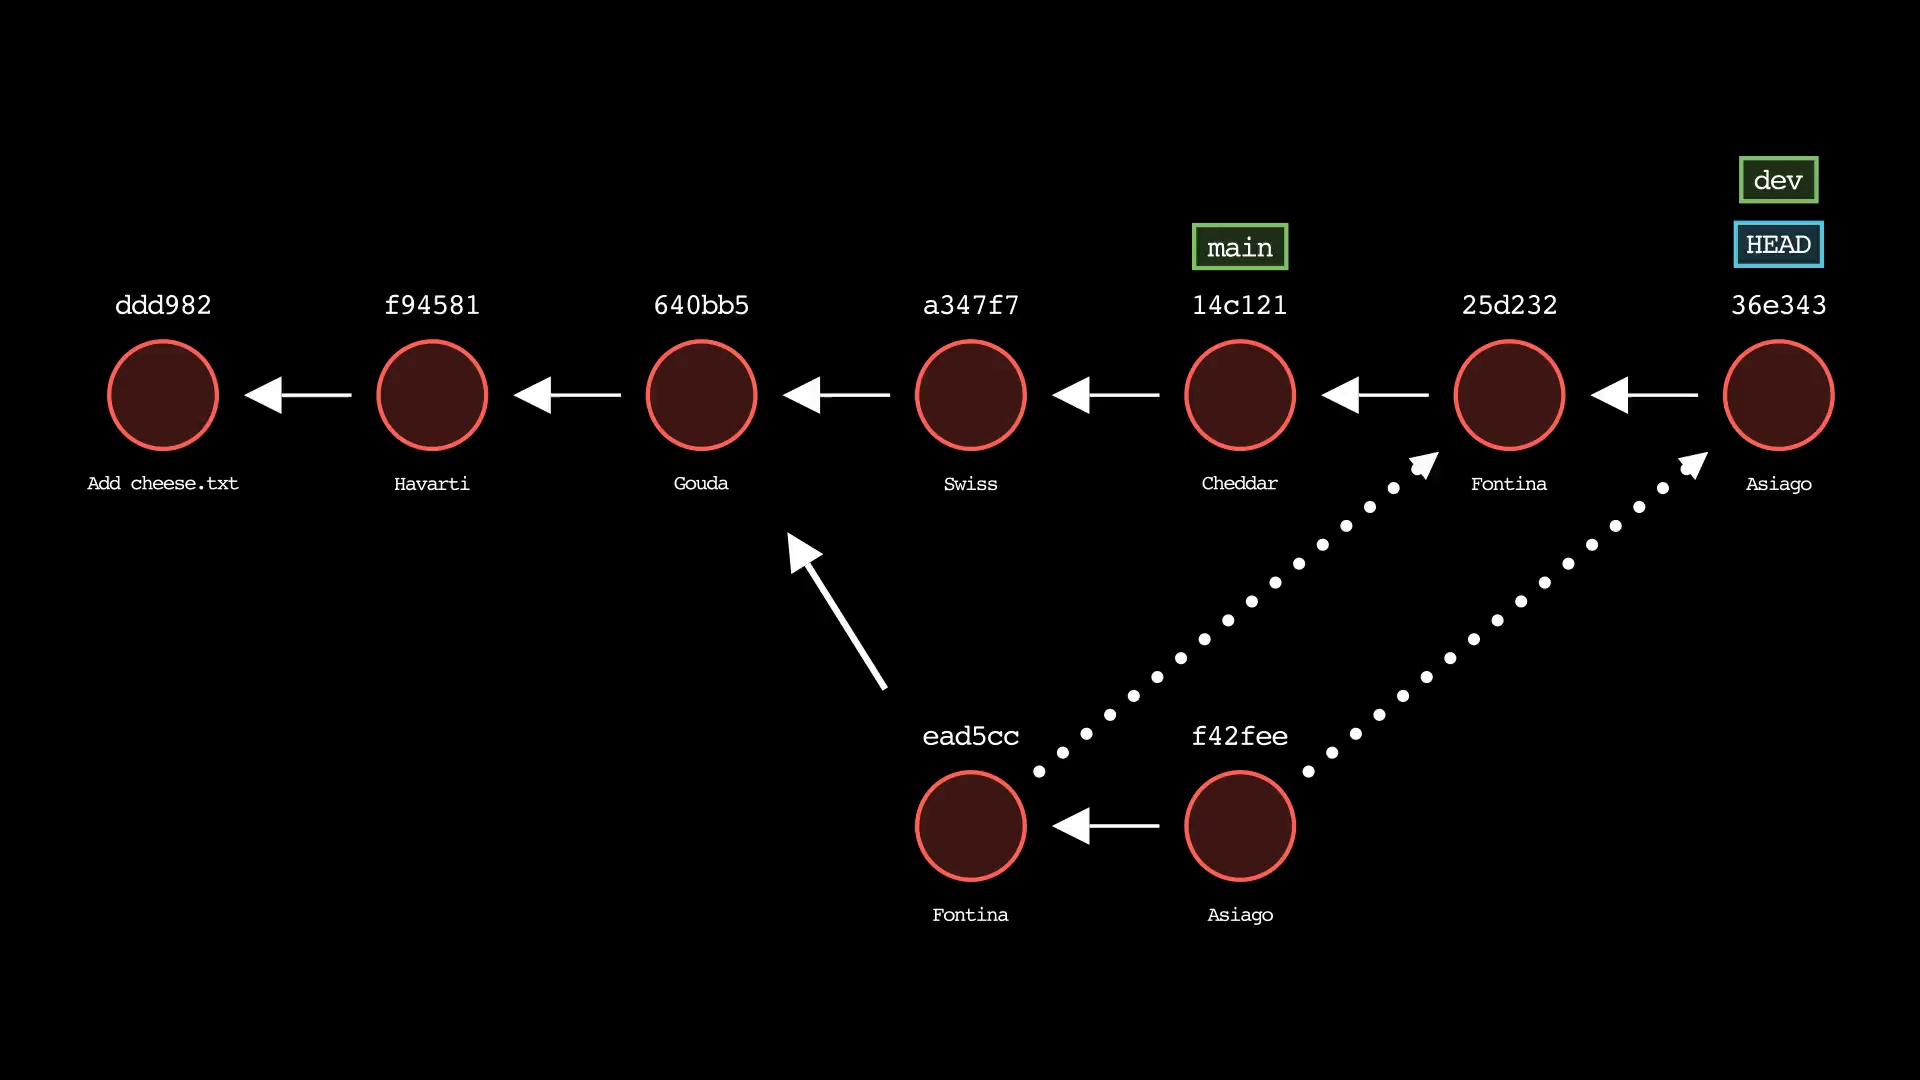
Usage: git-sim rebase <new-base>
- Specify
<new-base>as the branch name to rebase the active branch onto
Usage: git-sim cherry-pick <commit>
- Specify
<commit>as a ref (branch name/tag) or commit ID to cherry-pick onto the active branch - Supports editing the cherry-picked commit message with:
$ git-sim cherry-pick <commit> -e "Edited commit message"
$ git-sim --animate reset HEAD^GitSim.reset.mp4
$ git checkout main
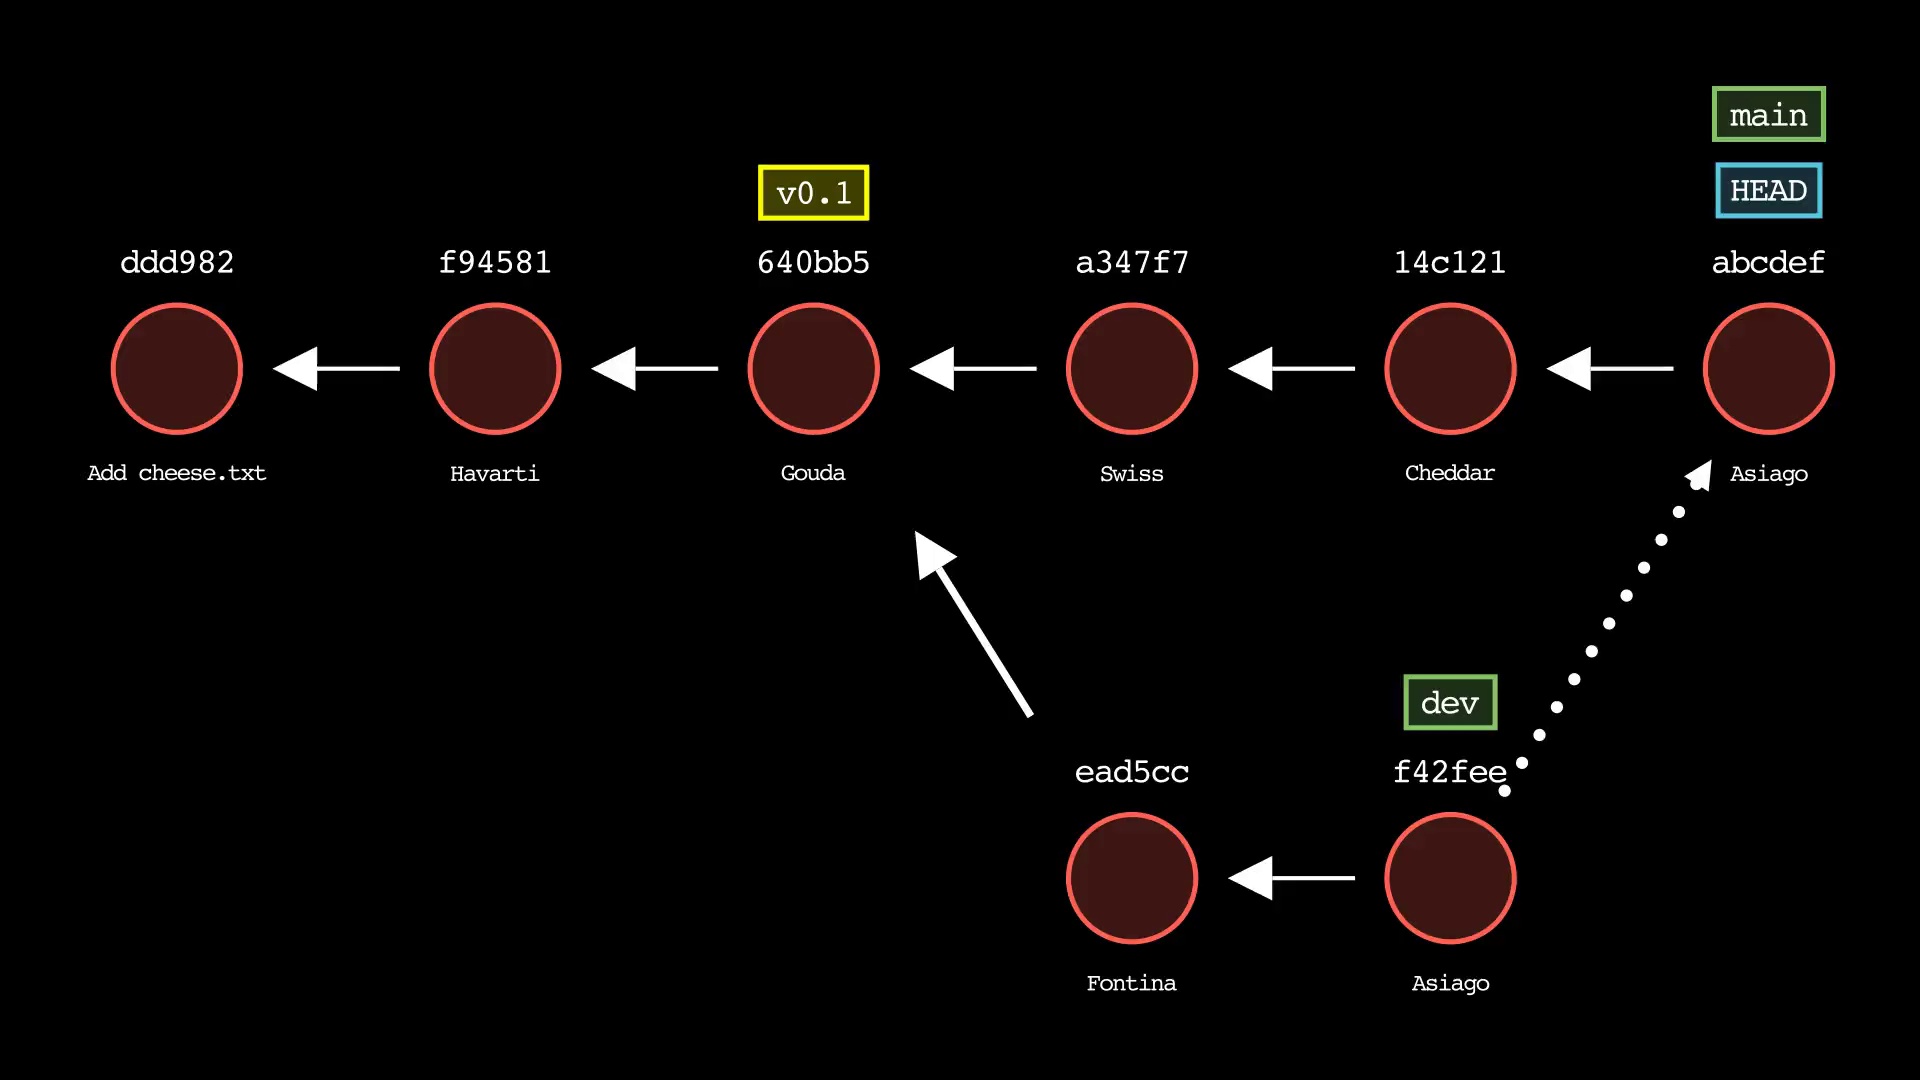
$ git-sim --animate merge devGitSim.merge.mp4
$ git checkout dev
$ git-sim --animate rebase main
GitSim.rebase.mp4
$ git checkout main
$ git-sim --animate cherry-pick dev
GitSim.cherry-pick.mp4
Simulate the output of the git log command:
$ cd path/to/git/repo
$ git-sim log
Simulate the output of the git status command:
$ git-sim statusSimulate adding a file to the Git staging area:
$ git-sim add filename.extSimulate restoring a file from the Git staging area:
$ git-sim restore filename.extSimulate creating a new commit based on currently staged changes:
$ git-sim commit -m "Commit message"Simulate stashing all working directory and staged changes:
$ git-sim stashSimulate creating a new Git branch:
$ git-sim branch new-branch-nameSimulate creating a new Git tag:
$ git-sim tag new-tag-nameSimulate a hard reset of the current branch HEAD to the previous commit:
$ git-sim reset HEAD^ --hardSimulate reverting the changes in an older commit:
$ git-sim revert HEAD~7Simulate merging a branch into the active branch:
$ git-sim merge feature1Simulate rebasing the active branch onto a new base:
$ git-sim rebase mainSimulate cherry-picking a commit from another branch onto the active branch:
$ git-sim cherry-pick 0ae641Use light mode for white background and black text, instead of the default black background with white text:
$ git-sim --light-mode statusAnimate the simulated output as a .mp4 video file:
$ git-sim --animate add filename.extAdd an intro and outro with custom text and logo (must include --animate):
$ git-sim --animate --show-intro --show-outro --outro-top-text="My Git Repo" --outro-bottom-text="Thanks for watching!" --logo=path/to/logo.png statusCustomize the output image/video directory location:
$ git-sim --media-dir=path/to/output statusOptionally, set the environment variable git_sim_media_dir to set a global default media directory, to be used if no --media-dir is provided. Simulated output images/videos will be placed in this location, in subfolders named with the corresponding repo's name.
$ export git_sim_media_dir=path/to/media/directory
$ git-sim status
Note: --media-dir takes precedence over the environment variable. If you set the environment variable and still provide the argument, you'll find the media in the path provided by --media-dir.
Generate output video in low quality to speed up rendering time (useful for repeated testing, must include --animate):
$ git-sim --animate --low-quality statusSee Quickstart section for details on installing manim and other dependencies. Then run:
$ pip3 install git-sim- Clone down the git-sim repository:
$ git clone https://github.com/initialcommit-com/git-sim.git- Browse into the
git-simfolder and build the Docker image:
$ docker build -t git-sim .- Run git-sim commands as follows:
- Windows:
docker run --rm -v %cd%:/usr/src/git-sim git-sim [global options] <subcommand> [subcommand options] - MacOS / Linux:
docker run --rm -v $(pwd):/usr/src/git-sim git-sim [global options] <subcommand> [subcommand options]
- Windows:
Optional: On MacOS / Linux / or GitBash in Windows, create an alias for the long docker command so your can run it as a normal git-sim command. To do so add the following line to your .bashrc or equivalent, then restart your terminal:
git-sim() { docker run --rm -v $(pwd):/usr/src/git-sim git-sim "$@" }This will enable you to run git-sim subcommands as described above.
Learn more about this tool on the git-sim project page.
Jacob Stopak - on behalf of Initial Commit