Deploy OpenShift 4 on the following platforms:
- AWS
- AWS GovCloud
This project uses the bare metal method of installation on all platforms listed above. This translates to there being NO integration with the underlying infrastructure provider.
This means that OpenShift will not be able to:
- Autoscale using
MachineSets - Create load balancers automatically for your ingress routers
- Provision storage via the cloud provider plugin (e.g. EBS volumes)
If you would like a cluster that provides integration with the underlying infrastructure provider, please see the built-in installation methods provided with the OpenShift installer: https://docs.openshift.com/container-platform/latest/welcome/index.html
Step 1
This project provides a container image that includes all of the dependencies
required to run the automation. To run the container image, you will need
either podman or docker installed on your system.
To install podman, follow the instructions here: https://podman.io/getting-started/installation.html
To install docker, follow the instructions here: https://docs.docker.com/get-docker/
Step 2
Clone this repository.
git clone https://github.com/jaredhocutt/openshift4-deploy.gitStep 3
Change your current directory to the cloned repository.
cd openshift4-deploy/NOTE: The following sections of documentation will assume that you are in the root directory of the clone repository.
In order to follow the steps below, you need to export your AWS credentials and the region to use.
If you already have a profile setup using the awscli, you can export
AWS_PROFILE. Your ~/.aws directory will already be mounted to the
environment for you.
export AWS_PROFILE=default
export AWS_REGION=us-east-1
Otherwise, export AWS_ACCESS_KEY_ID
and AWS_SECRET_ACCESS_KEY.
export AWS_ACCESS_KEY_ID=access_key
export AWS_SECRET_ACCESS_KEY=secret-key
export AWS_REGION=us-east-1Step 1: Create/Identify the SSH keypair for the Bastion host
If you already have an AWS key pair that you would like to use, you can skip this step.
If you do not have an AWS key pair or would like to create one specific to this environment, log into the AWS console and create one in the region where you will be deploying OpenShift 4.
Be sure to remember the name of the key pair and the path where you
saved the private key file (this is the .pem file that you download when
creating your AWS key pair) as you will need them in the next step.
IMPORTANT: The key pair .pem file should be in ~/.ssh as this directory
gets mounted to the environment for you. Also ensure that you set the
permissions to 0600 as you would for any SSH key.
Step 2: Create your variable file
There are several variables that you will need to define before running the deployment that are specific to your environment.
| Variable | Required | Default | Description |
|---|---|---|---|
base_domain |
✔️ | The base domain of the cluster. All DNS will be sub-domains of this base_domain and include the cluster_name. |
|
cloud |
✔️ | The cloud provider to deploy to. You should set this to aws to deploy to AWS and aws_govcloud to deploy to AWS GovCloud. |
|
cluster_name |
✔️ | The cluster name. This value will be in your DNS entries and should conform to valid DNS characters. |
|
keypair_name |
✔️ | The name of the AWS key pair to use for the bastion host. | |
keypair_path |
✔️ | The path to the private key for your AWS key pair. Note: The private key's integrity will be maintained. It is only used by Ansible to connect to the bastion host. |
|
openshift_version |
✔️ | The OpenShift version to install. The version must include the z-stream (e.g. 4.3.18) The list of versions can be found here |
|
pull_secret |
✔️ | The content of your pull secret, which can be found here. Be sure to wrap its value in single quotes. | |
fips_mode |
✔️ | Set to True to install a cluster that has FIPS-validation enabled | |
rhcos_ami |
✔️ | The AMI ID for RHCOS. If you are deploying into a commercial AWS region, the AMI ID can be found here. Be sure the documentation you are looking at matches the version of OpenShift you are deploying to get the correct AMI IDs. If you are deploying in AWS GovCloud, you will need to upload the RHCOS image and create your own AMI. After doing so, you can use that AMI ID for this variable. You can find details for creating a RHCOS AMI here. The intention is to add support to have this variable default to a sensible value, but at the moment you will need to provide the AMI ID. |
Create a variable file at <openshift4-deploy>/vars/aws.yml. An example file
matching the content below can be found at
<openshift4-deploy>/vars/aws.example.yml.
---

# The cloud provider to deploy to.
#
# The possible options are:
#   aws
#   aws_govcloud
cloud: aws

# The OpenShift version to install.
#
# The version must include the z-stream (e.g.4.4.3)
#
# The list of versions can be found at
# http://mirror.openshift.com/pub/openshift-v4/x86_64/clients/ocp/
openshift_version: 4.4.3

# The cluster name.
#
# This value will be in your DNS entries and should conform to valid DNS
# characters.
cluster_name: ocp4
# The base domain of the cluster.
#
# All DNS will be sub-domains of this base_domain and include the cluster_name.
base_domain: example.com

# The AMI ID for RHCOS.
#
# If you are deploying into a commercial AWS region, the AMI ID can be found
# here. Be sure the documentation you are looking at matches the version of
# OpenShift you are deploying to get the correct AMI IDs.
#
# If you are deploying in AWS GovCloud, you will need to upload the RHCOS image
# and create your own AMI. After doing so, you can use that AMI ID for this
# variable. You can find details for creating a RHCOS AMI here.
#
# The intention is to add support to have this variable default to a sensible
# value, but at the moment you will need to provide the AMI ID.
rhcos_ami: ami-123456789
# The name of the AWS key pair to use for the bastion host.
keypair_name: mykeypair
# The path to the private key for your AWS key pair.
#
# The private key's integrity will be maintained. It is only used by Ansible to
# connect to the bastion host.
keypair_path: ~/.ssh/mykeypair.pem

# The content of your pull secret, which can be found at
# https://cloud.redhat.com/openshift/install/pull-secret.
#
# Be sure to wrap its value in single quotes.
pull_secret: ''

# Install the cluster in FIPS mode
fips_mode: false
Step 3: Create your DNS records (Public Zone and NS record)
If you are running in AWS GovCloud, you can't create a public zone because public zones are not supported yet. The automation will create a private zone for you. Proceed to the next step.
Log into the AWS console and create a public Route53 Hosted Zone for your cluster.
The name MUST match the format {{ cluster_name }}.{{ base_domain }} using
the values you specified for those in your variable file. For example, if
cluster_name is ocp4 and base_domain is cloud.example.com, then your
hosted zone should be ocp4.cloud.example.com.
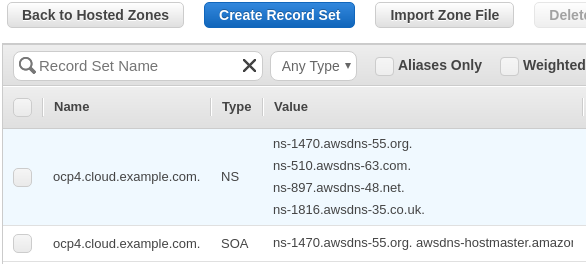
After you create your hosted zone, you should see something similar to:
Copy the value for the NS record to your clipboard.
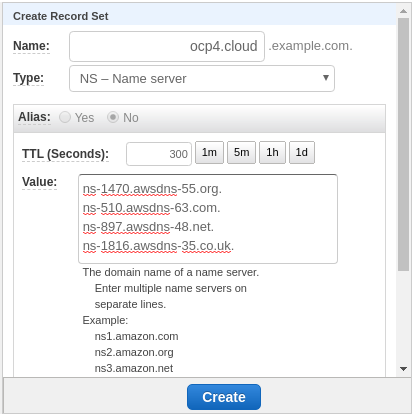
Go to your primary Route53 hosted zone for your domain (or subdomain), click
Create Record Set and add an NS record pointing to your new hosted zone.
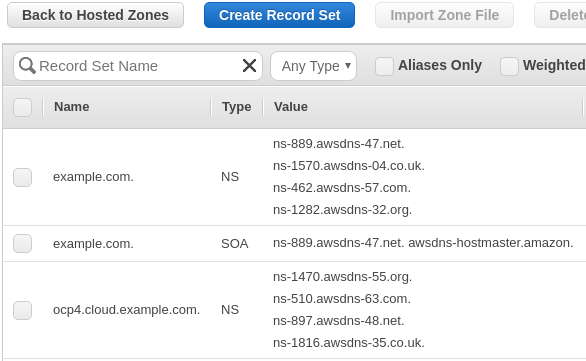
After clicking Create, your primary Route53 hosted zone should look similar to:
Step 4: Run the automation
Execute the automation to create your cluster.
./openshift-deploy create --vars-file vars/ocp4.ymlAfter your environment is provisioned, it's likely you'll want to shut it down when you're not using it and be able to start it back up when you need it.
IMPORTANT: You cannot shutdown your cluster until after it has been up for at least 24 hours due to short-lived certificates that get rotated at the 24 hour mark. There is a known workaround documented here but has not beed added to this deployment yet.
Execute the automation to start your cluster.
./openshift-deploy start --vars-file vars/ocp4.ymlExecute the automation to stop your cluster.
./openshift-deploy stop --vars-file vars/ocp4.ymlOnce you no longer need your cluster, you can use the automation to destroy your cluster.
Be sure to execute the automation from the same machine where you created the cluster as there is Terraform state data that is required to clean up all of the resources previously created.
Execute the automation to destroy your cluster.
./openshift-deploy destroy --vars-file vars/ocp4.ymlWhen the automation to create a cluster completes, you are given output that describes information about the cluster you just deployed. Sometimes it's useful to get this information again.
NOTE: Your cluster must be running for this to work. It requires connecting to your bastion host to pull important information about your cluster.
Execute the automation to display information about your cluster.
./openshift-deploy info --vars-file vars/ocp4.ymlIf you are trying to troubleshoot, make modifications to the automation, or anything else that may require you to have access to an environment with all of the software dependencies already available, you can open a shell into the containerized environment.
Open a shell inside the containerized environment.
./openshift-deploy shell

