Note
🚨 For safety reasons, it may be advisable to use a separate, non-personal account for your Github activity.
🚨 Ensure that your personal email address is not visible when you push commits to Github. More info
A lot of services and domains are outside of Iran and they are restricted or blocked, for accessing this service you need to use VPN or proxies with tunneling option, apart from these problems, when we use proxies the domestic services are unavailable because our IP is not in Iran; for bypassing these issues we gathered a list of Iranian domains and services to help our people bypass this situation.
This repository is a compiled list of public information about websites hosted in Iran. It is intended for informational purposes only and is not intended to provide guidance on how to connect to or create or manage a virtual private network (VPN). The content in this repository is provided as-is and we make no representations or warranties of any kind, express or implied, about the completeness, accuracy, reliability, suitability or availability of the information contained in this repository. Any reliance you place on such information is strictly at your own risk. We will not be liable for any errors or omissions in the information or for any losses, damages, or other liabilities that may arise from its use. Please use caution and consult with a qualified professional before using any information from this repository.
This can differ depending on which tool you use. You can download the domains list from
the release page.
In v2ray clients you can set Domain Resolution Strategy to IPIfNonMatch for better routing.
more info.
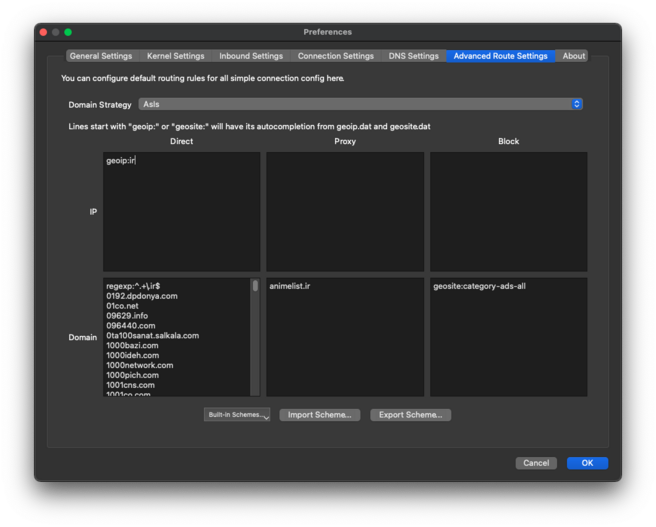
In the release section, you'll find the qv2ray_schema file.
- Download the file.
- open
preferencesand click onAdvanced Route Settings. - From the bottom of the screen, click on
import schema.... - choose the downloaded file (qv2ray_schema.json).
- in the opened dialogue box, click on yes.
- Click on OK.
 |
It can be used in all v2fly, v2ray and xray clients.
-
Download
iran.datfile from here. -
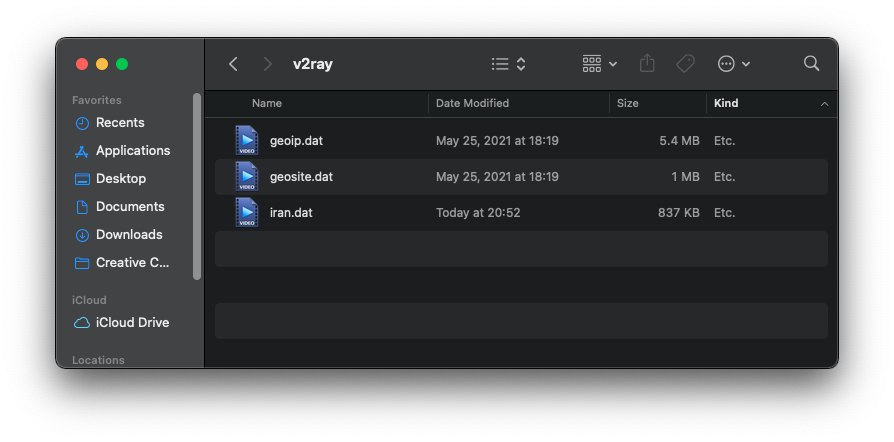
Copy/Import file in your client. for example:
- v2ray macOS:
/usr/local/share/v2ray
- v2ray macOS:
-
Add proper rules:
ext:iran.dat:irin bypass sectionext:iran.dat:otherin bypass sectionext:iran.dat:adsin block section
-
Reconnect.
 |
-
Download
iran.datfile from here. -
Import .dat file from
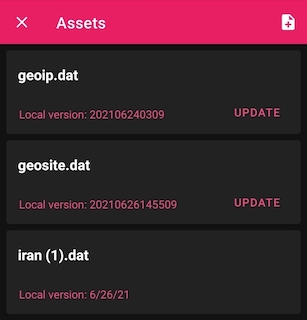
Route -> Three dots -> Manage Route Assets: -
Add proper rules
Route -> Create Route:- Block Ads:
- domain:
geosite:category-ads-all - outbound:
Block
- domain:
- Block Iran Ads:
- domain:
ext:iran.dat:ads - outbound:
Block
- domain:
- Bypass Iran .ir Domains:
- domain:
regexp:.+\.ir$ - outbound:
Bypass
- domain:
- Bypass Iran non .ir Domains:
- domain:
ext:iran.dat:other - outbound:
Bypass
- domain:
- Bypass Iran geoip:
- ip:
geoip:ir - outbound:
Bypass
- ip:
- Block Ads:
for screenshots of routing settings click here.
- Reconnect.
 |
- Download
iran-geosite.dbfile from here. - Rename it to
geosite.db - Import .db file from
Route -> Three dots -> Manage Route Assets: - Add proper rules
Route -> Create Route:- Block Iran Ads:
- domain:
geosite:ads - outbound:
Block
- domain:
- Bypass Iran .ir Domains:
- domain:
domain:.ir - outbound:
Bypass
- domain:
- Bypass Iran non .ir Domains:
- domain:
geosite:other - outbound:
Bypass
- domain:
- Bypass Iran geoip:
- ip:
geoip:ir - outbound:
Bypass
- ip:
- Block Iran Ads:
- Reconnect.
iran-geosite.db by doing this, so you can't use default geosite categories like category-ads-all. You can switch back to default geosite by updating geosite.db from Manage Route Assets section.
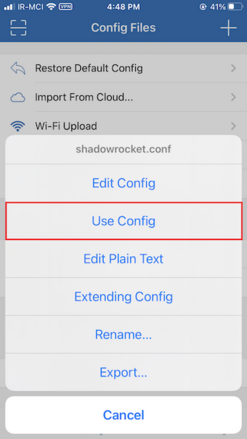
- Download
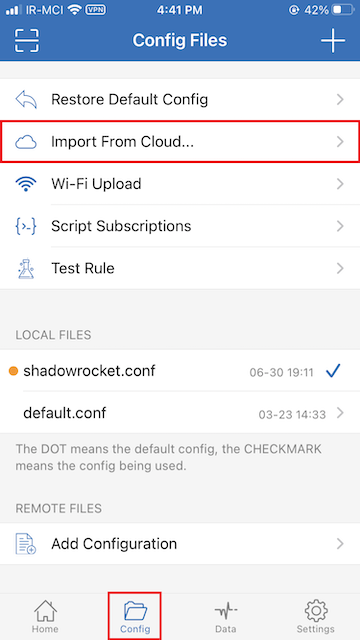
shadowrocket.conffile. - Tap
Import From Cloudin the Shadowrocket app and then import the file. - Finally, tap on the
shadowrocket.confand selectUse Config.
 |
 |
Clash (Like ClashX / clash_for_windows_pkg / Clash Verge / ...)
- Make sure you are using at least version
2023.04.13of Clash Premium Core Orv1.14.4of Clash.Meta Core. If not, you can use the old version format described in the third step. - Open your current profile/config that you use.
- Add these lines to the file:
rule-providers:
  iran_other:
    type: http
    format: text
    behavior: domain
    url: "https://github.com/bootmortis/iran-hosted-domains/releases/latest/download/clash_rules_other.txt"
    path: ./ruleset/iran_other.txt
    interval: 432000
  iran_ads:
    type: http
    format: text
    behavior: domain
    url: "https://github.com/bootmortis/iran-hosted-domains/releases/latest/download/clash_rules_ads.txt"
    path: ./ruleset/iran_ads.txt
interval: 432000rule-providers:
iran_other:
type: http
behavior: domain
url: "https://github.com/bootmortis/iran-hosted-domains/releases/latest/download/clash_rules_other.yaml"
path: ./ruleset/iran_other.yaml
interval: 432000
iran_ads:
type: http
behavior: domain
url: "https://github.com/bootmortis/iran-hosted-domains/releases/latest/download/clash_rules_ads.yaml"
path: ./ruleset/iran_ads.yaml
interval: 432000- Add these lines to
rules:section
  - RULE-SET,iran_ads,REJECT
  - DOMAIN-SUFFIX,ir,DIRECT
  - RULE-SET,iran_other,DIRECT
- GEOIP,IR,DIRECT- Save the file.
- Based on the client, you may need to set clash on
Rulemode.
- Open your current profile/config that you use.
- Add these lines to
[Rule]section
DOMAIN-SET,https://github.com/bootmortis/iran-hosted-domains/releases/latest/download/surge_domainset_ads.txt,REJECT,update-interval=432000
DOMAIN-SUFFIX,ir,DIRECT
DOMAIN-SET,https://github.com/bootmortis/iran-hosted-domains/releases/latest/download/surge_domainset_other.txt,DIRECT,update-interval=432000
GEOIP,IR,DIRECT
Surfboard ignore update-interval at this moment, consider updating from Tool>External resources
RULE-SET,https://github.com/bootmortis/iran-hosted-domains/releases/latest/download/surge_ruleset_ads.txt,REJECT,update-interval=432000
DOMAIN-SUFFIX,ir,DIRECT
RULE-SET,https://github.com/bootmortis/iran-hosted-domains/releases/latest/download/surge_ruleset_other.txt,DIRECT,update-interval=432000
GEOIP,IR,DIRECT- Save the file.
- Set 'Outbound Mode' to 'Rule-based'.
DOMAIN-KEYWORD,,YourFinalProxy/ProxyGroup,force-remote-dnsUse your own Proxy/ProxyGroup instead of 'YourFinalProxy/ProxyGroup'
🚨 You can also use Surge's Rule-Set or Domain-Set in Loon / LanceX.
- First download
iran.datfrom here. - From the menu, go to the
Geo asset filessection, press+from the top, and select theiran.datfile. - From the menu, go to
Settingsand make sureDomain Strategyis set toIpIfNonMatch. - Go to the
Custom rulessection inSettings.
- In the
DIRECT URL OR IPtab, writeext:iran.dat:ir,ext:iran.dat:other,geoip:ir, then press🗸from the top. - In the
BLOCKED URL OR IPtab, writeext:iran.dat:adsand then press🗸from the top again.
- Hit back, and that's it.
For blocking local domains and IPs in the server side follow this instructions (also be sure to check #58 too).
ℹ️ You can see your current Nekoray core by going to preferences > Basic Settings > Core.
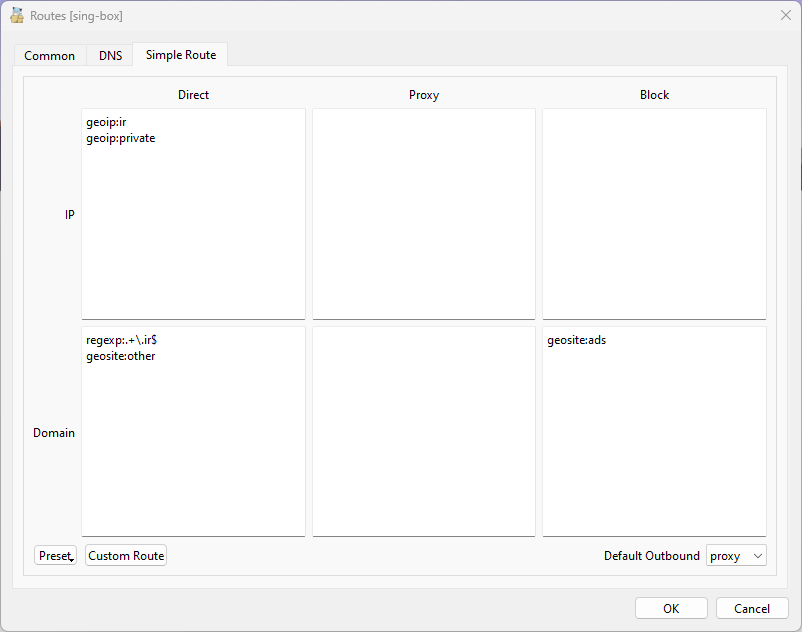
- Download
iran-geosite.dbfrom release section. - Rename it to
geosite.db. - Rename
geosite.dbin Nekoray folder tobackup-geosite.db. - Copy the downloaded
geosite.dbto Nekoray folder. - Open
preferencesand click onRouting Setting. - Go to
Simple Routetab. - Copy the following lines to the corresponding fields:
Direct, IP
geoip:ir
geoip:private
Direct, Domain
regexp:.+\.ir$
geosite:other
Block, Domain
geosite:ads
- Press OK button and restart the app.
geosite.db, you can't use default geosite categories like category-ads-all. You can switch back to default geosite by removing the new geosite.db and renaming backup-geosite.db back to geosite.db. You can also download the original geosite.db from sing-geosite.
 |
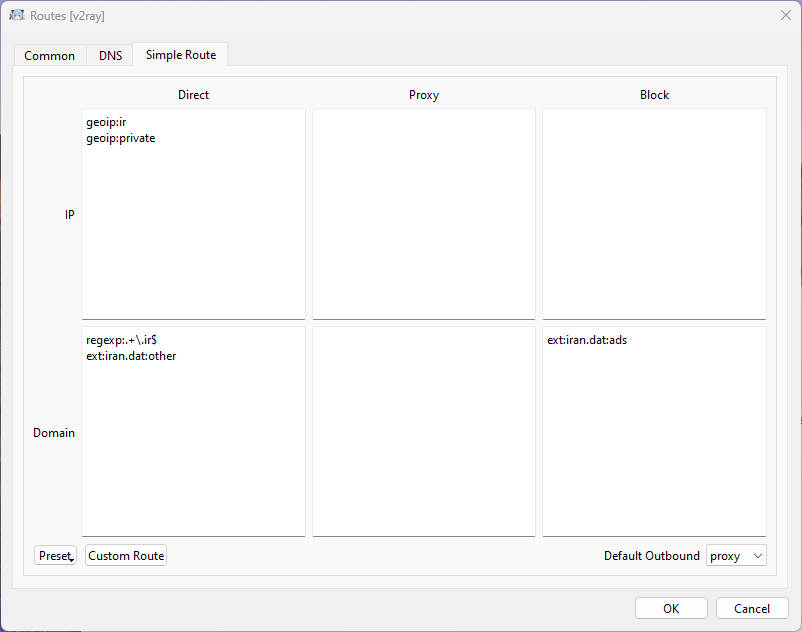
- Download
iran.datfrom release section. - Copy
iran.datto Nekoray folder. - Open
preferencesand click onRouting Setting. - Go to
Simple Routetab. - Copy the following lines to the corresponding fields:
Direct, IP
geoip:ir
geoip:private
Direct, Domain
regexp:.+\.ir$
ext:iran.dat:other
Block, Domain
ext:iran.dat:ads
- Press OK button and restart the app.
 |
- Download
iran.datfile from here and place in v2rayN directory and insidebinfolder. - Open v2ray and select
Settingsand then selectRoutingSetting - In the new window click on
Advanced Functionand chooseAdd - In the new window, in
Remarksfield choose any name and in theRule Listempty area right-click and selectRule Add - In the new window choose
directforoutboundTagand the domain section typeext:iran.dat:ir,ext:iran.dat:other,regexp:^.+\.ir$ - Click on
Confirmuntil you reach the main app window - Make sure that your rule is selected from the bottom of the page. If not choose it from the drop down menu.
- Download
iran-geosite.dbfile from here and place it in the sing-box working directory. - Open the sing-box config file and edit the Route section in this format
{
  "route": {
    "geosite": {
      "path": "iran-geosite.db",
      "download_url": "https://github.com/bootmortis/iran-hosted-domains/releases/latest/download/iran-geosite.db"
    },
    "rules": [
      {
        "geosite": "ir",
        "outbound": "direct"
      },
      {
        "geosite": "other",
        "outbound": "direct"
      },
      {
        "geosite": "ads",
        "outbound": "block"
      },
      {
        "domain_suffix": [
          ".ir"
        ],
        "outbound": "direct"
      }
    ]
  }
}- For more information about the sing-box config template see here.
-
Download
hysteria_client.aclORhysteria_server.aclbased on your usage from here.- hysteria_client.acl : block Iran ADs and bypass other Iran Domains/IPs (for client)
- hysteria_server.acl : block all Iran Domains/IPs (for server)
-
Add these lines to your conifg:
    "acl": "acl_file_path",
    "mmdb": "GeoLite2-Country.mmdb"
'acl_file_path': path of downloaded
.aclfile
Ensuring that you have the latest version of the iran.dat file is crucial for accurate filtering of Iranian domains. This section will guide you on how to set up an automated process to update the file on a regular basis.
- You should have
curlandshasuminstalled on your system.
- Download the update_iran_dat.sh script from this repository.
curl -LO https://raw.githubusercontent.com/bootmortis/iran-hosted-domains/main/scripts/update_iran_dat.sh
- Make the script executable by running the following command in the terminal:
chmod +x update_iran_dat.sh
- Open your crontab file by running the following command:
crontab -e
- In the crontab editor, add the following line to schedule the script to run every Tuesday (a day after we update
iran.dat):Make sure to replace0 0 * * 2 /path/to/update_iran_dat.sh /path/to/iran.dat
/path/to/update_iran_dat.shwith the actual path to the script on your system and/path/to/iran.datwith the actual path to theiran.datfile that you want to update. - Save the crontab file and exit the editor.
The script update_iran_dat.sh handles the process of updating the iran.dat file. It checks if the file already exists and compares the checksum of the existing file with the latest version available on the repository. If a new version is available, it downloads the updated file and replaces the existing one. If the local file doesn't exist, it simply downloads the latest version and saves it to the specified path.
Note: The script assumes that you have the necessary permissions to write to the directory where the iran.dat file is located. If you encounter any issues, ensure that the script has appropriate write permissions or modify the script accordingly.
It is recommended to test the script manually before setting up the cron job to ensure it executes correctly.
1. Install golang
It's important to install the right version. Always check it from v2fly/domain-list-community.
2. Clone v2fly/domain-list-community
git clone https://github.com/v2fly/domain-list-community
In a .dat file, you can have as many distinct groups as you want. Each of these groups can be in bypass, proxy or blocked sections. Each group can have as many domains as you want.
Each group is a txt file containing domains. For example, you can have an ads.txt file containing ad domains.
When cloning domain-list-community, you also clone all the groups that have been there before. Since you don't need them, delete everything in /data directory.
Now you have to copy your files to /data directory. Make sure to remove their file extension. So for example, ads.txt needs to be ads.
cd domain-list-community
rm data/*

cp ~/ads.txt data/ads
go run ./ --outputdir=../
- iran.dat: Contains all websites hosted in Iran and ADs in a special format.
- domains.txt: Contains all websites hosted in Iran.
- qv2ray_schema.json: Importable json schema that can be used in Qv2ray.
- shadowrocket.conf: Importable conf file that can be used in Shadowrocket.
- Iran Domains:
- ITO GOV - Mirror
- Enamad - Mirror
- ADSL TCI
- V2fly Domain List Community (MIT License)
- Custom List
- ADs:
- uBOPa - uBO Parsi filter list (MIT License)
If you know of any other source, or you found a website that isn't here, please open an issue or add that specific website to custom_domains.py and make a PR.
A Python script is executed by Github Action and generates files that are on the release page.