Create, customize and deploy your own PyScript website in minutes. ✨
In this template repository we have the development environment and base set and ready to go. So that you can immediately launch your Codespace environment and start customizing your site using Copilot to help you write code faster.
- Who is this for? Anyone looking to create a PyScript site, learn web development, or test out Codespaces.
- How much experience do you need? Zero. You decide how much you want to customize based on your experience, and time available.
- Tools needed: None. No need to install anything! All you need is a web browser.
- Prerequisites: None. This template includes your development environment and deployable web app for you to create your own site.
This template includes the minimal viable PyScript application, from which you can build.
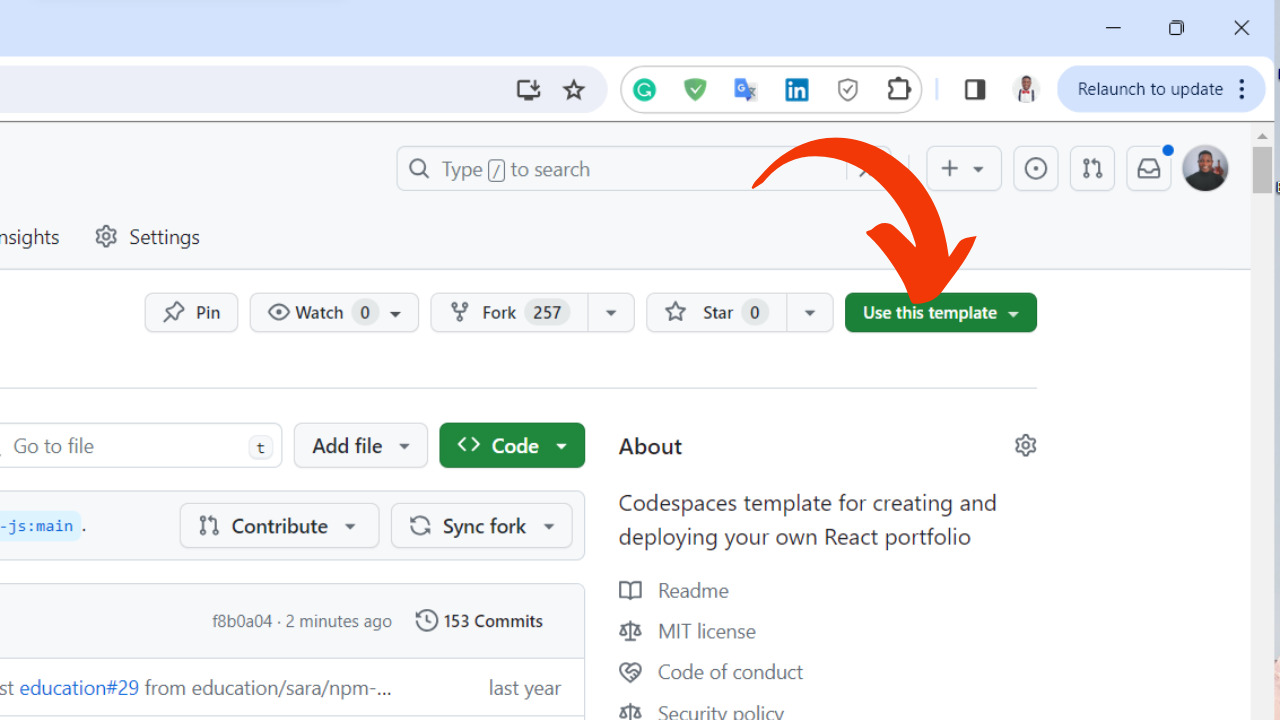
- Click the Use this Template button and then Create a new repository as can be seen in the image below.
Note: Make sure you've signed in to GitHub otherwise, you wouldn't see the Use this Template button.

- Select the repository owner (e.g. your GitHub account)
- Enter a unique name for your new repository
- Click the Code button
- Click Create Codespace on main button
- Customize your PyScript site with Copilot
- Deploy your site
This repo is a GitHub template to build a PyScript web application. The goal is to give you a template that you can immediately utilize to create your own PyScript website through Codespaces.
The repo contains the following:
.devcontainer/devcontainer.json: Configuration file used by Codespaces to configure Visual Studio Code settings, such as the enabling of additional extensions.config.json: the PyScript configuration used by your application.index.html: the HTML page used to load your PyScript application.main.py: the Python script to run.mini-coi.js: a utility to ensure all PyScript's features are available.README.md: this file (that you're reading right now).
This PyScript project contains everything you need so that you can immediately open Codespaces, see it running, and deploy at any point.
Your development environment is all set for you to start.
- Visual Studio Code with the Python plugin enabled.
- The LiveServer plugin (so you can view your site).
- GitHub copilot support (if you have it enabled for your account).
- Create a repository from this template. Use this create repo link. Select the repository owner, provide a name, a description if you'd like and if you'd like the new repository to be public or private.
- Before creating the Codespace, enable GitHub Copilot for your account.
- Navigate to the main page of the newly created repository.
- Under the repository name, use the Code drop-down menu, and in the Codespaces tab, select "Create codespace on main".
- Wait as GitHub initializes the Codespace.
- When complete you will see your Codespace load with a terminal section at the bottom. Codespaces will install all the required extensions in your container. Once the package installs are completed, you'll be able to start editing and start a LiveServer to see your site.
Project includes the setup needed for you to deploy FREE to either Azure Static Web Apps or GitHub Pages. Instructions are included below for Azure. The following YouTube video demonstrates how to get your Codespace up and running, then deployed to GitHub Pages in under two minutes:
Azure Static Web Apps is Microsoft's hosting solution for static sites (or sites that are rendered in the user's browser, not on a server) through Azure. This service provides additional opportunities to expand your site through Azure Functions, authentication, staging versions and more.
You'll need both Azure and GitHub accounts to deploy your web application. If you don't yet have an Azure account you can create it from within during the deploy process, or from below links:
With your project open in Codespaces:
- Click Azure icon in the left sidebar. Log in if you are not already, and if new to Azure, follow the prompts to create your account.
- From Azure menu click “+” sign and then “Create Static Web App”.
- If you are not logged into GitHub you will be prompted to log in. If you have any pending file changes you will then be prompted to commit those changes.
- Set your application information when prompted:
- Region: pick the one closest to you
- Project structure: select "React"
- Location of application code:
/ - Build location:
dist
- When complete you will see a notification at the bottom of your screen, and
a new GitHub Action workflow will be added to your project. If you click
“Open Action in GitHub” you will see the action that was created for you,
and it is currently running.

- To view the status of your deployment, find your Static Web App resource in the Azure tab in the VS Code left side bar.
- Once deployment is complete, you can view your brand new new publicly accessible application by right clicking on your Static Web App resource and selecting "Browse Site".
Issues? When creating your Static Web app, if you are prompted to select an Azure subscription and are not able to select a subscription, check the "Accounts" tab in VS Code. Make sure to choose the "Grant access to ..." options if those options appear. Should you receive the error-message "RepositoryToken is invalid. ..." switch to Visual Studio Code for the Web (vscode.dev) and repeat the steps there.
🤩 Bonus: Setup a custom domain for your Azure Static Web App
Help us make this template repository better by letting us know and opening an issue!.

