The purpose of this project is making a soccer robot. For this purpose, various methods and tools are introduced such as Robot Operation System (ROS) for robot control, and Deep Reinforcement Learning for controlling algorithm.
Due to the characteristic of Deep Learning, a large amount of training data is required. Thus, virtual simulation tool of ROS called Gazebo is additionally used. The project uses the one of famous Deep Reinforcement Learning algorithm which uses a human expert data for improving performance.
In order to use the robot algorithm trained in the virtual simulation in the real world, I use a CycleGAN for generating view of simulation world from view of real world.
Finally, hardware information of robot also will be shared as cad format for making other researchers, makers to use this project for their own purpose.
More detailed instruction can be found at my blog post of DeepSoccer
- ROS Melodic, Gazebo 9
- ROS openai_ros package
- Gazebo only provides Python 2.7(From ROS Noetic at Ubuntu 20.04, Python3 can be used)
- Tensorflow 2.1.0
- requests
- pynput
- progressbar
- opencv-python
- ROS Dep(sudo apt install ros-melodic-velocity-controllers ros-melodic-joint-state-publisher-gui)
- JetPack 4.4
- ROS Melodic
- Tensorflow 2.2.0
- Python2 for ROS acuator, sensor node
- Python3 for ROS main node
- Jetbot SDF file, ROS: Jetbot SDF file, ROS
- Gazebo parameter setting: Gazebo parameter
- URDF file usage in Gazebo: URDF file usage in Gazebo
- Object detecion using cvlib: Object detecion using cvlib
- Soccer field, ball model: Soccer field, ball model
- Reinforcement Learnig model: Reinforcement Learnig model
- Inference saved model: Tensorrt
- Onshape 3D model to URDF: onshape-to-robot
- GPIO control for solenoid electromagnet : https://www.jetsonhacks.com/2019/06/07/jetson-nano-gpio/ ,https://github.com/NVIDIA/jetson-gpio
- Ball kicking mechanism: https://www.youtube.com/watch?v=fVGrYoqn-EU
- How to read LaserScan data(ROS python): https://www.theconstructsim.com/read-laserscan-data/
- Convert Video to Images (Frames) & Images (Frames) to Video using OpenCV (Python) : https://medium.com/@iKhushPatel/convert-video-to-images-images-to-video-using-opencv-python-db27a128a481
- Python Multithreading with pynput.keyboard.listener: https://stackoverflow.com/a/59520236/6152392
- How to use a Gazebo as type of OpenAI Gym: http://wiki.ros.org/openai_ros
- Solenoid joint spring plugin: https://github.com/aminsung/gazebo_joint_torsional_spring_plugin
- Custom control plugin for Gazebo: http://gazebosim.org/tutorials?tut=guided_i5&cat=
- Forgetful Expirience Replay for Reinforcement Learning from Demonstrations: https://github.com/cog-isa/forger
- Compiling ROS cv_bridge with Python3: https://cyaninfinite.com/ros-cv-bridge-with-python-3/
- Style Transfer for Sim2Real: https://github.com/cryu854/FastStyle
- CycleGAN for Sim2Real: https://www.tensorflow.org/tutorials/generative/cyclegan
- Image Segmentation for CycleGAN: https://www.kaggle.com/santhalnr/cityscapes-image-segmentation-pspnet
The purpose of this project is to train Jetbot to play soccer based on simulation and then apply trained model to actual Jetbot. Therefore, I am currently updating the code and description of the current simulation robot and the actual robot to this repository together. However, you can run only simulation without any actual hardware.
At your terminal, run below command.
$ cd ~/catkin_ws/src/
$ git clone https://github.com/kimbring2/DeepSoccer.git
$ cd ..
$ catkin_make
$ source devel/setup.bash
Put a 'https://github.com/kimbring2/DeepSoccer/tree/master/spawn_robot_tools' folder to your 'catkin_ws/src' folder.
If you get a 'RLException' error message, use 'source devel/setup.bash' command and try again.
If you get that error when try to run 'roslaunch jetbot_description jetbot_rviz.launch' command, try to install related package using below command at your terminal.
$ sudo apt install ros-melodic-joint-state-publisher-gui
If you get a 'Could not load controller' error message, try to install related package using below command at your terminal.
$ sudo apt-get install ros-melodic-ros-control ros-melodic-ros-controllers
If you get error message includes 'No transform from', try to install unicode ubuntu package and reboot.
$ sudo apt-get install unicode
First, set up ROS in actual Jetbot hardware based on manual of https://github.com/dusty-nv/jetbot_ros.
Then run roscore on Jetbot terminal and publish the camera frame using jetbot_camera node.
$ roscore
$ rosrun deepsoccer_ros deepsoccer_camera
You can control a wheel motor using below Python script.
$ rosrun deepsoccer_ros deepsoccer_motors.py
$ rostopic pub -1 /deepsoccer_motors/cmd_str_wheel1 std_msgs/String --once "'30'"
$ rostopic pub -1 /deepsoccer_motors/cmd_str_wheel2 std_msgs/String --once "'30'"
$ rostopic pub -1 /deepsoccer_motors/cmd_str_wheel3 std_msgs/String --once "'30'"
$ rostopic pub -1 /deepsoccer_motors/cmd_str_wheel4 std_msgs/String --once "'30'"
You can control a roller and solenoid motor using two Python script.
$ rosrun deepsoccer_ros deepsoccer_roller.py
$ rostopic pub -1 /deepsoccer_roller/cmd_str std_msgs/String --once "in"
$ rostopic pub -1 /deepsoccer_roller/cmd_str std_msgs/String --once "out"
$ rosrun deepsoccer_ros deepsoccer_solenoid.py
$ rostopic pub -1 /deepsoccer_solenoid/cmd_str std_msgs/String --once "in"
$ rostopic pub -1 /deepsoccer_solenoid/cmd_str std_msgs/String --once "out"
For getting lidar sensor distance and infrared object detection value.
$ sudo chmod a+rw /dev/ttyTHS1
$ rosrun deepsoccer_ros deepsoccer_lidar.py
$ rostopic echo /deepsoccer_lidar
$ rosrun deepsoccer_ros deepsoccer_infrared.py
$ rostopic echo /deepsoccer_infrared
You can start all node by just one command line.
$ roslaunch deepsoccer_ros start.launch
You can also give a control command using Python code. Run 'jetson_soccer_main.py' file at Jetson Nano terminal.
$ python deepsoccer_main.py
I remodel hardware of Jetbot because it is not suitable for soccer. As you know easily, soccer robot needd a kicking and holding part. The Jetbot soccer version can hold a soccer ball and kick it. The wheel part is changed to omniwheel type for moving more freely. Battery, DC motor, WiFi antenna of previous Jetbot are reused for easy developing.
I use Onshape cloud 3D modeling program to create a model. You can see DeepSoccer 3D model.
After making 3D model, I convert it to URDF format for Gazebo simulation using onshape-to-robot.
You can see a RViz 3D model of Jetbot soccer using below command.
$ roslaunch deepsoccer_description deepsoccer_rviz.launch
After launching a RViz, you can control of each wheel and roller using dialog box.
After checking operation of each part at RViz, try to control it in Gazebo simulation.
$ roslaunch deepsoccer_gazebo main_soccer.launch
You can control of each wheel, roller, solenoid motor using 'rostopic pub' command. First, adjust the speed of the wheels to approach to the ball.
- Command for wheel motor
$ rostopic pub -1 /robot1/wheel1_velocity_controller/command std_msgs/Float64 "data: 30"
$ rostopic pub -1 /robot1/wheel2_velocity_controller/command std_msgs/Float64 "data: 30"
$ rostopic pub -1 /robot1/wheel3_velocity_controller/command std_msgs/Float64 "data: 30"
$ rostopic pub -1 /robot1/wheel4_velocity_controller/command std_msgs/Float64 "data: 30"
Next, rotate a roller motor to pull the ball.
- Command for roller motor
$ rostopic pub -1 /robot1/roller_velocity_controller/command std_msgs/Float64 "data: 30"
Finally, kick the ball via speed control of solenoid motor.
- Command for solenoid motor
$ rostopic pub -1 /robot1/stick_velocity_controller/command std_msgs/Float64 "data: 30"
If you run a 'main_soccer.py file in jetbot/jetbot_control file, you can give a command by typing a character.
s : stop
f : forward
l : left
r : right
h : hold ball
k : kick ball
Please check video for checking how to give a command(https://www.youtube.com/watch?v=rTVKIcgdVGo)
Soccer robot need to check a obstacle of front side. Using only camera sensor is not enough for that. Thus, I decide adding lidar sensor. Information of lidar sensor can be checked by using ROS topic named '/deepsoccer/laser/scan'
$ rostopic echo /deepsoccer/laser/scan -n1
Among that information, range from robot to front object can be got by using Python
def lidar_callback(msg):
    global lidar_range

    lidar_range = msg.ranges[360]
Gazebo simulator visualize the range of the lidar sensor. You can see the range value of lidar sensor is changed depending on the distance between the robot and front obstacle.

Like the original version of Jetbot, Jetbot soccer version can be controlled by gamepad. You can check a code for that teleoperation_soccer.ipynb file. Upload it to Jetson Nano and run it.
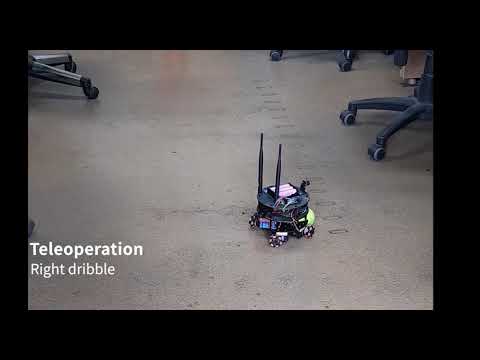
You can use the gamepad for performing the basic actions for soccer. Multi players will be able to play robot soccer together if power of robot is a bit more reinforced. It is little weak for playing real soccer.
Since the jetbot soccer version uses solenoid electromagnet for kicking ball which has a spring, it cannot be implemented using default controller of Gazebo. In such a case, we are able to create a custom plugin. First, 'solenoid_electromagnet_joint_spring_plugin' package need be built using 'catkin_make' command.
Spring equation for solenoid electromagnet<gazebo>
<!-- joint torsional spring plugin -->
<plugin name="stick_solenoid_electromagnet_joint_spring" filename="libsolenoid_electromagnet_joint_spring_plugin.so">
<kx>1000000000</kx>
<set_point>0.0</set_point>
<joint>stick</joint>
</plugin>
</gazebo>
The built custom plugin is used for stick joint. You need to declare it in the jetbot_soccer.gazebo file as like above.
After changing a line of start_training.launch like below.
<node pkg="my_deepsoccer_training" name="deepsoccer_single" type="gym_test.py" output="screen"/>
You can check code for it at gym_test.py file.
Start Gazebo by using below command.
$ roslaunch my_deepsoccer_training start_training.launch
Since Reinforcement Learning used in DeepSoccer is a method that uses expert data, user can control a robot directly. For using collecting_human_dataset.py file for that, you need to change a line of launch file located in launch folder.
<node pkg="my_deepsoccer_training" name="deepsoccer_single" type="collecting_human_dataset.py" output="screen"/>
After that, launch a Gazebo using below command.
$ roslaunch my_deepsoccer_training start_training.launch
Once Gazebo is started, you can give commands to the robot using the keyboard keys. S is stop, f is forward, l is left, r is right, b is reverse, h is catching the soccer ball, k is kicking ball, and p is the running. When you press the q key, the recorded data is saved in the folder and the entire program ends.
You can set the path and name of saving file by changing a save_path and save_file options of my_deepsoccer_single_params.yaml file.
You can train a robot using human demonstration data(https://drive.google.com/drive/folders/1s6hmnXj9IfdfTJzRg9rVuYyJ65MTTluU?usp=sharing). Change a line of launch file like that.
Robot soccer is quite difficult to hold the ball accurately unlike soccer games where you can control a ball by just pressing a key. The process for the robot to hold the ball is divided into several stages. First stage is rotating angle of robot for capturing ball inside of front camera angle. Next, robot must move to the ball keeping it in the center of the camera in order to hold it by the roller. Finally, robot should move forward towards the goal post while fixing the ball to the roller. When robot get close enough to the goal post, it can kick the ball using solenoid electromagnet.

<node pkg="my_deepsoccer_training" name="deepsoccer_single" type="train_single.py" output="screen"/>
File for this script is located at train_single.py file. There are four important function in that file.
agent.add_demo()
agent.pre_train(config['pretrain']['steps'])
agent.train(env, name="model.ckpt", episodes=config['episodes'])
agent.test(env)
Human demonstration data is added to buffer by add_demo function. Next, agent is trained using pre_train function. After finishing pretraining, agent can be trained using a data from interaction between agent and environemnt using train() function. Every trained result is able to be checked by using test(function).
Start Gazebo by using below command.
$ roslaunch my_deepsoccer_training start_training.launch
All parameters related to Reinforcmeent Learning can be checked at deepsoccer_config.yaml file. Buffer size and pretrain steps are important. Save_dir, tb_dir parameter means saving location of trained Tensorflow model and Tensorboard log file.
In order to use the model trained by Gazebo simulation at Jetson Nano. You need to copy a folder named pre_trained_model.ckpt generated after training at previous step. Inside the folder, there are assets and variables folders, and frozen model named saved_model.pb.
After placing DeepSoccer_ROS Package to your ROS workspace of Jetson Xavier NX, run below command.
$ roscore
$ roslaunch deepsoccer_ros start.launch
It will launch all actuator and sensor ROS node. After that, change a pre_trained_model.ckpt folder path what you copied at deepsoccer_main.py. Next, move to script folder of deepsoccer_ros ROS package and run below command.
$ python3 deepsoccer_main.py
Because Tensorflow 2 of Jetson Xavier NX only can be run by Python3, you need to do one more job because cv_bridge of ROS melodic is not able to be ran at Python3. Please follow a intruction at https://cyaninfinite.com/ros-cv-bridge-with-python-3/.
If the tasks described on the above site are completed successfully, DeepSoccer start to control acuator based on the data from real sensor.

It is confirmed that robot do not show the same movement as the trained one when the raw camera frame is used as input to the RL model.
If you use DeepSoccer to conduct research, we ask that you cite the following paper as a reference:
@misc{kim2020deepsoccer,
  author = {Dohyeong, Kim},
  title = {DeepSoccer},
  year = {2020},
  publisher = {GitHub},
  journal = {GitHub repository},
  howpublished = {\url{https://github.com/kimbring2/DeepSoccer/}},
  commit = {9ccab28a7e2a9a14caa119a765f95e2c6d0b044e}
}
 I receive a prize from NVIDIA for this project
 I receive Jetson AI Specialist certification from NVIDIA by this project
Apache License 2.0