We at Hidrun are committed to provide a complete set of hardware for Hidrun platform with open source hardware designs and open source firmware.
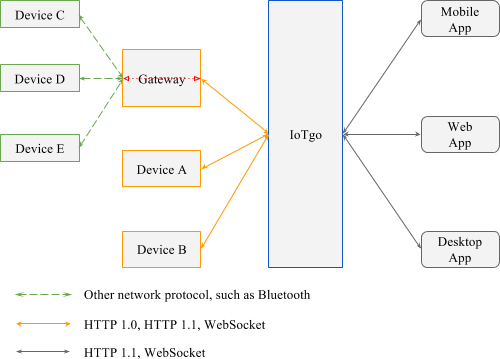
The overall Hidrun system architecture including Hidrun, Hidrun-compatible apps and devices is illustrated by following graph.
single-board computer (like Raspberry PI) developers and other embedded system or robot developers could use Hidrun Device API to connect their devices or robots to Hidrun and then easily control them by utilizing Hidrun Web App.
In one word, we want to provide cloud capability for device or robot developers and device capability for app developers.
Hidrun is not an ordinary IoT cloud platform, we designed this platform to be open, simple and easy to use, so everyone can handle the hardware, software and website design in the same time.
-
Improve UI design: display device connecting status and last connect time on device detail page. [Connecting status added]
-
Support GPS device: receive device GPS information and display the exact location on google map.
-
Add the functions of brightness control and RGB adjustment for Light device.
-
Show power consumption information and the control function for Switch device.
-
Store historic data collected from all kinds of sensers.
-
Provide websocket interface and support bidirectional communication between IoTgo and devices.[Done! Currently is only enabled for indie device] -
Provide Android app code.[Done! Please head over to IoTgo Android App]
Install
Get source code from github.com
git clone https://github.com/oatmeal3000/HidrunCloud.git
Change directory to downloaded IoTgo and install dependencies.
cd HidrunCloud
#Upgrade node modules before installation rm -rf node_modules && npm install
Change directory to IoTgo Web App frontend and install dependencies.
cd public/frontend && bower install
Change directory to IoTgo Web App backend and install dependencies.
cd ../backend && bower install
Change directory back to IoTgo root
cd ../..
Copy config.js.sample to config.js which is the actual configuration file being used during IoTgo boot process.
cp config.js.sample config.js
Edit config.js and change corresponding fields to reflect your hosting environment.
#Install mongodb http://www.cnblogs.com/OneDirection/p/6797347.html
Running the service
you can start it in console mode
DEBUG="iotgo" ./bin/www
To run IoTgo on other port instead of 80, you can use PORT environment variable.
PORT="3000" DEBUG="iotgo" ./bin/www
To run IoTgo as system service
sudo service iotgo start
