Welcome to this interactive workshop where we will use GitHub Copilot to create a C# project with CRUD operations. This project will allow us to add, update, and delete users. We will work through multiple different use-cases of GitHub Copilot.
Start by launching your Codespace environment or IDE of your choice in which GitHub Copilot is supported (Visual Studio, VS Code, GitHub Codespaces, Neovim and JetBrains). Note: This workshop relies heavily on Copilot Chat which may not be available in all IDEs -- however, you may still follow along and prompt GitHub Copilot inline using comments rather than using chat.
Take a moment to explore the project directory. (Surprise! It's empty)
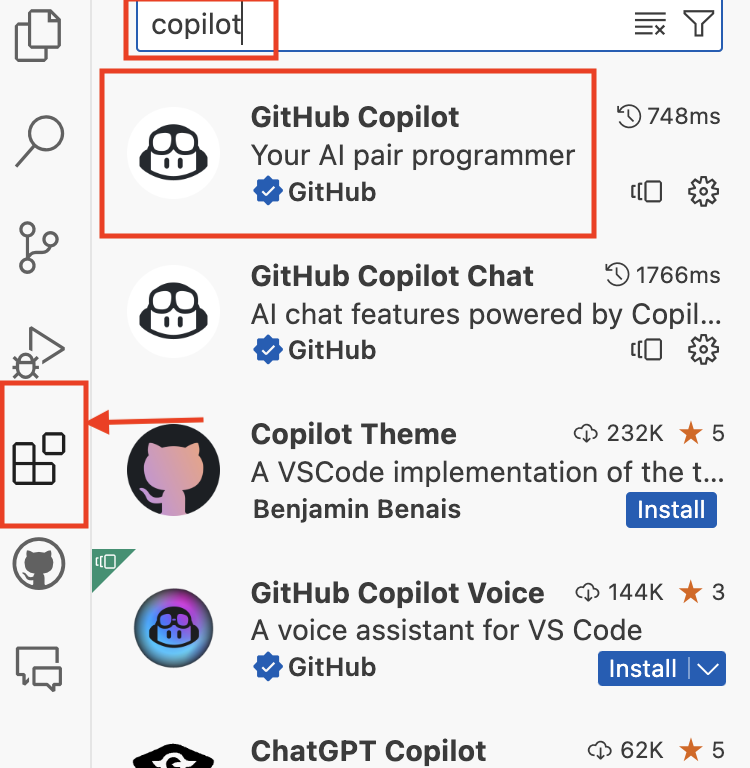
Navigate to the extensions tab on the left hand side of the codespace. Search 'copilot' and install the GitHub Copilot extension. Note that this will also install the chat feature. If using a different IDE, navigate to the marketplace and search for copilot.
Depending on which IDE you are using, you will be prompted to login with your GitHub credentials.
Open up the chat feature and say hello to Copilot!
GitHub Copilot chat includes built-in commands (hotkeys) for common tasks. You can explore these using the / command in chat.
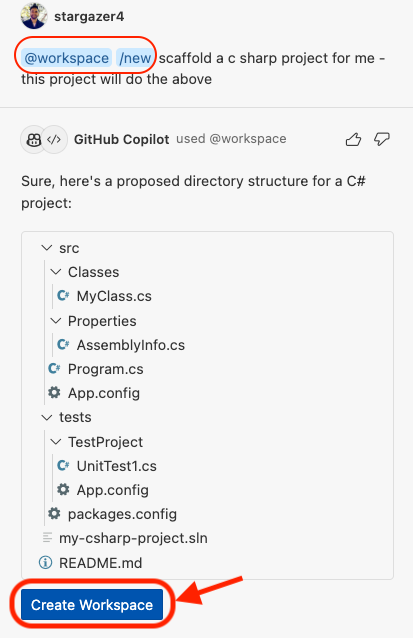
Start typing new in the chat and choose the new workspace option. Ask Copilot to scaffold a new C# project. Copilot will create a new workspace and present you with a convenient button to create the workspace for you. Click this button, name the workspace my-csharp-project (see second image below) and wait for the Codespace to reload. (see image below)
Once the Codespace has reloaded, familiarize yourself with the contents of the new project and its directories.
We will use Copilot in the IDE to create a User class with ID, Name, and Email properties, along with their respective get and set methods.
We will use Copilot in the IDE to create a User class with ID, Name, and Email properties, along with their respective get and set methods.
Navigate to the /src/Classes directory and create a new file called User.cs (Note: If there is no /src/Classes directory, create one).
At the top, we will write a comment to prompt GitHub Copilot:
// setup a class called User with 3 properties: Id, Name, and Email
// The properties are defined using the get and set accessors.
// Use the appropriate namespace for the project (MyCSharpProject.Classes).
// The set accessor assigns a new value to the property, and the get accessor returns the property value.
The contents returned should be something along the lines of:
using System;

namespace MyCSharpProject.Classes
{
    public class User
    {
        public int Id { get; set; }
        public string Name { get; set; }
        public string Email { get; set; }
    }
}
Alternatively, you may begin typing into the file the solution above, and see what suggestions Copilot returns along the way.
We will ask Copilot chat to create the UserService. This service will handle the CRUD operations for our User objects.
Navigate to the /src/Classes directory and create a new file called UserService.cs. We will use GitHub Copilot chat to generate the contents of this service file.
In the chat interface, prompt copilot to
// We are creating a simple C# console application that performs basic CRUD operations on a list of users. Create a UserService class in the MyCSharpProject.Classes namespace that manages a list of User objects. The User class has properties Id, Name, and Email. The UserService class should have methods to add a user, get a user by id, update a user's details, and delete a user by id.The response should contain code similar to the following solution below:
using System.Collections.Generic;
using System.Linq;
namespace MyCSharpProject.Classes{
public class UserService
{
    private List<User> users = new List<User>();

    public void AddUser(User user)
    {
        users.Add(user);
    }

    public User GetUser(int id)
    {
        return users.FirstOrDefault(u => u.Id == id);
    }

    public void UpdateUser(User user)
    {
        var existingUser = GetUser(user.Id);
        if (existingUser != null)
        {
            existingUser.Name = user.Name;
            existingUser.Email = user.Email;
        }
    }

    public void DeleteUser(int id)
    {
        var user = GetUser(id);
        if (user != null)
        {
            users.Remove(user);
        }
    }
}
}
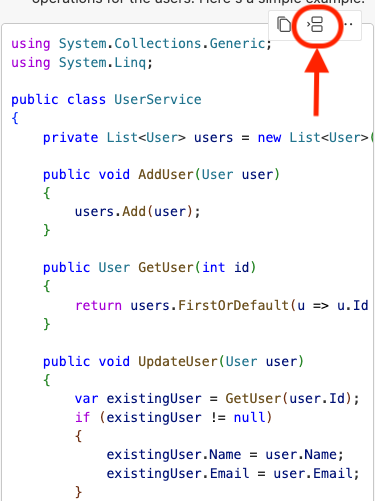
Use the built-in insert button (see below) in the chat response interface to insert at the cursor in your UserService.cs file.
Navigate to the Program.cs file (in the root directory) and use Copilot chat to create the entry point for our project.
// This file contains the Main method where you create an instance of UserService and perform operations like adding, getting, updating, and deleting users.
// create a main program that uses the UserService class to add, get, update, and delete a User. The User class has properties Id, Name, and Email. The UserService class has methods to add a user, get a user by id, update a user's details, and delete a user by id. Demonstrate these operations in the Main method.
The response should contain code similar to the following solution below:
using System;
using MyCSharpProject.Classes;

public class Program
{
    static void Main(string[] args)
    {
        UserService userService = new UserService();

        // Add a user
        userService.AddUser(new User { Id = 1, Name = "John Doe", Email = "john.doe@example.com" });

        // Get a user
        User user = userService.GetUser(1);
        Console.WriteLine($"Got user: {user.Name}");

        // Update a user
        user.Name = "Jane Doe";
        userService.UpdateUser(user);

        // Delete a user
        userService.DeleteUser(1);
    }
}
Use the built-in insert button (see below) in the chat response interface to insert at the cursor in your UserService.cs file.
Use Copilot to add additional users in the Program.cs file.
Another use case for GitHub Copilot chat is code review. For an extra set of eyes, you may highlight the contents of each of the three files and ask Copilot to review them for syntax errors or any other issues.
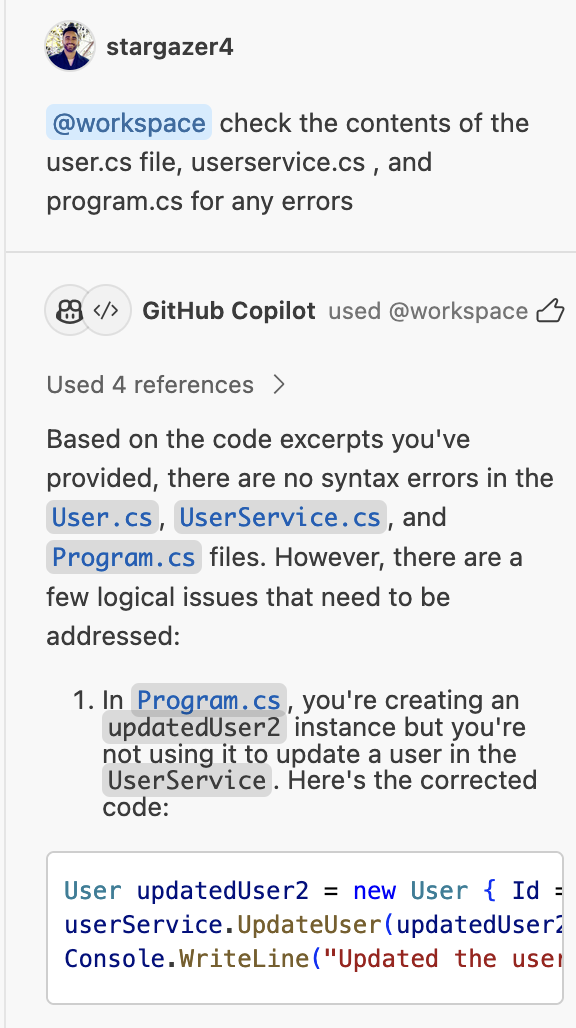
Alternatively, you may use the built-in /workspace command and ask Copilot chat to check the contents of specific files for errors (see image below):
Copilot Chat can be leverage to document existing codebases. Highlight the contents of the UserService.cs file (or any file of your choice) and ask Copilot Chat to modify this file in order to include documentation in the form of inline comments. Review the response and notice how Copilot can aide in documenting existing codebases - making it much easier for developers to understand how to navigate complex and unfamiliar codebases.
Navigate to your .csproj file in the /src directory - if it doesn't have one already, create the file and name it based on your project name, ie: MyCSharpProject.csproj. Navigate to Copilot Chat to generate the contents for the .csproj file. Ask Copilot to use .NET version 7 and to include the appropriate ItemGroup elements.
// Create a .NET project file that targets .NET 7.0, outputs an executable, and includes Program.cs and all C# files in the Classes directoryThe response should contain code similar to the following solution below:
<Project Sdk="Microsoft.NET.Sdk">

    <PropertyGroup>
        <OutputType>Exe</OutputType>
        <TargetFramework>net7.0</TargetFramework>
        <EnableDefaultCompileItems>false</EnableDefaultCompileItems>
    </PropertyGroup>

    <ItemGroup>
        <Compile Include="Program.cs" />
        <Compile Include="Classes/*.cs" />
    </ItemGroup>

</Project>
Now we're ready to build the project. Navigate to the /src directory via the terminal and run dotnet build. If you run into any errors, copy and paste the contents of the error into Copilot chat and use it as an aide to guide you towards a fix.
Use dotnet run to run the application.
Use Copilot to generate tests for your application. Test files are located in the /tests directory.
Create a test file and name it UserServiceTests.cs - this should be created in the /tests/MyCSharpProject.Tests directory. Ask Copilot Chat to generate unit tests for the addUser, getUserById, deleteUser and updateUser methods in the UserService.cs file - you'll want to review the output and modify accordingly to ensure the appropriate function names are being used.
Alternatively, you may generate the unit tests one method at a time, using inline comments to prompt Copilot. Begin typing the following and press enter to see Copilots suggestions. Sometimes, you will need to hit enter twice (to have a new line) in order to generate suggestions for the next block of code.
//create a test method for the add user method in the UserService.cs fileReview the response provided by Copilot, accept the suggestions and edit as necessary.
Once the first test is created, you'll notice that if you have a new line between the previous chunk of code, Copilot should begin to prompt for additional tests (see image below):
Run through and create a few different tests. Below is a sample output -- keep in mind your solution will look a bit different.
using System;
using Microsoft.VisualStudio.TestTools.UnitTesting;
using MyCSharpProject.Classes;


namespace MyCSharpProject.Tests
{
    [TestClass]
    public class UserServiceTests
    {
        //create a test method for the add user method in the UserService.cs file
        [TestMethod]
        public void TestAddUser()
        {
            // Arrange
            int id = 1;
            string name = "Test User";
            string email = "testuser@example.com";

            // Act
            User user = new User { Id = id, Name = name, Email = email };


            // Assert
            Assert.AreEqual(id, user.Id);
            Assert.AreEqual(name, user.Name);
            Assert.AreEqual(email, user.Email);


        }


        //create a test method for the get user by id method in the UserService.cs file
        [TestMethod]
        public void TestGetUserById()
        {
            // Arrange
            UserService userService = new UserService();
            User user = new User { Id = 1, Name = "Test User", Email = "testemail@example.com" };
            userService.AddUser(user);

            // Act
            User retrievedUser = userService.GetUserById(1);

            // Assert
            Assert.AreEqual(user.Id, retrievedUser.Id);
            Assert.AreEqual(user.Name, retrievedUser.Name);
            Assert.AreEqual(user.Email, retrievedUser.Email);
        }

        //create a test method for the update user method in the UserService.cs file
        [TestMethod]
        public void TestUpdateUser()
        {
            // Arrange
            UserService userService = new UserService();
            User user = new User { Id = 1, Name = "Test User", Email = "testuser@example.com" };
            userService.AddUser(user);
            User updatedUser = new User { Id = 1, Name = "Test User", Email = "newemail@example.com" };

            // Act
            userService.UpdateUser(updatedUser);
            User retrievedUser = userService.GetUserById(1);

            // Assert
            Assert.AreEqual(updatedUser.Email, retrievedUser.Email);
        }

        //create a test method for the delete user method in the UserService.cs file
        [TestMethod]
        public void TestDeleteUser()
        {
            // Arrange
            UserService userService = new UserService();
            User user = new User { Id = 1, Name = "Test User", Email = "testuser@example.com" };
            userService.AddUser(user);

            // Act
            userService.DeleteUser(1);

            // Assert
            Assert.ThrowsException<Exception>(() => userService.GetUserById(1));


}
    }
}If there's no .csproj file in the tests/MyCSharpProject.Tests directory, you'll need to create one. Ask Copilot Chat to fill in the contents of this file. Below is a sample output:
<Project Sdk="Microsoft.NET.Sdk">

    <PropertyGroup>
        <TargetFramework>net7.0</TargetFramework>
    </PropertyGroup>

    <ItemGroup>
        <PackageReference Include="Microsoft.NET.Test.Sdk" Version="17.0.0" />
        <PackageReference Include="MSTest.TestAdapter" Version="2.2.7" />
        <PackageReference Include="MSTest.TestFramework" Version="2.2.7" />
    </ItemGroup>

    <ItemGroup>
        <ProjectReference Include="..\..\src\MyCSharpProject.csproj" />
    </ItemGroup>

</Project>
Ensure you are in the /tests/MyCSharpProject.Tests directory. Open up terminal and navigate to /tests/MyCSharpProject.Tests and run the command dotnet test.
If you run into errors, you can use Copilot chat to assist you. Consider using the built-in /fix command.
Enjoy the workshop and happy coding!
- Refractor code using GitHub Copilot Chat - highlight the contents of the
UserService.csfile and ask Copilot Chatrefractor this code snippet- notice the output suggested by Copilot. - Modify the methods in UserService.cs to update a user's name or email address (updateEmail or updateName)
- Modify the GetUser method to support pagination
- Create a method to assign roles to a user
- Create a method to search for users by name
- Create a method to log events in the application
- Create an API controller for the User class
- Create unit tests for the UpdateUser method
- Create unit tests for the getUser method
- Create unit tests for the addUser method
- Modify code to handle errors/exceptions


