
This is a small demo that aims to demonstrate the new observable states feature in Version 2 of Corda. As well as observable states, it also uses the following features:
- Confidential identities
- Queryable states and custom vault queries
- Schedulable states
- Finish the contract and flow unit tests
- Add a Spring Reactive web server
- Finish the campaign contract code
- Finish the README.md
- Fill in the checkTransaction menthod of collect sigs flow
- The manager should check that the cash transactions send the cash to him. For this to work, we need to use the same key for each cash state
- etc etc
There are two types of parties:
- Campaign Managers
- Pledgers
As all nodes have the same CorDapp they all have the capability of setting up campaigns and pledging to other campaigns.
-
The demo begins with a node starting a new campaign. The node starting a new campaign becomes the manager for that campaign. The manager also needs to specify what the target amount to raise is, along with the campaign deadline and a name for the campaign. The manager is the only participant in the
Campaignstate, so it should only be stored in the manager node's vault. However, as we use the observable states feature via theBroadcastTransactionandRecordTransactionAsObserverflows, all the other nodes on the network will store this campaign state in their vaults too. The create new campaign transaction looks like this: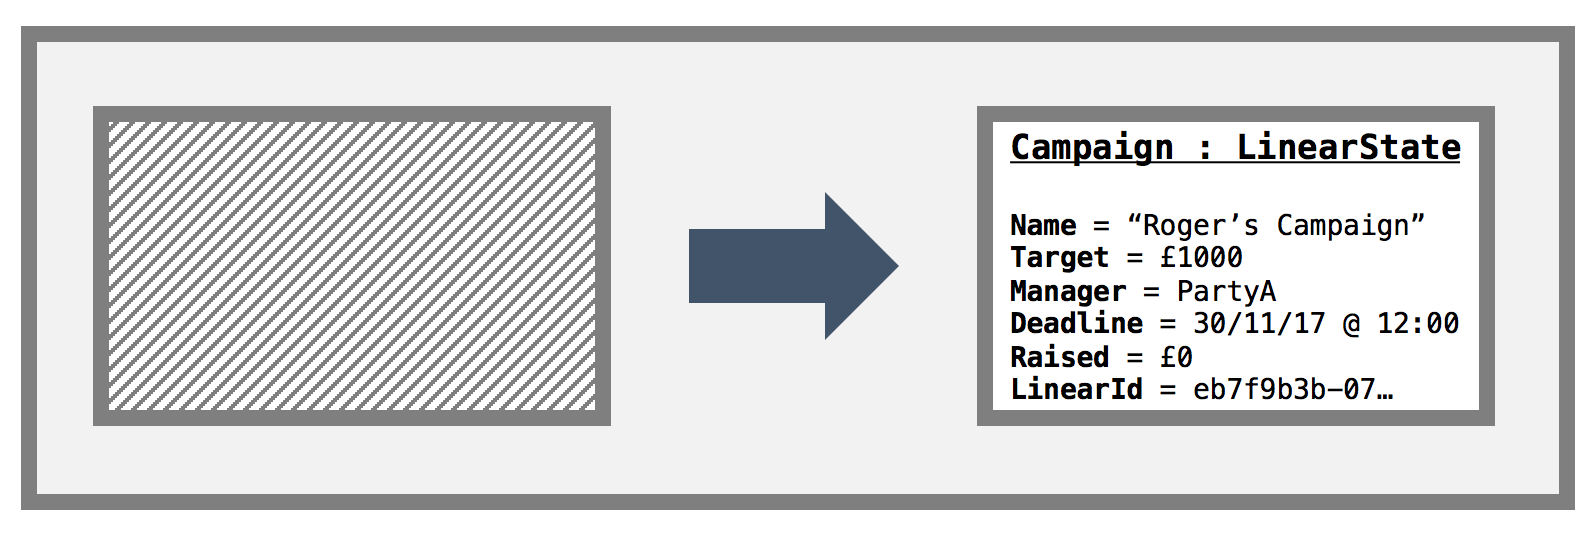
-
To make a pledge to a campaign, a node user must know the
linearIdof the campaign they wish to pledge to. As all the nodes on the network will receive newCampaignstates, they can query their vault to enumerate all the campaigns, then pick the one they wish to pledge to. Making a pledge requires a node user to specify thelinearIdof the campaign they wish to pledge to as well as the amount they wish to pledge. The pledging node then constructs a transaction that contains the newPledgestate as an output as well as theCampaignstate to be updated. As such there is both aCampaigninput and output. The transaction looks like this: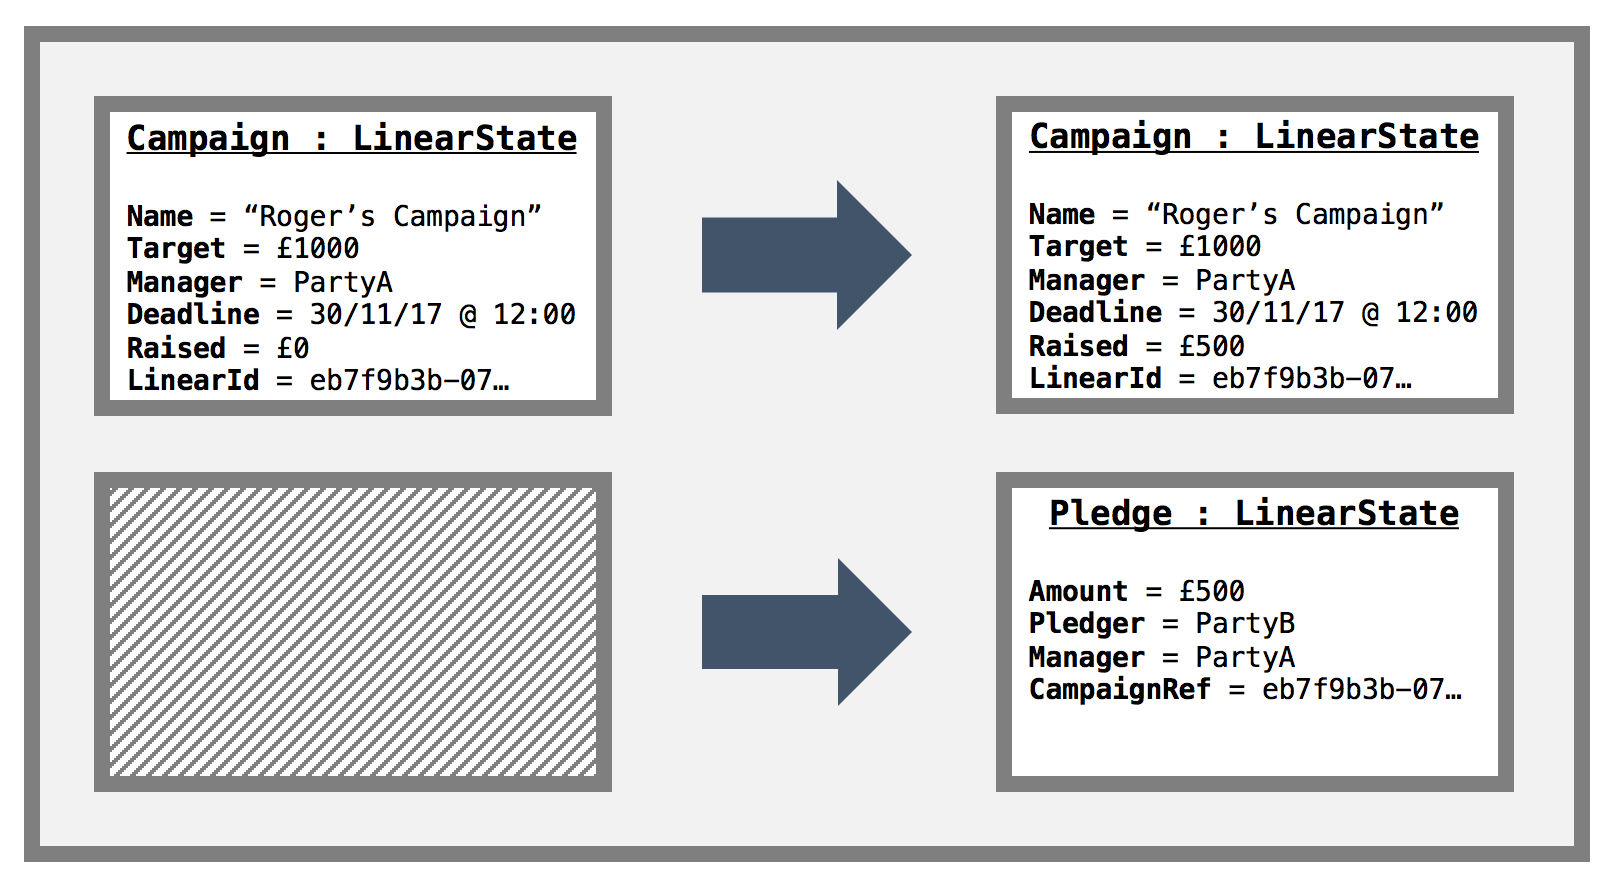
The
CampaignContractcode ensures thatCampaign.raisedSoFarproperty is updated in-line with the amount pledged. Note in the above diagram, as this is the only pledge so far in this scenario, theCampaignoutput state reflects the amount in thePledgestate.This as with the create campaign transaction covered above, this transaction is broadcast to all nodes on the network. It is worth noting, that currently, one can only observe a whole transaction as opposed to parts of a transaction. This is not necessarily an issue for privacy as the pledgers can create a confidential identity to use when pledging, such that it is only known by the pledger and the campaign manager. The main complication with only being able to store full transactions manifests itself when querying the vault - all the pledges that you have been broadcast, can be returned
-
The
Campaignis actually aSchedulableState. When we create a new campaign, we are required to enter a deadline to which the campaign will run until. Once the deadline is reached, a flow is run to determine whether the campaign was a success or failure.Success: The campaign ends successfully if the target amount is reached. In this case, an atomic transaction is produced to exit the
Campaignstate and all thePledgestates from the ledger as well as transfer the required pledged amounts in cash from the pledgers to the campaign manger.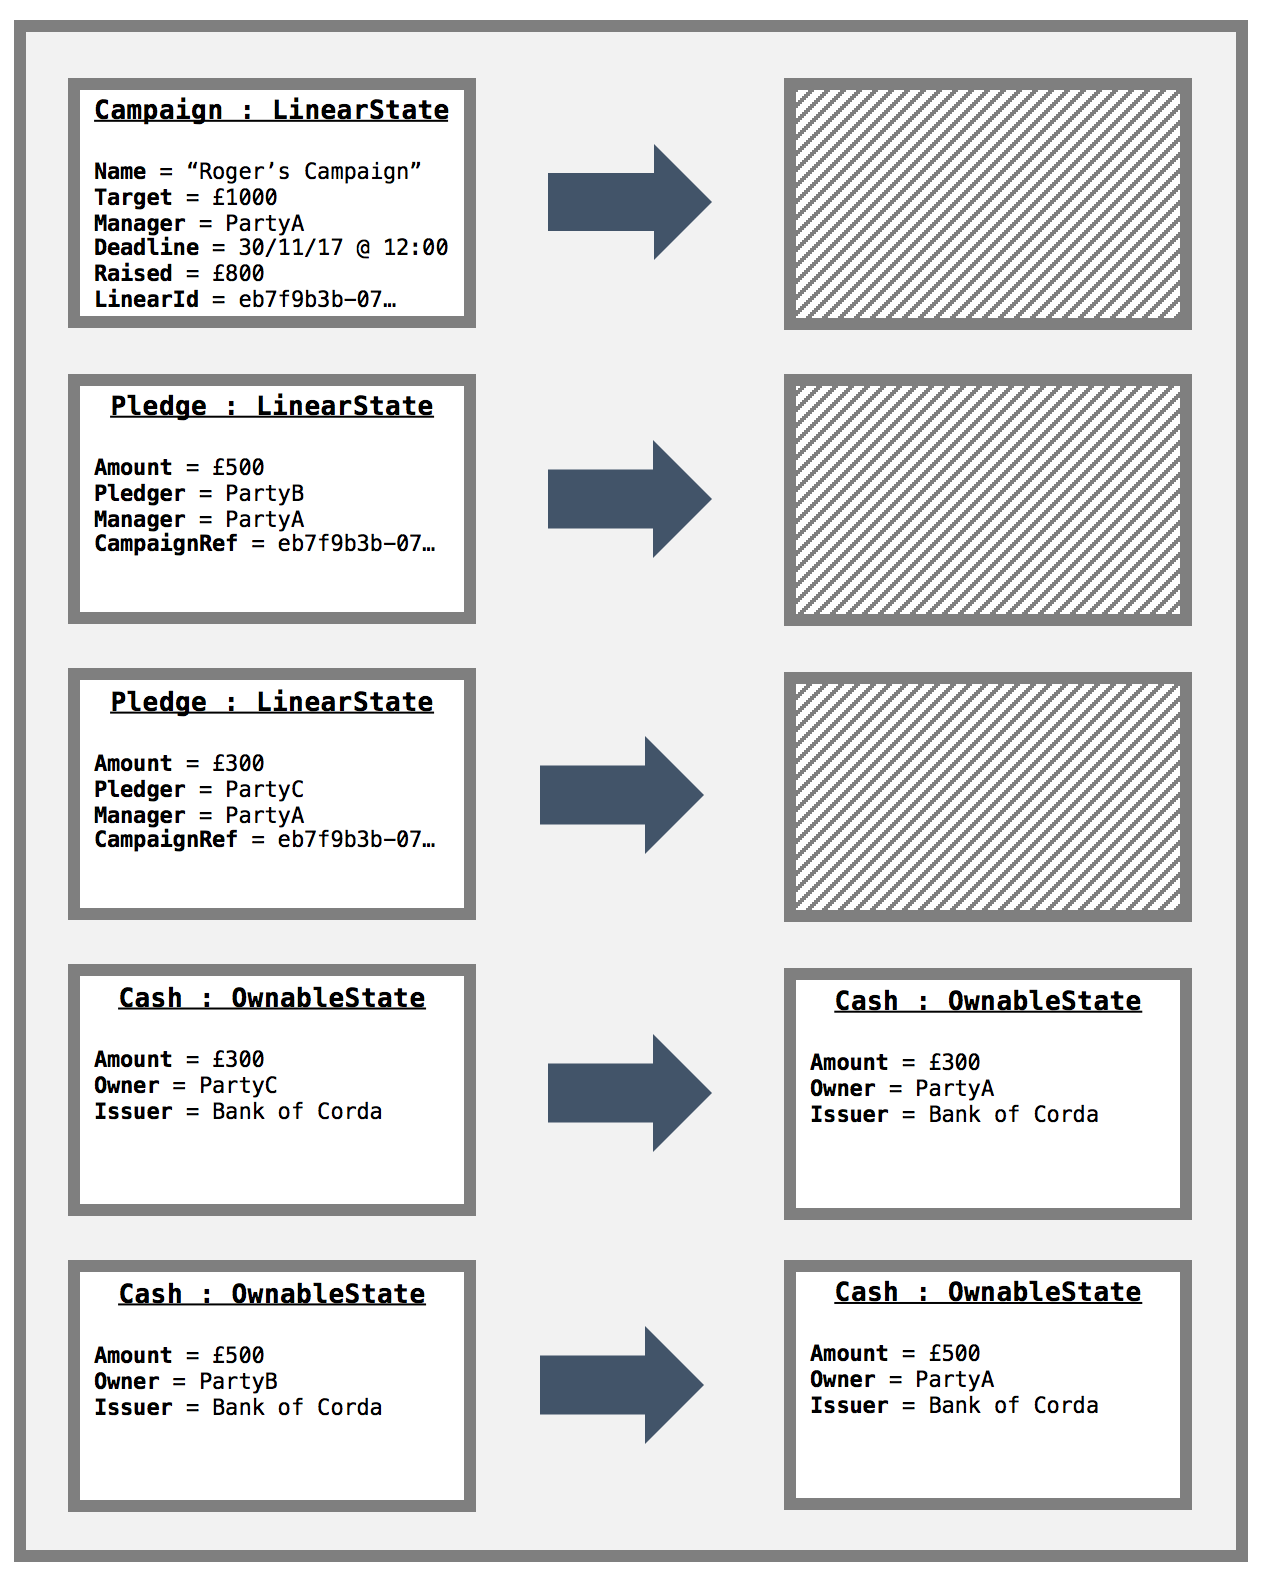
Failure: The campaign ends in failure if the target is not reached. In this case, an atomic transaction is produced to exit the
Campaignstate and all thePledgestates from the ledger. The transaction looks like this: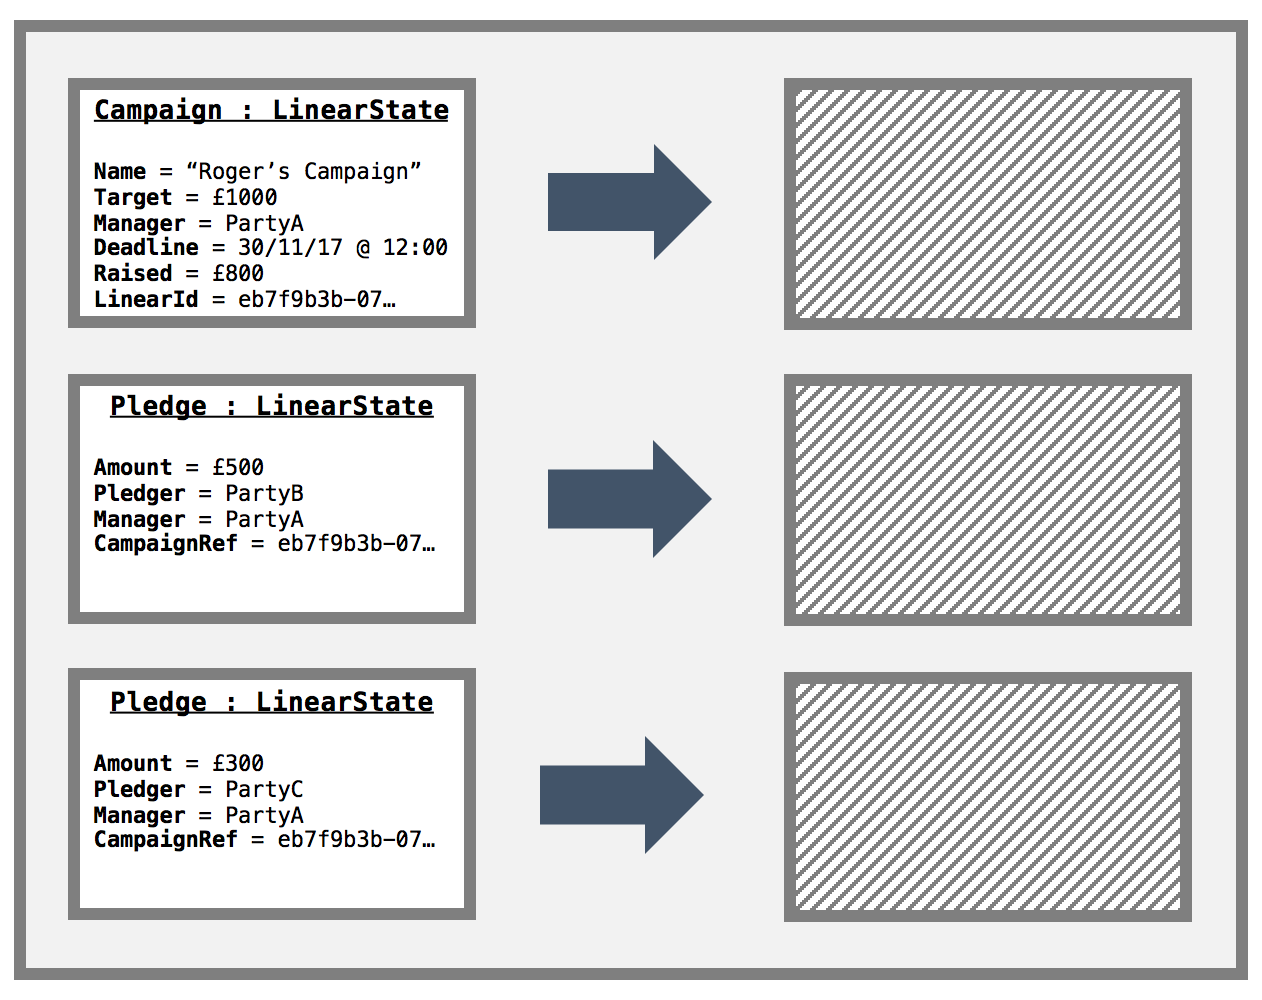
As with all the other transactions in this demo, these transactions will be broadcast to all other nodes on the network.


- If a node makes a pledge, they will have enough cash to fulfill the pledge when the campaign ends.
- Confidential pledger identities are adequate from a privacy perspective. We don't mind that the cash and pledge
states are shared to all nodes on the business network. If this an issue then we need to facilitate observable
states via the use of
FilteredTransactions. - Each pledger can only make one pledger per campaign. They may update their pledge if they wish, though.
- The
Campaignstate only needs to be signed by the campaign manager. - The
Pledgestates are bilateral agreements and are signed by the pledger and the campaign manager. - The
Campaignstate is included in all create pledge transactions to make sure the amount raised is updated with the correct amount pledged. As such, if two pledgers try to pledge at the same time, one pledge will end up being a double spend. We assume this is OK. - Any node can start a
Campaign. - Nodes can pledge to multiple
Campaigns. - After the campaign ends, it is OK to exit the
Campaignstate and all thePledgestates. - Only campaign managers can cancel pledges and a pledge cancellation must be accompanied with a campaign state and campaign End command.
You will need the following installed on your machine before you can start:
- JDK 8 installed and available on your path (Minimum version: 1.8_131).
- IntelliJ IDEA (Minimum version 2017.1)
- git
- Optional: h2 web console (download the "platform-independent zip")
For more detailed information, see the getting set up page on the Corda docsite.
Via gradle:
Unix:
./gradlew clean test
Windows:
gradlew.bat clean test
If you want to run the tests via IntelliJ then navigate to cordapp/strc/test/kotlin/net.corda.demos.crowdFunding in
the project explorer to see the unit test files. To run a test click the Green arrow in the left handle margin of the
editor.
To get started, clone this repository with:
git clone https://github.com/roger3cev/observable-states.git
And change directories to the newly cloned repo:
cd observable-states
Unix:
./gradlew deployNodes
Windows:
gradlew.bat deployNodes
Note: You'll need to re-run this build step after making any changes to the template for these to take effect on the node.
Once the build finishes, change directories to the folder where the newly built nodes are located:
cd build/nodes
The Gradle build script will have created a folder for each node. You'll
see three folders, one for each node and a runnodes script. You can
run the nodes with:
Unix:
./runnodes --log-to-console --logging-level=INFO
Windows:
runnodes.bat --log-to-console --logging-level=INFO
You should now have three Corda nodes running on your machine serving the template.
When the nodes have booted up, you should see a message like the following in the console:
Node started up and registered in 5.007 sec
To be added.
Tutorials and developer docs for CorDapps and Corda are here.