I received the device as a gift. Whenever I receive a new device I take a quick look into it. Especially with a device that invites some rather personal or business critical data. Even though in this case I more or less trust the company Ratta to do the best they can to protect my data - being a (part-)Chinese company I believe limits to what they can do. We all are aware of the conversation around the state of privacy laws and regulations in China. Also I had reason to believe devices are being made by a third party OEM manufacturer also located in mainland China and wanted to see what else is happening on the device.
TL;DR The device can be rooted through multiple attack vectors. Software as well as hardware based.
Good news: after looking into the device I could not find anything obviously compromising in terms of spyware or other invasive practice. Some of the Ratta Apps come with partly obfuscated Tencent components embedded. The device seems to be respecting your telemetry settings (take note Google, Apple, et al) but is very regularly checking for updates which at least might be tracking you in terms of location and usage patterns. Some servers apparently are located in China so potentially open to the Chinese government. Even though the company seems to be aware of the topic and rolling out servers in the US. To put things into perspective: any embedded Google or Amazon device, any popular operating system, any smartphone or popular social media app gathers more information about you than what I found here.
Warning: I do not advise anyone to follow this writeup in practice as you will very likely render your device unsuable. Much of this is written down from memory. Which in my case isn't very reliable. So there might be errors or omissions that increase your risk of rendering your device unusable along with voiding your guarantee.
Update 2022/08/08: I notified Ratta a bit over two weeks ago to let them know I would release this information. As expected Ratta replied kindly and promised to work on the issues. I also want to point out that I am in no way implying CHINA = EVIL here. I am voicing a general wish for my data to be safe and private and see issues in US, European, Indian, Russian,... privacy practice as much as I see it with China.
See above. Given physical access this device can not be considered secure for any highly sensitive data.
Given the nature of it's outdated version of Android and the lack of security measures I would under no circumstances make my device available to any untrusted party. I would also advice to never attach it to any unknown computer or public charging cable since some of these attacks can be done in an entirely automated way.
I am not a security person. This cost me two weekends of gathering publicly available data. Any person or party motivated enough and more talented than me will be quicker. Also since Ratta promised to allow sideloading anyways as well as seeing the device coming wide open with preinstalled su binary, public test keys, open boot loader, (disabled, easily unlocked) adb console interface and other open doors I assume this will not create any unexpected inconvenience.
In any way this document has been made available to Ratta via email on Jul 27 2022, two weeks ahead of posting publicly.
Nope. Under no circumstances I will distribute any files that might even remotely be covered by copyright or such. If you know what you're doing this writeup contains more than enough information. If not, please leave your device as is and ask Ratta for shell / root access to your device.
You can find a limited amount of device specifications by installing the kindle app which is - as of the time of writing - the only available app on the integrated "app store" of the device. Or you just unpack an OTA update.zip.
The device runs Android 8.1 on a Rockchip PX30 platform consisting of a 1,5GHz quad core ARM Cortex-A35, 2 gigs of RAM and a 1404x1872 eink display. The Rockchip platform seems to often be found in car radios and other embedded devices that come with a user interface. So you can find a lot of official and less official info on it by just googling.
Like so: rockchip.fr/PX30%20datasheet%20V1.1.pdf Or so: opensource.rock-chips.com/wiki_Main_Page
Deducting from the fact that there's a /r/supernote and a /r/supernote_beta on reddit a beta program exists for the device.
Ratta offers information on both release an beta updates there as well as on their website:
- support.supernote.com/category/1/system-update
- support.supernote.com/article/2/release-notes-for-a5-x-and-a6-x
The current non-beta can be downloaded from here: support.supernote.com/article/3/how-to-update-your-supernote
The beta can not as it's distribution is tied to the serial number of your device as can be found in the SupernoteSettings.apk, since independently of the version currently installed, it connects to the same server and URL. See below for more in depth info.
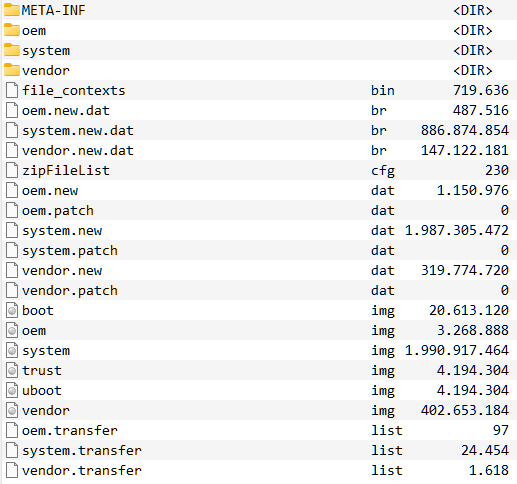
Updates are common, non encrypted Android OTA files which can easily be unpacked and analysed using freely available tools. See below for more info.
update.zip with unpacked .br brotli images:
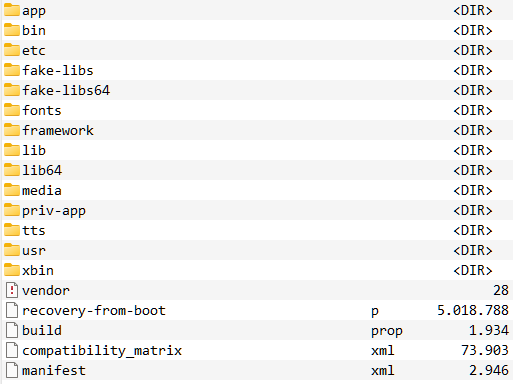
update.zip:/system
The device updates by coordinating with a server at device.supernote.com.cn to see whether there is a new update available:
curl -X POST -k -H 'Content-Type: application/json' -i 'https://device.supernote.com/official/system/business/android/update/download' --data '{"language":"EN", "equipmentNo":"SN100Bxxxxxxxx", "logicVersion":"Chauvet 2.4.15(566)", "configureList":[{"type":"1", "version":"Chauvet.D002.2203101001.566_release"}]}'
Error messages are in chinese but are the usual Device doesn't need an update, Serial number unknown, etc.
If an update is available the device receives a download URL along with a full changelog etc.
{"success":true,"errorCode":null,"errorMsg":null,"configureList":[{"type":"1","version":"Chauvet.xxxx.xxxxxxxxxx.xxx_xxxxxxx","fileName":"Chauvet.xxxx.xxxxxxxxxx.xxx_xxxxxxx.zip","name":null,"packageName":null,"versionNo":null,"url":"https://prod-ratta-firmware.s3.ap-northeast-1.amazonaws.com/xxxxxx/update.zip","size":xxxxxxxx,"md5":"abcdefabcdefabcdefabcdef"}],"totalSize":xxxxxxxx,"fixPointList":[{"current":false,"version":"Chauvet x.x.xx(xxx)","fixPoint":"
...
","opTime":"xxxx-xx-xx xx:xx:xx"}],"logicVersion":" Chauvet x.x.xx(xxx)","deployDate":"xxxx-xx-xx xx:xx:xx"}
Which is then being downloaded and handed over to the recovery system.
Same happens if you follow the manual update instructions by putting an update.zip file in the /EXPORT/ folder on your device and pull the USB cable. The device discovers the file and asks you if it should go ahead installing.
The exact mechanism can be deducted from the following code.
com.ratta.supernote.update.NetWorkConstant
    public static final String DEV_BASE_URL = "http://10.20.22.32:9000";
    public static final String DOWN_LOAD_URL = "";
    public static final String NET_BASE_URL_PRODUCT = "http://10.20.22.32:8075/";
    public static final String NET_BASE_URL_TEST = "https://test-ms-device.ratta.com.cn/";
    public static final String RELEASE_BASE_URL = "https://device.supernote.com.cn/";
    public static final String UAT_BASE_URL = "https://device.supernote.com";
    public static final File DOWN_LOAD_PATH = new File("/cache");
    public static final String USBDisk_Path = Environment.getExternalStorageDirectory() + File.separator;
    public static final String FILE_TEST = USBDisk_Path + "EXPORT/test";
    public static final String FILE_PRODUCT = USBDisk_Path + "EXPORT/product";
    public static final String FILE_UAT = USBDisk_Path + "EXPORT/uat";
com.ratta.networklibrary.utils.C0598Utils
    String str = Build.DISPLAY; // i.E. Chauvet.D002.2203101001.566_release
    boolean exists = new File(Constant.FILE_USA).exists();
    int lastIndexOf = str.lastIndexOf("_");
    if (lastIndexOf != -1) {
        String substring = str.substring(lastIndexOf + 1);
        String str2 = ((TextUtils.equals(substring, "root") || TextUtils.equals(substring, "hard")) && exists) ? Constant.USA_BASE_URL : Constant.RELEASE_BASE_URL;
        if (new File(Constant.FILE_TEST).exists() || TextUtils.equals(substring, "test")) {
            str2 = exists ? Constant.TEST_USA_BASE_URL : Constant.TEST_BASE_URL;
        } else if (new File(Constant.FILE_PRODUCT).exists()) {
            str2 = Constant.DEV_BASE_URL;
        } else if (new File(Constant.FILE_UAT).exists() || TextUtils.equals(substring, "uat")) {
            str2 = Constant.UAT_BASE_URL;
        }
        if (!TextUtils.equals(substring, "release") && !TextUtils.equals(substring, "beta")) {
            return str2;
        }
        if (exists) {
            return Constant.USA_BASE_URL;
        }
    }
    return Constant.RELEASE_BASE_URL;
com.ratta.supernote.update.DownLoadService
    @POST("official/system/business/android/update/download")
    Call<DownResponse> downLoadFileInfo(@Body RequestBody requestBody);
com.ratta.supernote.update.UpDateAppService
    LocalSystemInfoBean localSystemInfoBean = new LocalSystemInfoBean(); // see CURL request above for example values
    localSystemInfoBean.setEquipmentNo(DownPresenter.getDeviceVersion());
    localSystemInfoBean.setLanguage(DownPresenter.getLanguage(this));
    localSystemInfoBean.setLogicVersion(DownPresenter.getLogicVersion());
    localSystemInfoBean.setConfigureList(DownPresenter.getSystemAllPackageVersion(this, new ArrayList()));
    RetrofitUtils retrofitUtils = RetrofitUtils.getInstance();
    final DownResponse downResponse = (DownResponse) retrofitUtils.execute(((DownLoadService) retrofitUtils.getService(DownLoadService.class)).downLoadFileInfo(DownLoadModel.getRequestBody(localSystemInfoBean)));
com.ratta.supernote.update.UpDateAppService
    if (new File(NetWorkConstant.DOWN_LOAD_PATH, "update.zip").exists()) {
        CacheInfoUtils.saveData(CacheInfoUtils.updateFlagPath, UpDateAppService.USB_UPDATE_FLAG);
        RecoverySystem.installPackage(UpDateAppService.this, new File(NetWorkConstant.DOWN_LOAD_PATH, "update.zip")); // if unfamiliar: https://developer.android.com/reference/android/os/RecoverySystem
    }
com.ratta.supernote.update.UpDateAppService
    private void checkRestartUpdate() {
        String str = SystemProperties.get(ConstanceUtil.restartKey, Constance.FILE_SEVER_UFILE);  // FILE_SEVER_UFILE = "0"; restartKey = "ratta.launcher.restart";
        LogUtils.m187d("ratta: " + str);
        if (!str.equals("1")) {
            SystemProperties.set(ConstanceUtil.restartKey, "1");
            this.firstSelectVersion = true;
            if (new File(Environment.getExternalStorageDirectory().getAbsolutePath() + File.separator + "EXPORT", "update.zip").exists()) {
                this.firstSelectVersion = false;
                usbUpdate();
                return;
            }
            LogUtils.m187d("checkRestartUpdate: getVersionList");
            getVersionList();
        }
    }

    public void usbUpdate() {
        if (this.usbUpdateFlag) {
            return;
        }
        final File file = new File(Environment.getExternalStorageDirectory().getAbsolutePath() + File.separator + "EXPORT", "update.zip");
        if (!file.exists()) {
            LogUtils.m187d("onReceive: No USB upgrade file");
            return;
        }
        GestureService.lockStatusbar = true;
        GestureService.lockSlidebar = true;
        this.usbUpdateFlag = true;
        LogUtils.m187d("usb update GestureService.lockStatusbar true");
        DialogUtils.getInstance().build(this).createDefaultDelayDialog(getString(C0688R.string.usb_detection_tips), 30, new LibDialogDelayDefaultListener() {  // "The upgrade pack is detected, do you want to install?"
        // goes on with housekeeping like removing any existing update.zip and a couple of checks for enough battery etc and then moves the update.zip to /cache as seen above
As you can see there are no sanity checks or any type of decryption going on. So you can basically take any file, move it to the /EXPORT/ folder and let the system hand it over to recovery.
I never checked but reading the code I assume you can up- and downgrade your device at will over USB.
Though since it's the standard Android recovery mechanism (which I am not super familiar with) it will check whether the file is signed with a known private key.
The device comes with a closed down ADB interface. It takes the adb reboot command which lets you put it in recovery adb reboot recovery as well as into fastboot adb reboot fastboot or bootloader mode adb reboot loader.
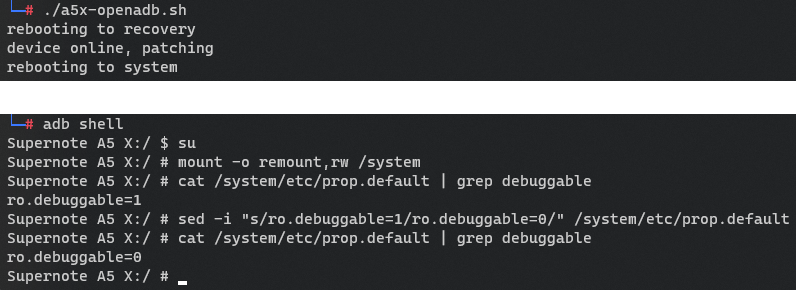
In recovery mode the device allows for a shell which runs as root. A limited command set is available but busybox is installed so nevermind. A logical step would be to unlock full access to adb by making a script like so:
#!/bin/bash

echo "rebooting to recovery"
adb reboot recovery

ANSWER=0
while [ "$ANSWER" != "1" ]; do
    sleep 2
    ANSWER=$(adb devices | grep rockchipplatform -c)
done

echo "device online, patching"

adb shell busybox mount -o rw,seclabel,relatime,data=ordered,inode_readahead_blks=8 /dev/block/by-name/system /system
adb shell sed -i "s/ro.debuggable=0/ro.debuggable=1/" /system/etc/prop.default

echo "rebooting to system"
adb reboot
After which the device is basically fully accessible via a standard adb shell which can then be elevated to root:
For non-technical users: this means your device is basically open, along with all your files. Any motivated user could at any time copy or modify any file on your device given USB access.
Since the bootloader is unlocked you could at any time flash any kernel or partition by rebooting the device into this mode and fastboot flash boot boot.img
For non-technical users: this means your device could freely be modified in such a way that you wouldn't notice and thus put your data and privacy at risk.
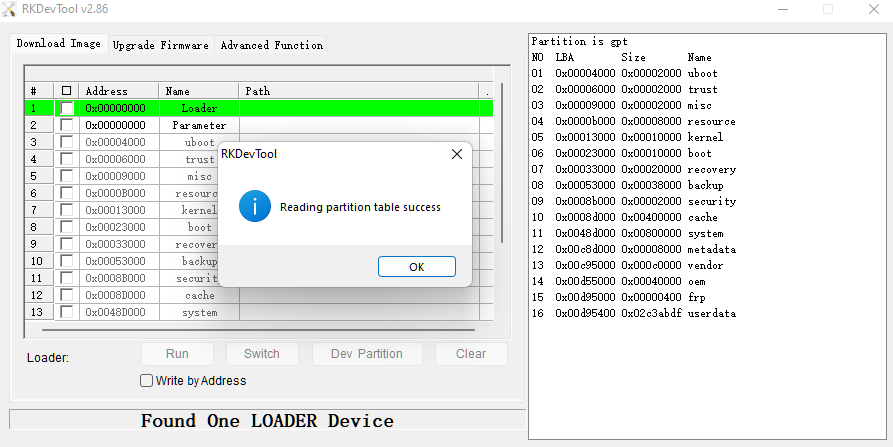
In this mode the device is being detected as "LOADER MODE" by Rockchip developer tools like RKDevTool. From here partitions can be overwritten, partition layout can be changed...
...and the device can be put into Maskrom Mode. More about that below.
For non-technical users: this means your device could freely be modified in such a way that you wouldn't notice and thus put your data and privacy at risk.
When I looked at the /system/build.prop I found
ro.build.description=px30_ht_eink-userdebug 8.1.0 OPM8.190505.001 Chauvet.D002.2206171001.629_beta test-keys
ro.build.fingerprint=Android/htfy_px30:/Chauvet.D002.2206171001.629_beta_:userdebug
test-keys is not a very good sign. If you're the developer. It's a beautiful sign if you're looking for a wide open door into the system.
I'm not going into the details of Android OTA but you can read about it here.
By looking at update.zip: /META-INF/com/android/otacert we can look at the public cert for the update:
-----BEGIN CERTIFICATE-----
MIID+zCCAuOgAwIBAgIJAJKlKMdz16FBMA0GCSqGSIb3DQEBCwUAMIGUMQswCQYD
VQQGEwJVUzETMBEGA1UECAwKQ2FsaWZvcm5pYTEWMBQGA1UEBwwNTW91bnRhaW4g
VmlldzEQMA4GA1UECgwHQW5kcm9pZDEQMA4GA1UECwwHQW5kcm9pZDEQMA4GA1UE
AwwHQW5kcm9pZDEiMCAGCSqGSIb3DQEJARYTYW5kcm9pZEBhbmRyb2lkLmNvbTAe
Fw0xNDEyMjMwNjQ0MDhaFw00MjA1MTAwNjQ0MDhaMIGUMQswCQYDVQQGEwJVUzET
MBEGA1UECAwKQ2FsaWZvcm5pYTEWMBQGA1UEBwwNTW91bnRhaW4gVmlldzEQMA4G
A1UECgwHQW5kcm9pZDEQMA4GA1UECwwHQW5kcm9pZDEQMA4GA1UEAwwHQW5kcm9p
ZDEiMCAGCSqGSIb3DQEJARYTYW5kcm9pZEBhbmRyb2lkLmNvbTCCASAwDQYJKoZI
hvcNAQEBBQADggENADCCAQgCggEBALl71fjESroAzdrkBKrApCrK9qnZfH38S3U3
6jhBOQtrwxnh/AaRC3hOyO5ihjwv1MlSuTA1DygGMznwP8rOQbc9eH4uqdnerE87
v0bc8lPCj22AAterZBZESqgfRwND/25S6A22wA/kpR/CiXMuWHlQfS6Q9CHBOwVQ
5ZZUge2KC1TbH8EtDkxDacOeTbhN6UQxxm3jgaIzkwyrEEcYB1m93CrTFOtVV7Jw
wo7XE5LGwo6nTzNieXJqoYxcNAMpv9seKW+GZ1EGl78e9B37SMoxq0I7HuStz5tD
tS2Er2YrjQig+1ZqgroIvPfEJAEyoEr0r6kK7jBh878usWOuWB0CAQOjUDBOMB0G
A1UdDgQWBBTV37ltjIiA28uNs8Z1hb6zasy5UzAfBgNVHSMEGDAWgBTV37ltjIiA
28uNs8Z1hb6zasy5UzAMBgNVHRMEBTADAQH/MA0GCSqGSIb3DQEBCwUAA4IBAQAZ
7pvK3yDr+O0G8ggDfaISkEeg0agocRcXGT/MRiPBz+n45+bEoym4hC2SdCxvHXES
5AHkFxjWavoQqAD8We955NCmpGzDip4hUctlXzqxYfSTvGiLArG92+Hcbu5RNx/7
o3Of39Mdge2jVKQuKAALWnb8TgJ/2k3KAUFzVqMXPY4asmnWtyW2FIKLdZU/yYTX
+8Tp0AhP+N84HUGg5BwQRD10/OGGY54rLfFy2aSLPxUZQ+VTSZB9Z9XRLxohsF/V
XBcZyCdPP254wDYL5R0HGWZv7CeBlVjw3FqDRI9aljdYfLpAk+clnRBwWOWHsiOE
pJXgkkLmpq0uDXsSMJZ2
-----END CERTIFICATE-----
Googling part of the cert yields at least one result from xda-developers.com where someone is trying to get into their Android 8.1 Rockchip PX5 device.
That's an even worse sign. Or an even more beautiful one for me.
Next I googled for an SDK around the PX30 platform and found one here:
en.t-firefly.com/doc/download/page/id/63.html#other_206
along with docs here:
wiki.t-firefly.com/en/Core-PX30-JD4/Android_development.html
and here:
wiki.t-firefly.com/en/Firefly-RK3399/customize_android_firmware.html
Downloading the SDK you can unpack the 7z archive and init the contained git repo through:
git clone PX30_Android8.1.0_LVDS_190706 directory_to_clone_into
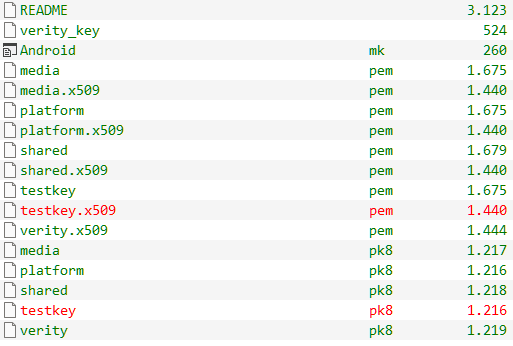
After a lengthy clone find the SDKs test keys under /build/make/target/product/security and you're good to go.
Fun fact: README in that folder states:
The test keys in this directory are used in development only and should NEVER be used to sign packages in publicly released images (as that would open a major security hole).
Yup, confirmed.
I leave the technique up to you - while working on Windows I use Multi Image Kitchen to unpack and repack and sign Android OTAs. You will have to move your
testkey.x509.pem and testkey.pk8 into the \bin folder of the tool and from there on will be able to create modified updates the device will have no choice but installing when you place it in the EXPORT folder.
Well, probably.
All you do from here is extremely prone to error and to soft bricking your device. As far as I know all Rockchip devices can never be entirely soft bricked since they always come with a maskrom mode which basically is an open programming interface.
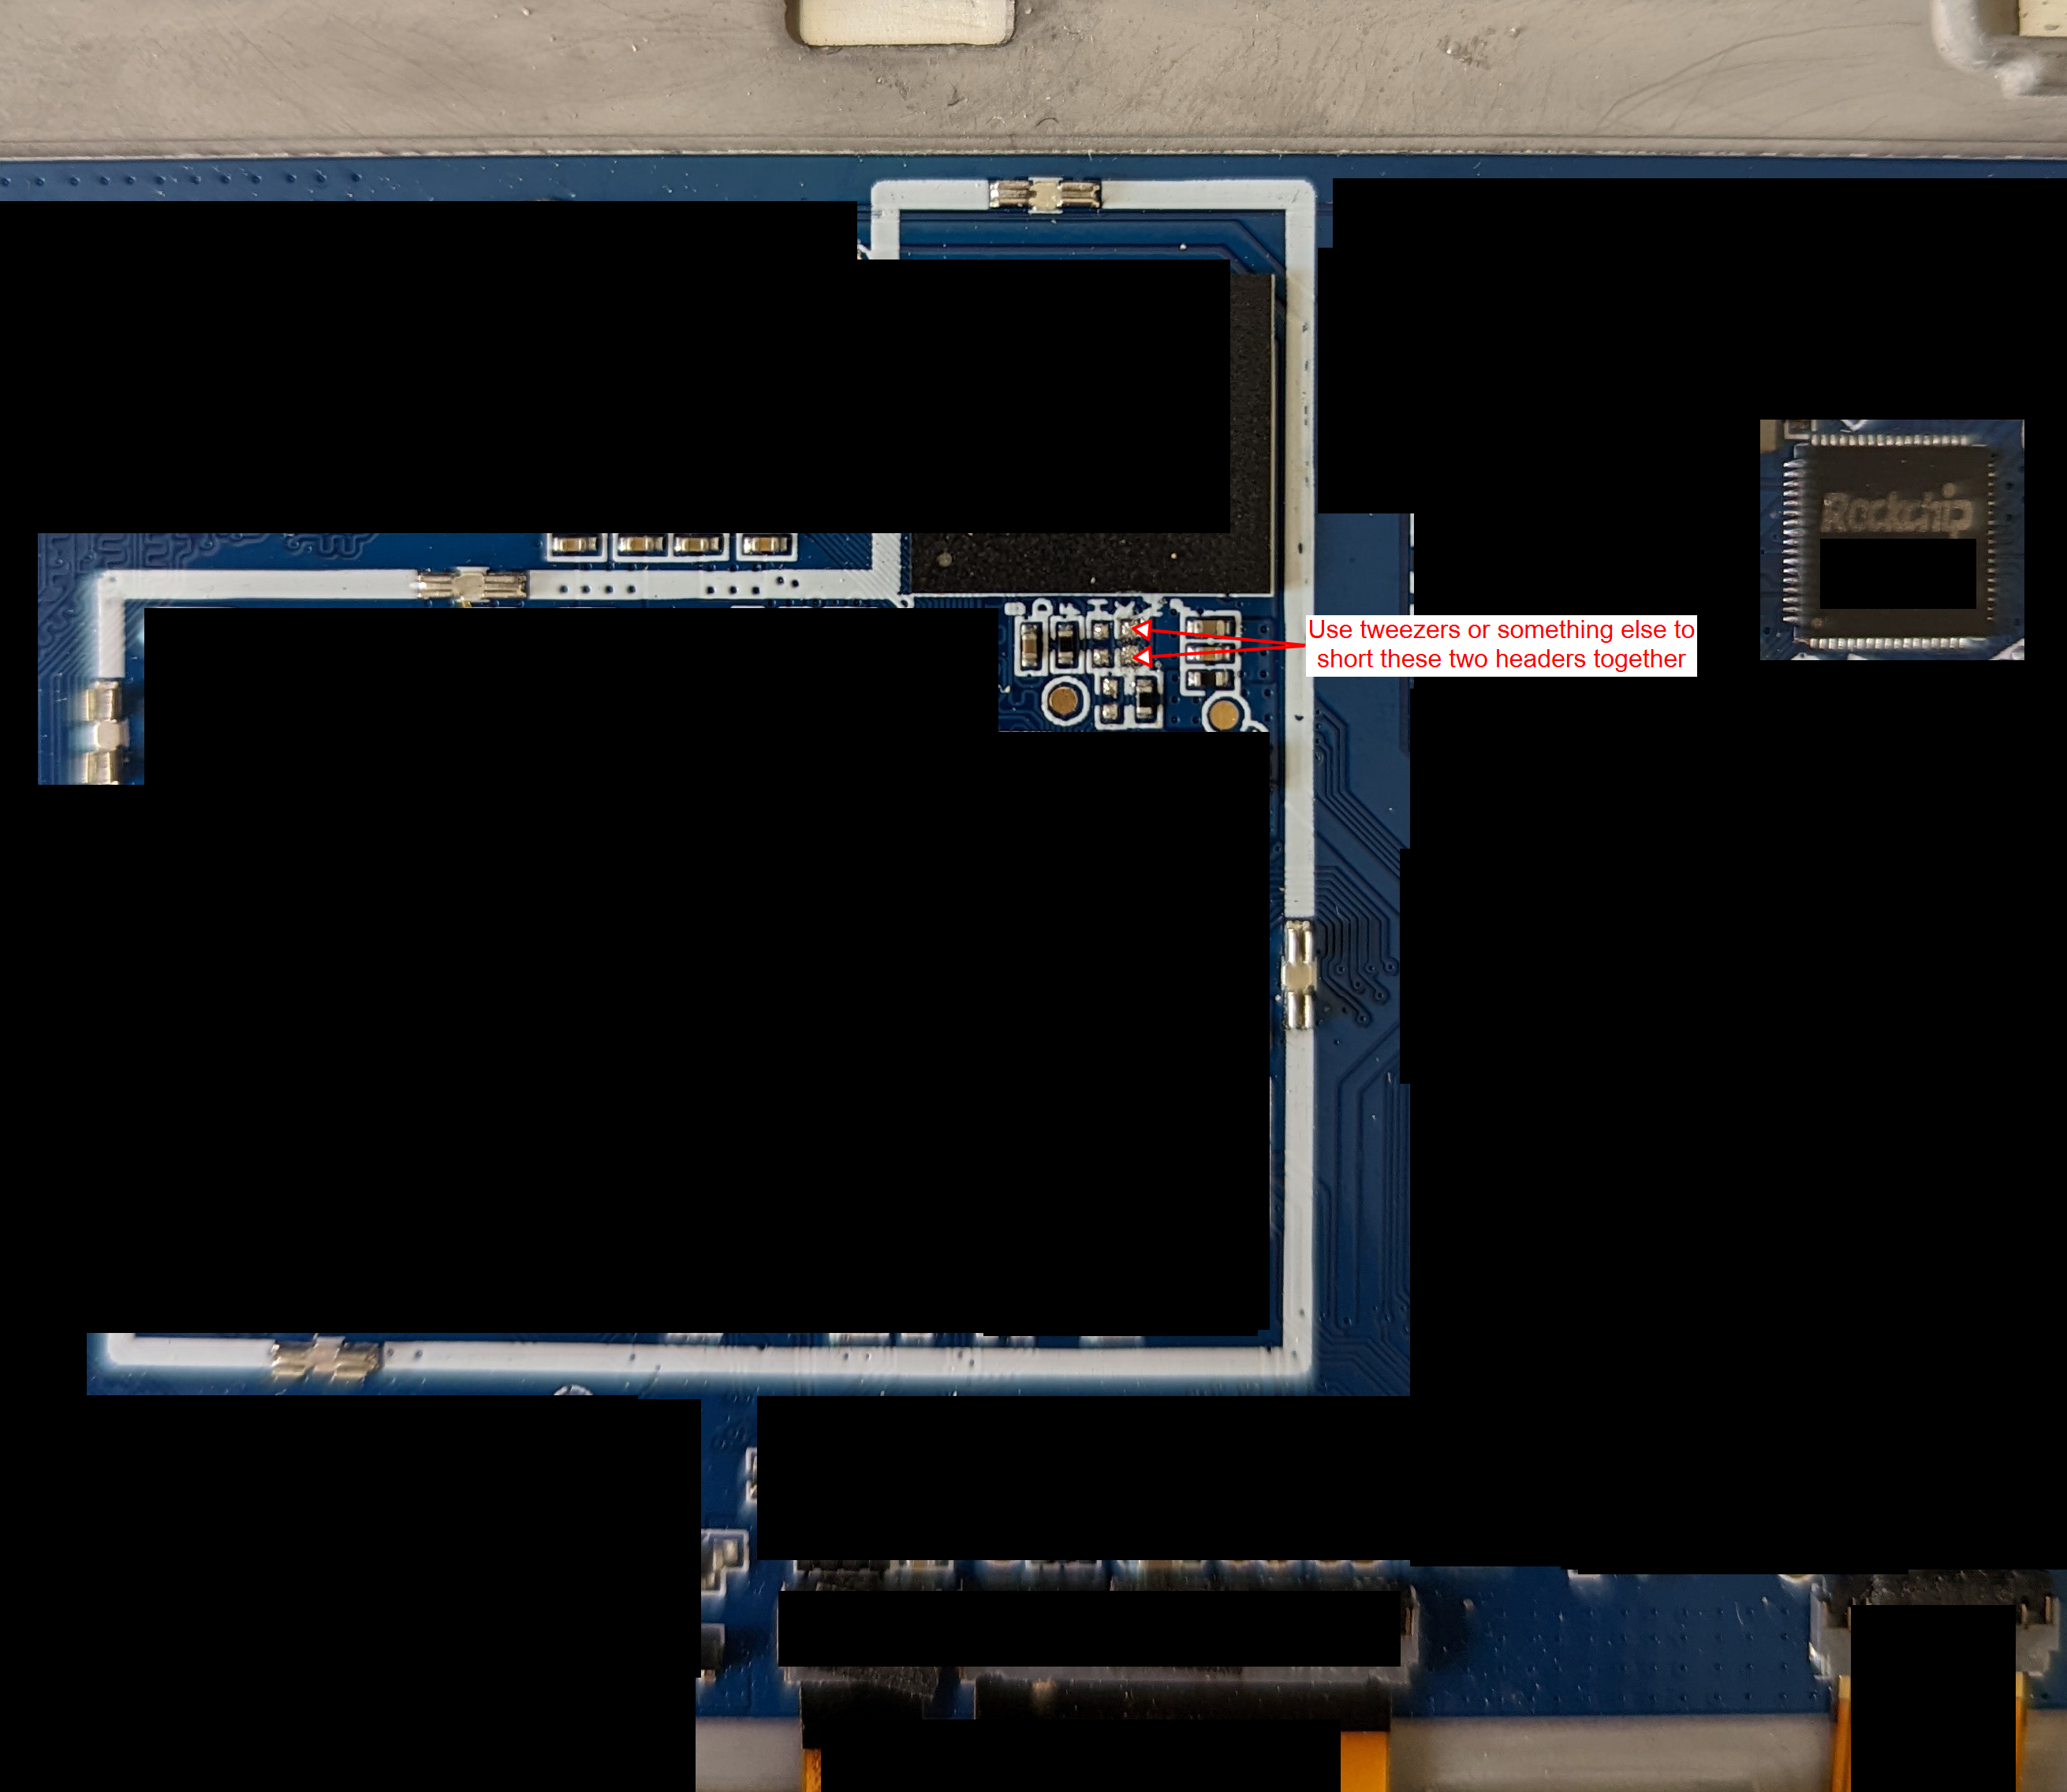
Usually this interface can be accessed through shorting two pins on the CPU. This works on your Supernote as well but involves opening the device and most probably voiding any remaining guarantee you might have.
See below for all info about PX30 maskrom and how to recover your device.
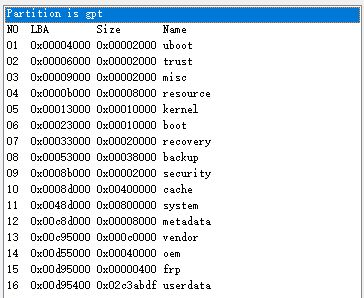
Backup all partitions in a root adb shell:
adb shell
for example by issuing these commands:
cat /dev/block/mmcblk1p1 > /sdcard/EXPORT/uboot.img
cat /dev/block/mmcblk1p2 > /sdcard/EXPORT/trust.img
cat /dev/block/mmcblk1p3 > /sdcard/EXPORT/misc.img
cat /dev/block/mmcblk1p4 > /sdcard/EXPORT/resource.img
cat /dev/block/mmcblk1p5 > /sdcard/EXPORT/kernel.img
cat /dev/block/mmcblk1p6 > /sdcard/EXPORT/boot.img
cat /dev/block/mmcblk1p7 > /sdcard/EXPORT/recovery.img
cat /dev/block/mmcblk1p8 > /sdcard/EXPORT/backup.img
cat /dev/block/mmcblk1p9 > /sdcard/EXPORT/security.img
cat /dev/block/mmcblk1p10 > /sdcard/EXPORT/cache.img
cat /dev/block/mmcblk1p11 > /sdcard/EXPORT/system.img
cat /dev/block/mmcblk1p12 > /sdcard/EXPORT/metadata.img
cat /dev/block/mmcblk1p13 > /sdcard/EXPORT/vendor.img
cat /dev/block/mmcblk1p14 > /sdcard/EXPORT/oem.img
cat /dev/block/mmcblk1p15 > /sdcard/EXPORT/frp.img
and potentially even save your userdata:
dd if=/dev/block/by-name/userdata bs=4096 count=1048576 of=/sdcard/EXPORT/userdata-1.img
dd if=/dev/block/by-name/userdata bs=4096 skip=1048576 count=1048576 of=/sdcard/EXPORT/userdata-2.img
dd if=/dev/block/by-name/userdata bs=4096 skip=2097152 count=1048576 of=/sdcard/EXPORT/userdata-3.img
dd if=/dev/block/by-name/userdata bs=4096 skip=3145728 count=1048576 of=/sdcard/EXPORT/userdata-4.img
dd if=/dev/block/by-name/userdata bs=4096 skip=4194304 count=1048576 of=/sdcard/EXPORT/userdata-5.img
dd if=/dev/block/by-name/userdata bs=4096 skip=5242880 count=1048576 of=/sdcard/EXPORT/userdata-6.img
backup -> /dev/block/mmcblk1p8
boot -> /dev/block/mmcblk1p6
cache -> /dev/block/mmcblk1p10
frp -> /dev/block/mmcblk1p15
kernel -> /dev/block/mmcblk1p5
metadata -> /dev/block/mmcblk1p12
misc -> /dev/block/mmcblk1p3
oem -> /dev/block/mmcblk1p14
recovery -> /dev/block/mmcblk1p7
resource -> /dev/block/mmcblk1p4
security -> /dev/block/mmcblk1p9
system -> /dev/block/mmcblk1p11
trust -> /dev/block/mmcblk1p2
uboot -> /dev/block/mmcblk1p1
userdata -> /dev/block/mmcblk1p16
vendor -> /dev/block/mmcblk1p13
rootfs / rootfs ro,seclabel,size=981980k,nr_inodes=245495 0 0
/dev/block/by-name/system /system ext4 ro,seclabel,relatime,data=ordered,inode_readahead_blks=8 0 0
/dev/block/by-name/vendor /vendor ext4 ro,seclabel,relatime,data=ordered,inode_readahead_blks=8 0 0
/dev/block/by-name/oem /oem ext4 ro,seclabel,noatime,nodiratime,block_validity,delalloc,barrier,noauto_da_alloc,user_xattr 0 0
/dev/block/by-name/cache /cache ext4 rw,seclabel,nosuid,nodev,noatime,nodiratime,discard,noauto_da_alloc,data=ordered 0 0
/dev/block/by-name/metadata /metadata ext4 rw,seclabel,nosuid,nodev,noatime,nodiratime,discard,noauto_da_alloc,data=ordered 0 0
/dev/block/by-name/userdata /data f2fs rw,lazytime,seclabel,nosuid,nodev,noatime,nodiratime,background_gc=on,discard,no_heap,user_xattr,inline_xattr,inline_data,inline_dentry,flush_merge,extent_cache,mode=adaptive,active_logs=6,alloc_mode=default,fsync_mode=posix 0 0
tmpfs /storage tmpfs rw,seclabel,relatime,mode=755,gid=1000 0 0
adb /dev/usb-ffs/adb functionfs rw,relatime 0 0
/data/media /mnt/runtime/default/emulated sdcardfs rw,nosuid,nodev,noexec,noatime,fsuid=1023,fsgid=1023,gid=1015,multiuser,mask=6,derive_gid 0 0
/data/media /storage/emulated sdcardfs rw,nosuid,nodev,noexec,noatime,fsuid=1023,fsgid=1023,gid=1015,multiuser,mask=6,derive_gid 0 0
/data/media /mnt/runtime/read/emulated sdcardfs rw,nosuid,nodev,noexec,noatime,fsuid=1023,fsgid=1023,gid=9997,multiuser,mask=23,derive_gid 0 0
/data/media /mnt/runtime/write/emulated sdcardfs rw,nosuid,nodev,noexec,noatime,fsuid=1023,fsgid=1023,gid=9997,multiuser,mask=7,derive_gid 0 0
The update that was on my device already came with a su binary and lots of shortcuts that gave me easy access to a root adb interface.
Some modifications I experimented with were:
/system/etc/prop.default
security.perf_harden=0
ro.debuggable=1
sys.rkadb.root=1
ro.debug.build=true
ro.oem_unlock_supported=1
ro.secure=0
ro.adb.secure=0
persist.sys.usb.config=mtp,adb
And while there I blocked the very frequent update checks and optional telemetry (also blocks the built-in App Store but that's pretty much useless as we can now sideload apps to the device)
/system/etc/hosts
127.0.0.1       device.supernote.com.cn
127.0.0.1       supernote.com.cn
127.0.0.1       www.supernote.com.cn
127.0.0.1       device.supernote.com
127.0.0.1       supernote.com
127.0.0.1       www.supernote.com
127.0.0.1       test-ms-device.ratta.com.cn
127.0.0.1       uat-ms-device.ratta.com.cn
127.0.0.1       ratta.com.cn
You have a working root adb interface from here, can sideload apps and fully modify the /system to your liking after issuing a mount -o remount,rw /system
First step I then made then was installing a properly working SuperSU system-based root solution. For that I downloaded the latest supersu.zip, unpacked it, looked at the install script and put files in place manually in a super hacky way:
/system/.ext/.su   # useless I think? Didn't bother to understand
/system/xbin/daemonsu
/system/xbin/su
/system/xbin/sugote
/system/xbin/sugote-mksh
/system/xbin/supolicy
/system/lib64/libsupol.so
/system/app/SuperSU/SuperSU.apk
And modify /system/bin/install-recovery.sh to end in:
/system/xbin/daemonsu --auto-daemon &
/system/etc/install-recovery-2.sh
Then modifying file contexts and access rights by modifying system_file_contexts.txt to end in:
/system/app/SuperSU/SuperSU.apk u:object_r:system_file:s0
/system/xbin/su u:object_r:system_file:s0
/system/bin/.ext/.su u:object_r:system_file:s0
/system/xbin/daemonsu u:object_r:system_file:s0
/system/xbin/sugote u:object_r:zygote_exec:s0
/system/xbin/supolicy u:object_r:system_file:s0
/system/lib64/libsupol.so u:object_r:system_file:s0
/system/xbin/sugote-mksh u:object_r:system_file:s0
and system_fs_config.txt to end in:
system/app/SuperSU 0 0 0755
system/app/SuperSU/SuperSU.apk 0 0 0644
system/xbin/su 0 2000 0755
system/bin/.ext 0 2000 0755
system/bin/.ext/.su 0 2000 0755
system/xbin/daemonsu 0 2000 0755
system/xbin/sugote 0 2000 0755
system/xbin/supolicy 0 2000 0755
system/lib64/libsupol.so 0 0 0644
system/xbin/sugote-mksh 0 2000 0755
Worked perfectly fine.
It would have been simple to implement a quick script but at this point I was just getting into Android root and my plan was to install a proper magisk systemless root.
Magisk can produce pre modified "rooted" boot.img kernel and ramdisk by feeding it the unmodified boot.img.
Take the boot.img from the root of your update.zip and copy it to /storage/emulated/0/Download
Sideload latest Magisk like so:
adb install Magisk-v25.x.apk
On the device go to Settings > Apps > My apps to make the system refresh the list of apps and have it add Magisk to the sidebar. You might have to scroll there to find it, since the launcher UI clearly isn't made for people with many apps.
Before being able to choose a file to patch in Magisk I needed to install a DocumentProvider which I chose to be Total Commander (download) as it's free and super handy. Sideloaded that:
adb install tcandroidxxxx-universal.apk
Do the same as above to make it appear in the sidebar. Open it and blindly tap on the top right to open an "empty" menu where you try to tap the second last item to switch from the dark theme to the light one in order to finally see everything properly.
Open Magisk, (grant it root access), tap Update, leave everything as is, tap next, "Select and Patch a file", choose Total Commander (url...) as provider and then select your boot.img.
Again copy the resulting magisk_patched-xxx.img from it's default work folder /storage/emulated/0/Download back to your computer.
From boot your device into fastboot:
adb reboot fastboot
and issue the standard:
fastboot flash boot magisk_patched-xxx.img
and
fastboot reboot
If all went well, your device will boot into system, you can open magisk and it will report the version installed along with Ramdisk: yes. If you previously installed SuperSU or haven't removed the pre-installed su binary it will warn you of a corrupted installation and ask you to remove any previous root. You do that by removing all the files you added or just the pre installed su and libsupol.so
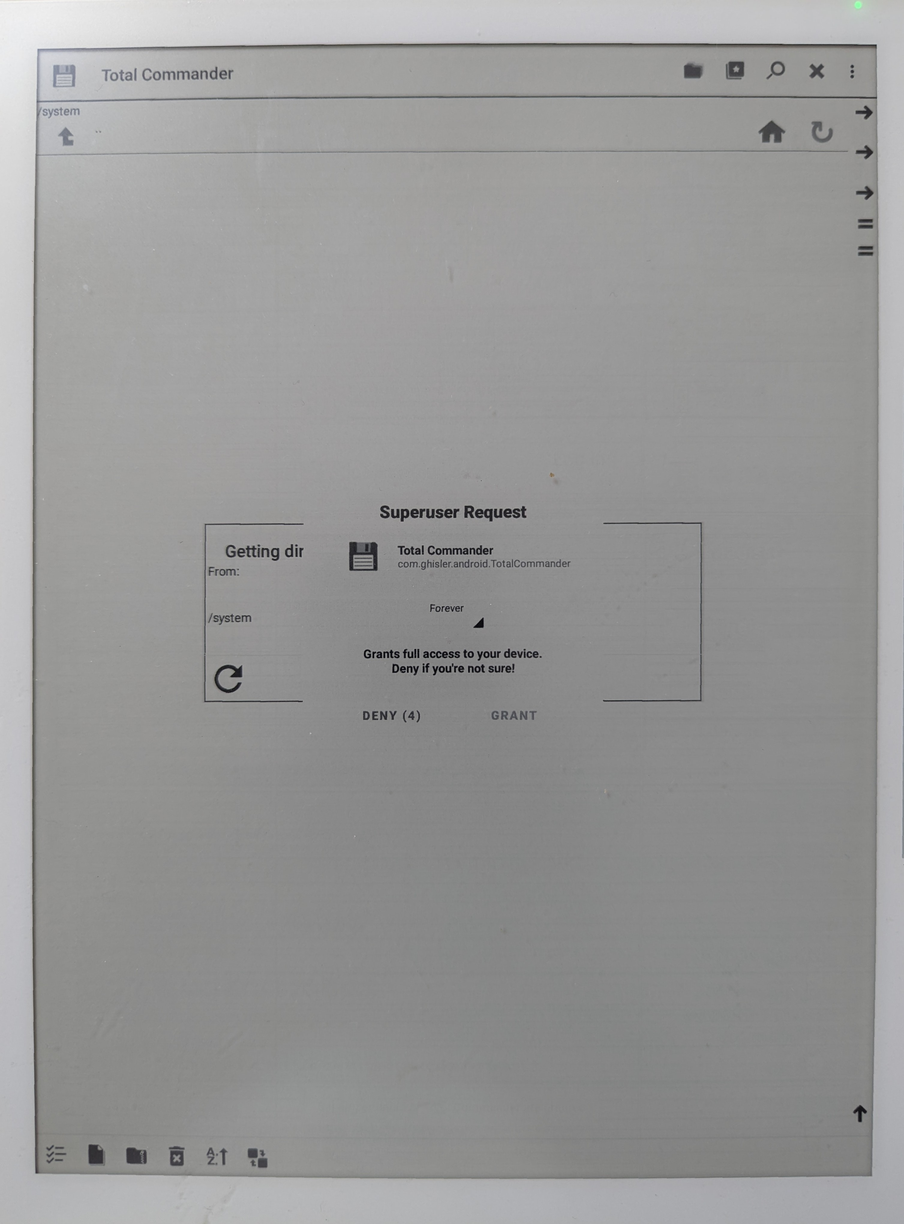
Open any app that requests Superuser to make sure things are working properly and be greeted by the familiar Superuser prompt:
I assembled a list of previous firmware files going back to v1.0.1(077).
To be completed once I have time.
In case anything happens to your device, open it, remove the shielding from the CPU, short the following two pin headers while pressing the reset switch next to power switch.
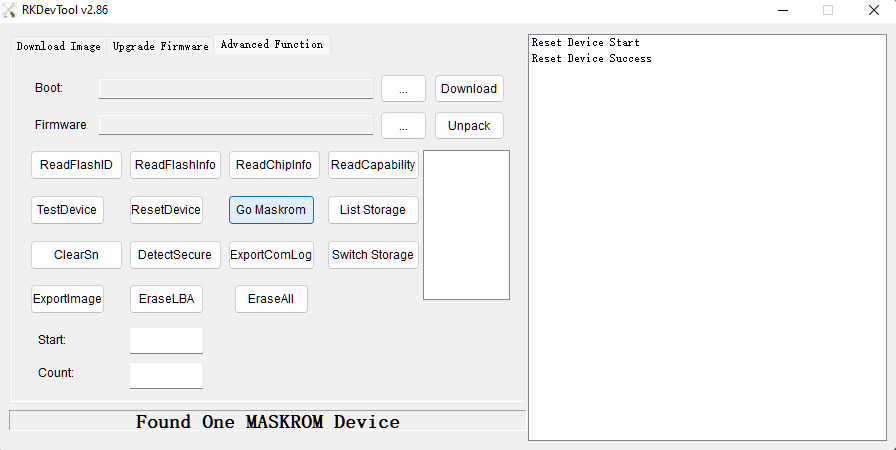
This will put your device in maskrom mode. I will not go into all detail on how to recover the device exactly but will leave you the most relevant info as well as the advice to make backups of all your partitions before doing ANY modifications to your device.
Next install maskrom drivers (Make sure to enable unsigned drivers in windows then use tools like RKImageMaker and AFPTool to create an update.img that can be flashed through RKDevTool (from here) in maskrom. RKDevTool contains the aforementioned two binaries you need to create the update package.
RKDevTool by default comes in chinese language and with more or less useless validation checks of your firmware which you can turn off by using it's .ini:
[Language]
Selected=2
and
FW_NOT_CHECK=TRUE
RB_CHECK_OFF=TRUE
CHECK_MACHINE_MODEL=FALSE
All in all figuring out the process was a fun experience since the Rockchip SDK and tooling landscape is extremely fragmented.
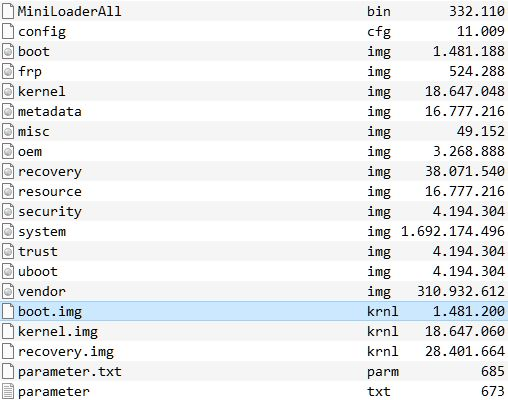
These files will be needed for a complete update.img. You can source them from places like the partition backups you made and in parts from the abovementioned SDK or googling.
The krnl files are there since I created a toolchain that uses a tool called imgRePackerRK (download) to convert raw .img files into the Rockchip compatible format (.img.krnl).
The tool is apparently made to replace RKImageMaker and AFPTool and be a all in one solution to create Rockchip update.img. But it wouldn't produce consistent results for me.
But it converts kernel, boot and recovery images that are compatible with Rockchip recovery.
Image\boot.img.krnl vs. Image\boot.img
So I use it to create the .krnl files conveniently and then run my toolchain.bat to build a working update.img while keeping the original .img files along with the .krnl files.
    move Image\boot.img Image\boot.img.tmp
    move Image\recovery.img Image\recovery.img.tmp
    move Image\kernel.img Image\kernel.img.tmp
    move Image\boot.img.krnl Image\boot.img
    move Image\recovery.img.krnl Image\recovery.img
    move Image\kernel.img.krnl Image\kernel.img
    copy Image\parameter.txt .\parameter
    Afptool -pack ./ Image\tmp-update.img
    RKImageMaker.exe -RKPX30 Image\MiniLoaderAll.bin  Image\tmp-update.img update.img -os_type:androidos
    move Image\boot.img Image\boot.img.krnl
    move Image\recovery.img Image\recovery.img.krnl
    move Image\kernel.img Image\kernel.img.krnl
    move Image\boot.img.tmp Image\boot.img
    move Image\recovery.img.tmp Image\recovery.img
    move Image\kernel.img.tmp Image\kernel.img
    del Image\tmp-update.img
pause To help you along the way here's also a compatible /Image/parameter.txt:
FIRMWARE_VER:8.1.0
MACHINE_MODEL:RK3326
MACHINE_ID:007
MANUFACTURER: RK3326
MAGIC: 0x5041524B
ATAG: 0x00200800
MACHINE: 3326
CHECK_MASK: 0x80
PWR_HLD: 0,0,A,0,1
TYPE: GPT
CMDLINE:mtdparts=rk29xxnand:0x00002000@0x00004000(uboot),0x00002000@0x00006000(trust),0x00002000@0x00009000(misc),0x00008000@0x0000b000(resource),0x00010000@0x00013000(kernel),0x00010000@0x00023000(boot),0x00020000@0x00033000(recovery),0x00038000@0x00053000(backup),0x00002000@0x0008b000(security),0x00400000@0x0008d000(cache),0x00800000@0x0048d000(system),0x00008000@0x00C8d000(metadata),0x000C0000@0x00C95000(vendor),0x00040000@0x00D55000(oem),0x00000400@0x00D95000(frp),-@0x00D95400(userdata:grow)
As well as the /package-file
package-file    package-file
bootloader  Image/MiniLoaderAll.bin
parameter   Image/parameter.txt
trust       Image/trust.img
uboot   Image/uboot.img
misc    Image/misc.img
resource    Image/resource.img
kernel  Image/kernel.img
boot    Image/boot.img
recovery    Image/recovery.img
security    Image/security.img
system  Image/system.img
metadata    Image/metadata.img
vendor  Image/vendor.img
oem Image/oem.img
frp Image/frp.img
# baseparamer  Image/baseparamer.img
# ҪдÈëbackup·ÖÇøµÄÎļþ¾ÍÊÇ×ÔÉí£¨update.img£©
# SELF Êǹؼü×Ö£¬±íʾÉý¼¶Îļþ£¨update.img£©×ÔÉí
# ÔÚÉú³ÉÉý¼¶Îļþʱ£¬²»¼ÓÈëSELFÎļþµÄÄÚÈÝ£¬µ«ÔÚÍ·²¿ÐÅÏ¢ÖÐÓмǼ
# ÔÚ½â°üÉý¼¶Îļþʱ£¬²»½â°üSELFÎļþµÄÄÚÈÝ¡£
# RESERVED²»´ò°übackup
backup  RESERVED
update-script   update-script
recover-script  recover-script
Not bother to check whether following scripts are needed but I included them for good measure.
Make sure to check your misc.img as it directs recovery what to do when updating. In my case I used a blank one that does nothing. Others for example will wipe userdata making you will lose your data.
wipe misc.img
blank misc.img
/recover-script
#!enable_script
# ÔÚÐÞ¸´Ê±ÏÔʾÌáʾÐÅÏ¢
print "Please KEEP your USB cable or DC-in connected\n"
# »¹Ôsystem
write_image PACKAGE:system SYSTEM:
check_image PACKAGE:system SYSTEM:
# ¸ñʽ»¯Êý¾Ý·ÖÇø
format CACHE:
format DATA:
format PAGECACHE:
format SWAP:
update-script
#!enable_script
# ÔÚÉý¼¶Ê±ÏÔʾÌáʾÐÅÏ¢
print "\nPlease KEEP your USB cable or DC-in connected\n"
print "Do NOT remove SD card form the device\n\n"

# Éý¼¶kernel
write_image PACKAGE:kernel KERNEL:
check_image PACKAGE:kernel KERNEL:

# Éý¼¶boot
write_image PACKAGE:boot BOOT:
check_image PACKAGE:boot BOOT:

# Éý¼¶recovery
write_image PACKAGE:recovery RECOVERY:
check_image PACKAGE:recovery RECOVERY:

# Éý¼¶system
write_image PACKAGE:system SYSTEM:
check_image PACKAGE:system SYSTEM:

# Éý¼¶backup
write_image PACKAGE:backup BACKUP:
check_image PACKAGE:backup BACKUP:

# Éý¼¶parameter
write_image PACKAGE:parameter PARAMETER:
check_image PACKAGE:parameter PARAMETER:

# ¸ñʽ»¯Êý¾Ý·ÖÇø
format DATA:
format CACHE:

# дÈëÃüÁÔÚbootloaderÆô¶¯Ê±Éý¼¶bootloader
write_blcmd update-bootloader

# ½«bootloader´æ·Åµ½MISC·ÖÇø
write_loader PACKAGE:bootloader MISC: 0xC000

# ɾ³ýÉý¼¶°ü
delete PACKAGE:
