🤗 TensorFlow & TFLearn implementation of Automatic Recognition of Student Engagement using Deep Learning and Facial Expression:
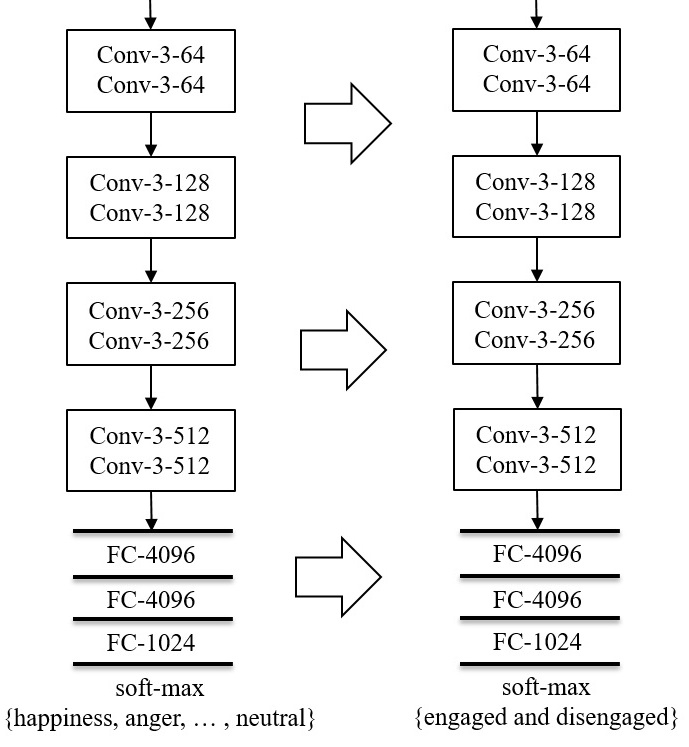
Engagement is a key indicator of the quality of learning experience, and one that plays a major role in developing intelligent educational interfaces. Any such interface requires the ability to recognise the level of engagement in order to respond appropriately; however, there is very little existing data to learn from, and new data is expensive and difficult to acquire. This work presents a deep learning model to improve engagement recognition from images that overcomes the data sparsity challenge by pre-training on readily available basic facial expression data, before training on specialised engagement data. In the first of two steps, a facial expression recognition model is trained to provide a rich face representation using deep learning. In the second step, we use the model's weights to initialize our deep learning based model to recognize engagement; we term this the engagement model. We train the model on our new engagement recognition dataset with 4627 engaged and disengaged samples. We find that the engagement model outperforms effective deep learning architectures that we apply for the first time to engagement recognition, as well as approaches using histogram of oriented gradients and support vector machines.
🤗 if you use our code or model, please cite our paper:
@inproceedings{nezami2019automatic,
  title={Automatic recognition of student engagement using deep learning and facial expression},
  author={Nezami, Omid Mohamad and Dras, Mark and Hamey, Len and Richards, Deborah and Wan, Stephen and Paris, C{\'e}cile},
  booktitle={Joint European Conference on Machine Learning and Knowledge Discovery in Databases},
  pages={273--289},
  year={2019},
  organization={Springer}
}
- Python 2.7.12
sudo apt update sudo apt upgrade sudo apt install python2.7 python-pip - Numpy 1.15.2
pip install numpy==1.15.2 - DLib, Pillow and OpenCV
pip install dlib pip install pillow pip install opencv-python - Tensorflow 1.8.0 and TFLearn
pip install tensorflow==1.8.0
pip install tflearn
We used two main datasets:
First, we pre-train our model on the facial expression recognition (FER) dataset. The dataset includes images, labeled {happiness, anger, sadness, surprise, fear, disgust, neutral}. It contains 35,887 samples (28,709 for the training set, 3589 for the public test set and 3589 for the private test set), collected by the Google search API. The samples are in grayscale at the size of 48-by-48 pixels.
Second, we train the model on our new engagement recognition (ER) dataset with 4627 engaged and disengaged samples. We split the ER dataset into training (3224), validation (715), and testing (688) sets, which are subject-independent (the samples in these three sets are from different subjects).
- CNN Model Source Code for training a basic CNN architecture on the ER dataset or your engagement dataset
- VGG Model Source Code for training a VGG architecture on the ER dataset or your engagement dataset
- Engagement Model Source Code for fine-tuning a pre-trained VGG architecture on the ER dataset or your engagement dataset
🤗 Please see below for more detail about data preparation, engagement model training and testing
We applied a similar pre-processing step for both FER and ER datasets:
We used a CNN based face detection algorithm to detect the face of each sample. If there is more than one face in a sample, we choose the face with the biggest size. Then, the face is transformed to grayscale and resized into 48-by-48 pixels.
# Place your images in the data directory
cd code/
# Download and unzip the mmod_human_face_detector.dat file from "http://dlib.net/files/mmod_human_face_detector.dat.bz2"
python preprocess.py
This will generate the preprocess images as numpy files in the the preprocess_data directory. (Here, for testing purposes, we only place 5 images from FER dataset in the data directory and create a sample numpy file for training (X_train.npy) in the preprocess_data directory with all zero labels (Y_train.npy). You need to apply this step for all your images with correct labels. You also need to create testing and validation numpy files.)
-
The CNN Model:
# Specify the name of the saved model in 'CNN_const.py' e.g., SAVE_MODEL_FILENAME = CNN_model
cd code/
python CNN_model.py train
or
-
The VGG Model:
# Specify the name of the saved model in 'VGG_const.py' e.g., SAVE_MODEL_FILENAME = VGG_model
cd code
python VGG_model.py train
- Download and untar the pretrained model on the ER dataset
wget https://cloudstor.aarnet.edu.au/plus/s/LqqdgwJ69NEdnDS/download tar -xzf download - Create a directory called 'model' beside 'code' directory
- Place the downloaded model in the directory
mv TF_start/* model/ rm -r TF_start - Run the model's script:
# Specify the name of the saved model in 'ER_const.py' e.g., SAVE_MODEL_FILENAME = TF_final
# uncomment self.model.load( join(SAVE_DIRECTORY, SAVE_MODEL_FILENAME), weights_only=True ) and restore=False in build_network(self) function
cd code/
python ER_model.py train
- Download and untar the trained model on the ER dataset
wget https://cloudstor.aarnet.edu.au/plus/s/i3oPqcjXhG7Ymva/download tar -xzf download - Create a directory called 'model' beside 'code' directory if you didn't before
- Place the files of the downloaded model in the the directory
mv TF_final/* model/ rm -r TF_final - Run the model's script:
cd code/ python ER_model.py test - Check predictions on sample data
python2

import numpy as np
predictions= np.load('test_f.npy')
print predictions
| Accuracy | F1 | AUC | |
|---|---|---|---|
| CNN Model | 65.70% | 71.01% | 68.27% |
| VGG Model | 66.28% | 70.41% | 68.41% |
| ER Model (our model) | 72.38% | 73.90% | 73.74% |
The CNN Model is inspired from Emotion recognition with CNN.
