Ethertoff is a simple collaborative web platform, much resembling a wiki but featuring realtime editing thanks to Etherpad. Its output is constructed with equal love for print and web.
Just a question: I thought it was ethertopff and not ethertoff but I don't remember why. What is the actual name?
Well someone misspelled ethertopdf as ethertopf which sounds like römertopf and than somebody else understood ethertoff like chokotoff and chokotoff being Bruxellois I thought it might be the best of all these references
Ethertoff has been initially developed for the OSP 2013 Summerschool bearing the name ‘Relearn’.
Ethertoff is structured as a wiki where each page constitutes an Etherpad.
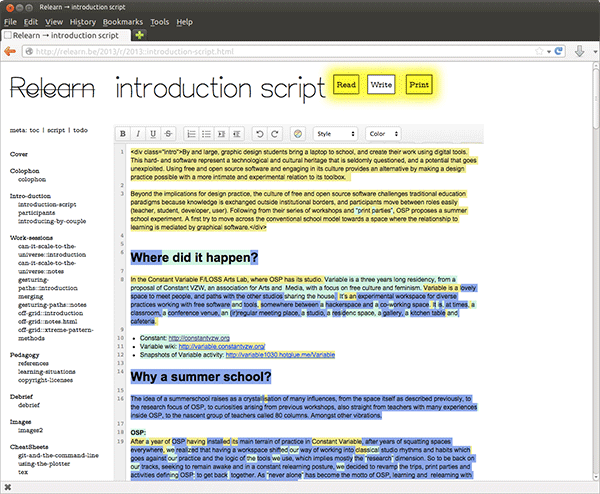
The pad is available to logged in users (‘write-mode’). The text of the pad is available to everyone (‘read-mode’).
Ethertoff is a shell for an Etherpad installation hosted on the same domain. This integration is based on Sofian Benaissa’s bridge between Django and Etherpad, originally created for THINK WE MUST/CON-VOCATION a performance during Promiscuous Infrastructures entrelacées, an exhibition by the collective Artivistic at SKOL.
- https://github.com/sfyn/django-etherpad-lite
- http://www.riotnrrd.info/tech/etherpad-lite-performances-ongoing-saga
- http://www.thinkwemust.org/?page_id=6
Requires Django 1.5 First create and install a virtual environment [1]. Then: sudo aptitude install libxml2-dev libxslt-dev pip install "django<1.6" south Markdown html5tidy python-dateutil rdflib pytz six isodate lxml pip install https://github.com/devjones/PyEtherpadLite/archive/master.zip pip install https://github.com/aleray/markdown-figures/archive/master.zip
mkdir -p ~/src/
cd ~/src
git clone git://git.constantvzw.org/relearn.be.git
cd relearn.be      # [2]
cd relearn
cp local_settings.py.example local_settings.py
# Change database details in local_settings.py
cd ..
python manage.py syncdb
python manage.py migrate etherpadlite
Change the info of your domain name and website name in the Sites section on http://localhost:8000/admin. Do not add "http://" in your domain name, otherwise the Re-index function won't work.
Open the python shell
python manage.py shell
And then do the following (replace the "domain" and "name" with your own info):
from django.contrib.sites.models import Site
site = Site.objects.create(domain='example.com', name='example.com')
site.save()
--> and then install etherpad
mkdir -p ~/src
cd ~/src
git clone https://github.com/ether/etherpad-lite.git
Linux Binaries (.tar.gz) from http://nodejs.org/download/
run Etherpad with:
~/src/etherpad-lite/bin/run.sh
Your Etherpad is running at http://127.0.0.1:9001/
In Etherpad’s folder, you will find a file called APIKEY.txt you need its contents later
Run the server: python manage.py runserver
visit the admin at: http://127.0.0.1:800/admin/ you can login with the superuser you created when you synced the database Now, on the Django admin:
Etherpadlite > Servers > Add
    # if local
    url: http://127.0.0.1:9001/
    # if on a server
    url: http://domainname/ether/
    api_key: the contents of the file APIKEY.txt
Go back to the admin home, and then add a new group: Auth > Groups > Add
Go back to the admin home, and then add the superuser (and all needed users) to the group you just created Auth > Users
Go back to the admin home, and then create an Etherpad Group based upon the group and the server you just created. Etherpadlite > Groups > Add
Now relearn is served at http://127.0.0.1:8000/ locally, or on your domain name on a server.
You can set the site name, that appears on the header, in the ‘sites’ app in the admin.
[1] Something like:
mkdir -p ~/venvs/
cd ~/venvs/
virtualenv relearn
source ~/venvs/relearn/bin/activate
[2] For those running the Virtual Machine from the relearn summer school:
cd ~/relearn/relearn.be/
Some extra challenges. Basically we can split it up like:
example.com / -> django /ether/ -> etherpad /static/ -> django static files
To test if everything is working, you can use screen to run gunicorn and etherpad scripts at the same time, and then use a daemon like Supervisor to run them in the background.
pip install "distribute>0.6.24" sudo aptitude install libmysqlclient-dev python-dev pip install MySQL-python
The django application runs through mod_wsgi (Apache) or gunicorn (nginx), or whatever way you prefer to run your wsgi python apps. You map it to the root of your domain.
For django, we need to set up some folder where the static files
are collected. You do this with the command: python manage.py collectstatic
This folder we then serve through nginx or apache, and map to the
folder /static/.
sudo aptitude install nginx
pip install gunicorn
cd /etc/nginx/sites-available/
# (edit nginx config file)
sudo vim relearn/
cd ../sites-enabled/
sudo ln -s ../sites-available/relearn
cd relearn_directory/
# (edit gunicorn config file)
vim run.sh
chmod +x run.sh
sudo service nginx start
# Run the server
./run.sh
To run the server in the background, use Supervisor daemon.
Etherpad, finally, runs as its own server. You probably need to use a supervisor such as supervisord to make sure it keeps running. You will also need to set up a database, because its default database is not intended for use on servers. Finally, you will need to reverse proxy the Etherpad process from your main web server, mapping it to a folder such as /ether/.
To run django and etherpad in the background.
sudo aptitude install supervisor
# Edit specific config file for each application in /etc/supervisor/conf.d/
# Example of config file:

[program:pads]
directory = /absolute/path/to/etherpad-lite/bin/
user = username
command = /absolute/path/to/etherpad-lite/bin/run.sh
stopwaitsecs=60

stdout_logfile = /absolute/path/to/etherpad-lite/logfile.log
stderr_logfile = /absolute/path/to/etherpad-lite/logfile.log

# Then run the apps daemon
supervisord
supervisorctl start app_name